

Tired of watching movies on a tiny virtual browser screen? With 4XVR Video Player Premium on Meta Quest, you can turn your headset into a dedicated IMAX-style personal theater with unmatched 7.1 spatial audio. In this complete setup guide, we walk you through every playback method step by step. Learn how to stream movies directly from your PC using the 4X Link app and SMB network sharing, play massive files from a USB drive, and connect to cloud storage via WebDAV. We even show you how to snag this premium app for 50% off. Stop struggling with complicated networking settings—read on to master your VR home cinema today.
4XVR Overview
If you watch Netflix or YouTube in the Quest browser, it usually feels like a decent outdoor theater, maybe around a 150-inch screen at best.
But with a dedicated video player, movie playback feels completely different—more like leaning back in a premium seat and watching an IMAX theater all to yourself.
On Meta Quest, some of the commonly used video players include the following:

MOON VR Player
The Player with the Best Image Quality
Price: 🌟🌟🌟

NEXt-Gen Video Player
Apple-style design at the lowest price
Price: 🌟🌟🌟

4XVR Video Player Premium
The best sound quality and smoothest controls
Price: 🌟

SKYBOX VR Player
The most features, but also the most bugs
Price: 🌟🌟

HereSphere
A real hassle to set up, with a pretty clunky interface
Price: 🌟
4XVR is a video player with top-tier image and sound quality, and it’s also very easy to use. Whether you’re new to VR or an experienced user, you can get started quickly and begin watching videos in no time.
However, while there is a one-month free trial, each playback session is limited to just five minutes. After a few minutes, playback is automatically stopped.
The full version costs $29.99, which isn’t exactly cheap, but with Meta’s Creator promotion, you can get it for 50% off at just $15.

I’ll break this into three parts.
We’ll go through how to connect to a PC, how to set up cloud access, and how to control playback while watching.
Video Playback
The basic controls in 4XVR are really simple. A red laser comes out of the controller, and you just pull the trigger to select or confirm.
There are four main playback options in the video menu:
- Local Videos: Play videos stored directly on the Quest headset.
- Local Network: Play videos from your PC or cloud storage.
- 4X Link: A companion PC app that makes local network connections faster and easier.
- USB Storage: Play videos directly from a USB drive connected via USB-C.
Local
This lets you play videos stored directly on the Quest headset. One important thing to note: your video files must be placed inside the Oculus folder. If they’re stored anywhere else, 4XVR won’t be able to detect them.

Once the files are in the correct folder, you can simply open the Local Videos menu and select a video to start playback.

Network
This is really the core feature of 4XVR, letting you play videos stored on your PC or in the cloud.
There are three supported connection types: SMB (network sharing), WebDAV (cloud streaming), and FTP (cloud streaming). Here, I’ll focus on the two most commonly used options: SMB and WebDAV.
Starting with 4XVR 2.0, the Network section also added support for connecting to cloud storage services.
To get started, select Local Network from the home screen. Then tap the + icon at the top of the screen. You’ll see several connection options, and I’ll explain how to use each of them step by step next.

SMB
SMB is standard Windows network sharing (formerly known as Network Neighborhood, now just ‘Network’), and it’s one of the most common ways to connect to a PC.
Before you start, make sure these three things are ready:
- Your Meta Quest headset and PC are connected to the same Wi-Fi router
- You know your PC login credentials (username and password)
- You’ve created a shared folder on your PC
Once those are set up, you’re good to go. Just follow the steps below.
For detailed instructions on configuring SMB network sharing on the PC side, you can refer to the guide linked on this page.
Step 1: Open SMB
Tap the + icon at the top of the home screen and select SMB.
Step 2: Enter the host name
Here, enter a name you choose for the host and your PC’s IP address.
Be careful when typing—the dot (.) is located under the number 9 on the keyboard, so make sure you don’t hit the wrong key.

Step 3: Set the connection password
Tap the ⋮ icon on the right side of the server you just added, then select Set Password.

Step 4: Enter the account and password
Again, pay close attention when typing, especially the dots (.).
Once you’re done, tap Next to continue.

Step 5: Try playing a video
If the connection is successful, you’ll see the folders and files shared from your PC.
Just select the file you want to watch and click it to start playback.

Webdav
WebDAV lets you stream videos directly from the cloud.
Here, I’ll use the cloud storage service PikPak as an example. If you already have WebDAV account details from another service, you can skip ahead and start from Step 4.
Before you begin, make sure you have the following:
- A paid PikPak account
If you register through the link, you’ll get a 5-day trial, which is perfect for testing the WebDAV feature.
If you’re using an iPhone or iPad, you’ll need to enter the invitation code “44502139” to receive the trial eligibility.
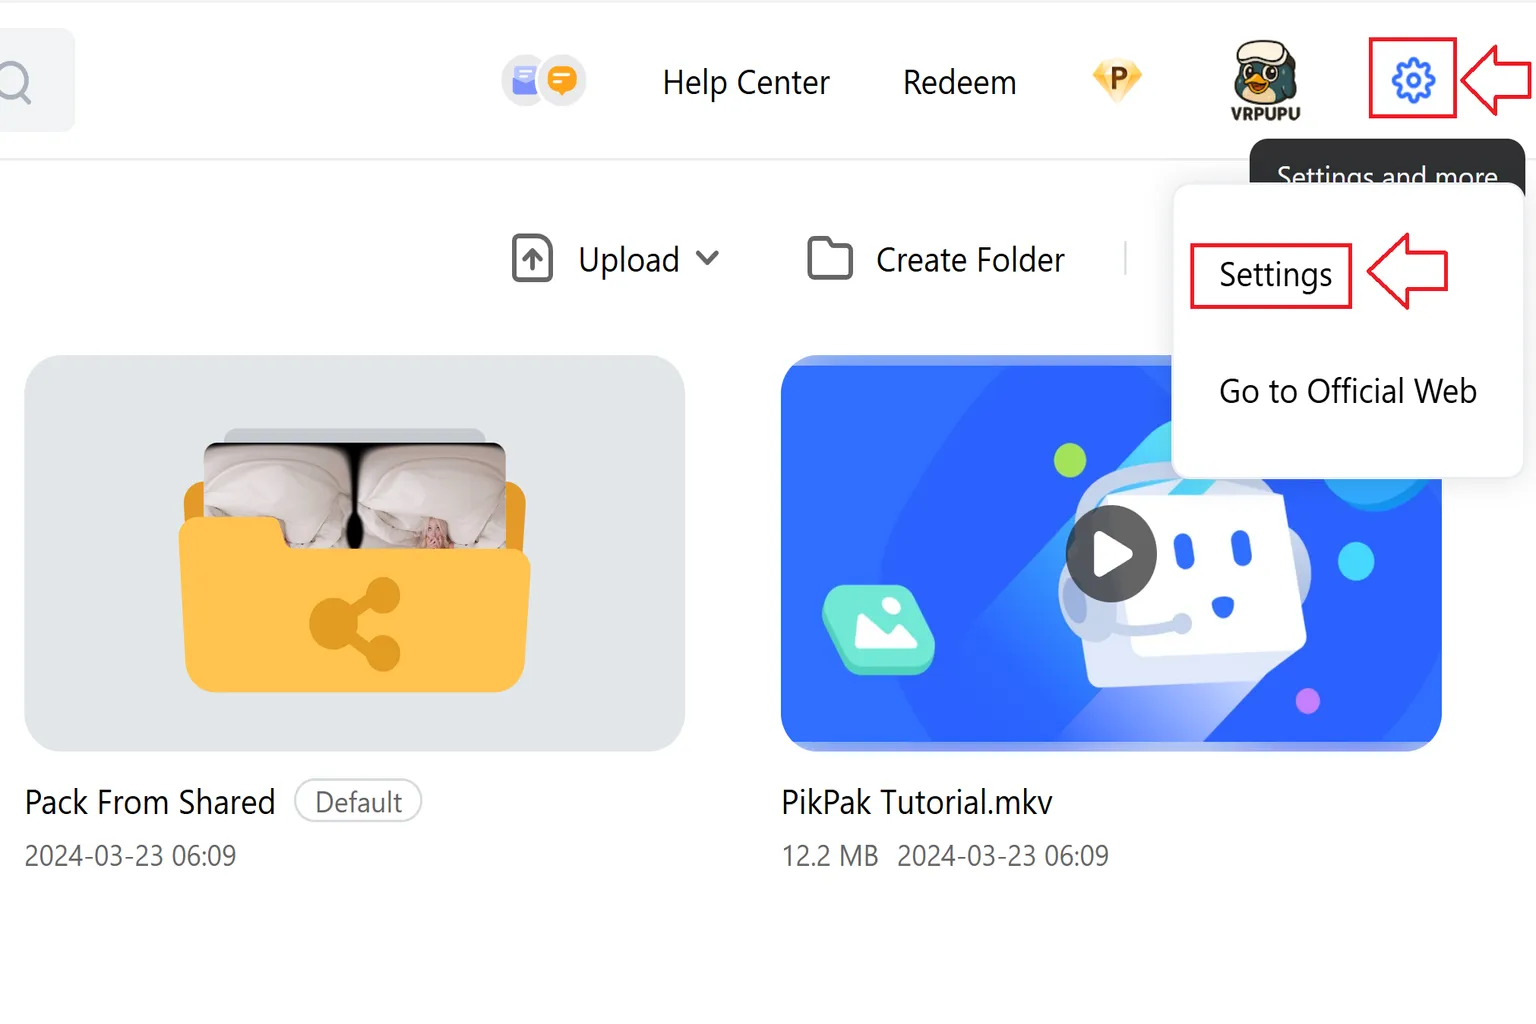
Step 1: Open the settings screen
Press the gear icon in the top-right corner and select Settings.
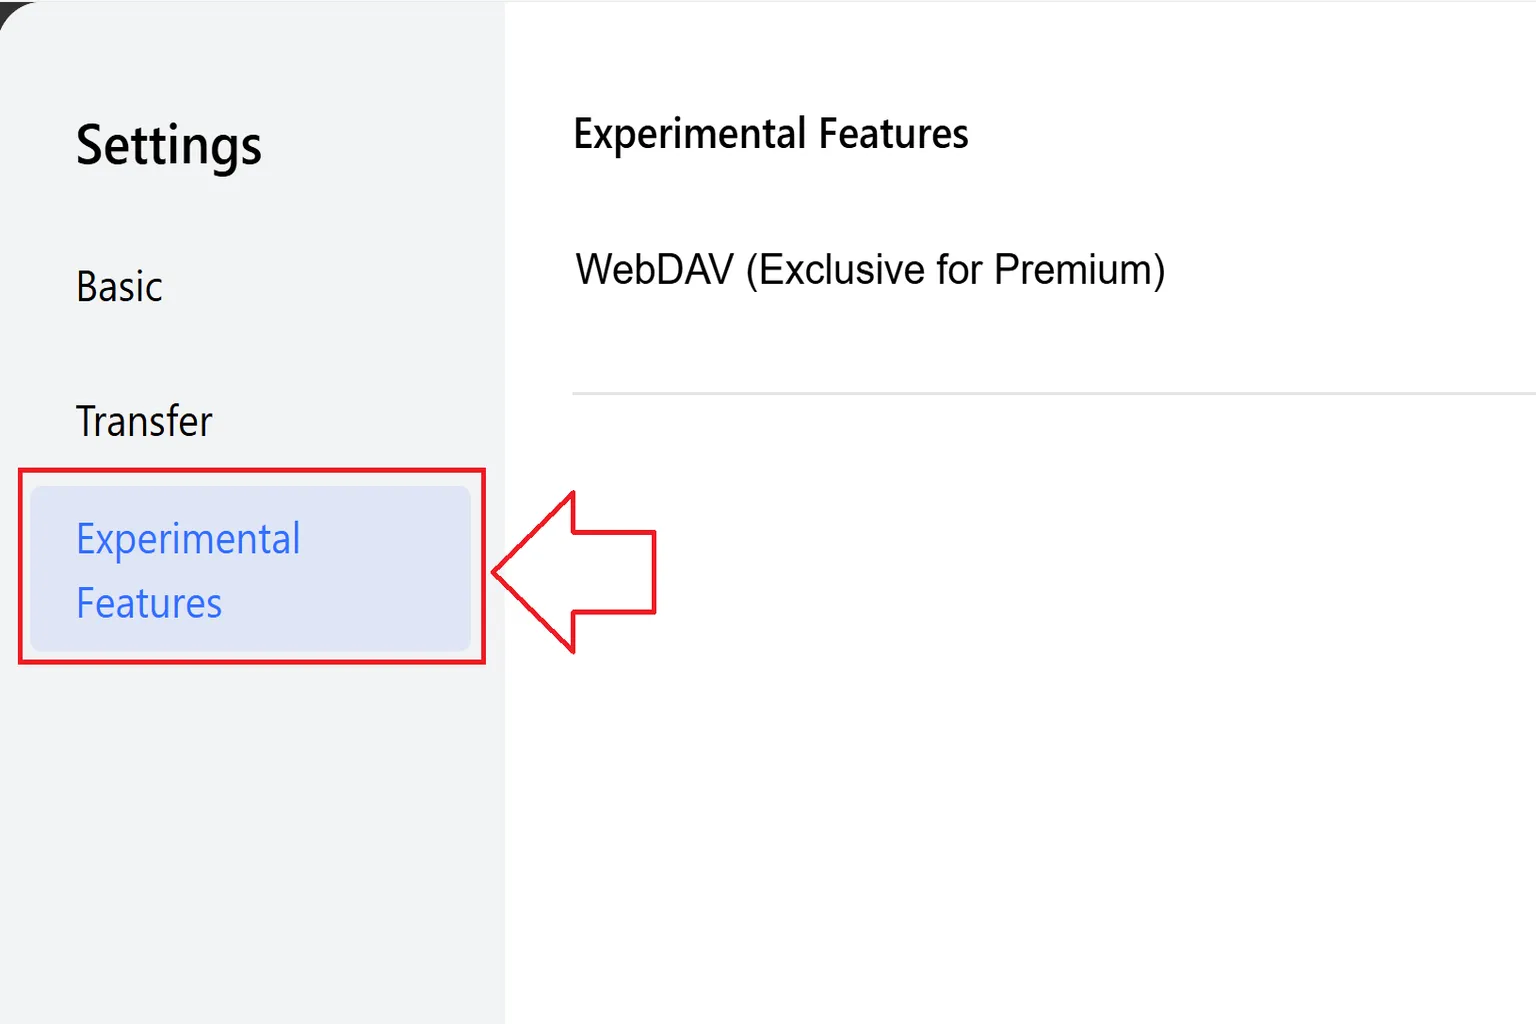
Step 2: Go to Labs features
Inside the Labs section, you’ll find WebDAV (Members Only). Open it to view the URL, account name, and password.
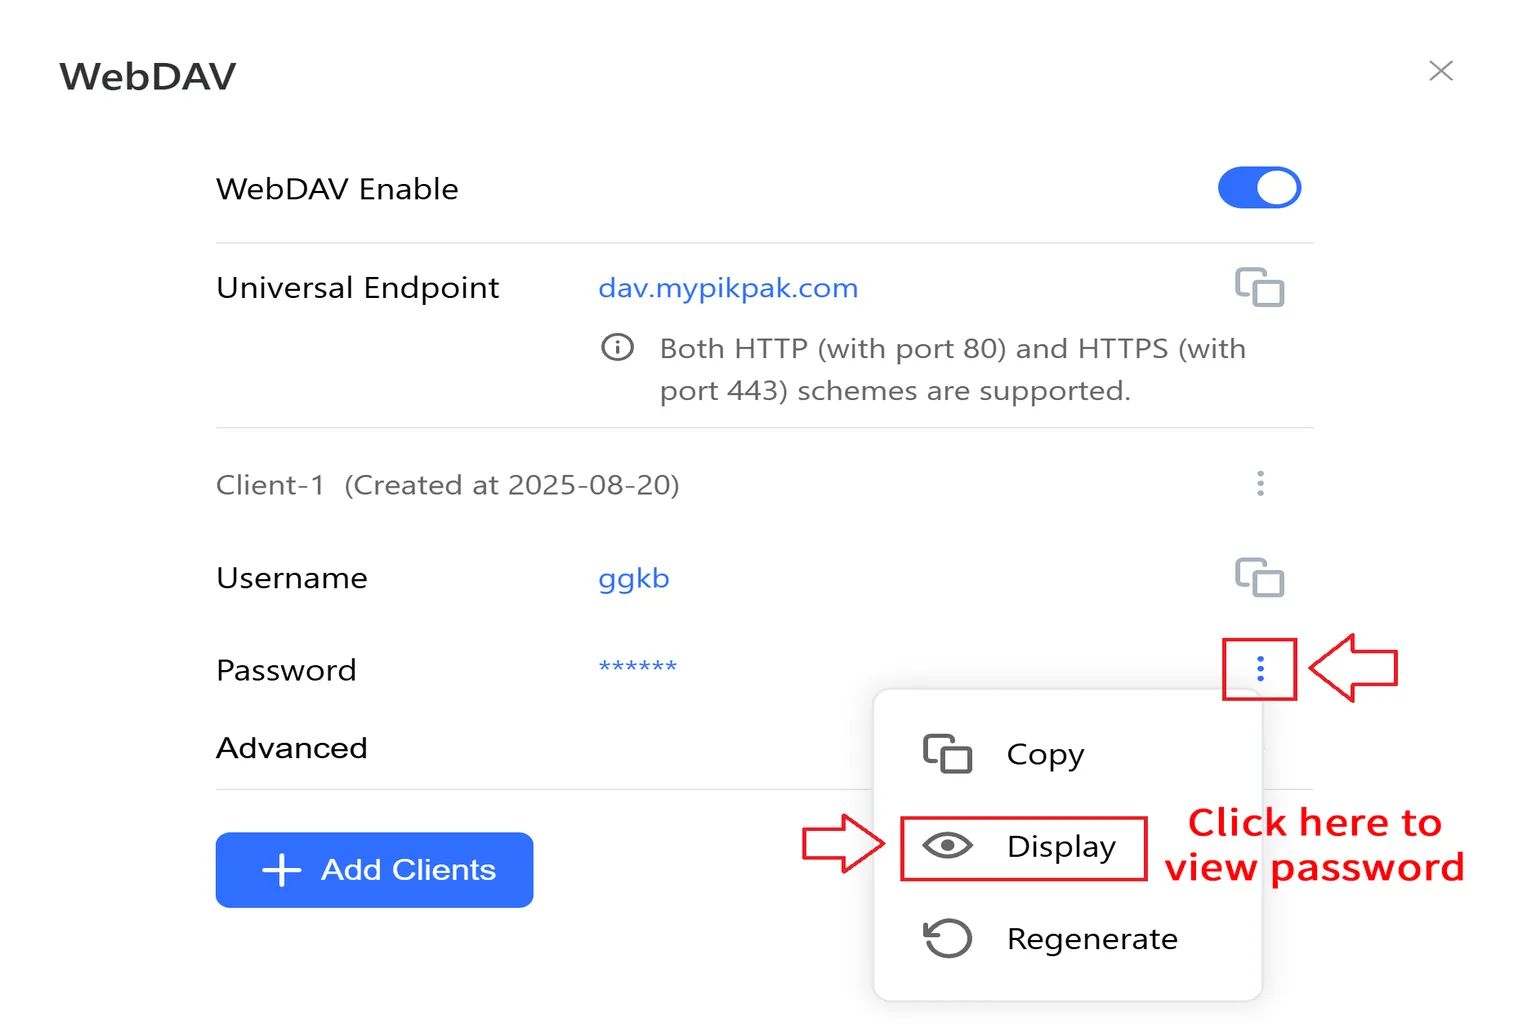
Step 3: Get your WebDAV account details
After enabling WebDAV, make a note of these three items: the Endpoint (URL), Username, and Password.
The password is hidden by default, so tap the ⋮ icon to reveal it before copying.
Step 4: Open WebDAV in 4XVR
From the home screen, tap the + icon at the top and select WebDAV.

Step 5: Enter the host name
Enter a host name of your choice and paste in the WebDAV URL you copied earlier.

Step 6: Set the account password
Tap the ⋮ icon next to the PikPak server entry and select Set Password.

Step 7: Enter your account details
Enter the username and password, then tap Confirm.
Once completed, you’ll be successfully connected to the WebDAV network drive.

Cloud Storage
Since 2025, the Quest versions of Skybox VR Player and Moon VR Player have gradually added support for cloud storage. Both use a web-based connection method.
As shown in the image below, you operate the service through a virtual browser displayed on a large screen.
The advantage is that you can use the cloud service’s original interface as-is, but if you only want to play videos, the process can feel a little cumbersome.
Moon VR Player Plex screen

In 2026, 4XVR Player was updated to version 2.0, adding cloud storage support.
It currently supports seven services: Baidu Netdisk, Dropbox, Box, OneDrive, Jellyfin, Emby, and Plex. Here’s how to use them.
Step 1: Choose a cloud storage service
Go to Network and select the ➕ icon in the upper-left corner. You’ll see the seven supported cloud storage options.
Select the cloud storage service you want to connect.
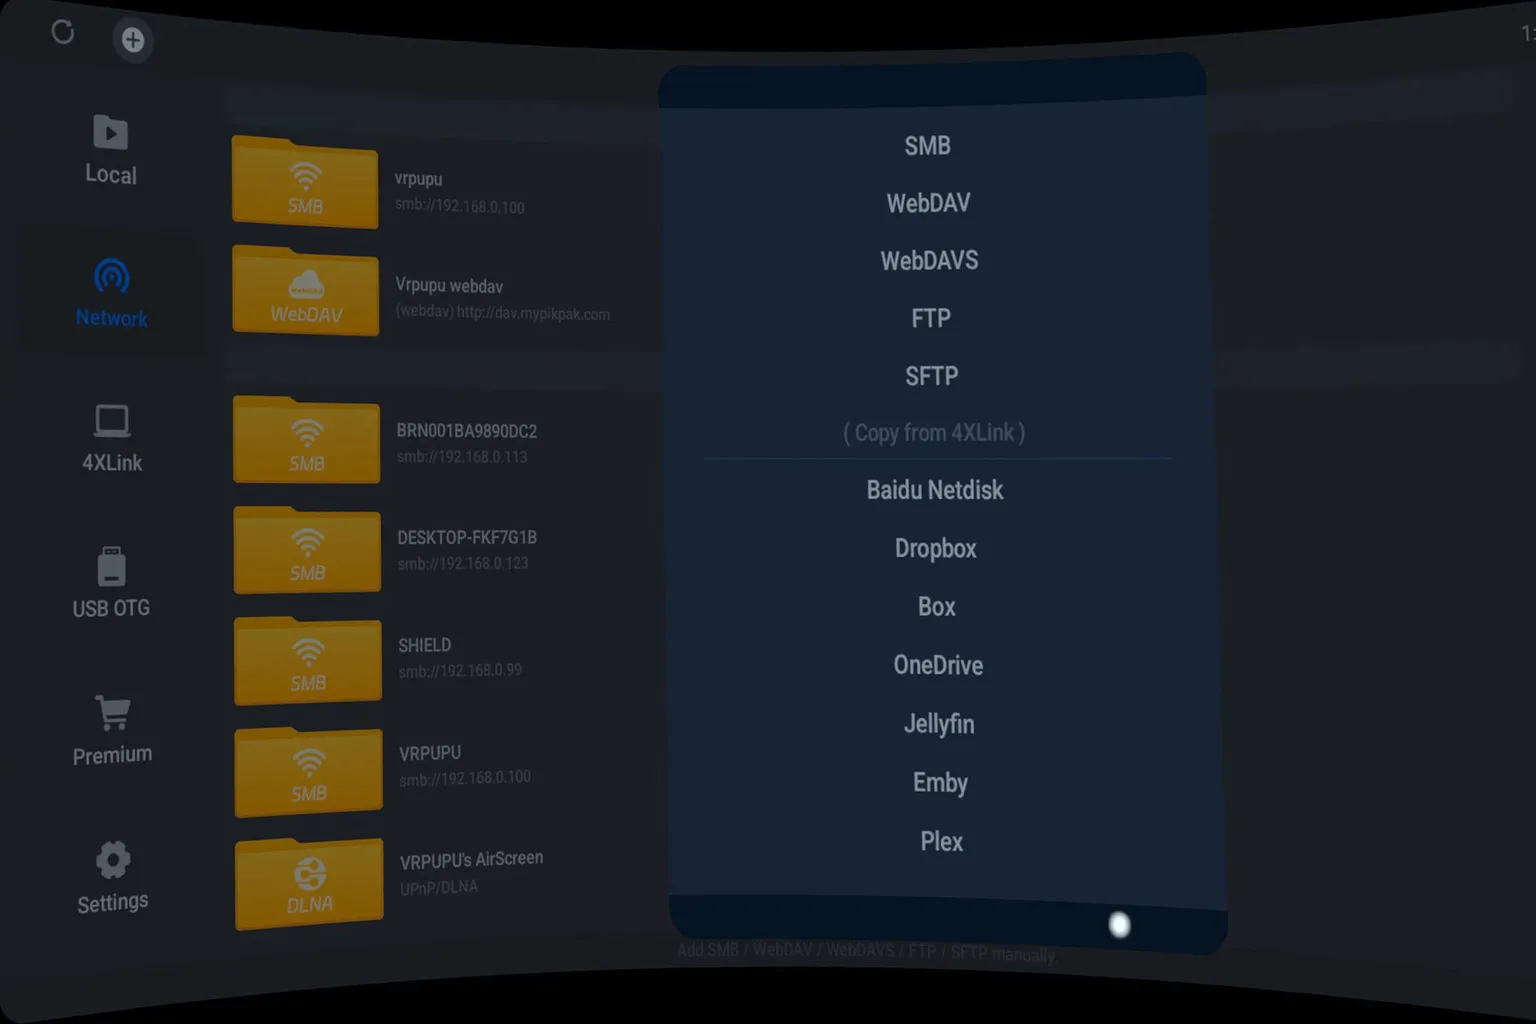
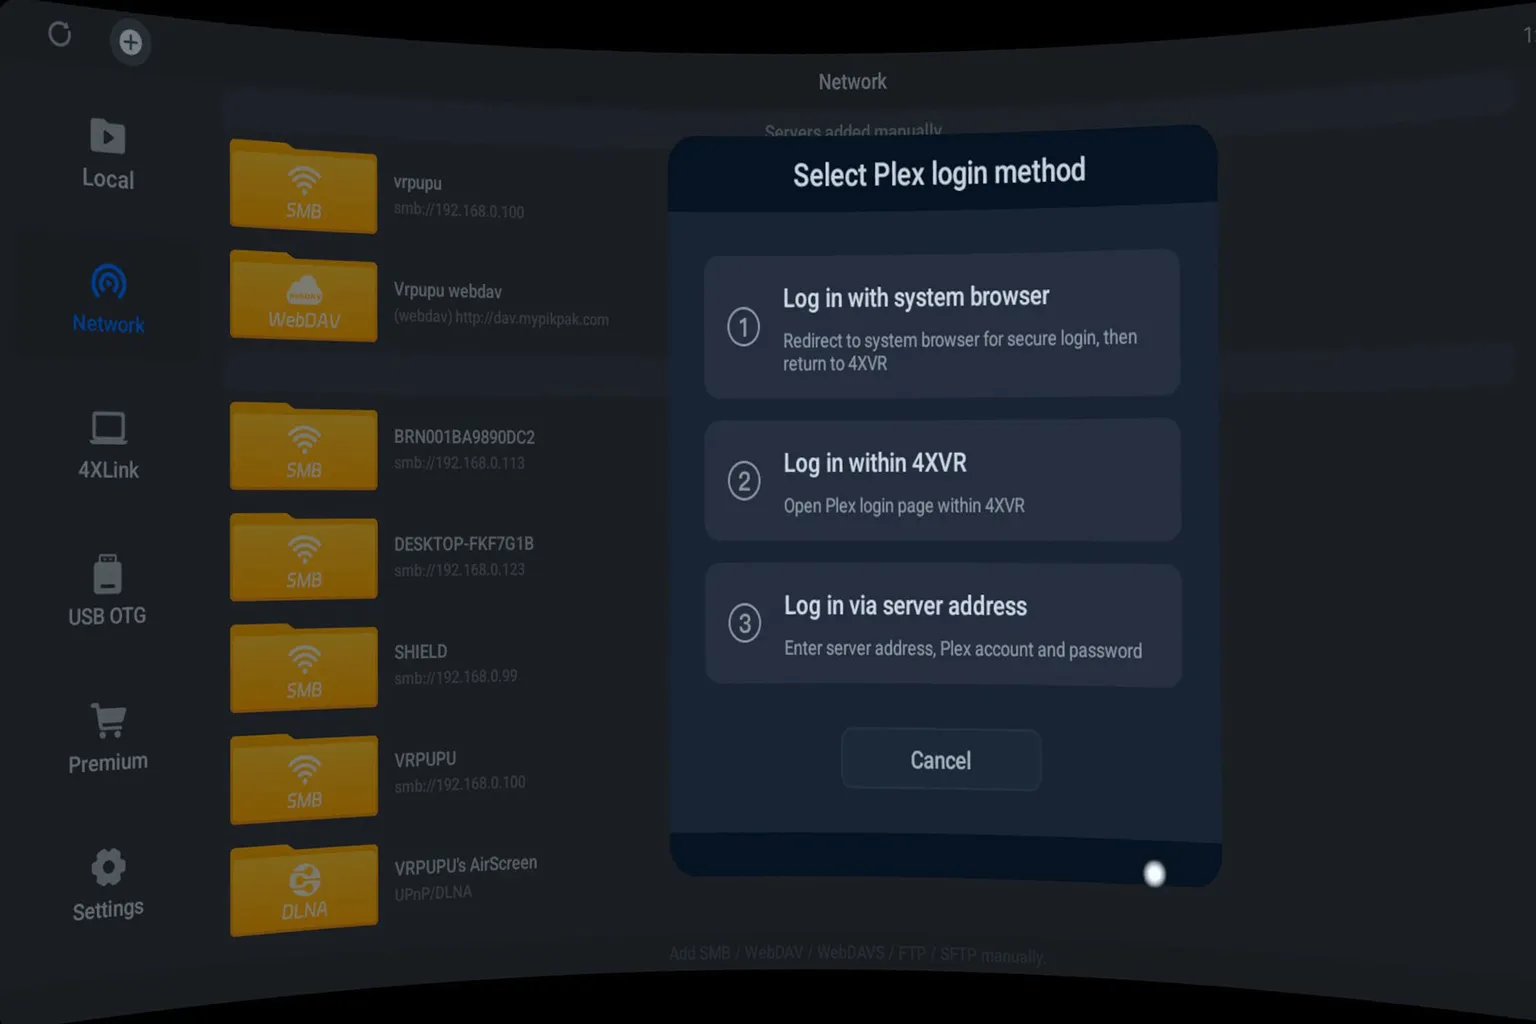
Here, I’ll use Plex as an example. After selecting Plex, you’ll see three connection methods.
Of these, Log in with system browser is the easiest. Just enter your Plex account details and password to connect.
Step 2: Connect to the cloud storage service
After selecting a cloud storage service, you’ll first be asked to set a connection name.
This is the name that will appear for the connection in 4XVR afterward.
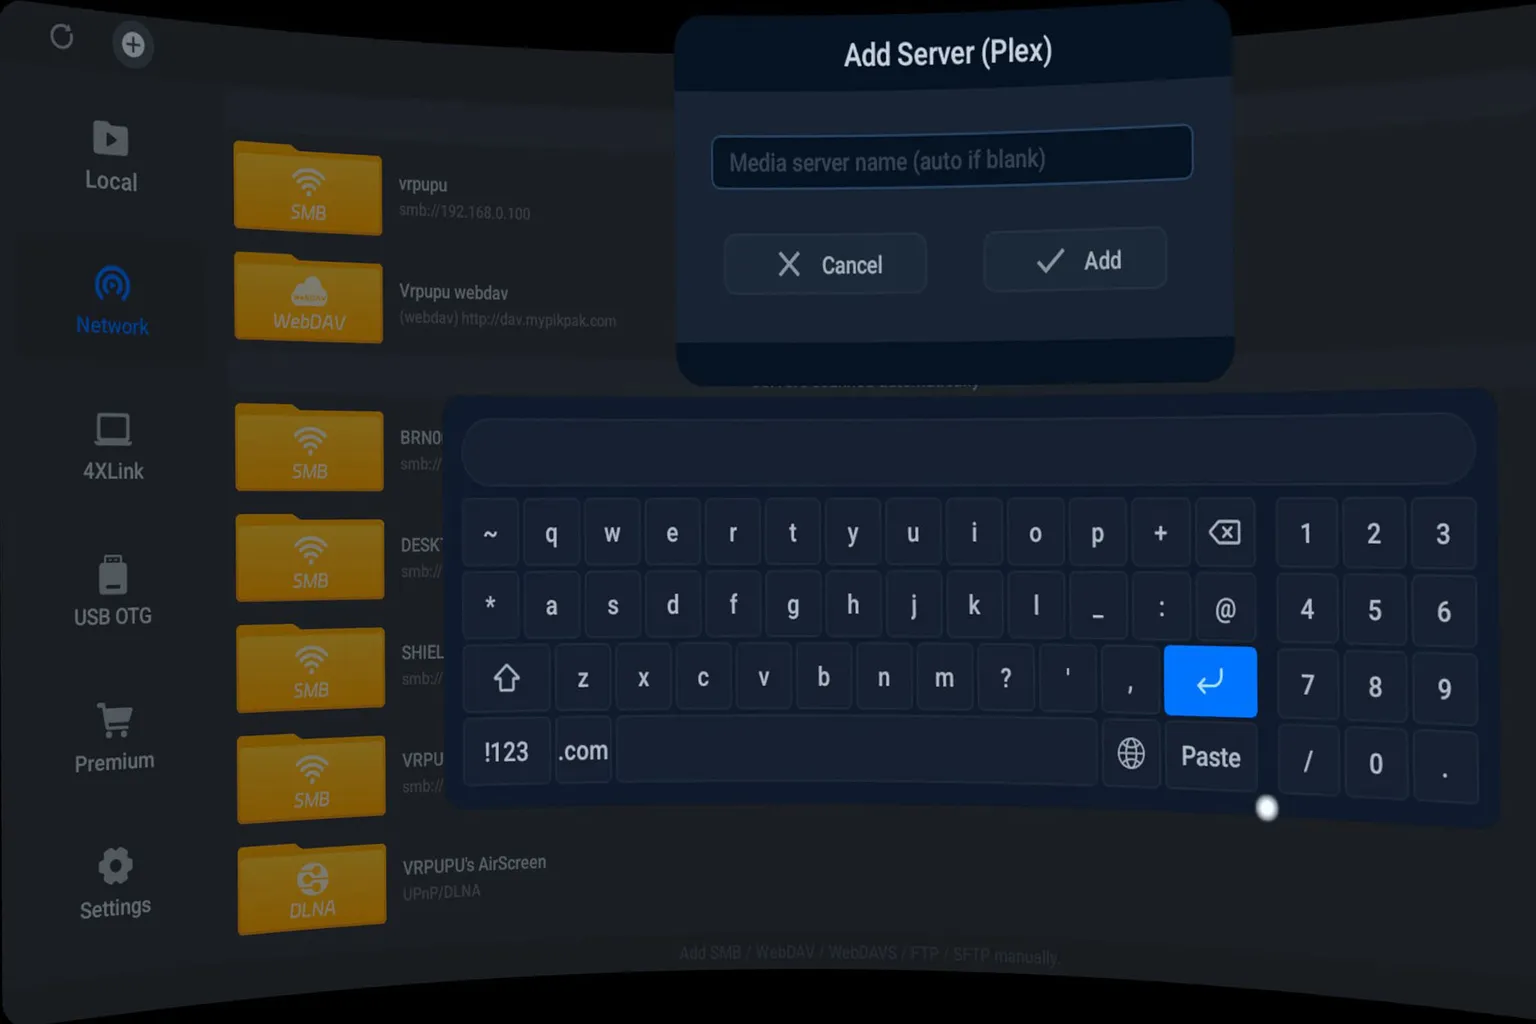
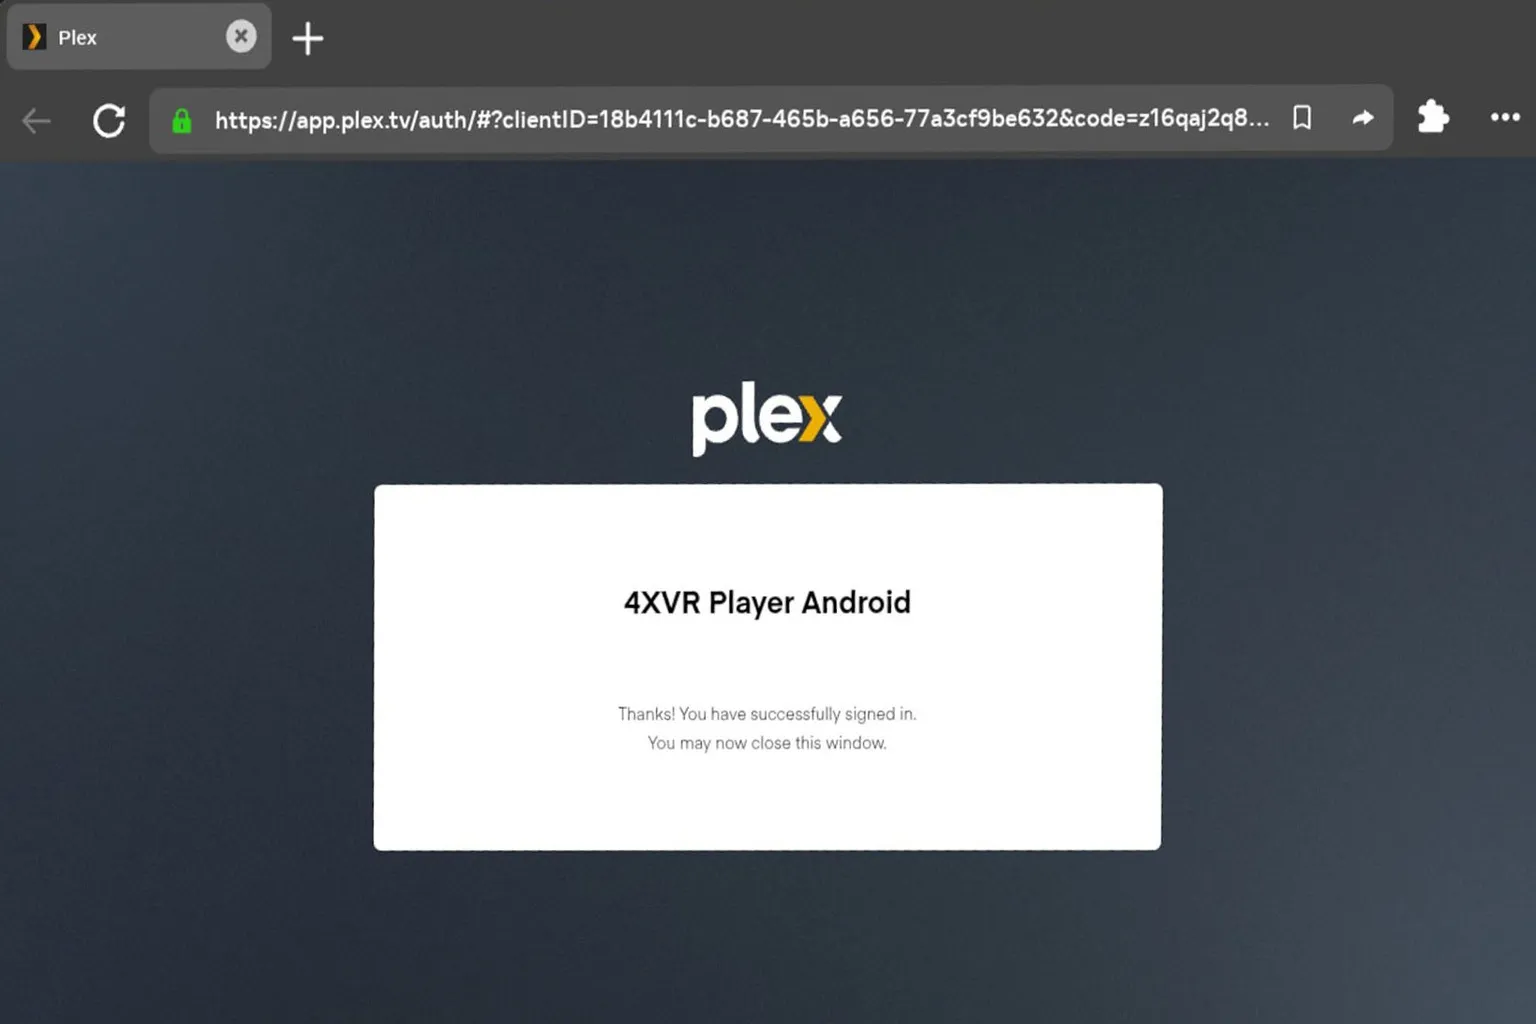
If you select Log in with system browser, the login page for that cloud storage service will open.
Enter your account information and password, then log in.
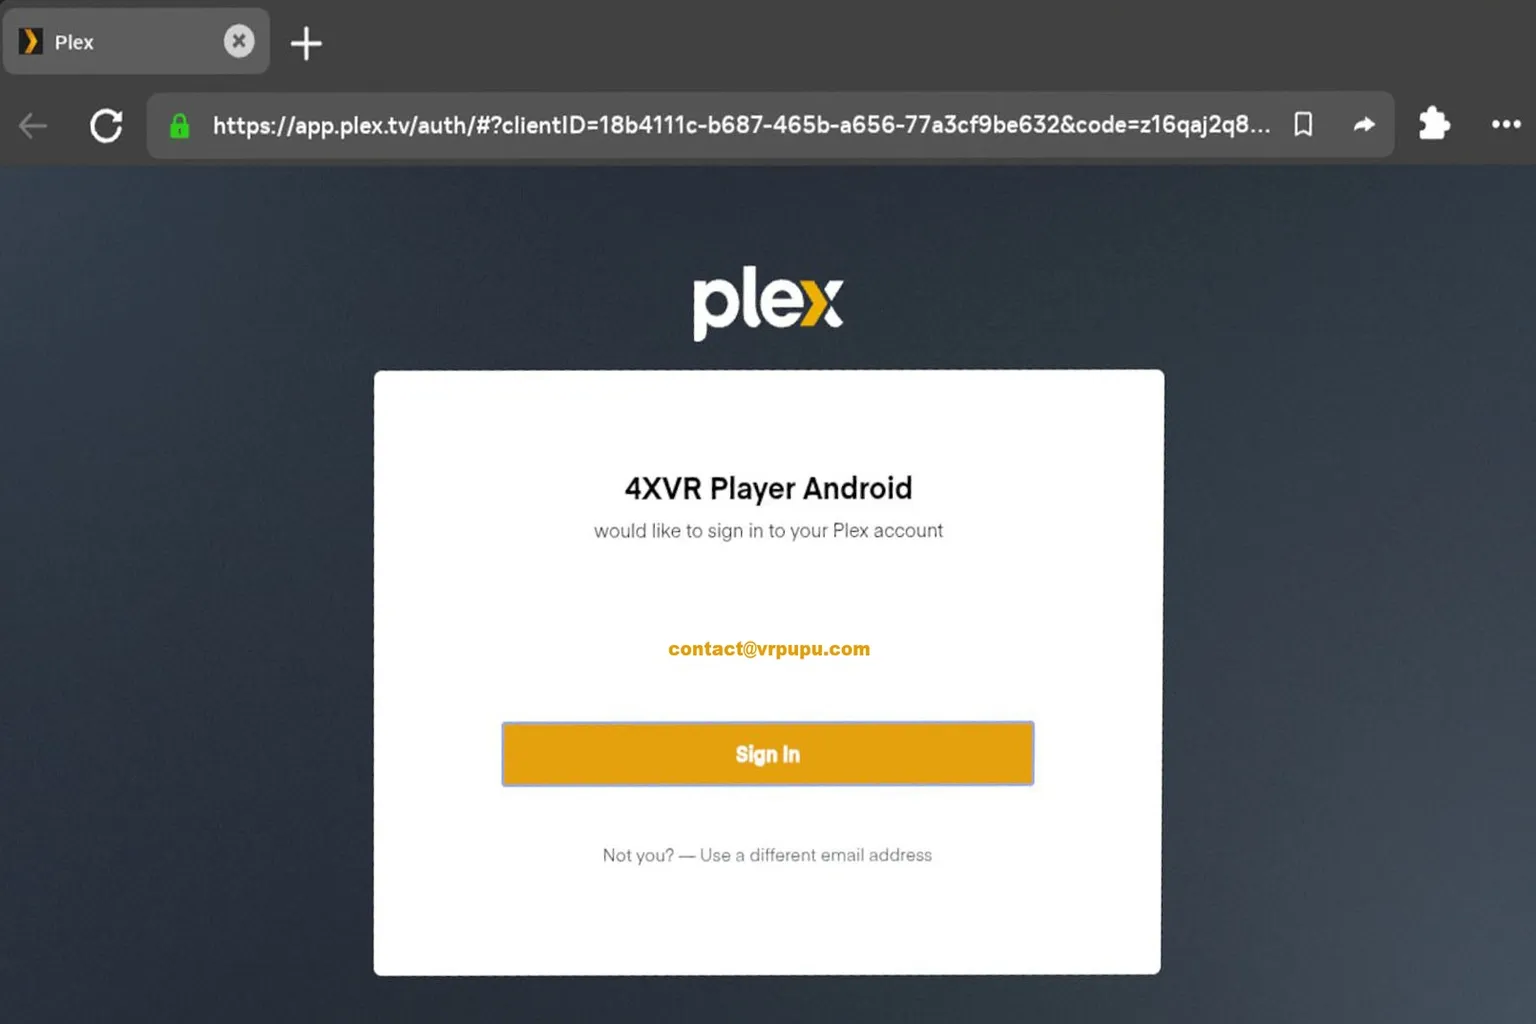
Once the connection is complete, close the browser and return to 4XVR Player.
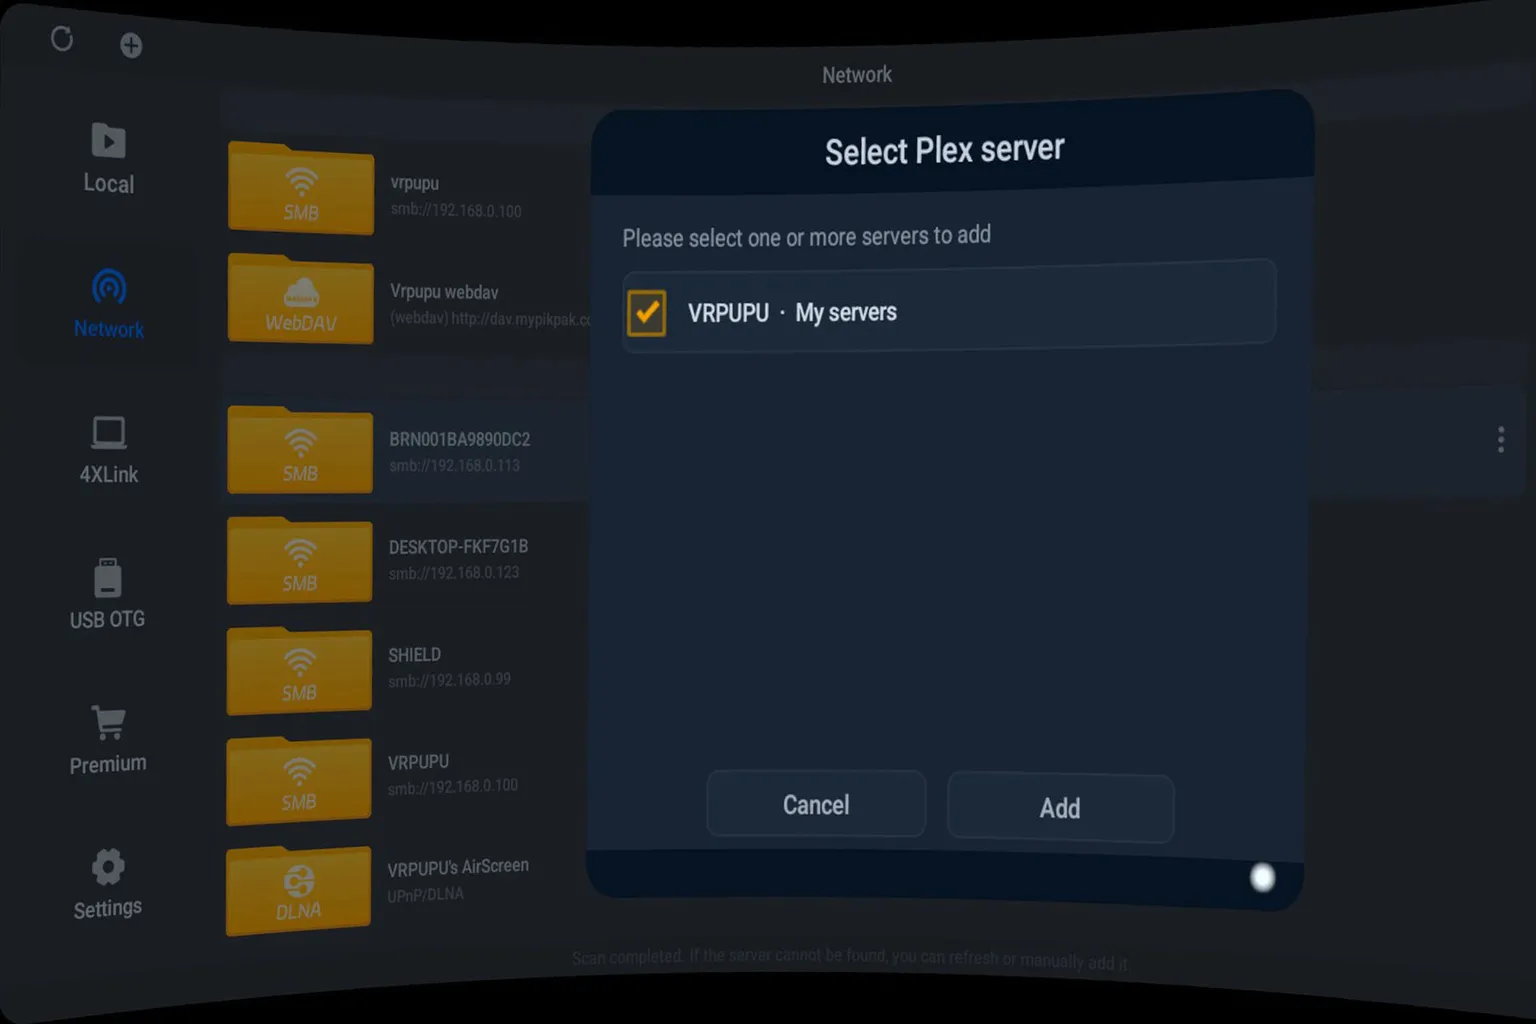
In 4XVR Player, select the server you want to add.
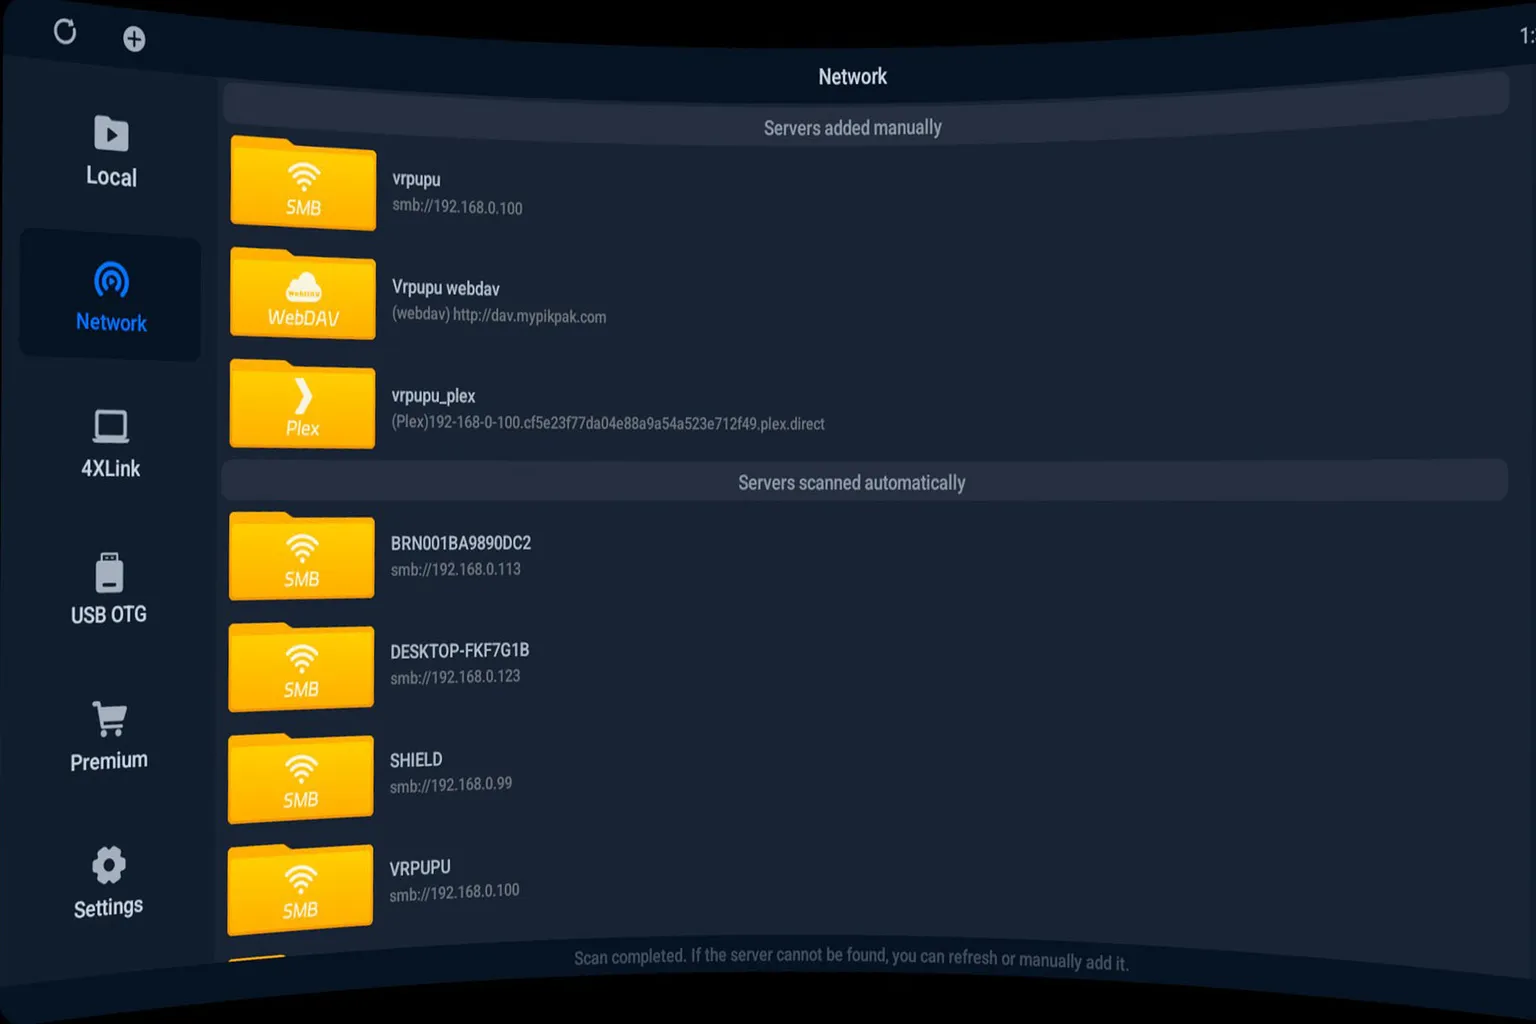
Once the connection is complete, the cloud storage service will appear under Servers Added Manually in Network.
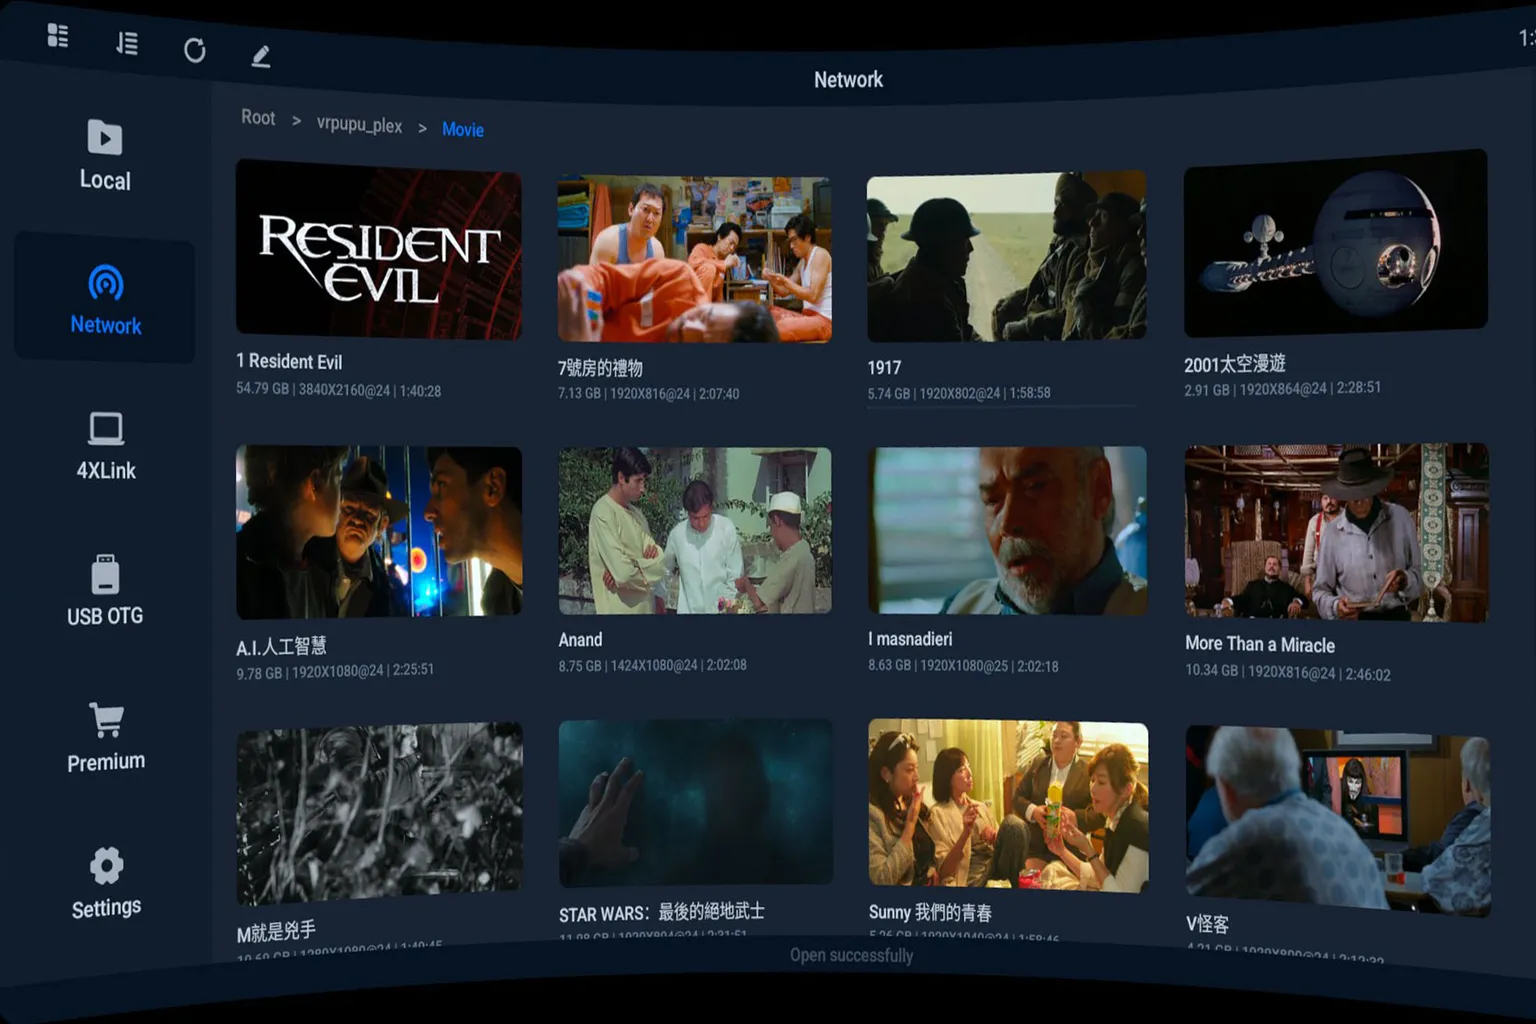
Step 3: Play videos
Once connected, you can play videos from the cloud storage service just like local videos. No special setup is needed, and playback is very smooth.
4X Link
The network sharing method (SMB) we talked about earlier honestly isn’t very smooth, right?
There are quite a few steps involved before you can actually connect, and it can feel a bit tedious.
That’s exactly why the developers built a dedicated Streaming Link feature, letting you connect your PC to the Quest quickly and easily.
To use this, you first need to install a PC app called 4X Link.
You can download it from the official 4XVR website. Both Windows and Mac versions are available, so just pick the one that matches your setup.
You’ll find the 4X Link download link at the very bottom of the official site.
Starting with version 2.0, 4XVR also supports NAS. You can install the software on a Synology or QNAP NAS and use it with 4XVR.

Once 4X Link is installed, you’ll be able to choose from three connection options:
- Local Videos: Access folders and files stored directly on your PC
- URL: Play files from a known URL, such as a shared Google Drive link
- Server: Connect using SMB, WebDAV, or FTP
The overall flow is almost the same as what we covered earlier, so here I’ll focus only on how to add files on the PC side.
Step 1: Add a connection
Select Add above Local Videos.

Step 2: Add files
Choose whether you want to add a single file or an entire folder (including everything inside it).
Anything you add will show up directly in the Local Videos list.

Step 3: Connect to Quest
As long as your Meta Quest and PC are connected to the same Wi-Fi router, they’ll link automatically.

Step 4: Play videos on Quest
Go back to your Quest and open 4X Link. You’ll see the videos you just added and can play them right away.

Note: URL
If you enter a direct video file URL under URL, the player will load it immediately and start playback.

USB OTG
This method lets you play files directly from a USB drive. It’s simple and quick, but personally, it’s not my favorite option.
Here’s what you need:
- A USB-C flash drive
- The drive formatted as FAT32, exFAT, or NTFS
- Your video files copied onto the USB drive
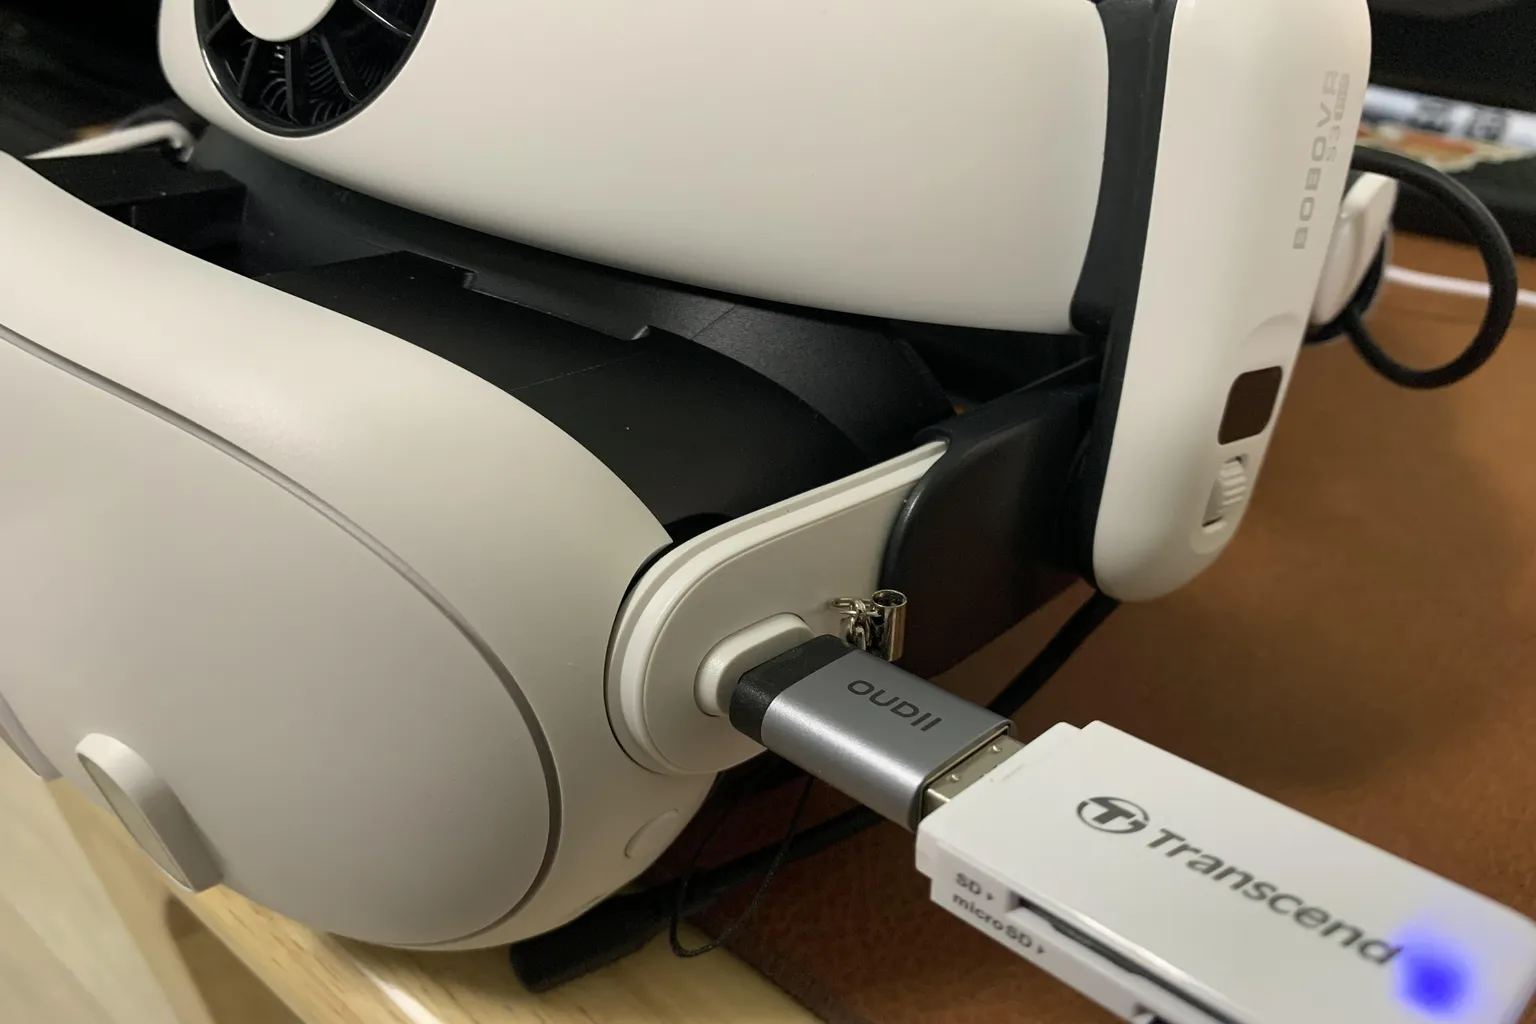
Step 1: Plug the USB drive into the Quest charging port
One thing to be careful about: this USB port is fairly delicate. Avoid pushing or bending the drive while it’s connected, or you risk damaging the port.
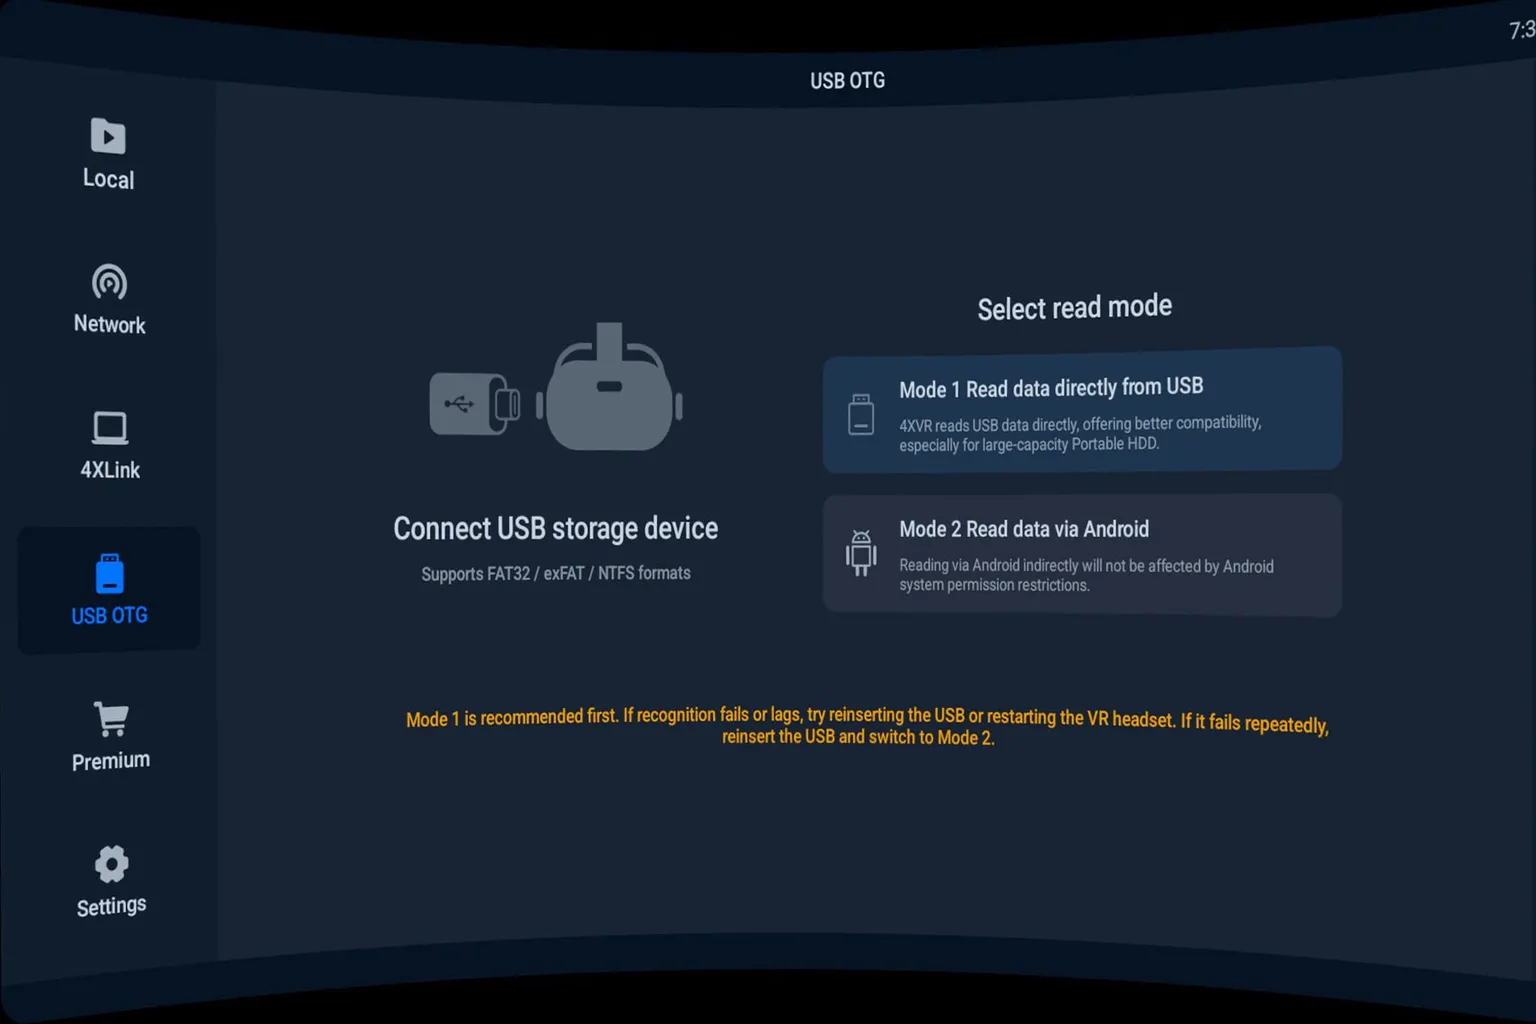
Step 2: Choose a connection method
There are two connection methods available here. Of these, Read data via Android is a unique 4XVR Player feature that can solve many cases where an external HDD isn’t detected.
- Method 1: Read data directly from USB: Most USB drives and card readers can be read without any issues using this method.
- Method 2: Read data via Android: By reading the device through Android, 4XVR can often access HDDs that normally aren’t detected.
Below are the results from my actual tests with various USB drives and HDDs.
| Model / Method | 4XVR Method 1 | 4XVR Method 2 | Moon | Skybox | NEX |
| Transcend Card Reader + MicroSD | Supported | Supported | Supported | Supported | Supported |
| Logitec LMD-SPE050UAC | Supported | Supported | Supported | Supported | Supported |
| Kingston XS1000 2TB | Supported | Supported | Not Supported | Supported | Not Supported |
| IO-DATA SSPS-US1GR 1TB | Not Supported | Supported | Not Supported | Not Supported | Not Supported |
| Crucial 2.5-inch SSD 275GB | Not Supported | Supported | Not Supported | Not Supported | Not Supported |
Step 3: Allow USB access
The first time you use it, you’ll be asked to grant permission to access the USB storage. Select OK.

Step 4: Play the video
Once access is granted, your videos will appear under USB OTG, and you can play them directly.

Playback Settings
While a video is playing, you can fine-tune a lot of controls.
I’ve marked all the important parts in the image below, so I’ll go through them one by one.

Audio Tracks:
Here you can switch audio modes and adjust audio sync delay. For normal playback, there’s almost no noticeable delay, so it’s usually best to leave this alone.
That said, 4XVR’s surround sound is genuinely impressive. On Quest 3, 7.1-channel audio honestly feels more powerful than my own home theater setup.

Subtitles:
You can choose between embedded subtitles or external subtitle files.
Font style and text color can be adjusted, but even the default subtitle settings are clear and comfortable to read.

Scene:
This lets you choose the viewing environment. You can watch in passthrough, MAX Theater, space, a hot air balloon, and more. Each setting gives a different vibe. You can also choose different seating styles. Personally, MAX Theater feels the most natural to me, but this really comes down to personal preference.

Besides the default MAX Theater, you can even watch a movie floating in a hot air balloon, which is a fun change of pace.

If you pick the Spanish calf leather sofa for seating, it honestly makes the whole experience feel more premium.

HDR: Adjust HDR settings
You can fine-tune brightness, saturation, and contrast here. That said, the default HDR settings already look great, so unless you’re very picky, you can safely leave this as-is.

Video Format: Manual VR format selection
VR videos come in many formats, but 4XVR’s auto-detection is very accurate, so most of the time you can just leave it on automatic.
One common case is 180-degree VR videos. Because the field of view is limited to 180°, you often see black edges during playback, which slightly breaks immersion. By switching to the fisheye format, the field of view expands to around 220°, and those black borders mostly disappear. This can make a big difference for certain VR videos.

Screen Curvature:
This lets you choose whether the screen in front of you is flat or curved. You can adjust how much of an arch the screen has.

This is especially useful for regular movies. Adding a slight curve often feels more natural to the eyes and makes long viewing sessions more comfortable.

Video Settings: Screen size and playback speed
Unless you have a specific reason, you can leave these untouched. The default settings already work very well.

System Settings
From the System Settings menu on the left side of the home screen, there are a few options you can tweak, but honestly, there’s no real need to change anything. The defaults are almost perfect.
That said, it’s worth noting that you can see 120Hz output support listed here.

That’s the full overview of 4XVR. After reading through it, does this player feel like a good fit for what you’re looking for?
There are also three other popular video players worth mentioning: Skybox, Moon, and NEX.
If you want to compare them before deciding, you can check out the article linked here as well.

5 Best Meta Quest VR Video Players Compared
NEX, Moon, Skybox, 4XVR & HereSphere

Moon VR Player Ultimate Guide
PC Streaming, WebDAV & Web Theater DLC

Skybox VR Player Complete Guide
Setup AirScreen, Network Streams & YouTube VR
FAQ – Common Questions
What playback methods does 4XVR support?
4XVR supports a wide range of playback methods, including local videos, USB storage, SMB (local network), WebDAV (cloud playback), cloud storage, and 4X Link (PC connection software), so you can choose the method that best fits your needs.
How do I play videos from my PC using 4X Link?
First, download and install the 4X Link software from the official 4XVR website. Connect your PC and Quest to the same Wi-Fi network, add videos or folders in 4X Link, then select 4X Link inside 4XVR on your Quest to play the videos directly.
What are the limitations of the 4XVR trial version?
The trial version is limited to 5 minutes of playback per session. To watch longer videos, you need to purchase the full version. At the moment, the Premium version is available at a limited-time half price of $15.
How do I play cloud videos using WebDAV?
Using PikPak as an example, you first need a paid account and must enable WebDAV to get the connection URL, username, and password. Then, add a new WebDAV server in 4XVR and enter those details to stream videos from the cloud.
What playback settings can I customize in 4XVR?
You can adjust audio tracks, subtitle settings, viewing environments (such as MAX Theater, space, or hot air balloon), HDR settings, video formats (with automatic detection), and screen curvature to create a comfortable viewing setup.
I don’t have a PC. Is it still worth buying this player?
Unless you plan to stream videos from cloud storage via WebDAV, there’s no strong need to buy this player if you don’t use a PC.
What makes 4XVR stand out?
It’s extremely easy to use, supports almost every playback method, and delivers excellent audio quality.