
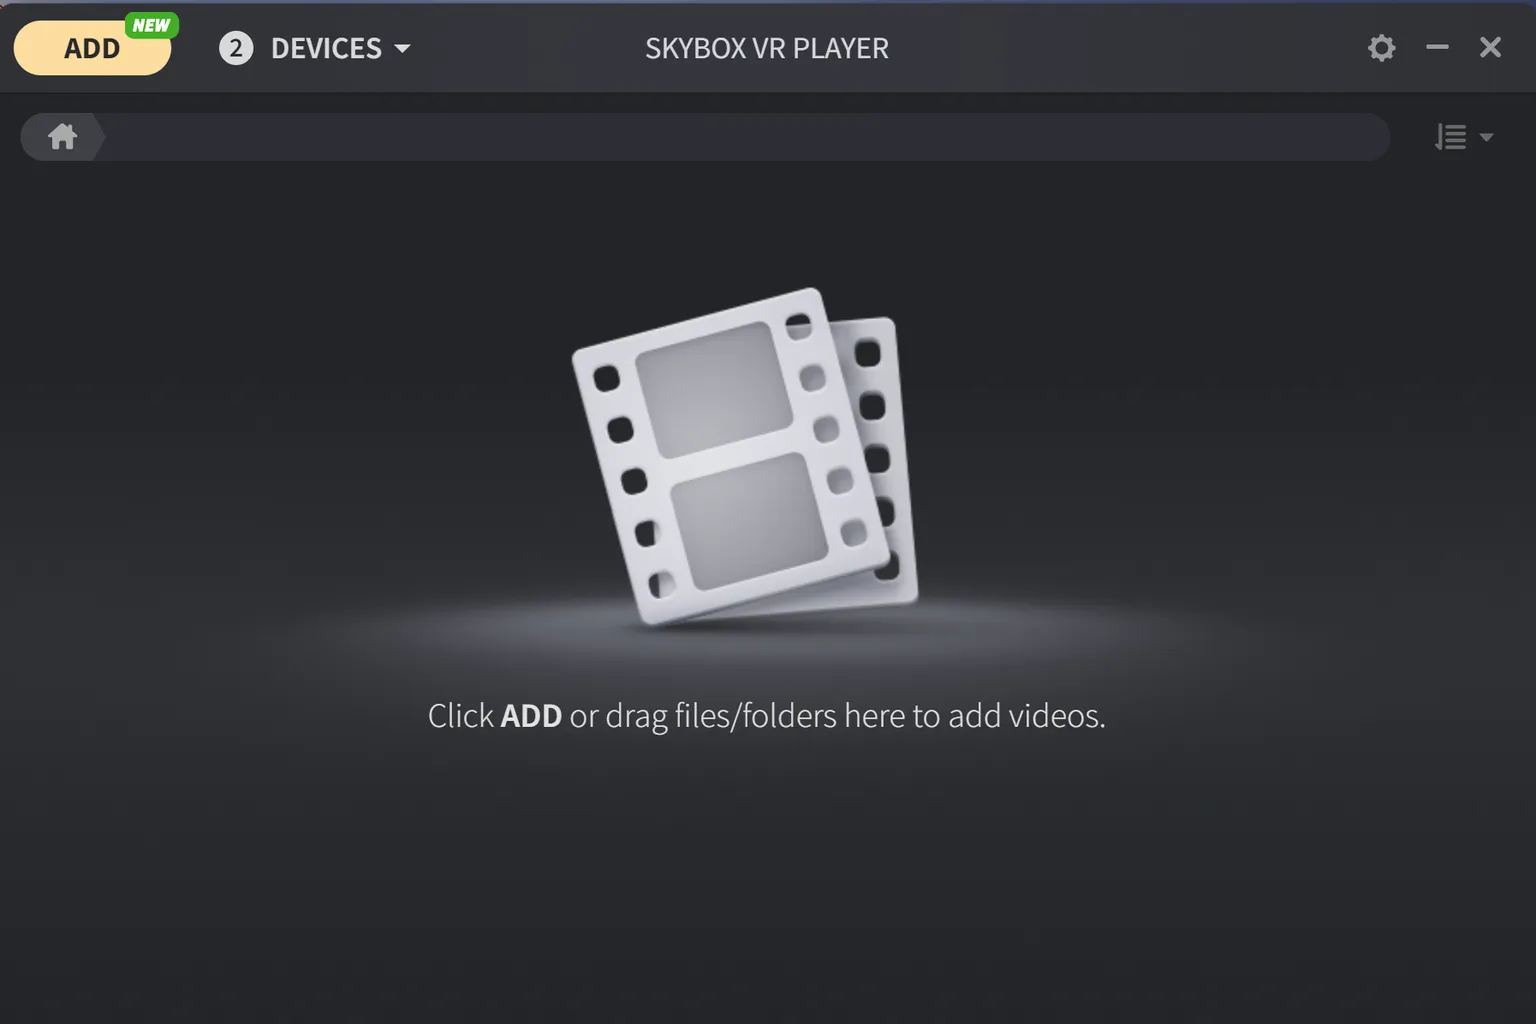
Want the best home theater experience on your Meta Quest? This Skybox VR Player guide walks you through the setup without the usual confusion. Learn how to set up AirScreen, stream through SMB or WebDAV, and get YouTube VR working the right way in just a few minutes.
Skybox VR Player Introduction
When watching videos on Meta Quest, the default built-in player supports only a limited range of formats and doesn’t handle network playback like cloud storage or Samba (SMB) shares. So if you really want to enjoy movies and videos on a huge VR screen, buying a dedicated video player is honestly the best option.
In the Meta Horizon Store, some of the most well-known video players you’ll often see include the following:

MOON VR Player
Cheapest player after discounts
Price: 🌟🌟🌟
Solid features with clean visuals
SKYBOX VR Player
Affordable and easy to use
Price: 🌟🌟
Feature-rich and simple controls
4XVR Video Player Premium
Great features, but expensive
Price: 🌟
Excellent audio presentation
HereSphere
More trouble than it’s worth
Price: 🌟
Very complex setup, not beginner-friendly
This time, I’m introducing Skybox VR Player, one of the best-selling VR video players out there. It supports a wide range of playback features, and some of them are Skybox-only functions that you rarely see in other players.
- Local playback: Play videos stored on the headset itself or on a USB drive.
- Network playback: Supports Samba (SMB network sharing) and WebDAV.
- AirScreen (Skybox exclusive): Play videos stored on your PC or mirror your entire PC screen inside VR.
- YouTube: Watch YouTube directly inside Skybox, and it now also supports Plex.
- Hidden folders: Hide videos or images you don’t want other users to see.
- Rooms: Invite friends and watch videos together.
- Other features: Fine image adjustments and various small but useful playback options.
When you look at it this way, it’s clear Skybox is more than just a simple video player.
In this latest 2.0 update, the developer says they added these new features:
- Added Plex support for network playback
- Watch-together mode so you and friends can enjoy the same video at the same time
- Dolby Vision support
- Blu-ray ISO support
Honestly, Skybox VR Player is so feature-packed it makes you wonder, “How is this only $9.99?”
From here, I’ll break things down and explain how to use each feature step by step.
Use promo code “VRPUPU” at checkout to get 10% off.
How To Use
Here we’ll explain how to set up and use the different playback options in Skybox VR Player.
There are four main connection methods, plus the hidden files feature. You can access all of them from the channel list on the left side of the main menu:
- Local Files
- Network
- AirScreen
- YouTube
- Rooms
- Hidden Files
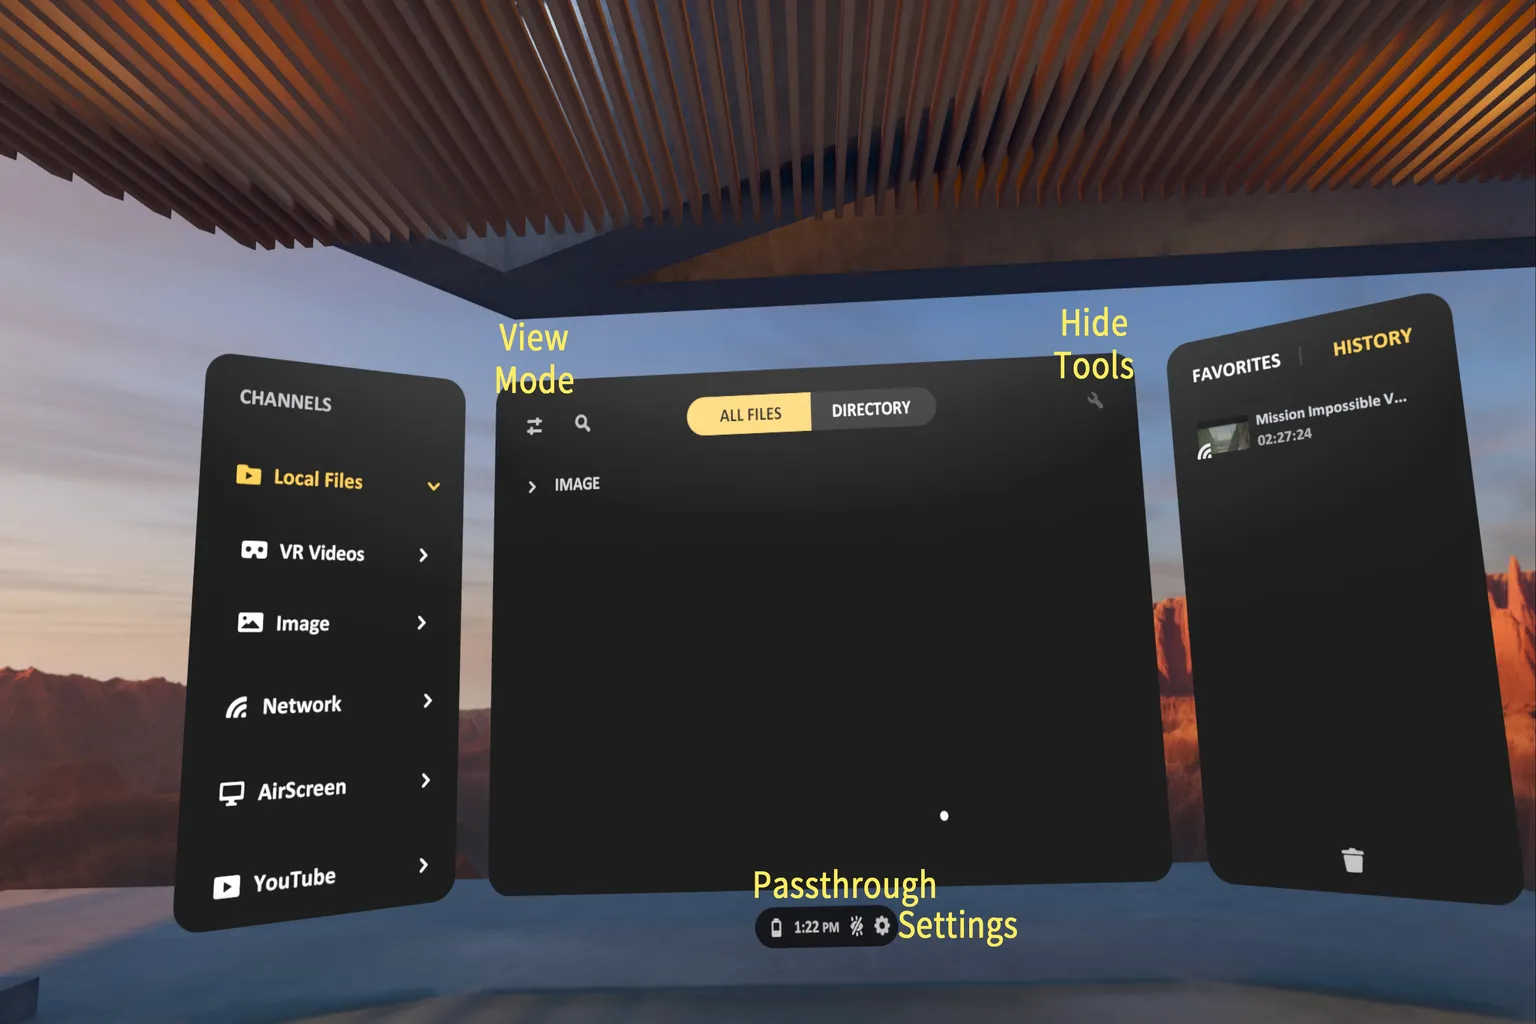
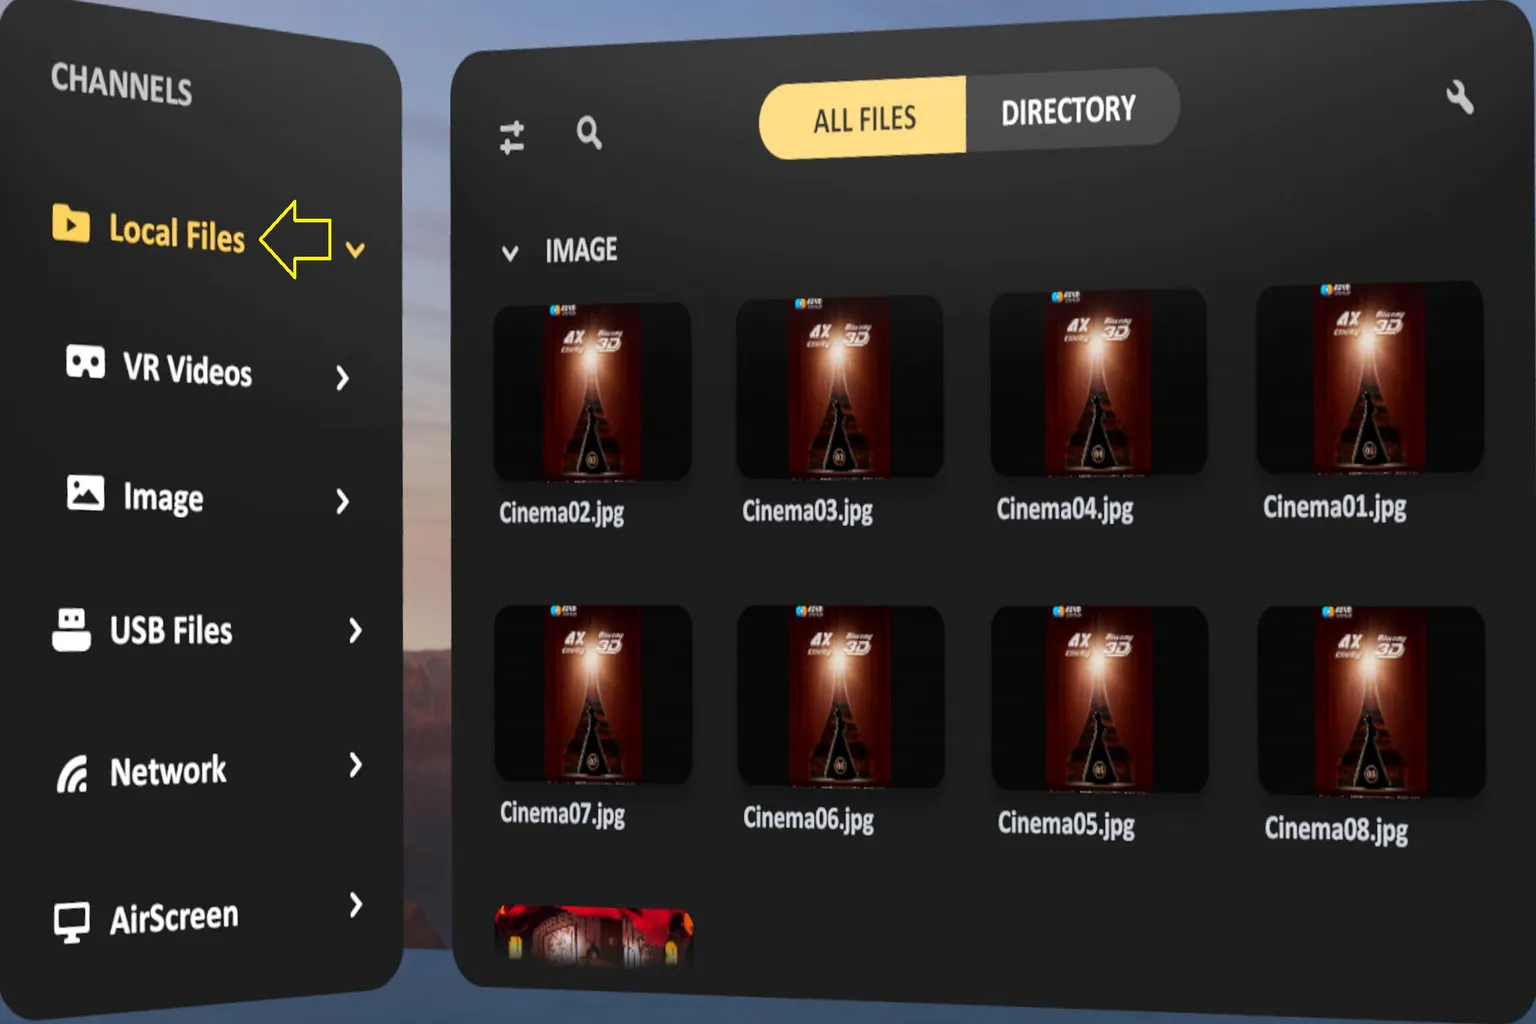
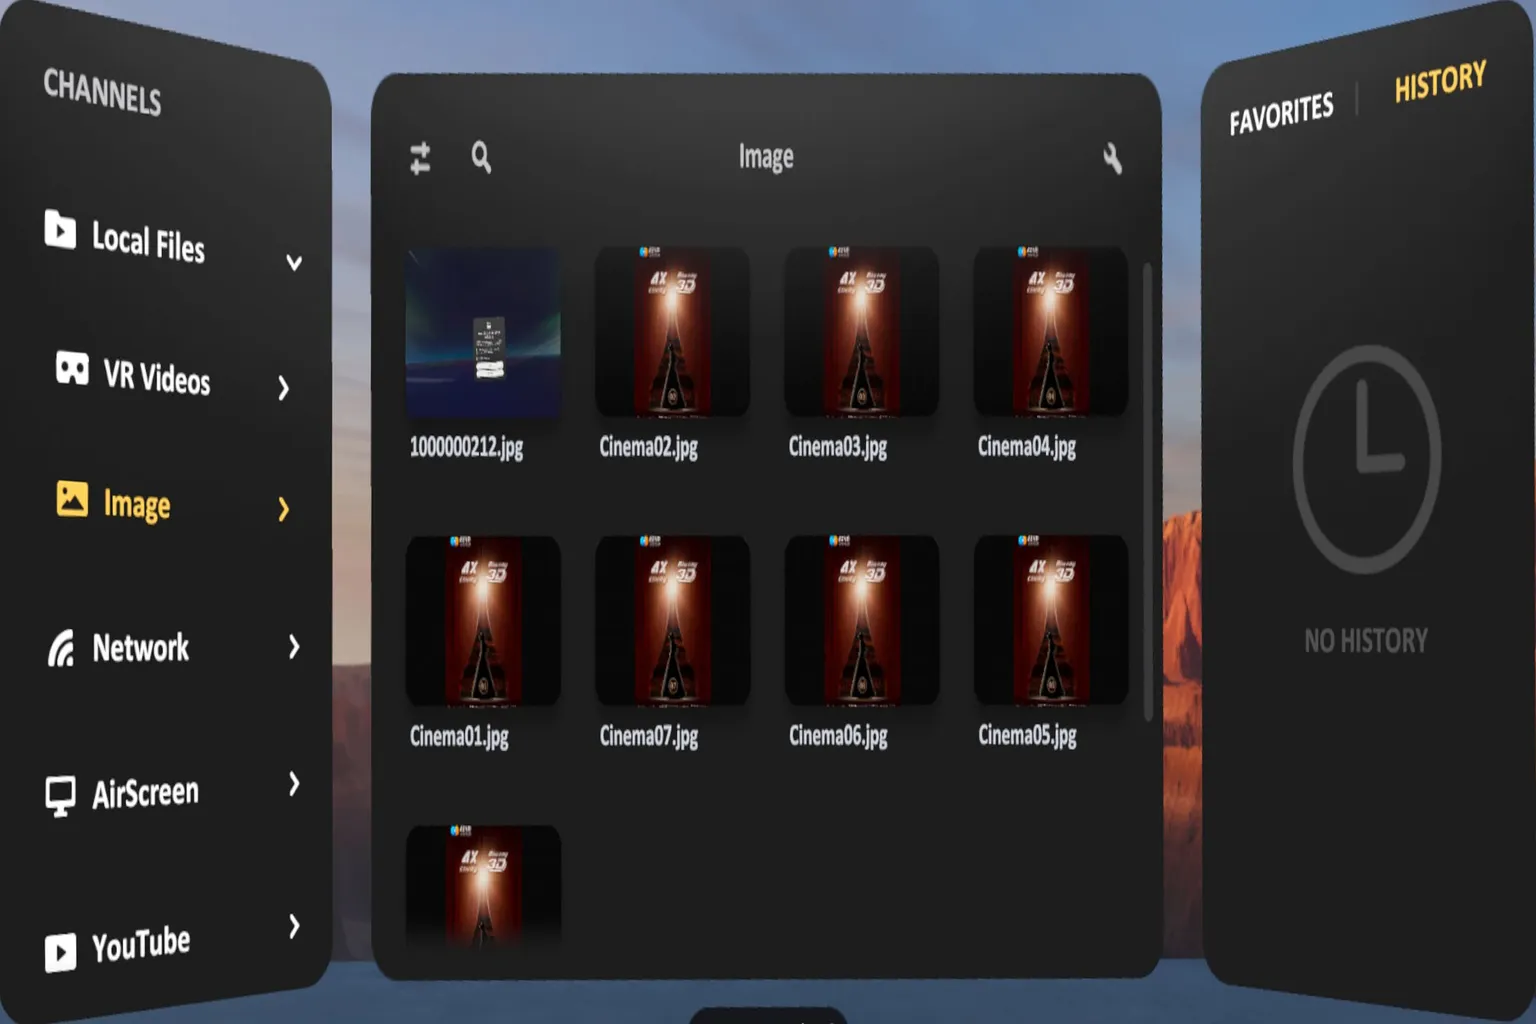
Local Files
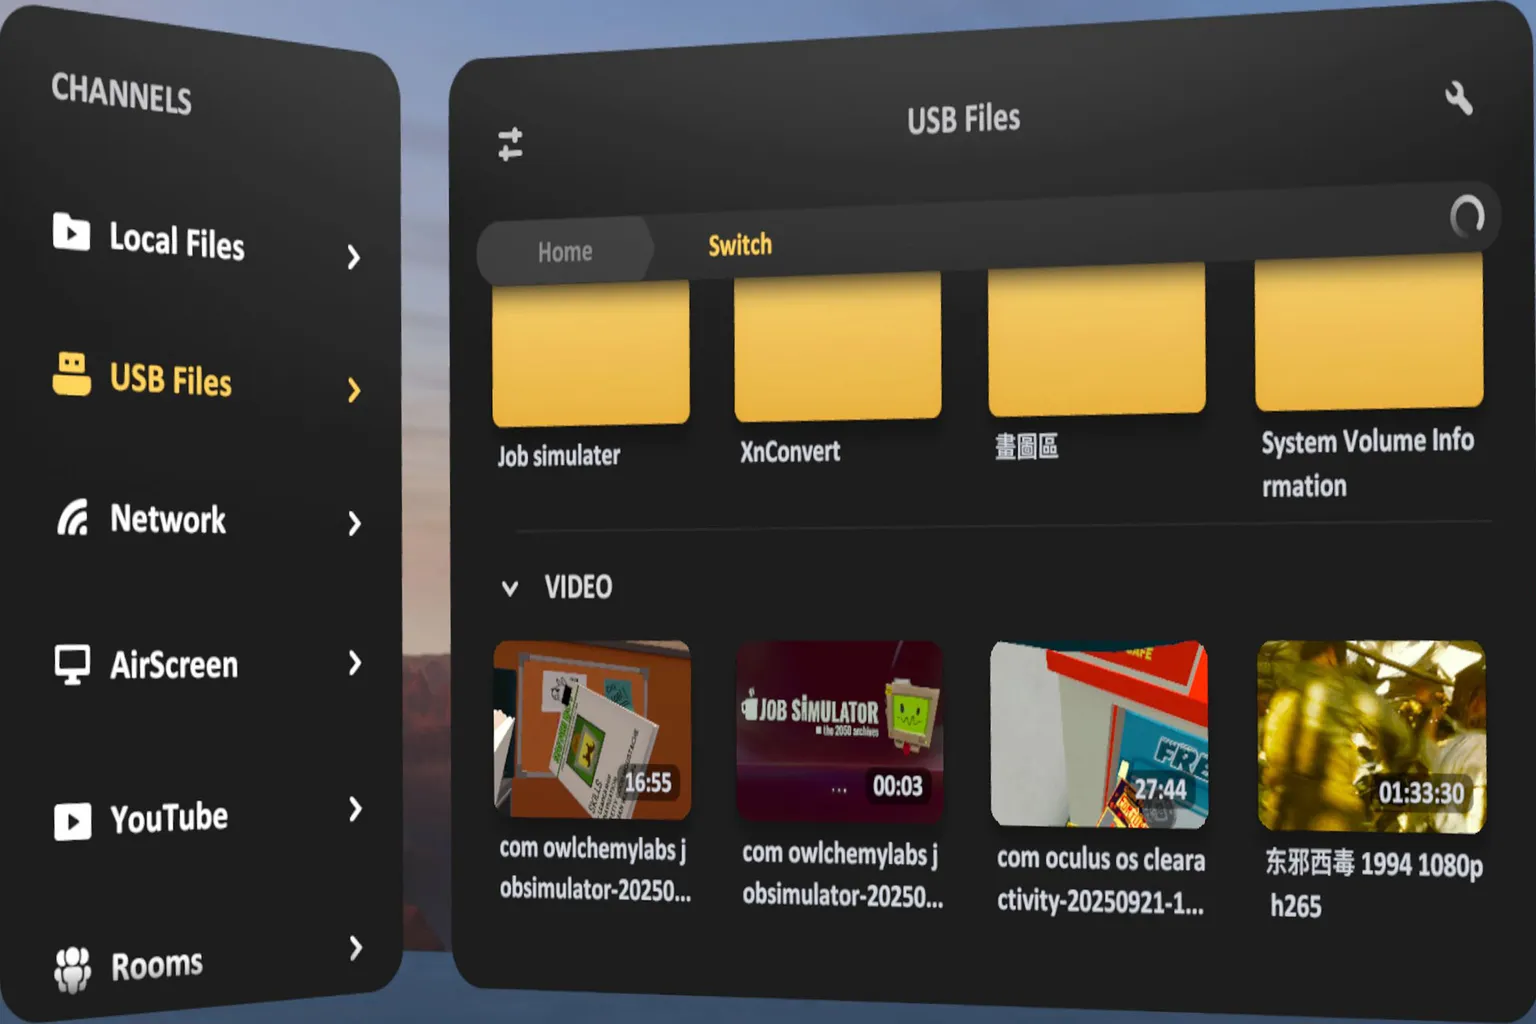
With this method, you can play videos stored directly on the headset, or videos saved on a USB drive.
First, select Local Files from the main menu.
Step 1: Access files
When you enter Local Files, you’ll see a list of videos stored on the headset.
If you haven’t transferred any videos yet but want to watch recordings made on the headset, open the Oculus folder.
(Meta still uses this name for backward compatibility).
This folder contains videos and screenshots recorded directly on the headset.
Step 2: Play videos from a USB drive
The USB-C port on Meta Quest is fairly delicate. If you apply too much force when inserting a USB drive, there’s a risk of damaging the port. For that reason, this method isn’t really recommended.
If you still want to use it, just insert a USB drive containing videos into the headset’s USB-C port, and the files will be available for playback.
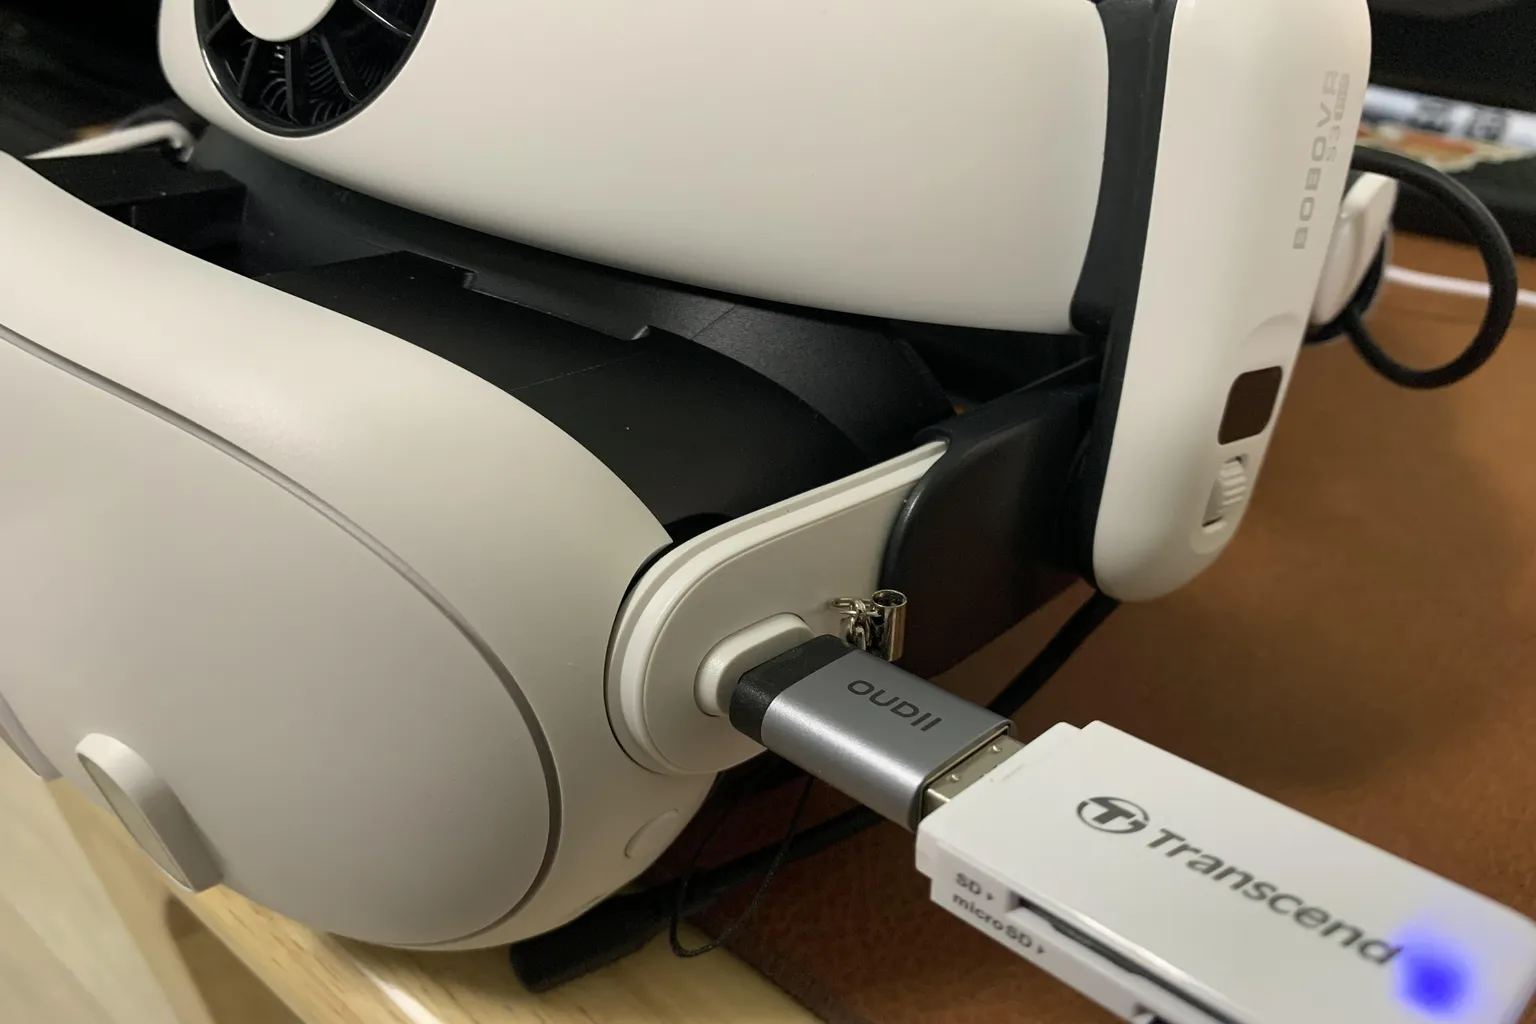
When a confirmation pops up on the headset asking “Allow SKYBOX to access?”, just approve it and the loading will start.

Once access is granted, you’ll see a list of videos stored on the USB drive. Select the file you want to watch, and playback will start immediately.
Network
Skybox supports three main network playback methods: network sharing (SMB), cloud playback (WebDAV), and media servers like Plex, Emby, and Jellyfin.
To use any of these, select Network from the main menu.
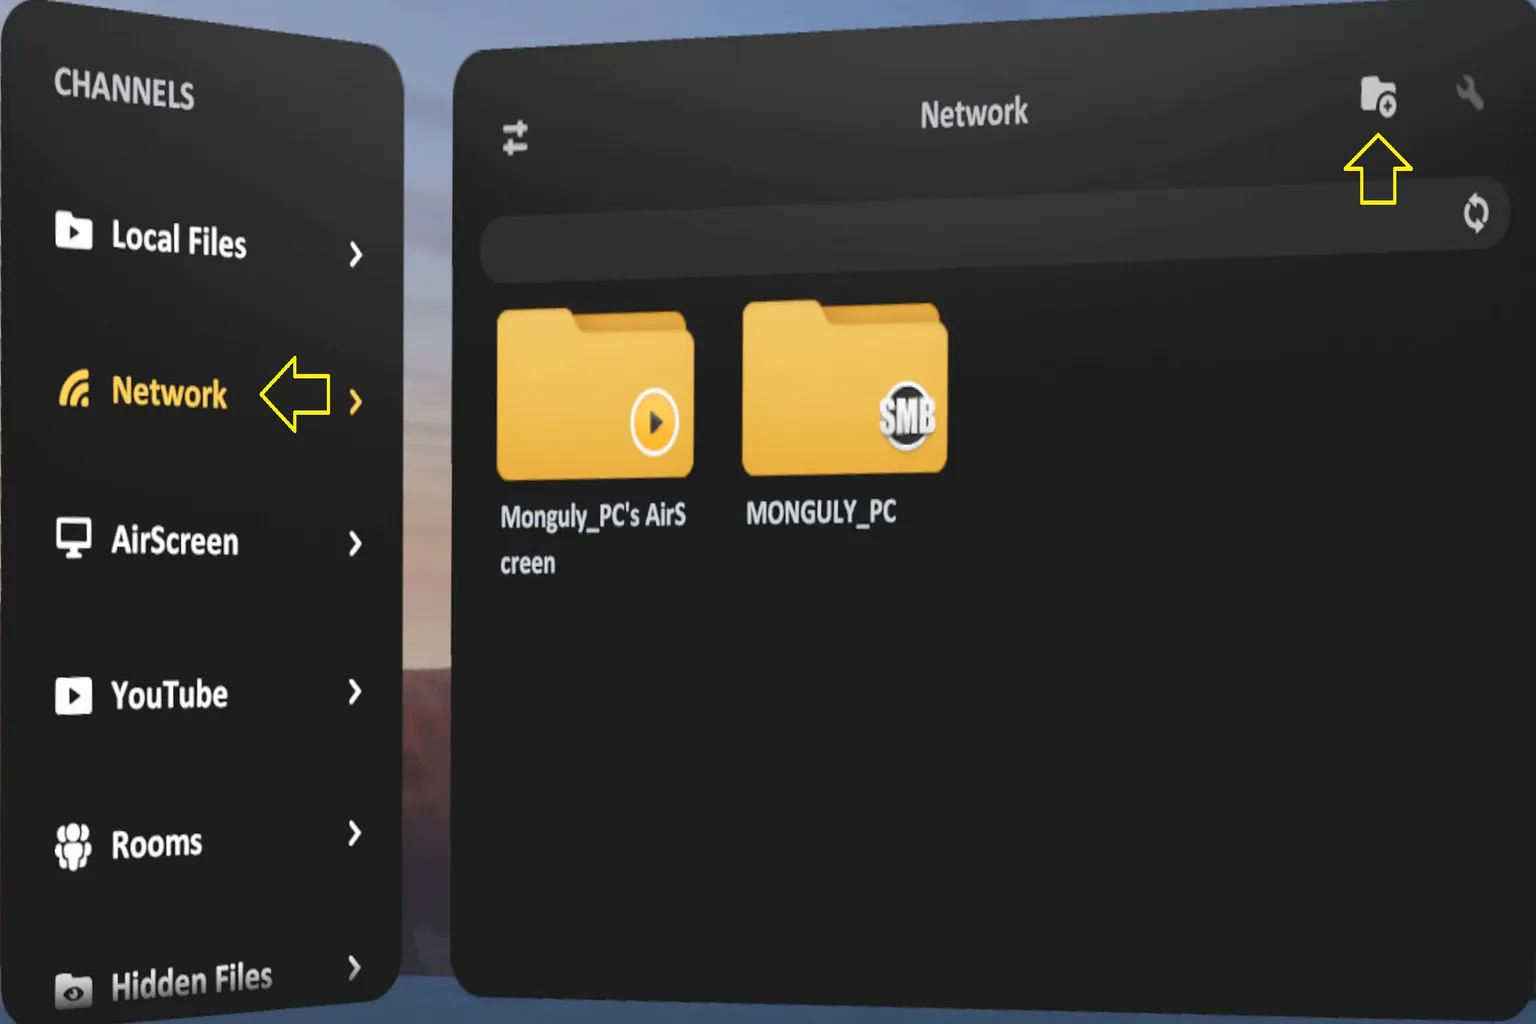
Then, tap the folder icon in the top-right corner and choose Add SMB or Add WebDAV, depending on the connection method you want to use.
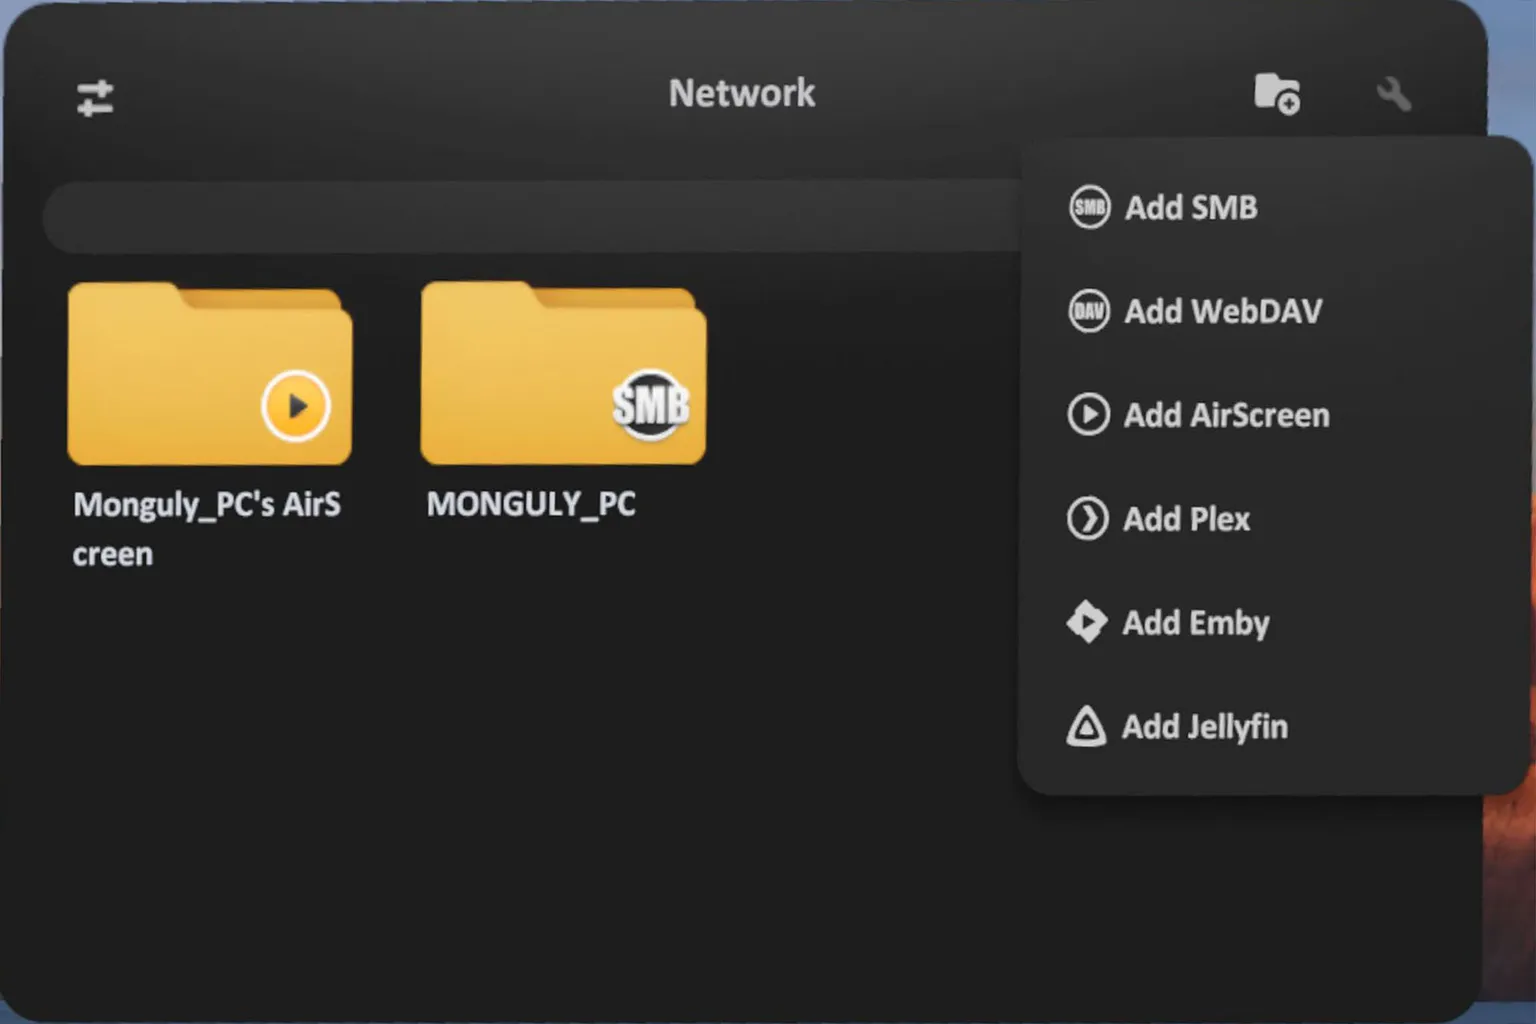
SMB
SMB (Samba) is the file-sharing system commonly used on Windows—basically what people call “network sharing.”
To use SMB in Skybox, you first need to set up a shared folder on your PC.
For detailed instructions on how to configure sharing on the PC side, refer to the setup guide linked here.
Once the PC-side setup is done, follow these steps:
Step 1: Check your PC’s IP address
Skybox’s SMB feature doesn’t auto-detect nearby PCs, so you need to enter the IP address manually.
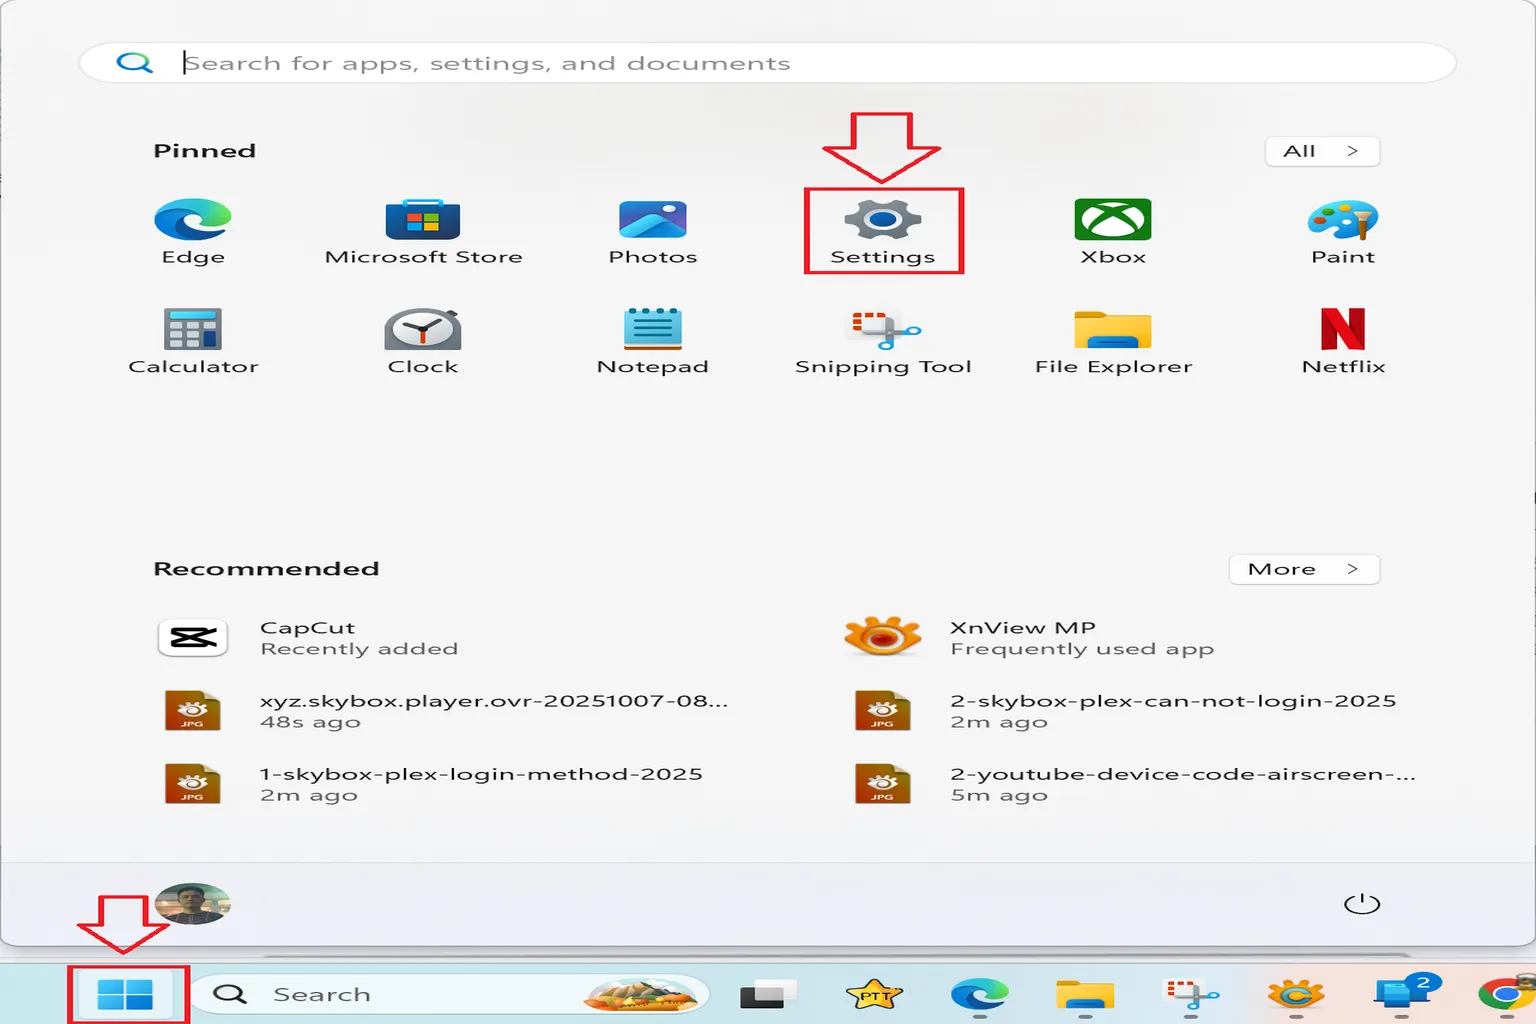
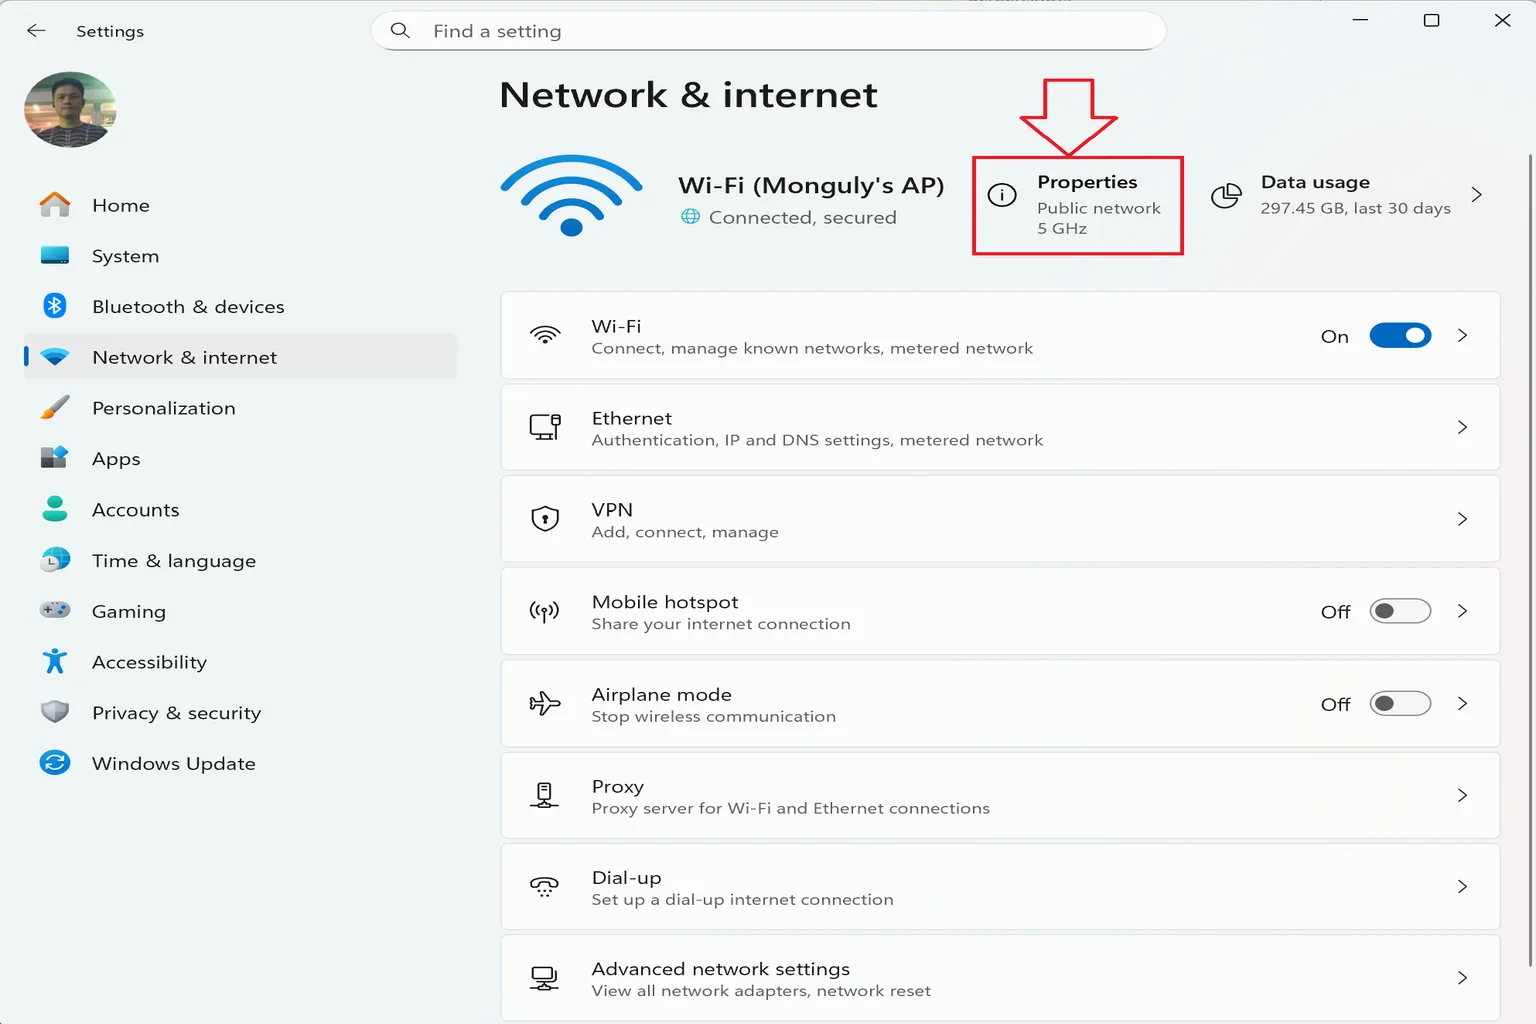
On a Windows PC, press the Win key, open Settings, then go to Network & Internet.
Click Properties (or Advanced network settings).
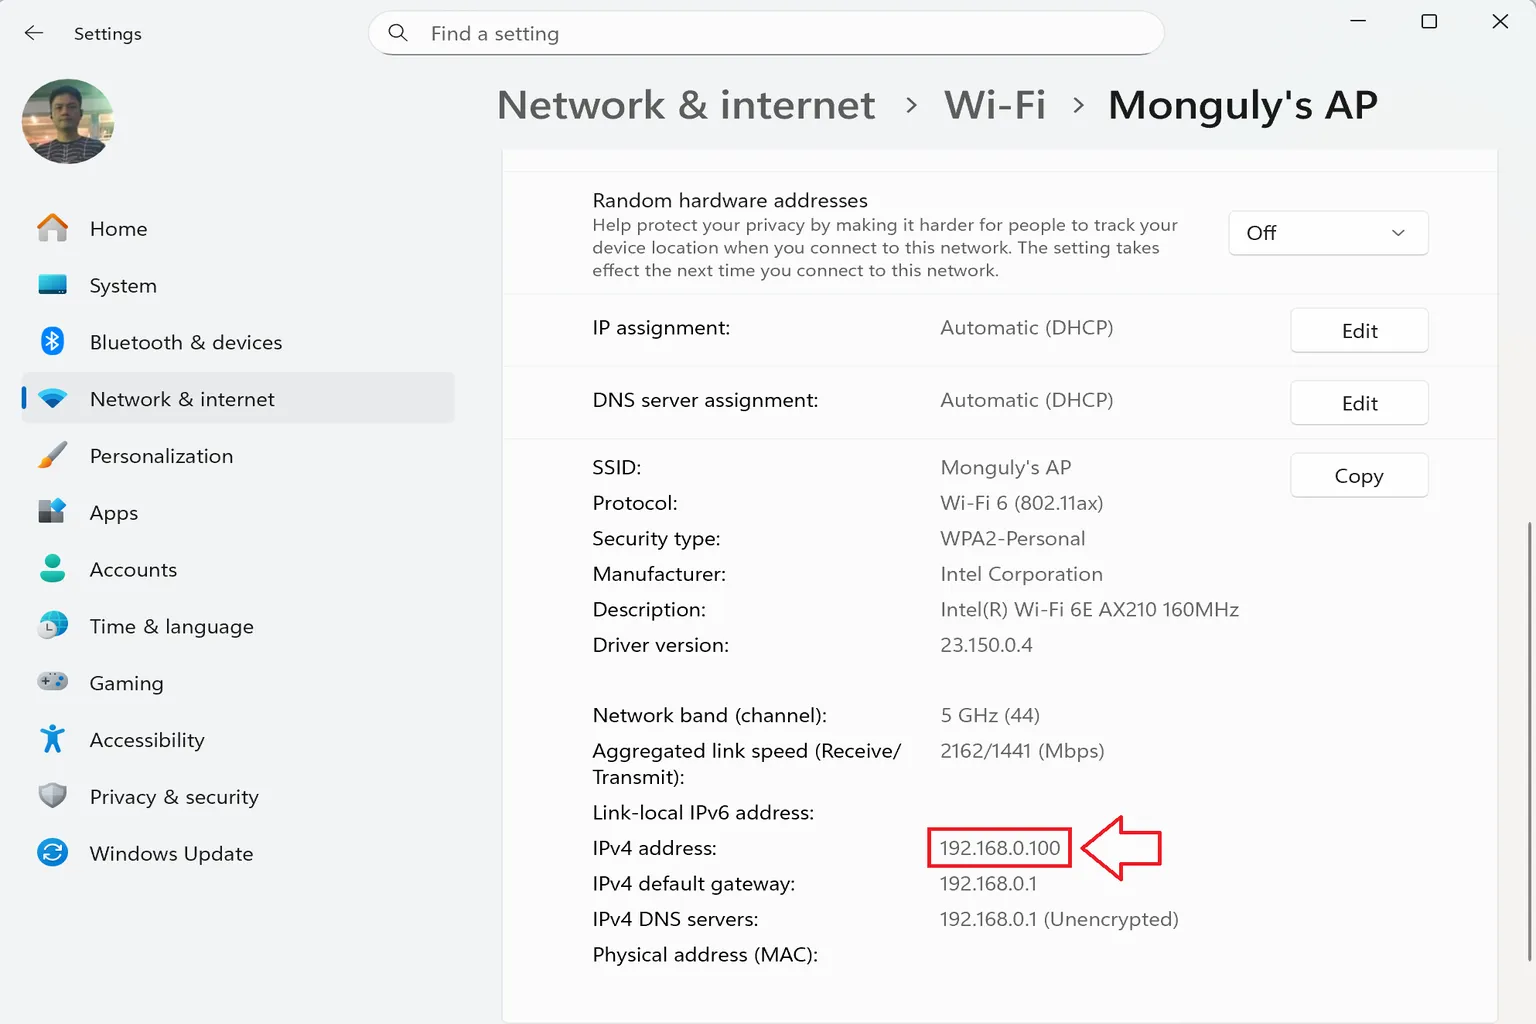
Step 2: Get the IP address
Look for the IPv4 address shown there. That number is your PC’s IP.
Make a note of it.
Step 3: Connect to the PC
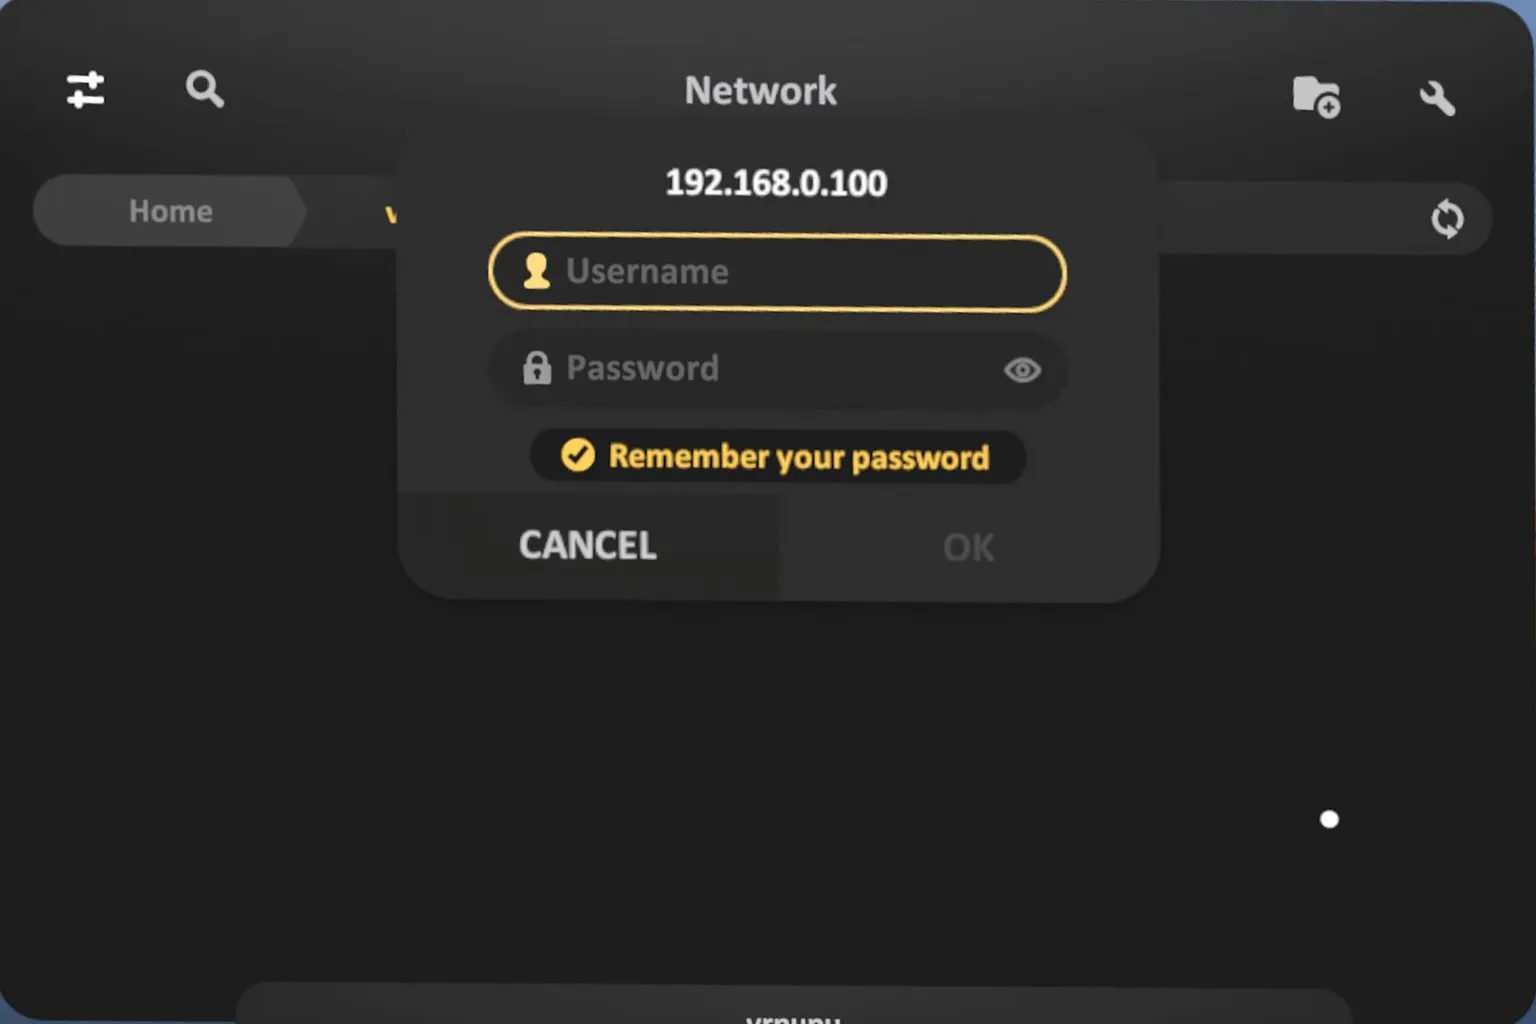
In Skybox, go to Add SMB.
Enter the PC’s IP address you noted earlier, along with any server name you like.
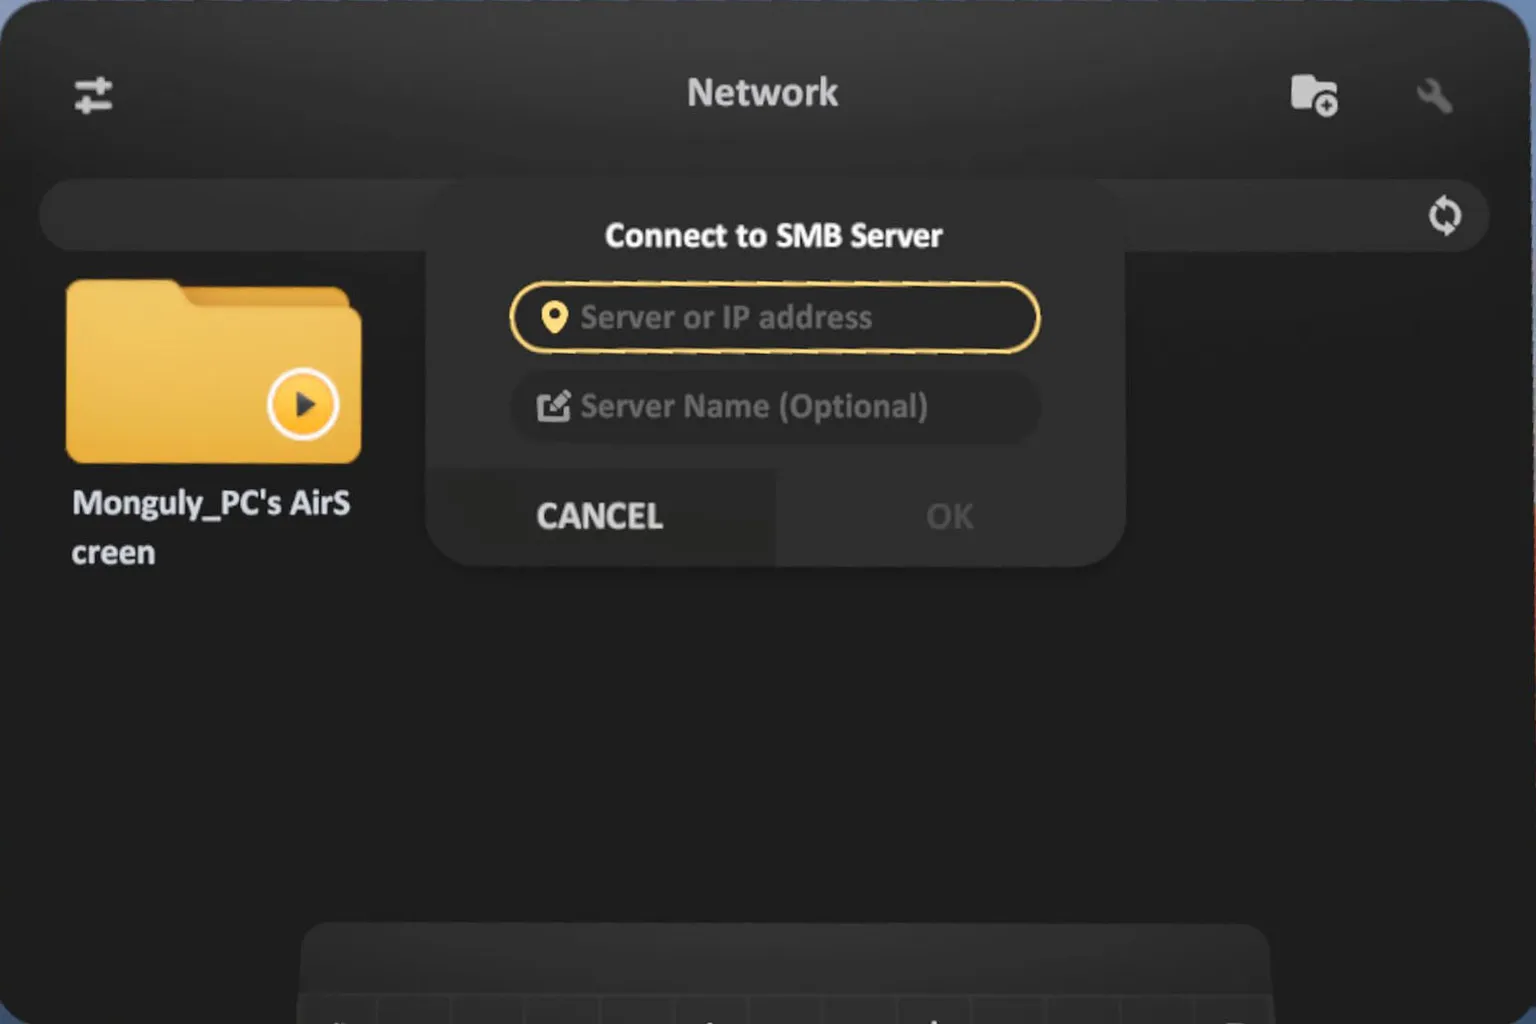
Finally, enter the username and password for the PC account that has access to the shared folder.
Once that’s done, the connection to your PC is complete.
Step 4: Play a video
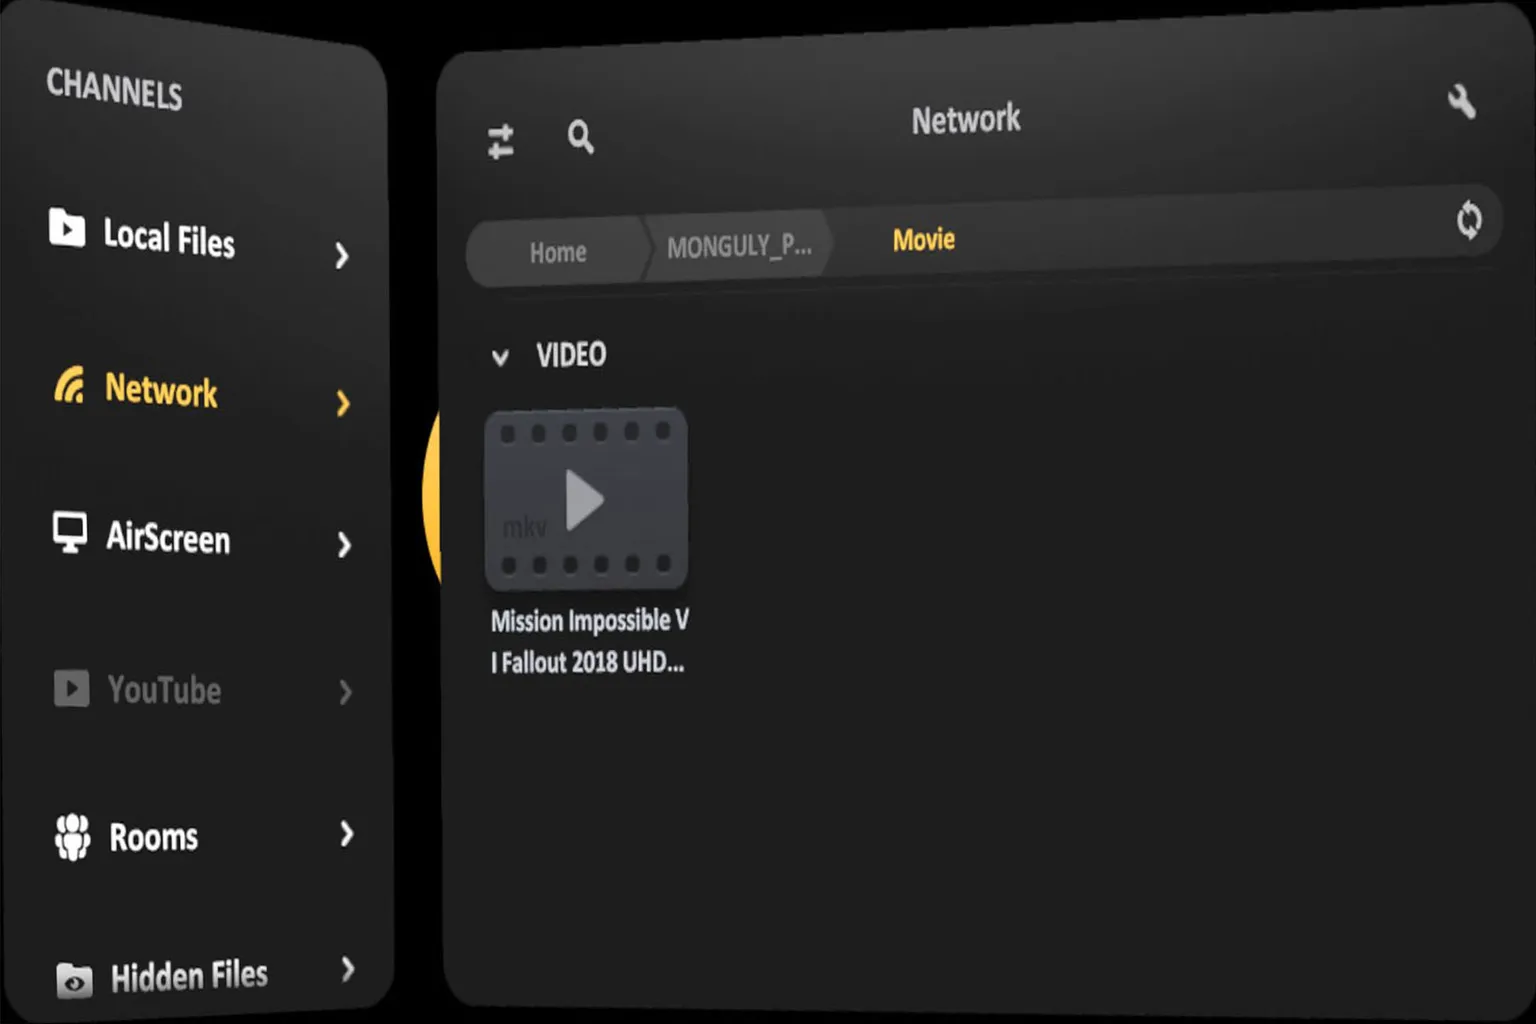
If the connection is successful, the shared folders will appear.
Just find the video you shared, select it, and playback will start right away.
WebDAV
This method lets you stream videos from a cloud service that supports WebDAV.
PikPak is often recommended, so here we’ll use it as an example and explain how to use PikPak cloud storage with Skybox VR Player.
If you don’t have an account yet, you can sign up for PikPak first. Just note that WebDAV requires a paid subscription.
If you register through the link, you can get a 5-day trial, which is perfect for testing the WebDAV feature.
If you’re using an iPhone or iPad, you’ll need to enter the invite code 44502139 to receive the trial eligibility.
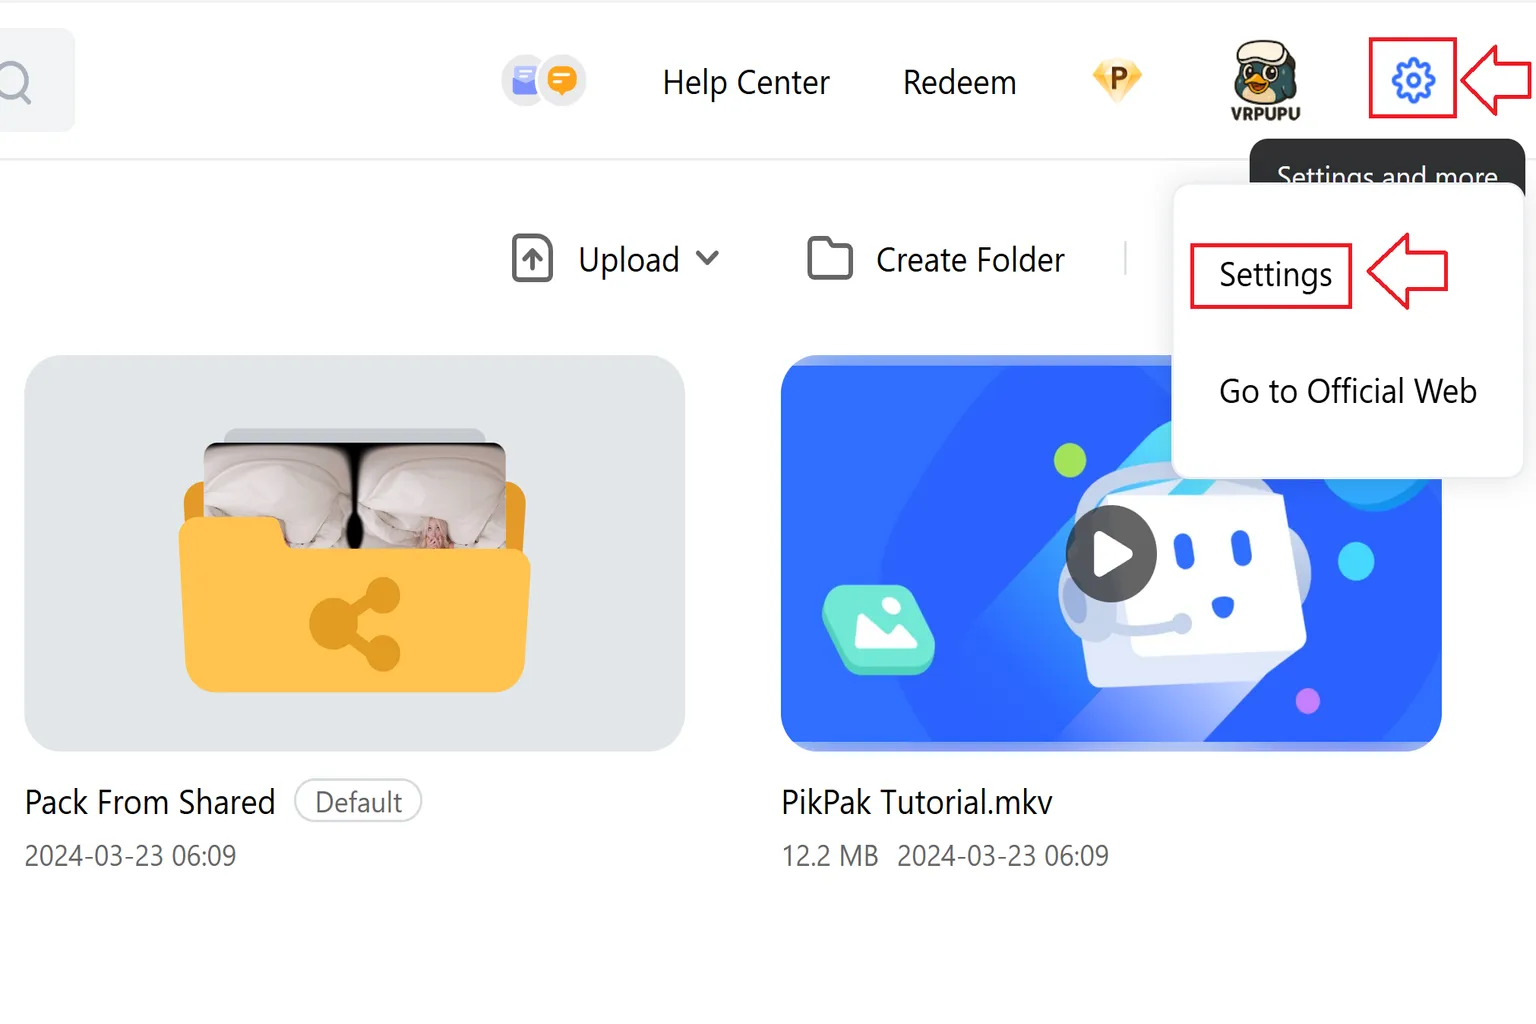
Step 1: Open Settings
Click the gear icon in the top-right corner and select Settings.
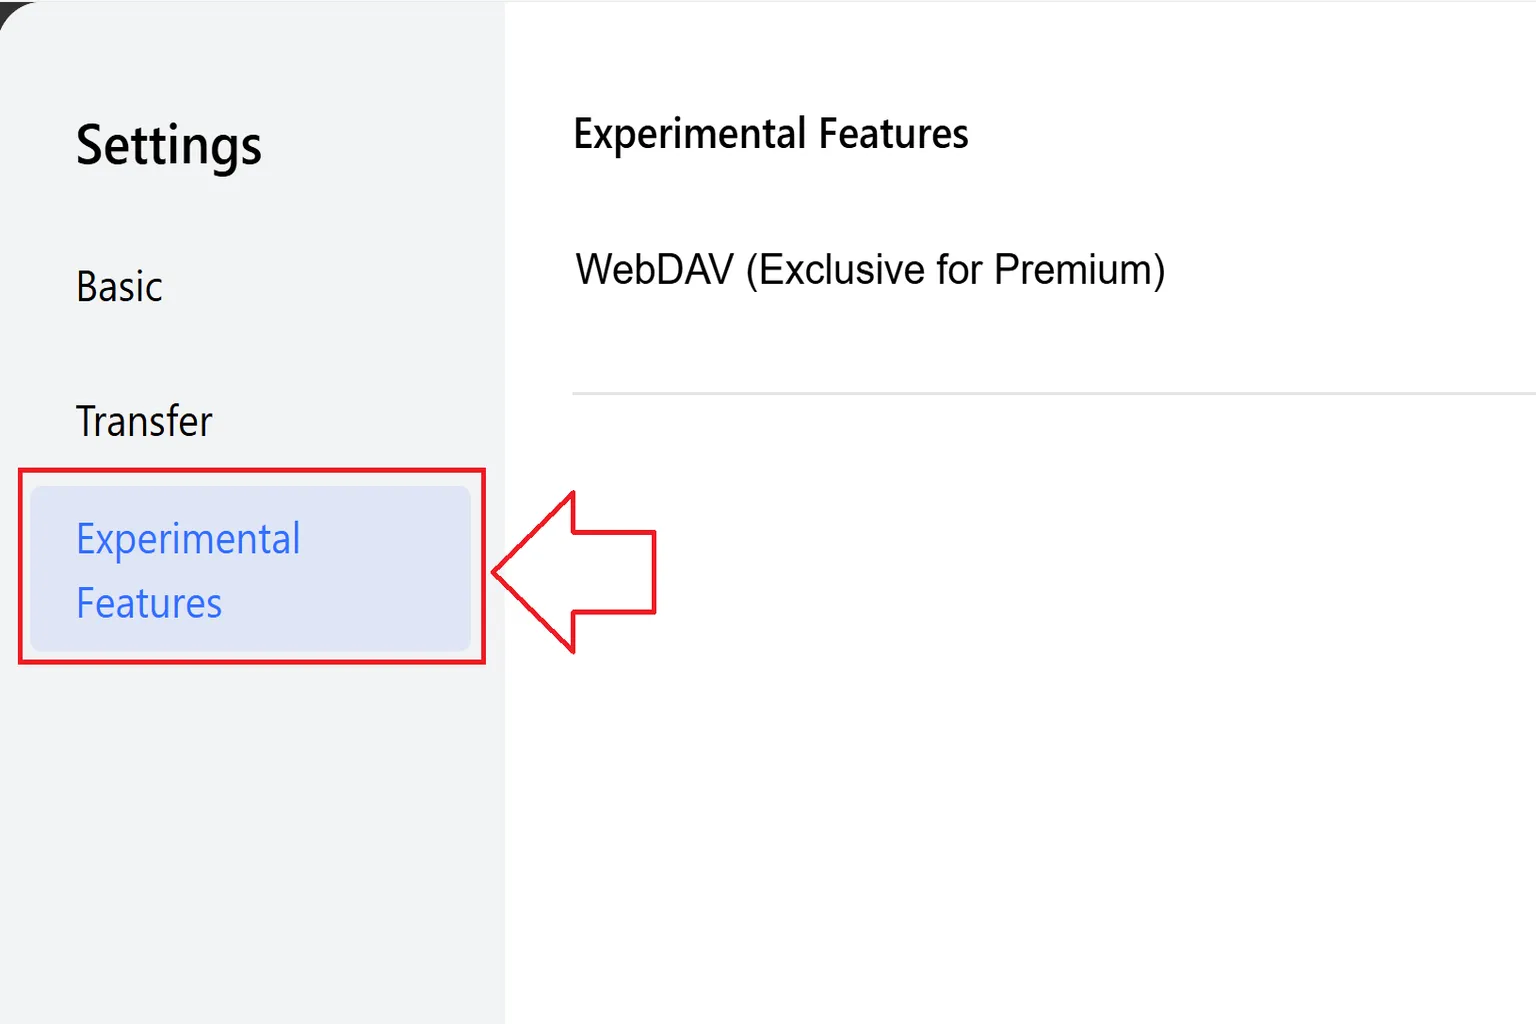
Step 2: Go to Lab Features
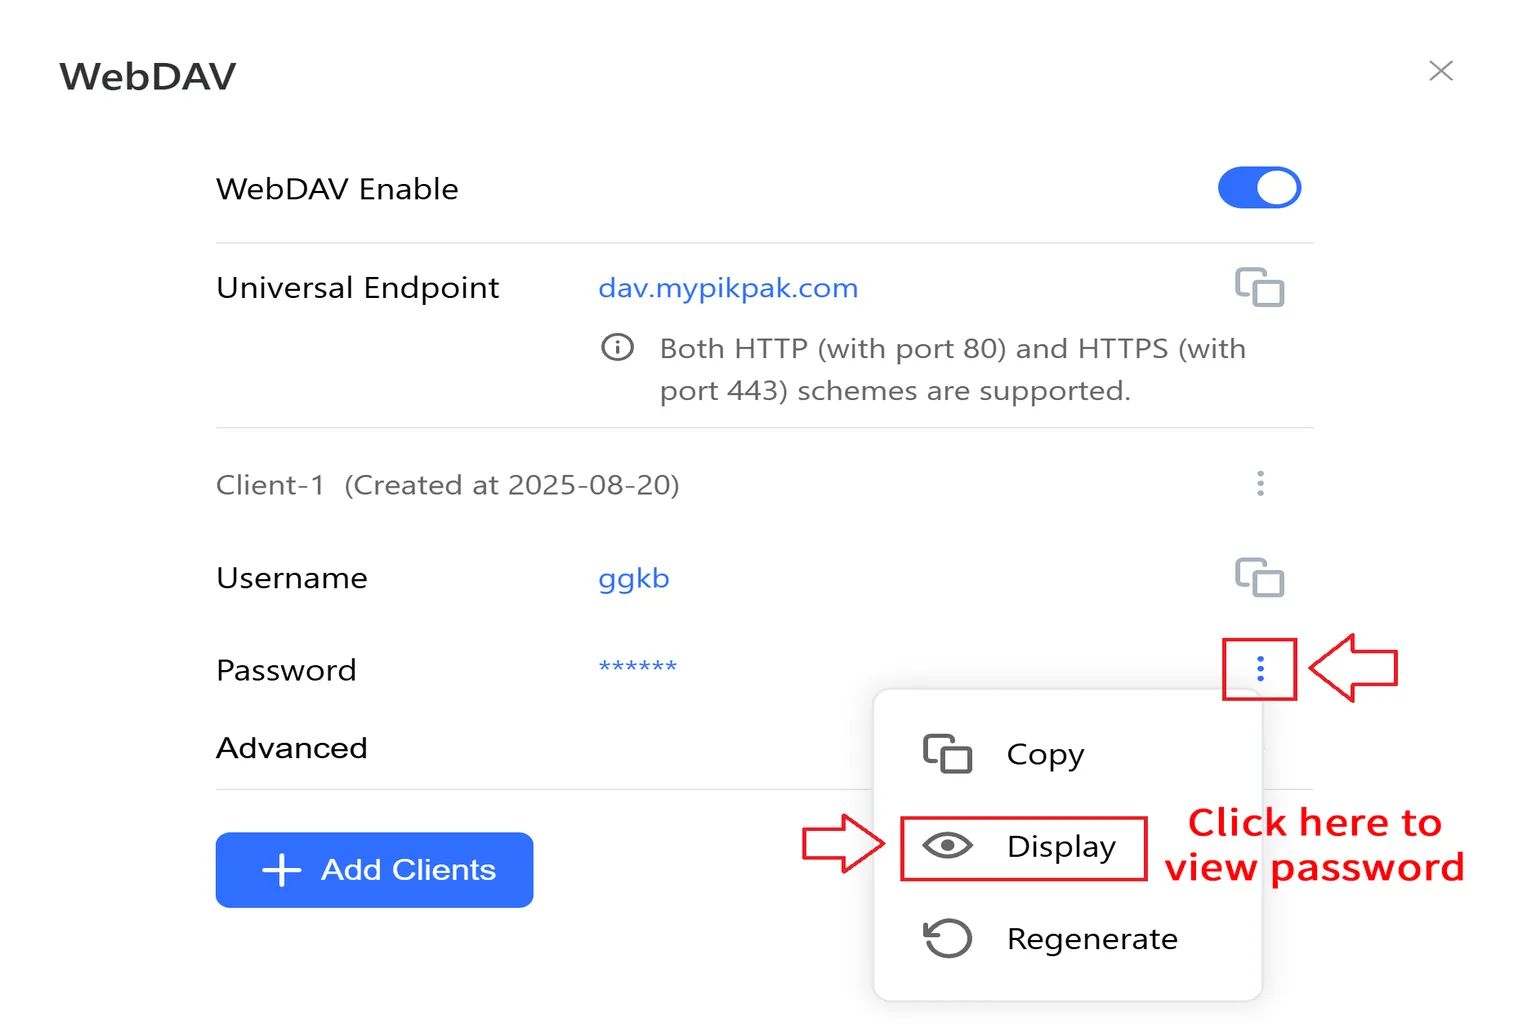
In the Lab section, find WebDAV (Members Only).
Here you can check the connection URL, username, and password.
Step 3: Get your WebDAV credentials
After enabling WebDAV, you’ll see three items: the endpoint URL, username, and password.
The password is hidden by default, so tap the ⋮ icon to reveal it and write it down.
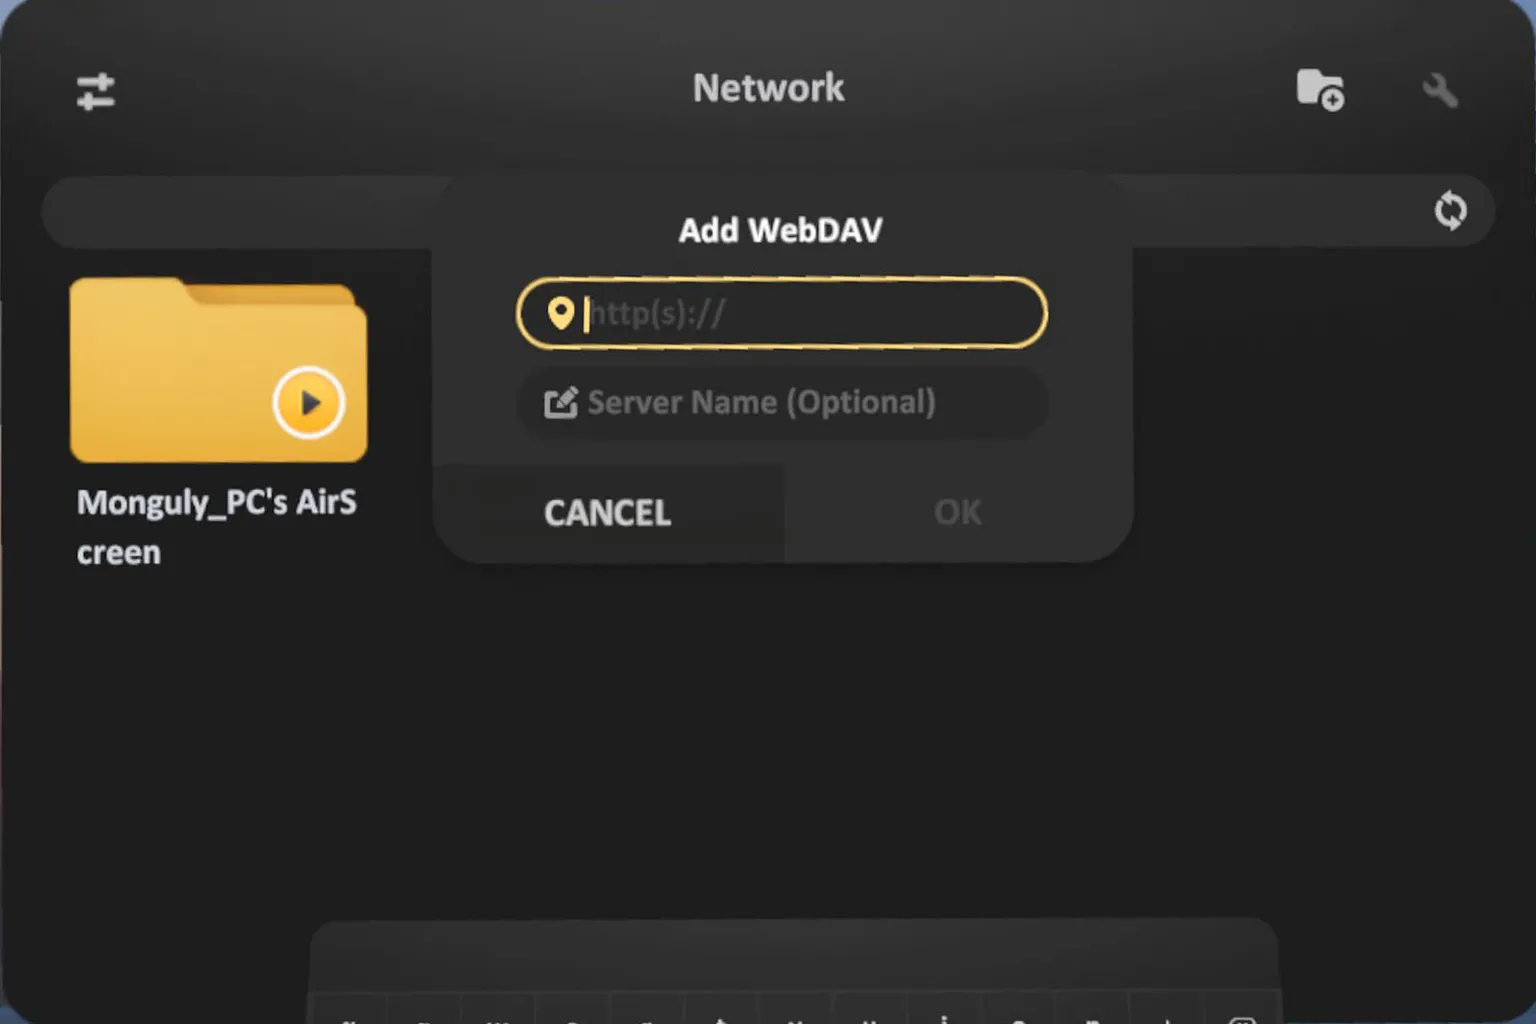
Step 4: Connect to WebDAV storage
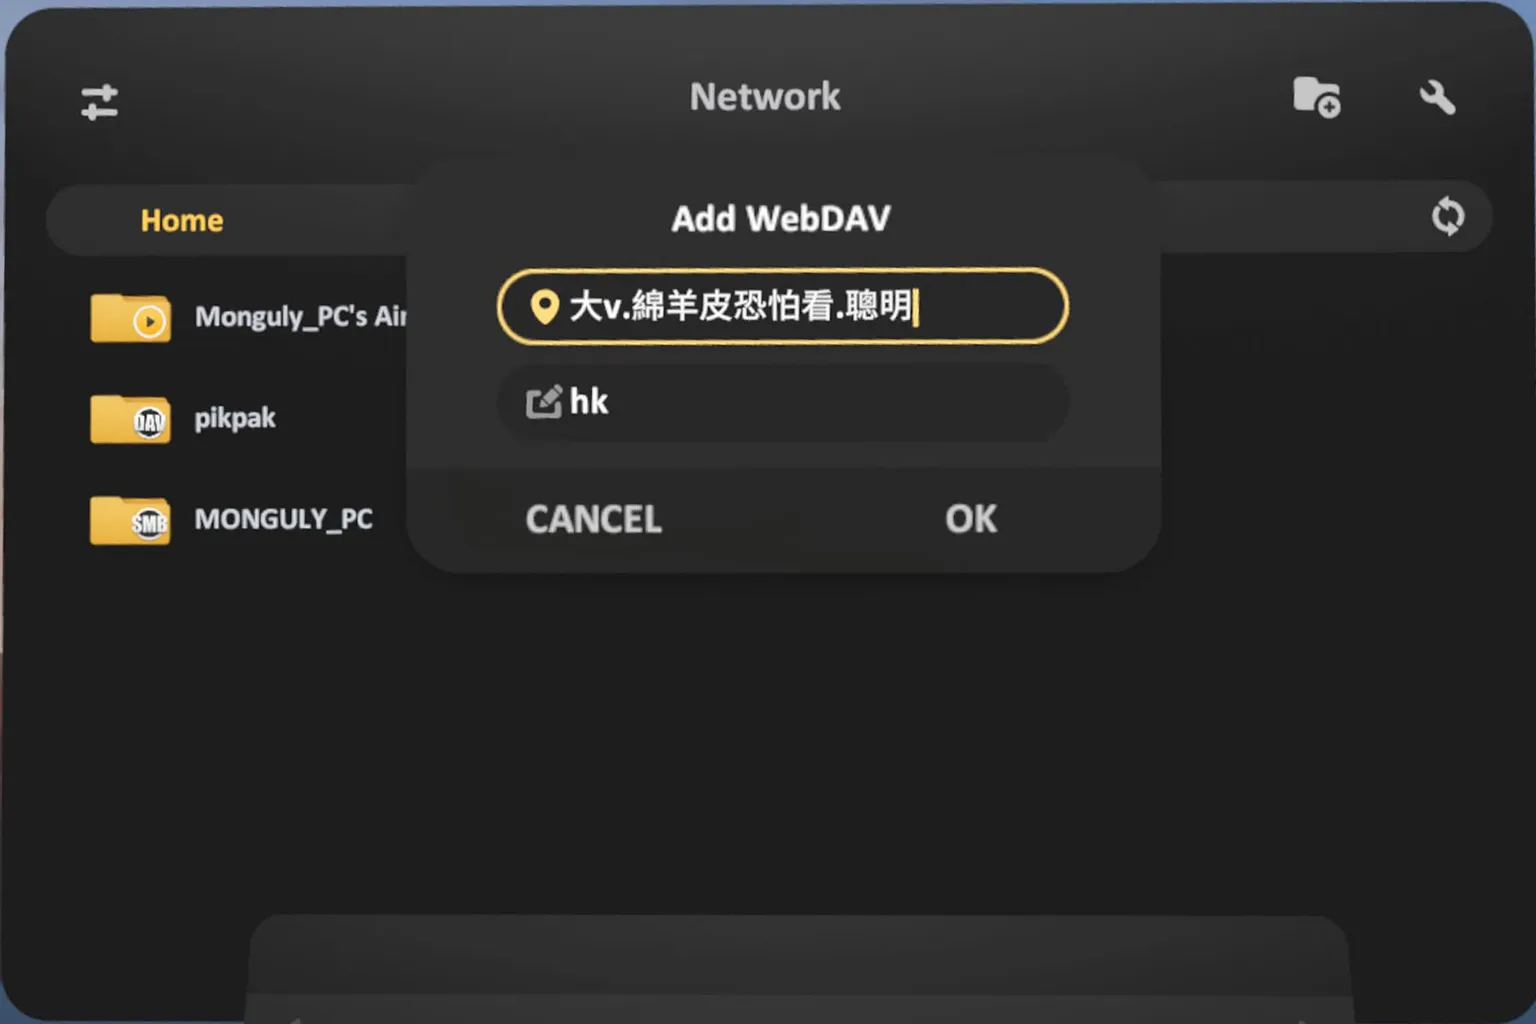
Go to Local Network → Add WebDAV, then enter the WebDAV URL you copied and a server name you can easily recognize.
Important: the URL must start with http://, or the connection won’t work.
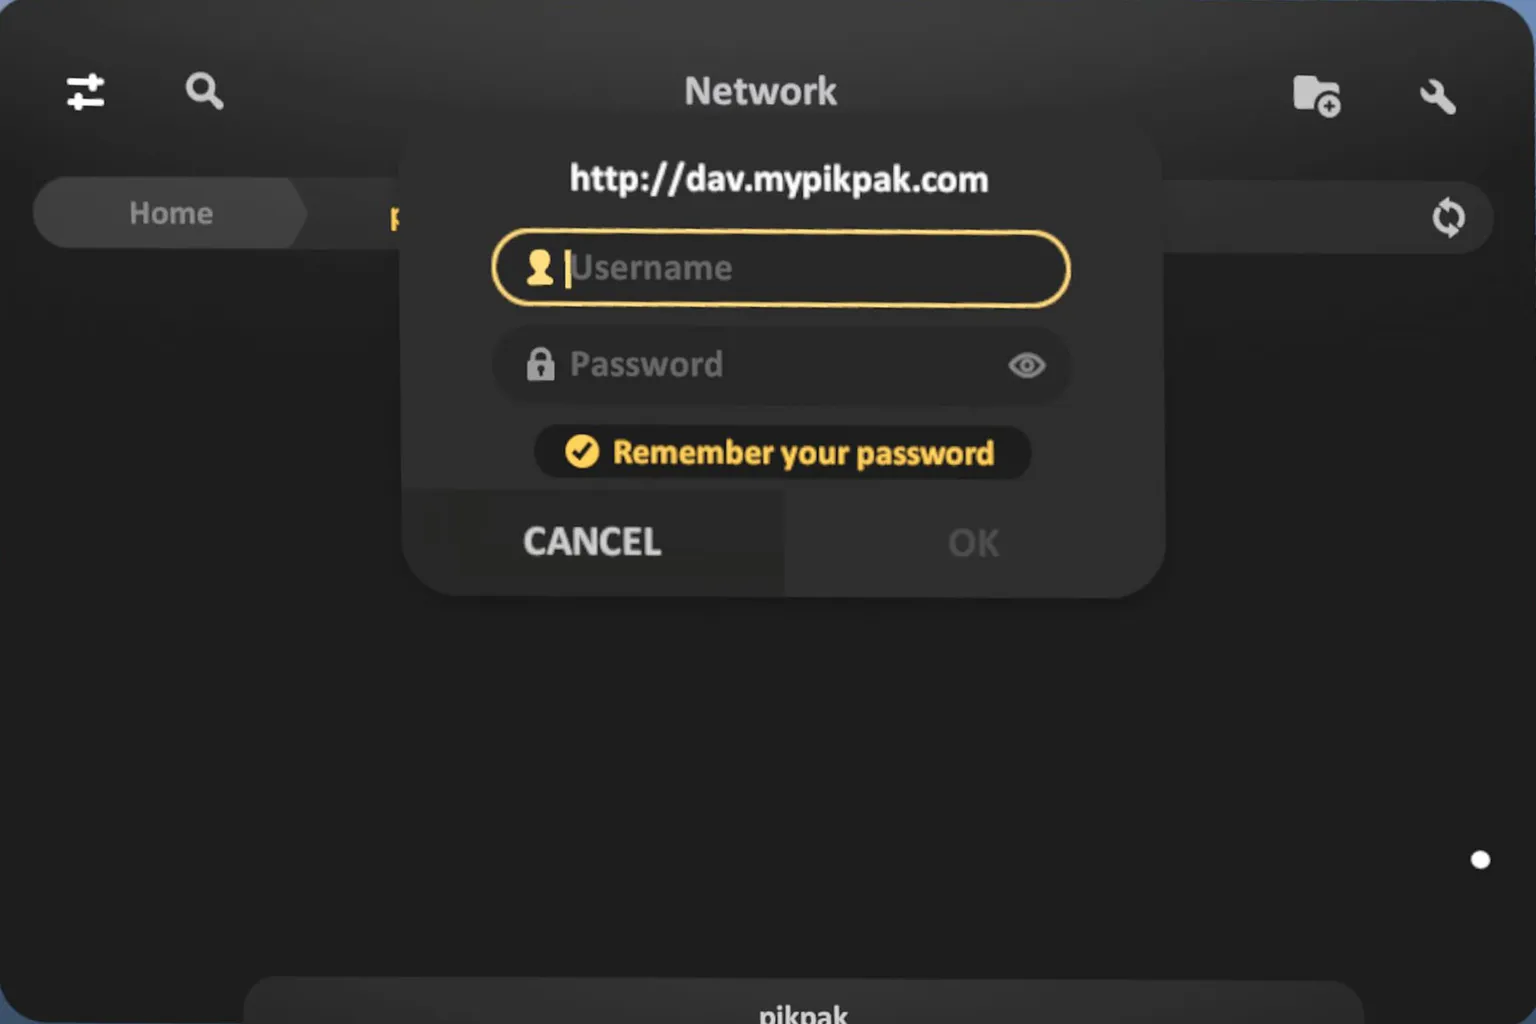
Enter the username and password, and the connection will be completed.
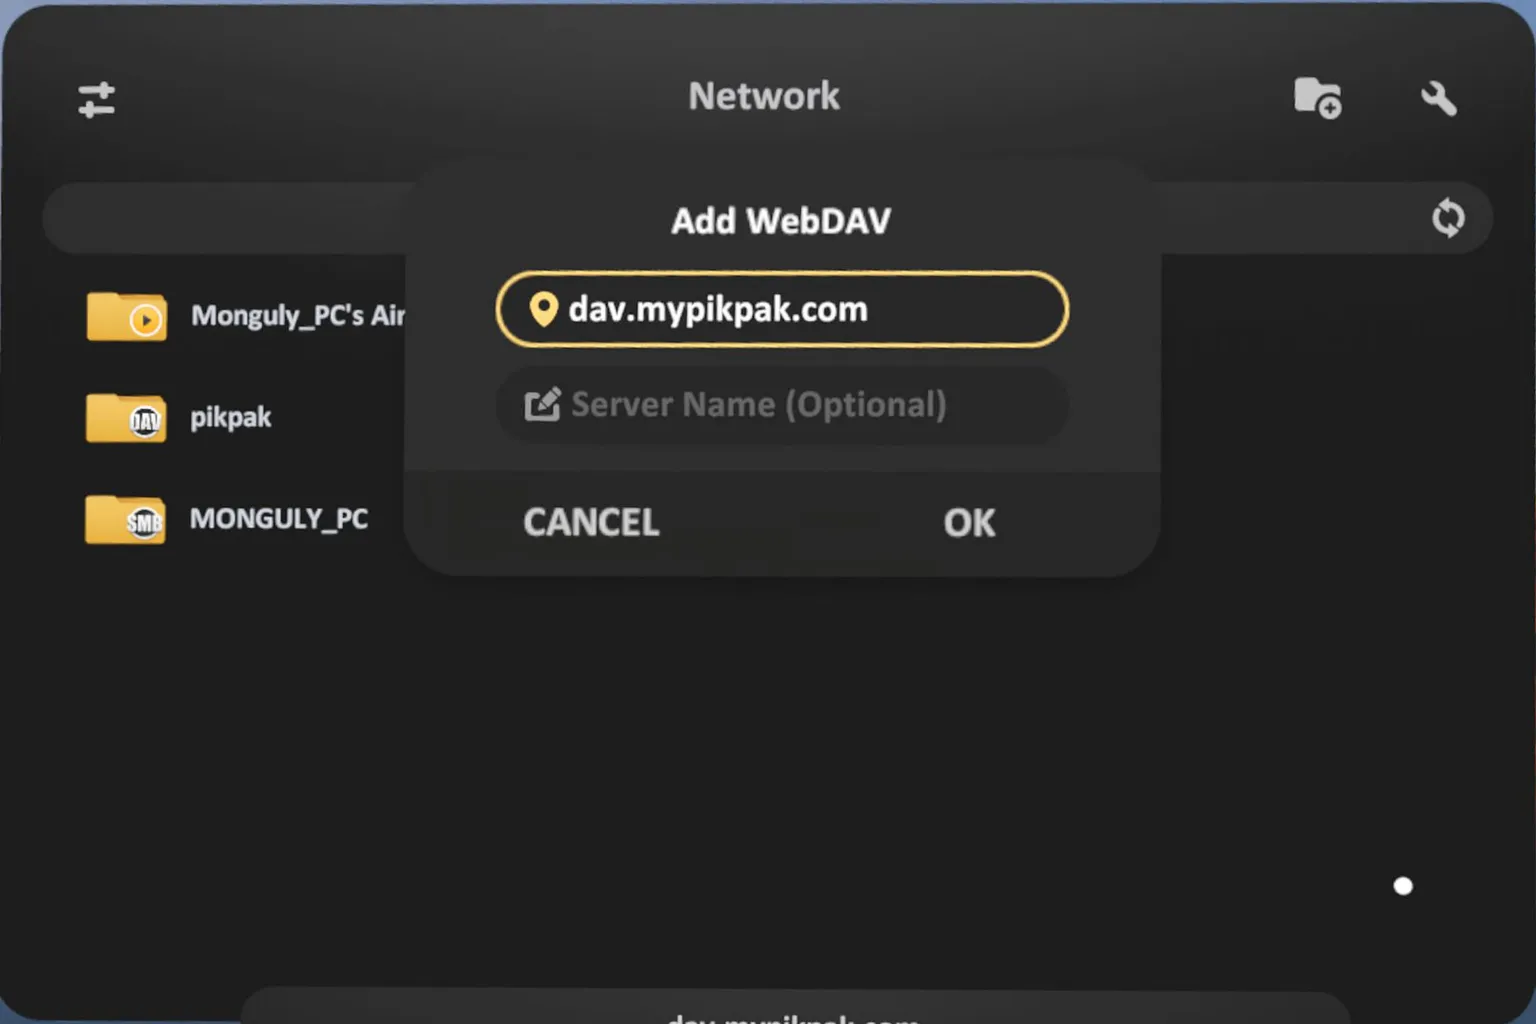
Step 5: Use the WebDAV storage
Once connected, your cloud folders will appear under Local Network.
Just select a file and it will start playing immediately.

Error 1: Cannot Connect
If you enter the URL without http:// at the beginning, it simply won’t connect.
Error 2: Can’t type English properly
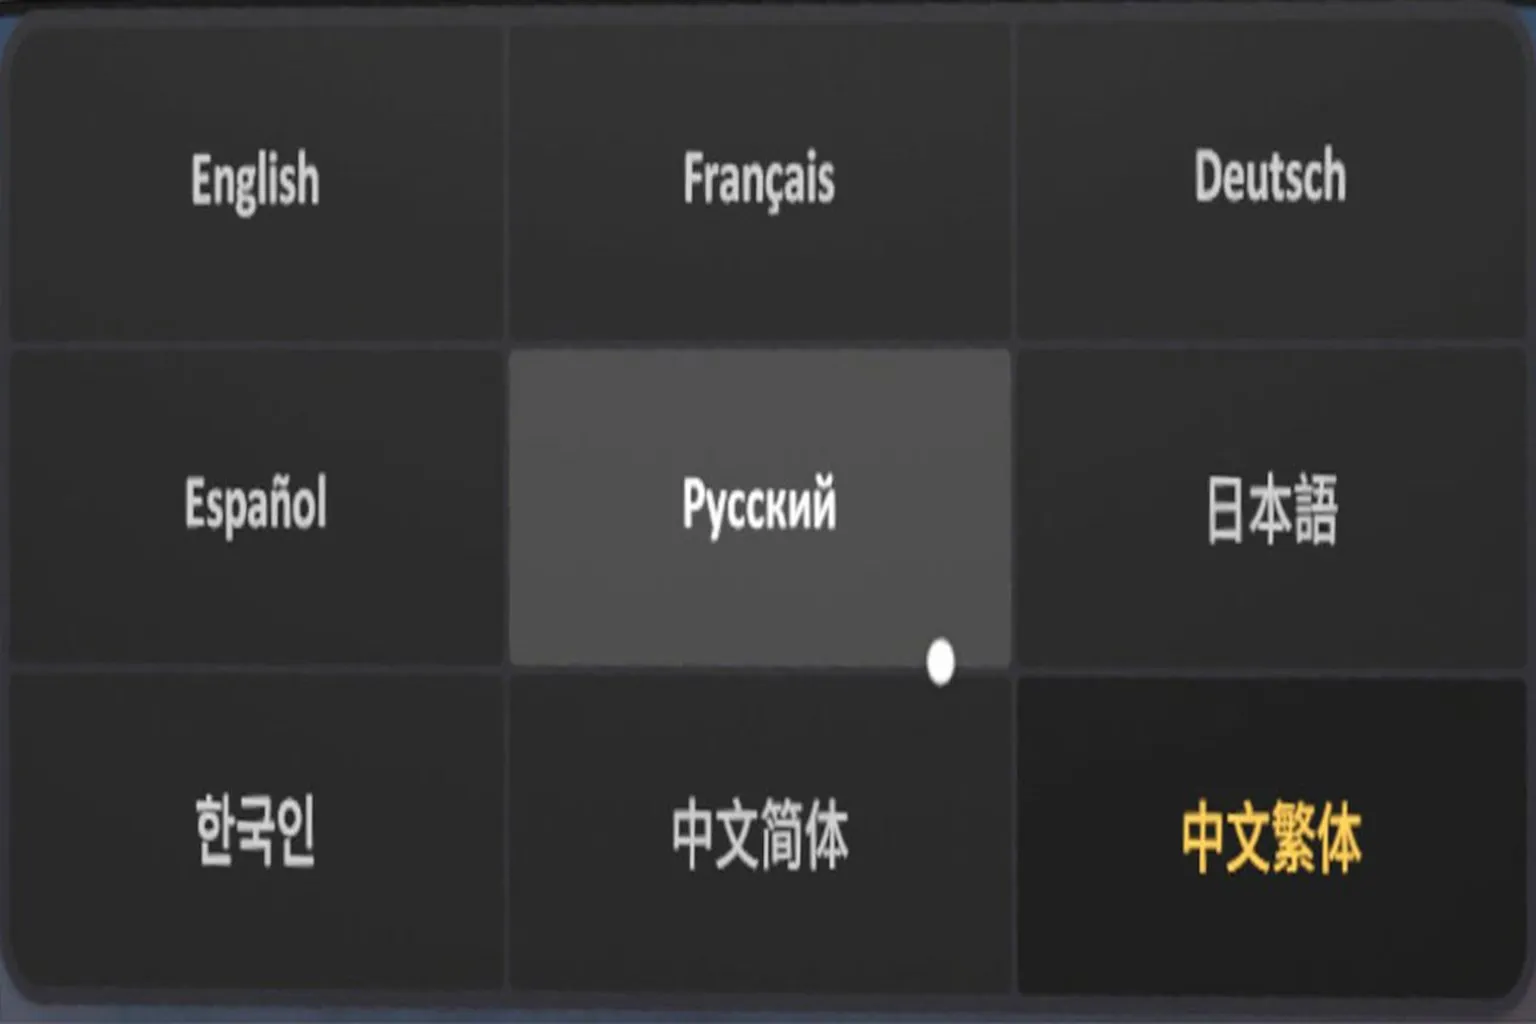
If your system language isn’t set to English, the input method may switch automatically (for example, Chinese Pinyin).
When that happens, the URL formatting can break, and the connection will fail.
Switch the keyboard input to English first, then try again.
If you see this situation, tap the 🌐 key on the keyboard.
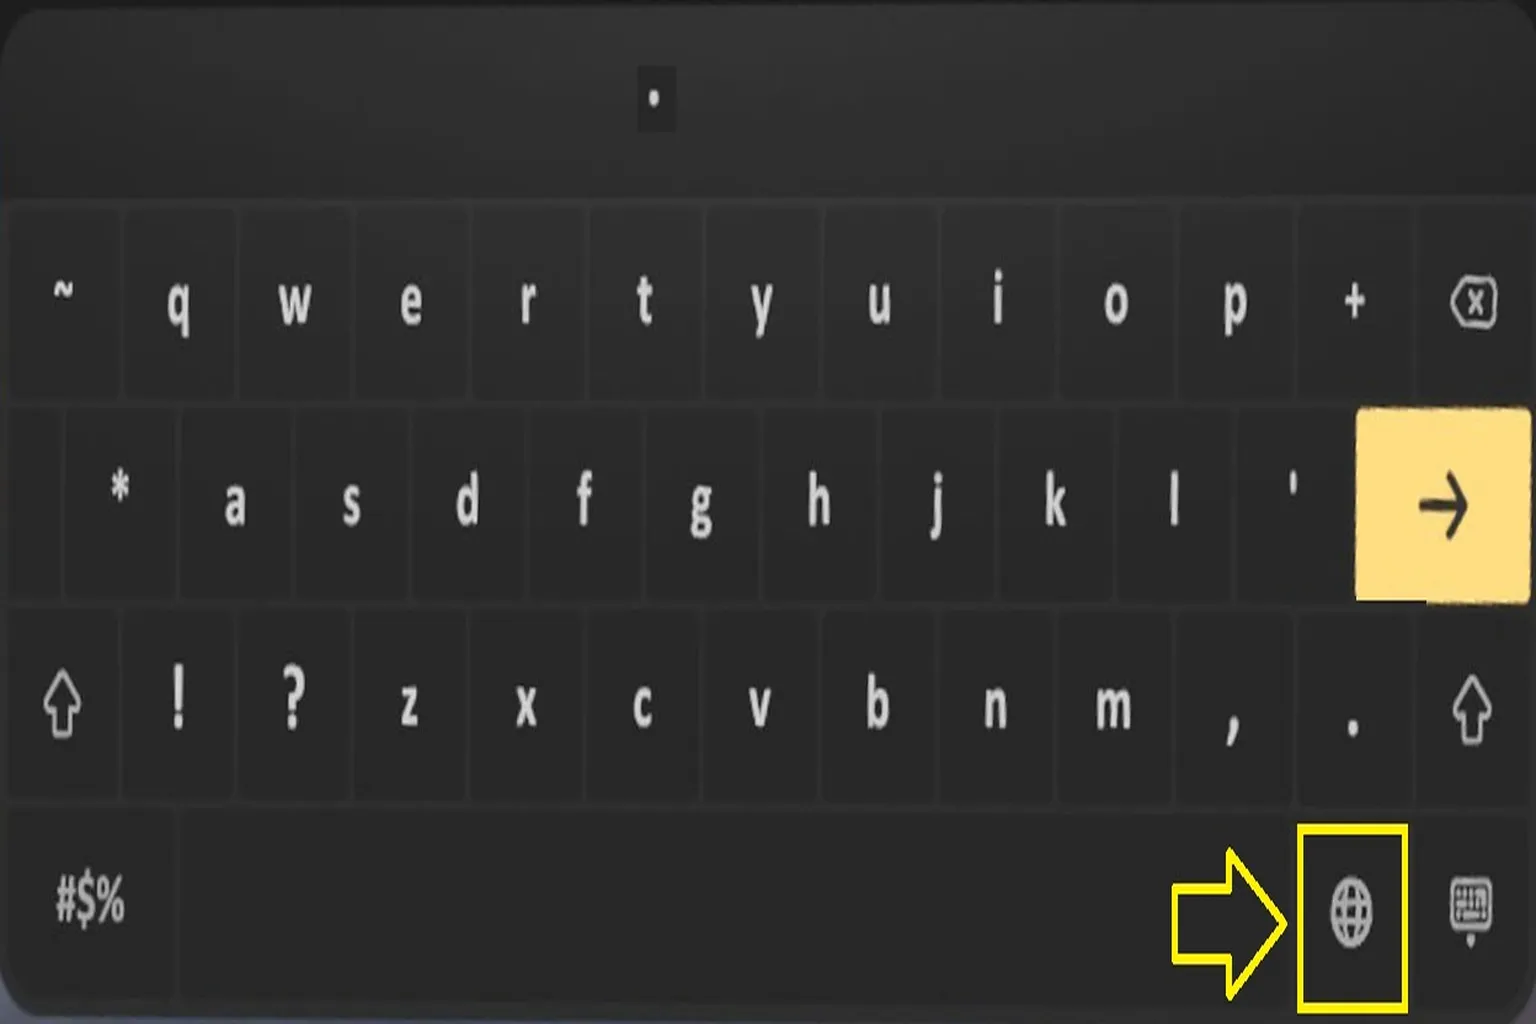
Switch the input language to English, and you’ll be able to enter the URL correctly.
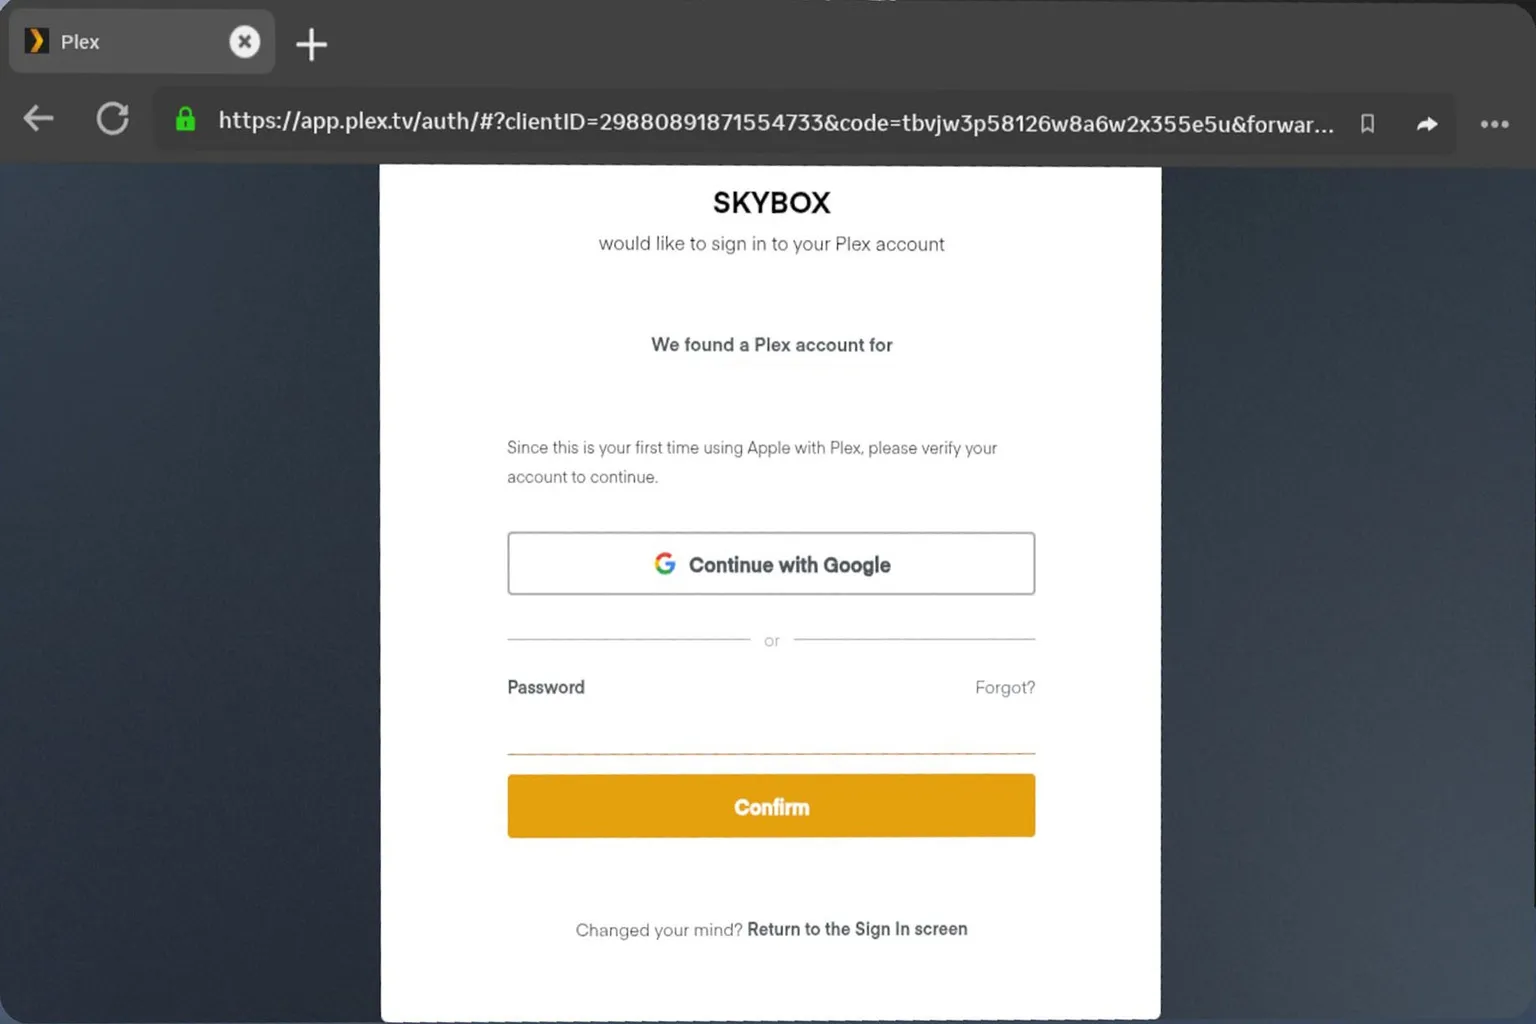
Plex
Plex was newly added in version 2.0, and on paper it supports three login methods: Google, Apple, and Email.
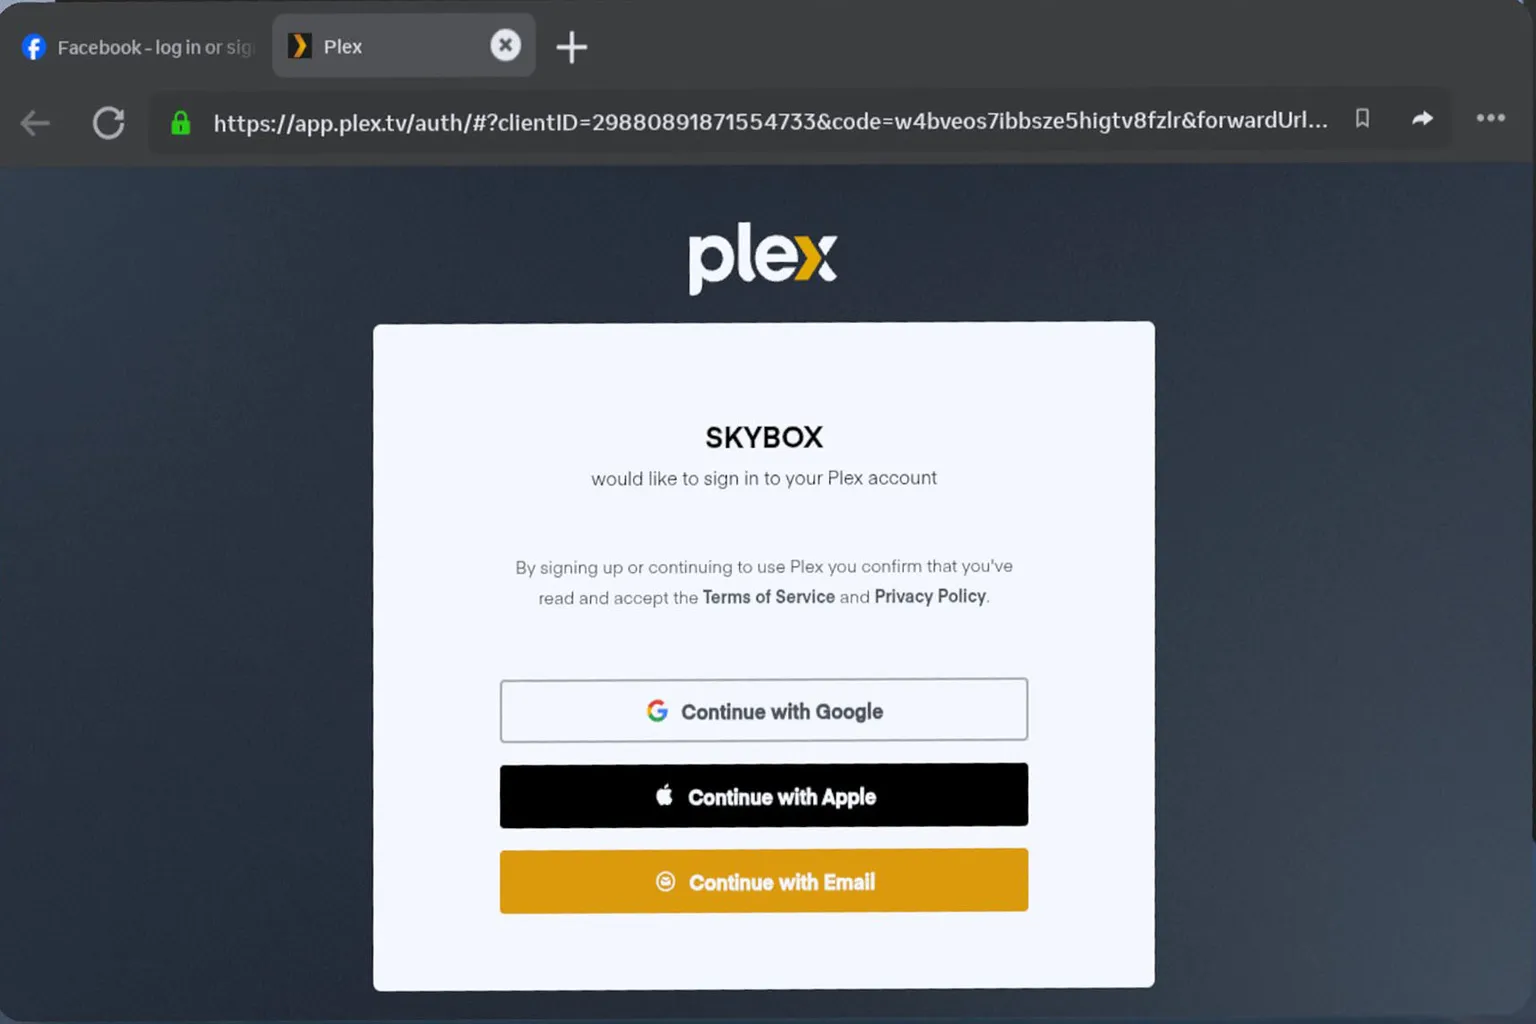
But honestly… none of them really work right now.
- Google login just doesn’t work at all.
- Apple login lets you in at first, but then it asks you to log in again using Email or Google anyway.
- Email login is even worse — you enter your password, and it still fails.
So yeah, Google, Apple, Email — all broken.
At the moment, Plex login is basically unusable in Skybox.
Best move for now is to just wait for the next update and hope they fix it.
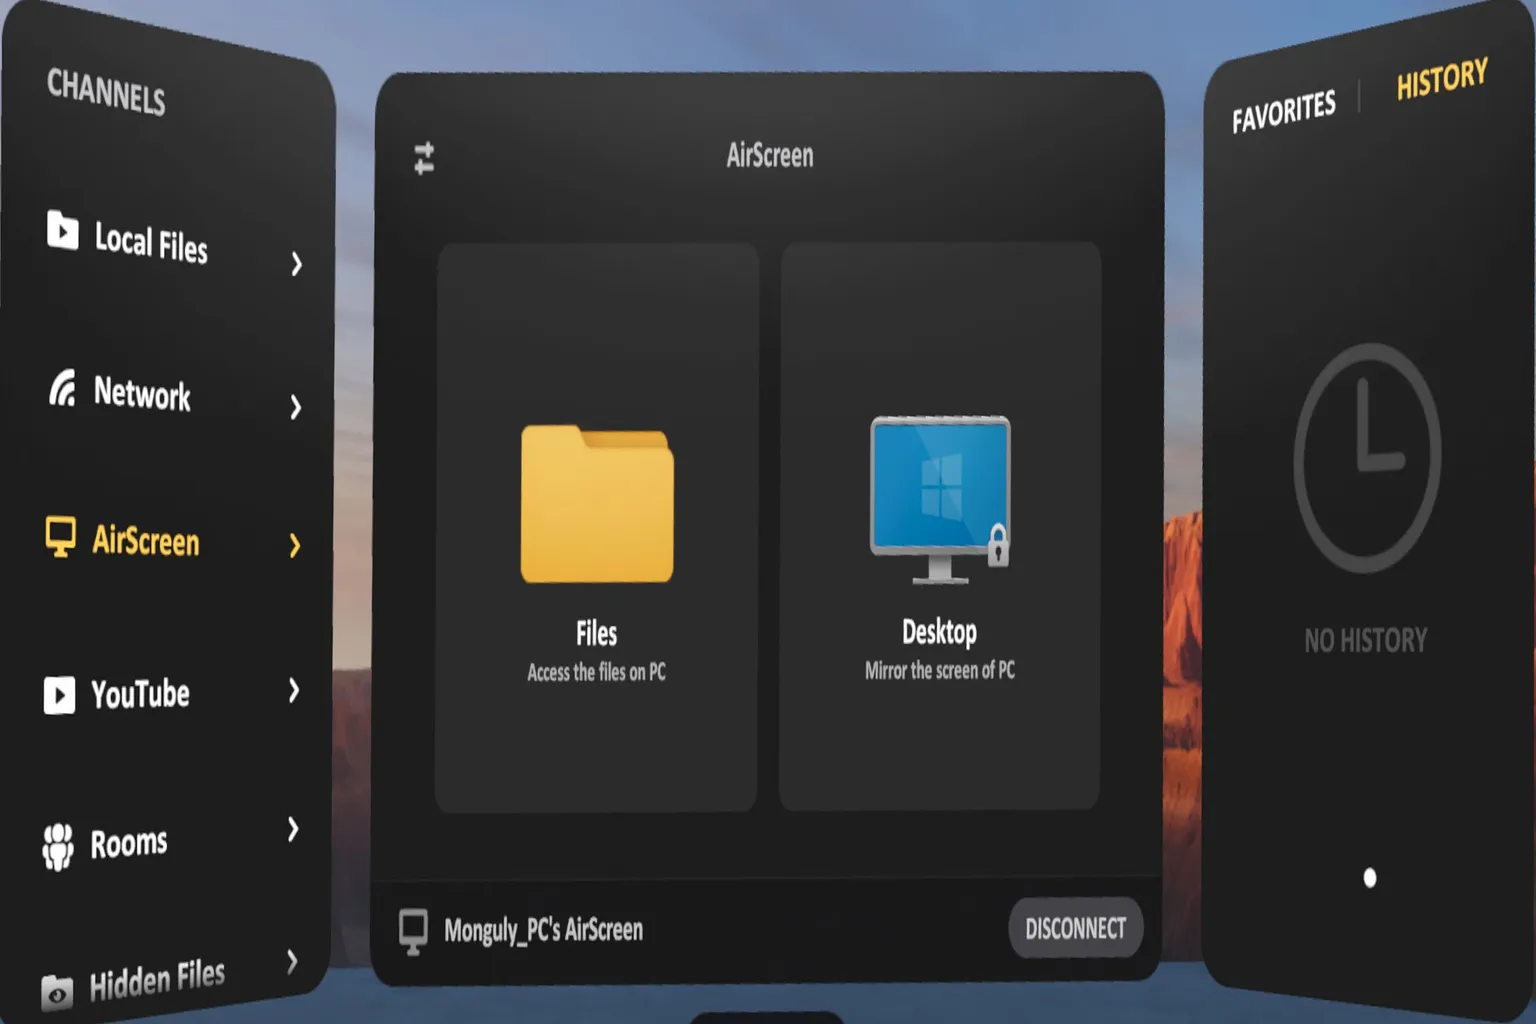
AirScreen
Most video players come with their own streaming tools to make it easy to connect to a PC.
Skybox’s AirScreen is a bit different though — it doesn’t just stream videos, it can mirror your entire PC desktop directly inside VR.
Before using it, install the AirScreen client on your PC and set up the folders you want to share.
Playing videos with AirScreen
Step 1: Visit the official website
To use AirScreen, you first need to download it from the official Skybox website.
Once you’re on the site, click Get the App in the center of the page.
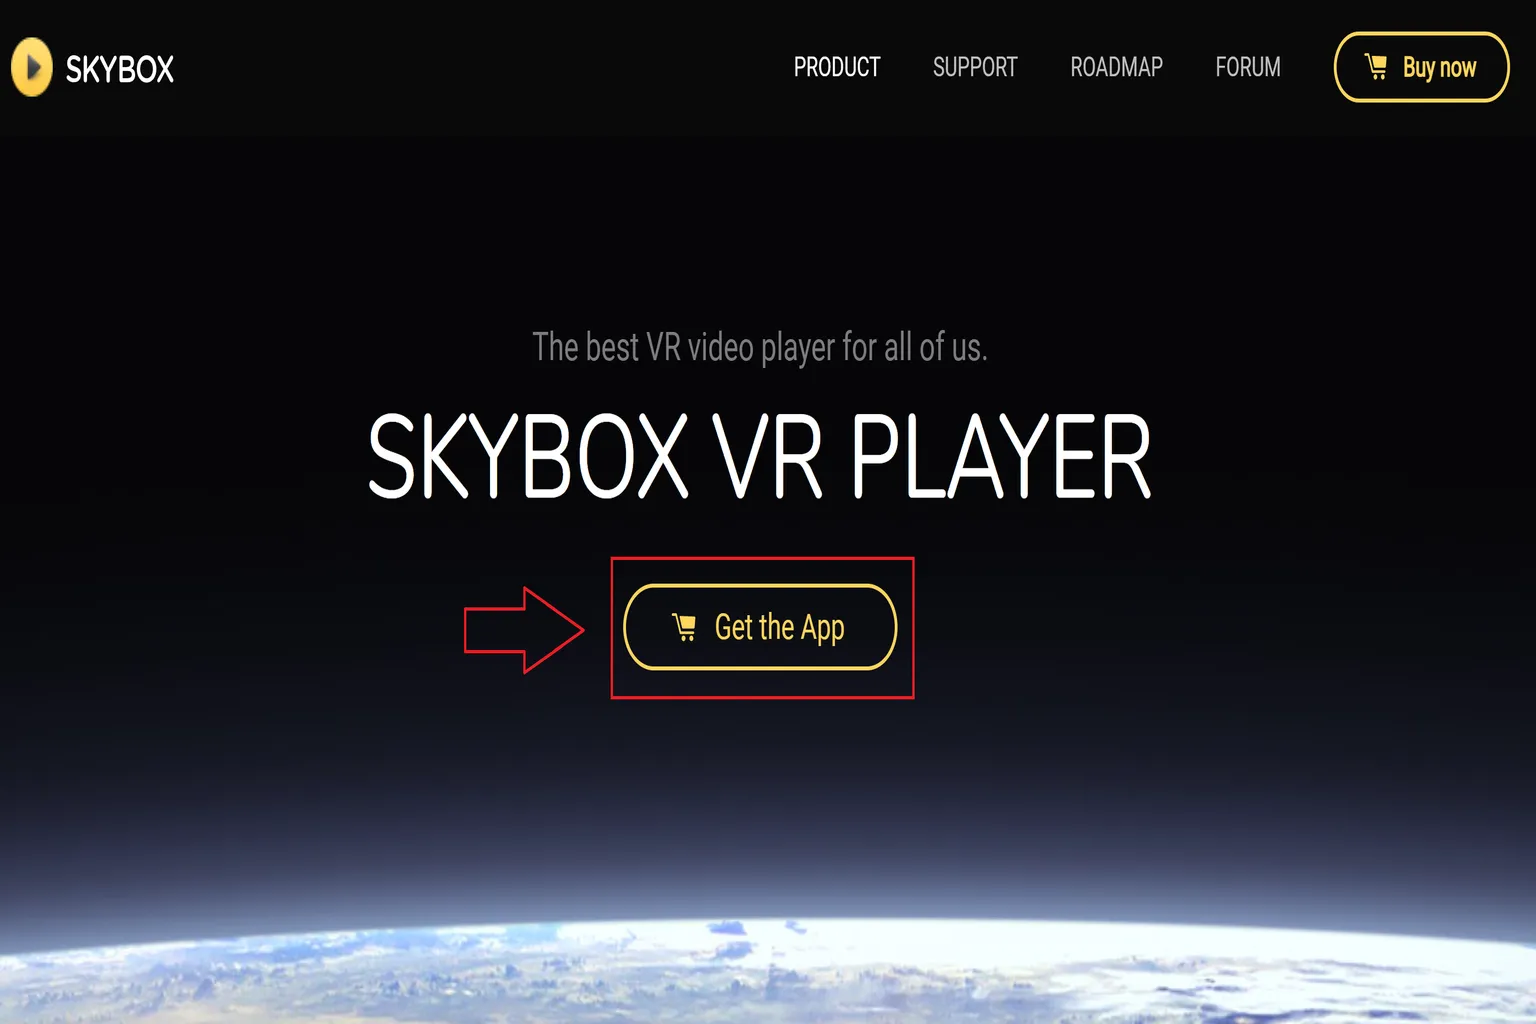
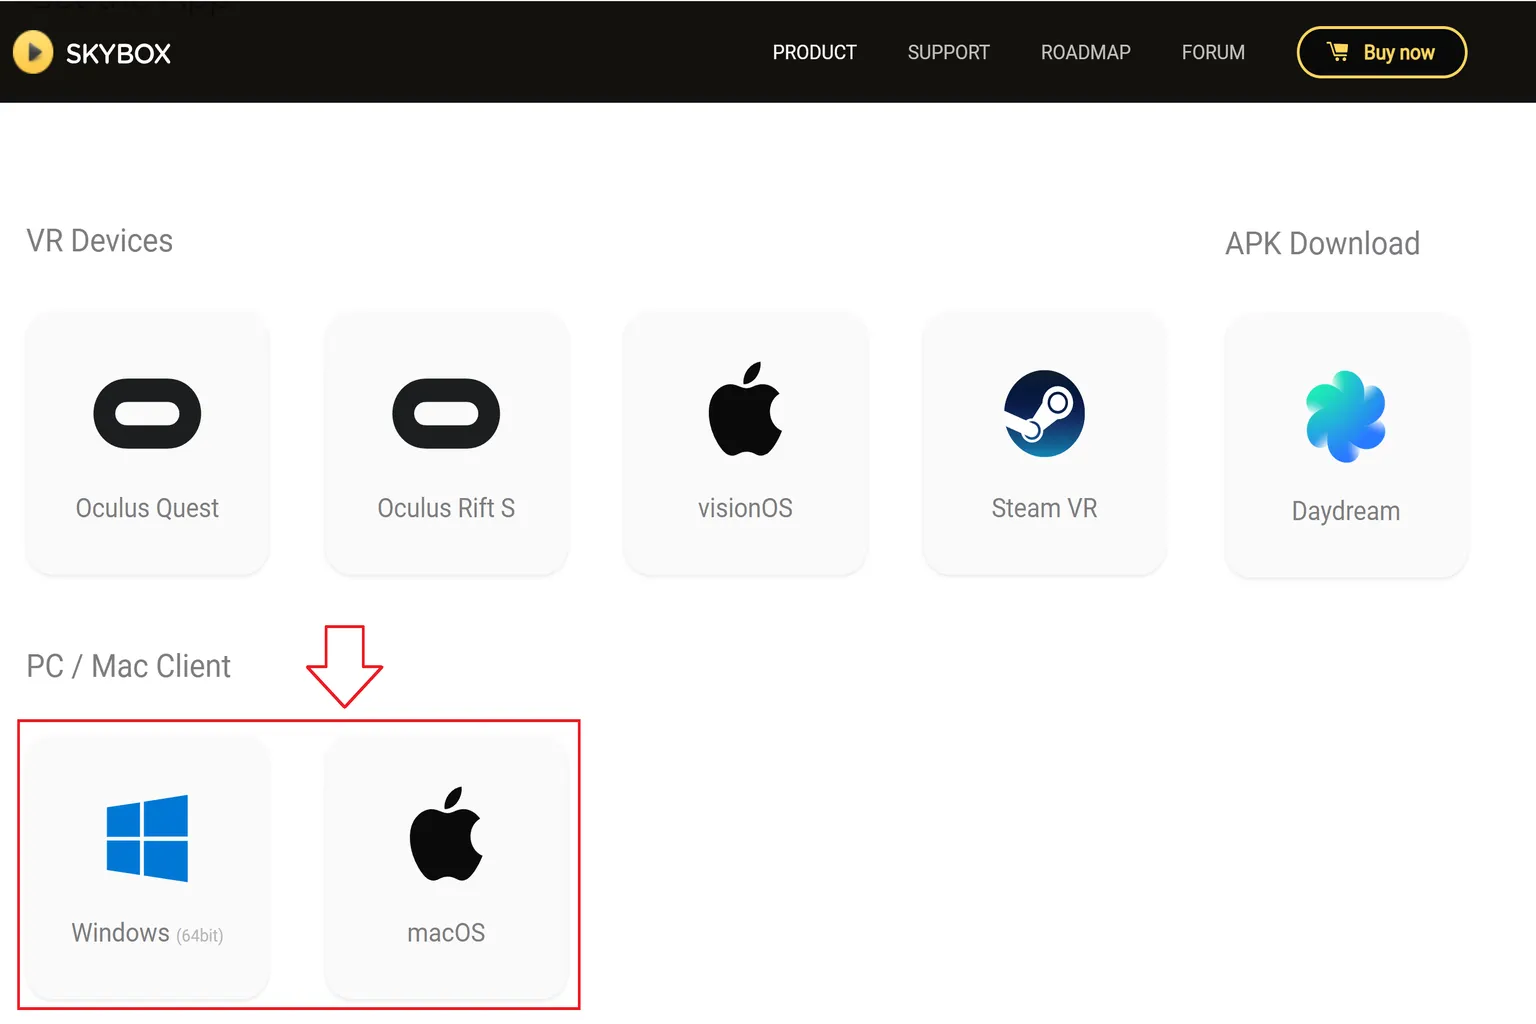
Scroll down and choose Windows or macOS, then download the version that matches your system.
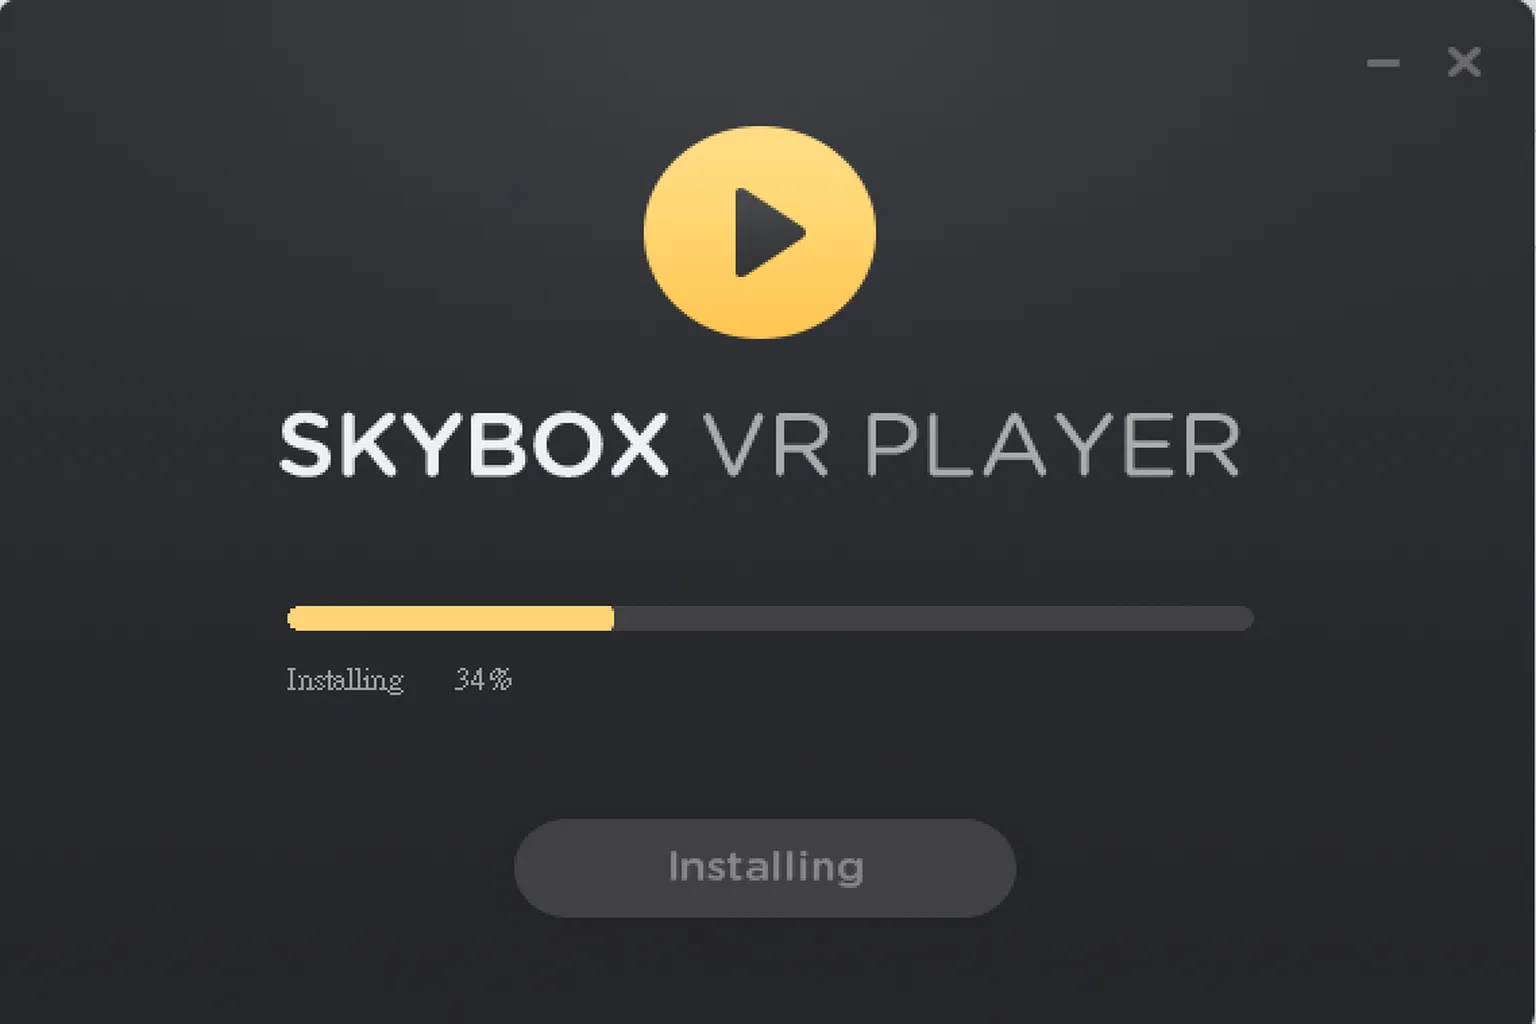
Step 2: Install and launch the software
Install the downloaded software on your PC. When the installation is finished, launch it.
You’ll see the Skybox VR Player PC interface.
Click the ADD button in the top-left corner to add the files you want to share.
Step 3: Add content to share
Click ADD in the top-left corner of the screen, and you’ll see four types of content you can add:
- ADD Folder: Add an entire folder
- ADD File: Add a single video file
- ADD URL: Add an online video URL
- ADD YouTube Account: Add a YouTube account
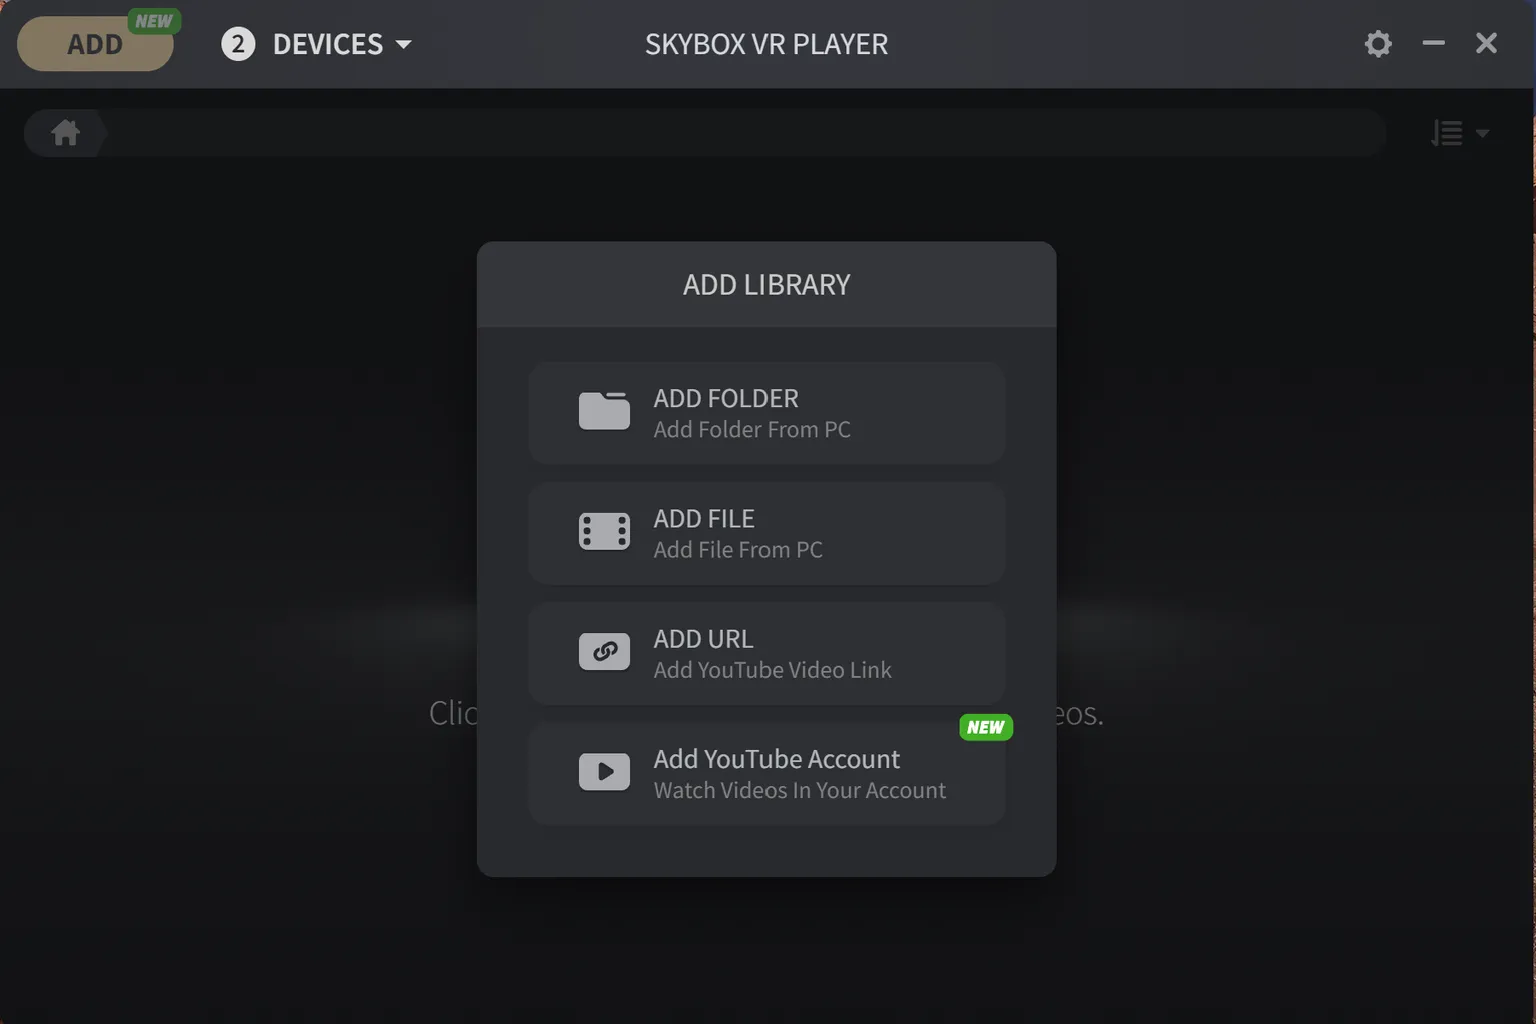
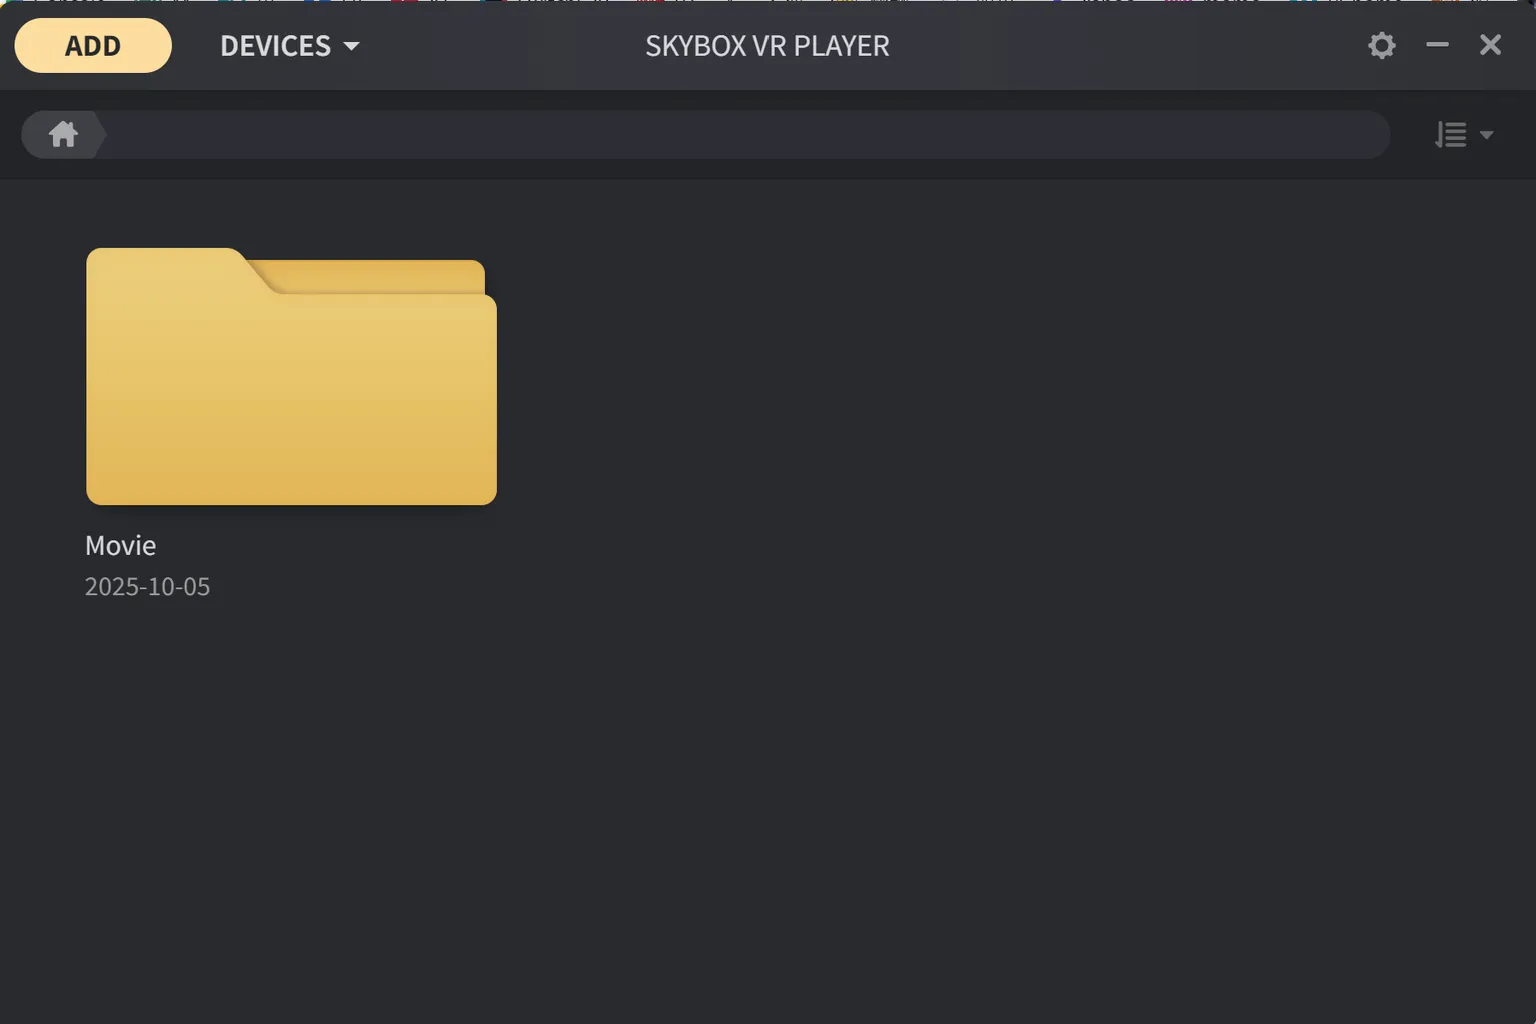
The most commonly used option is ADD Folder.
Once you select the folder you want to share, it will appear directly in Skybox’s main menu.
Note: Adding URLs
If you want to share online video URLs (for example, files hosted on Google Drive or Microsoft OneDrive), just paste the URL here.
You can paste multiple URLs at once, and when you’re done, click ADD to add them to the shared list.

Step 4: Play via AirScreen
Go back to the headset’s main menu and select AirScreen, then choose the connected PC shown on the right.
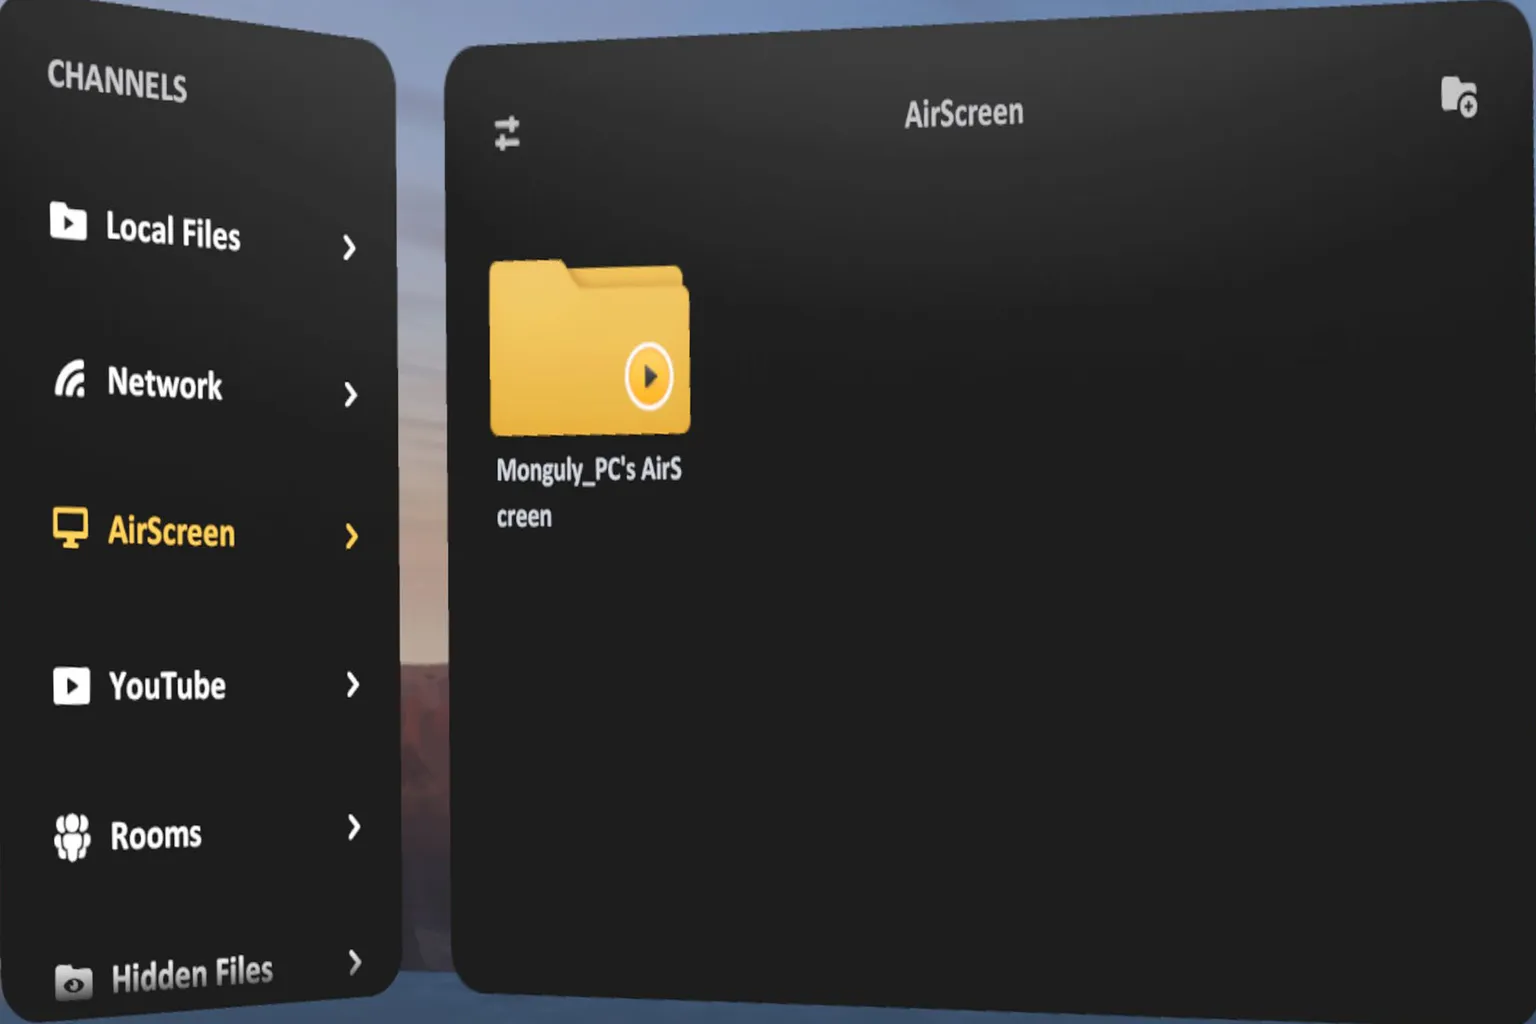
Once connected to the PC, select Files from the left-side menu.
Step 5: Play a video
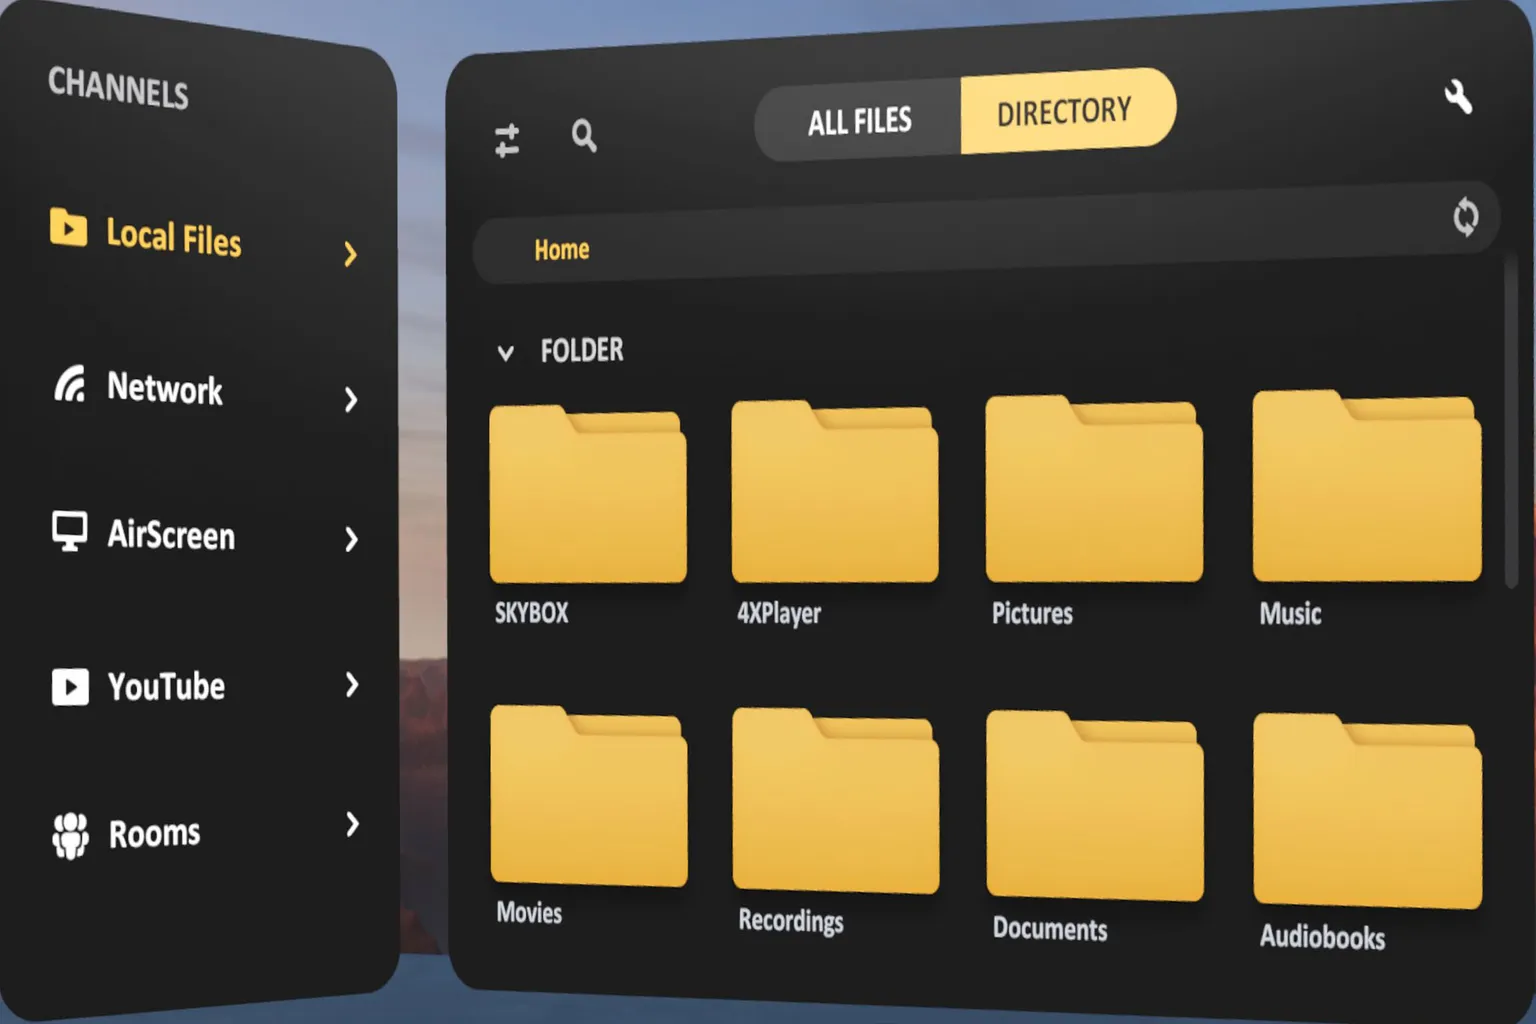
After the connection is established, you’ll see a list of the shared videos.
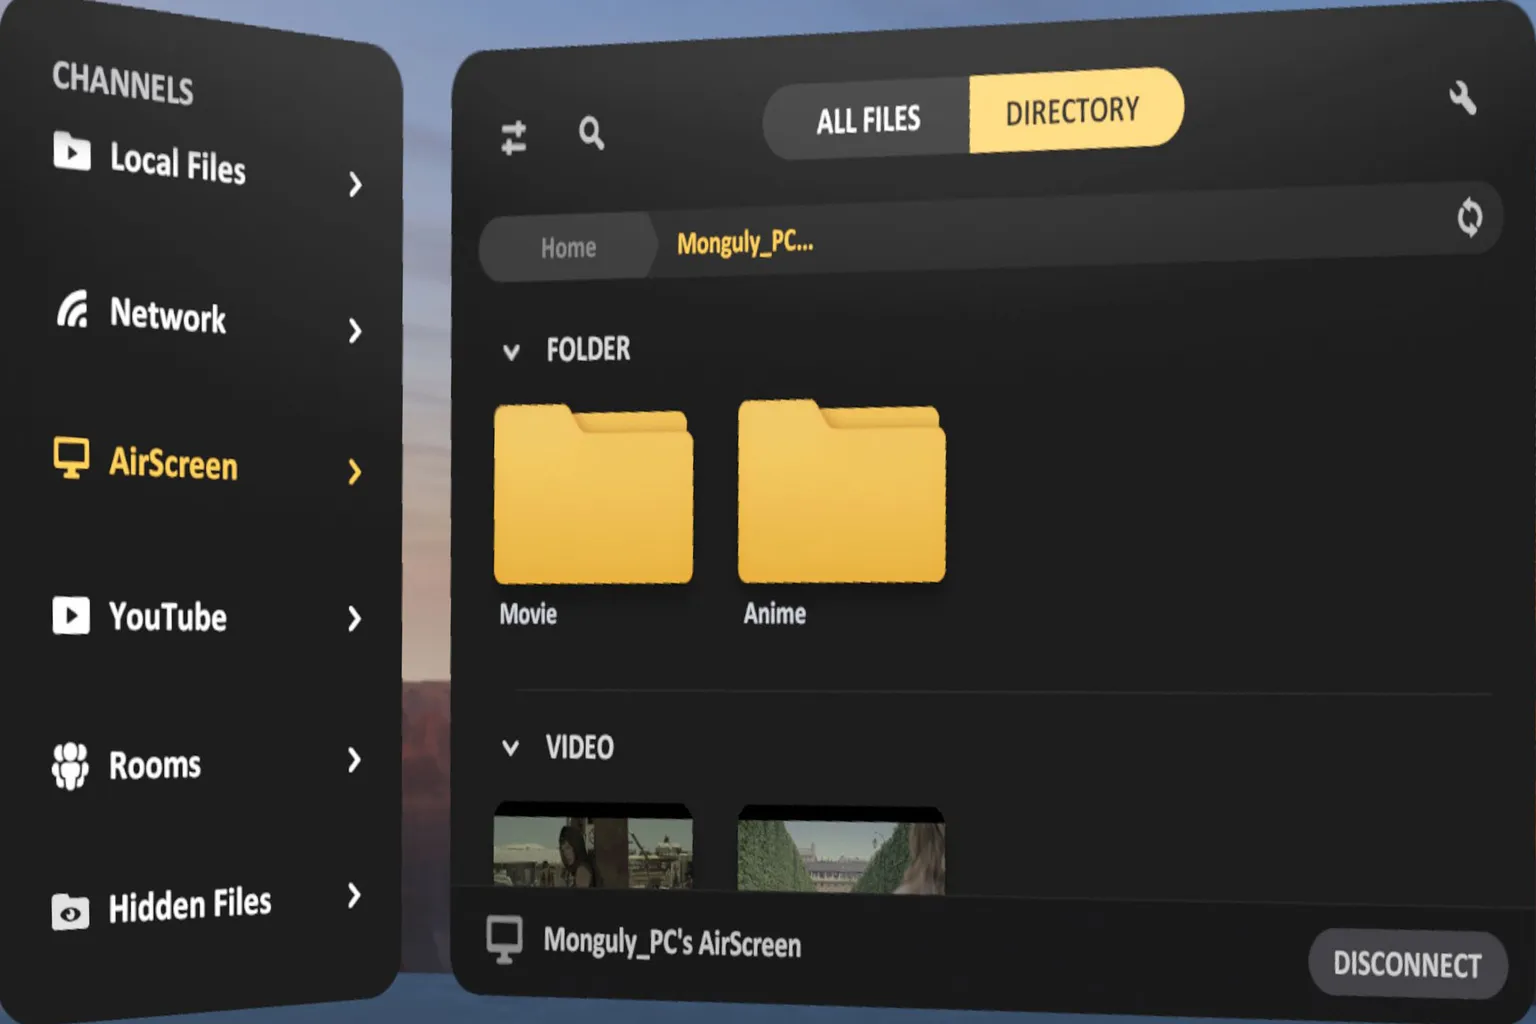
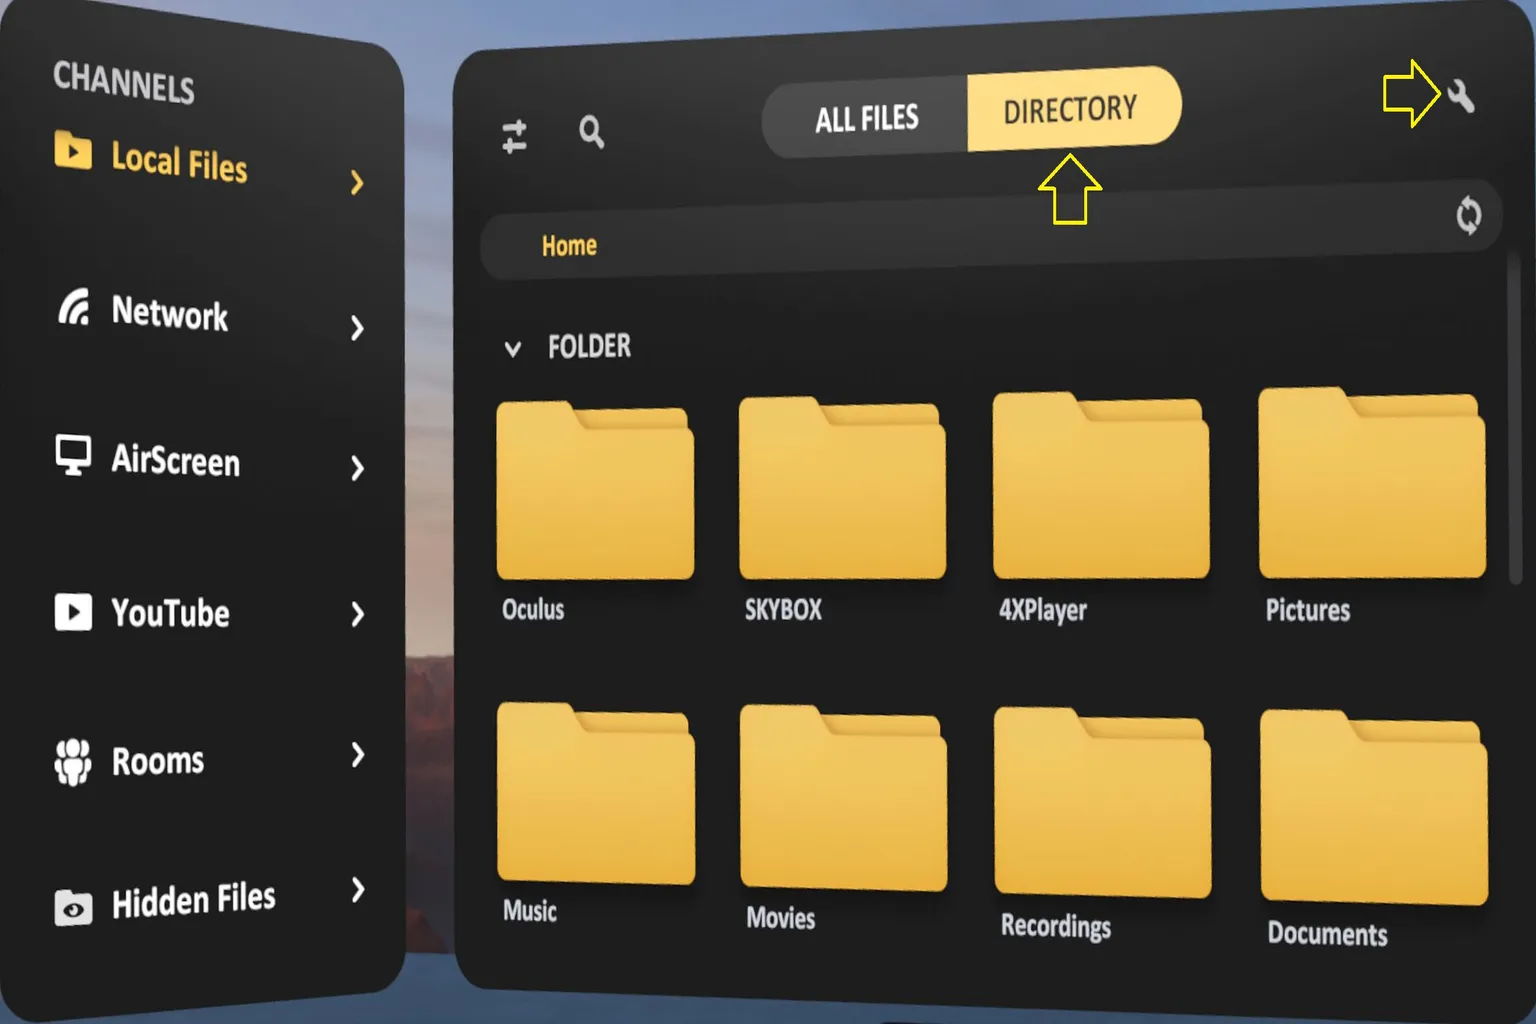
There are two display modes:
- All Files: Shows all shared video files in a single list
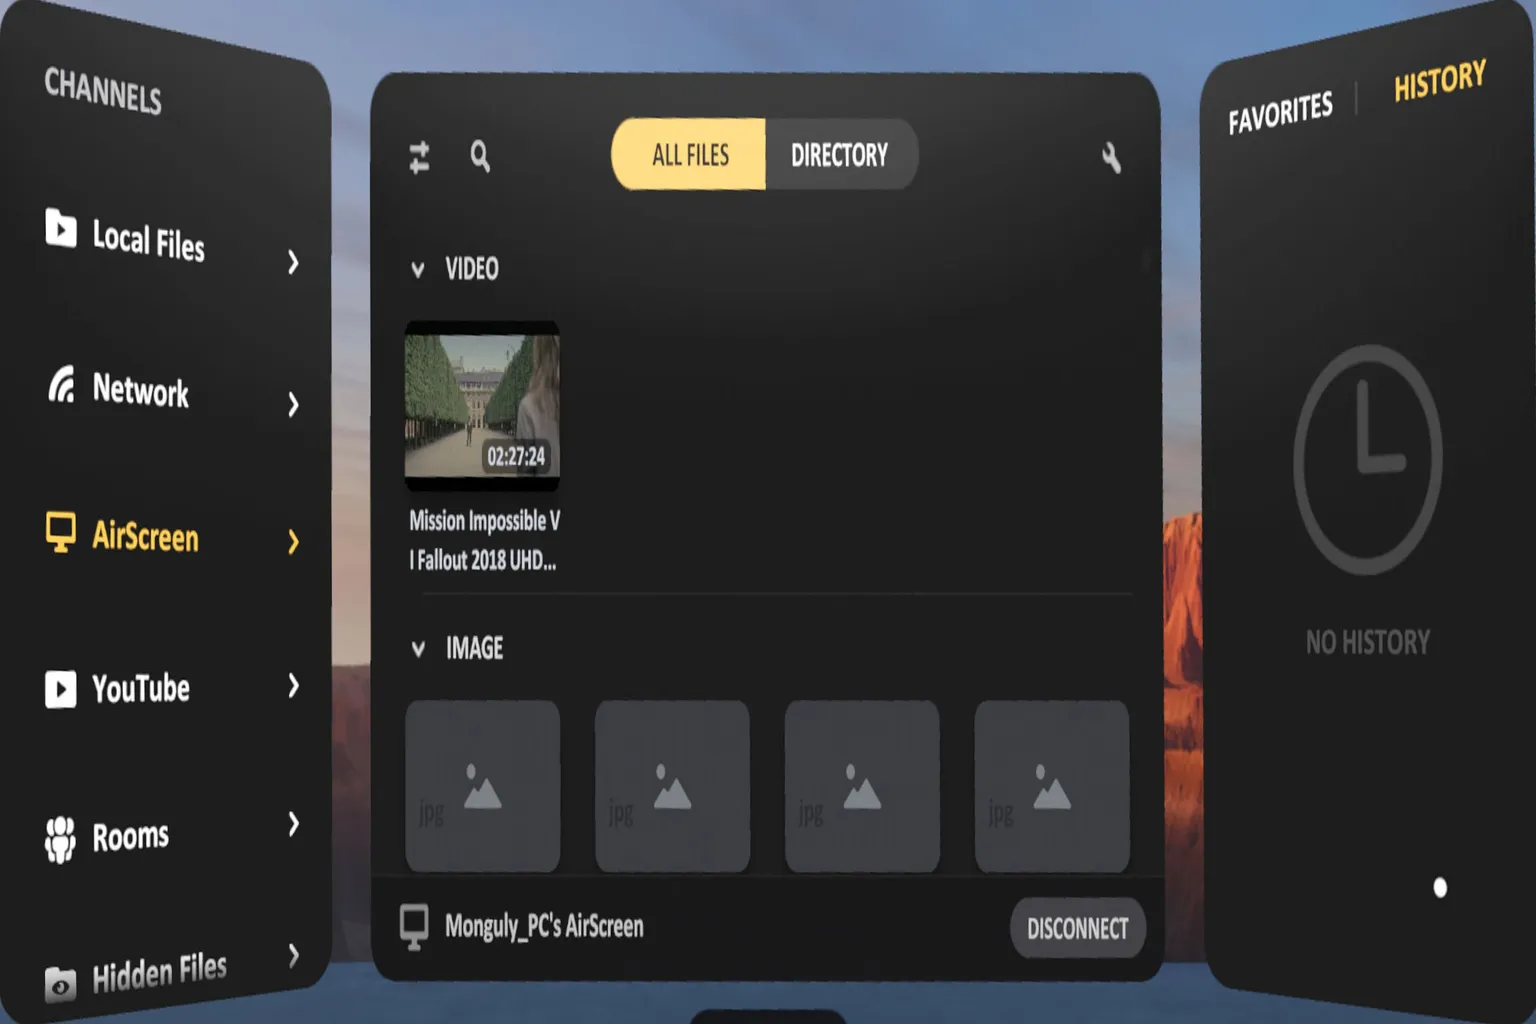
- Directory: Displays videos organized by their original folders
AirScreen Desktop Mirror (PC Screen Streaming)
AirScreen also has a more interesting feature called Desktop Mirror, which lets you display your entire PC screen directly inside VR.
You can use the headset like a virtual PC monitor, so it’s useful for more than just watching videos.
Step 1: Open Desktop mode
Open AirScreen in the headset and select Desktop from the options on the right.
Step 2: Pair the headset
The first time you use this feature, pairing is required.
The headset will ask for a pairing code, so enter the 4-digit code shown in the PC version of AirScreen.
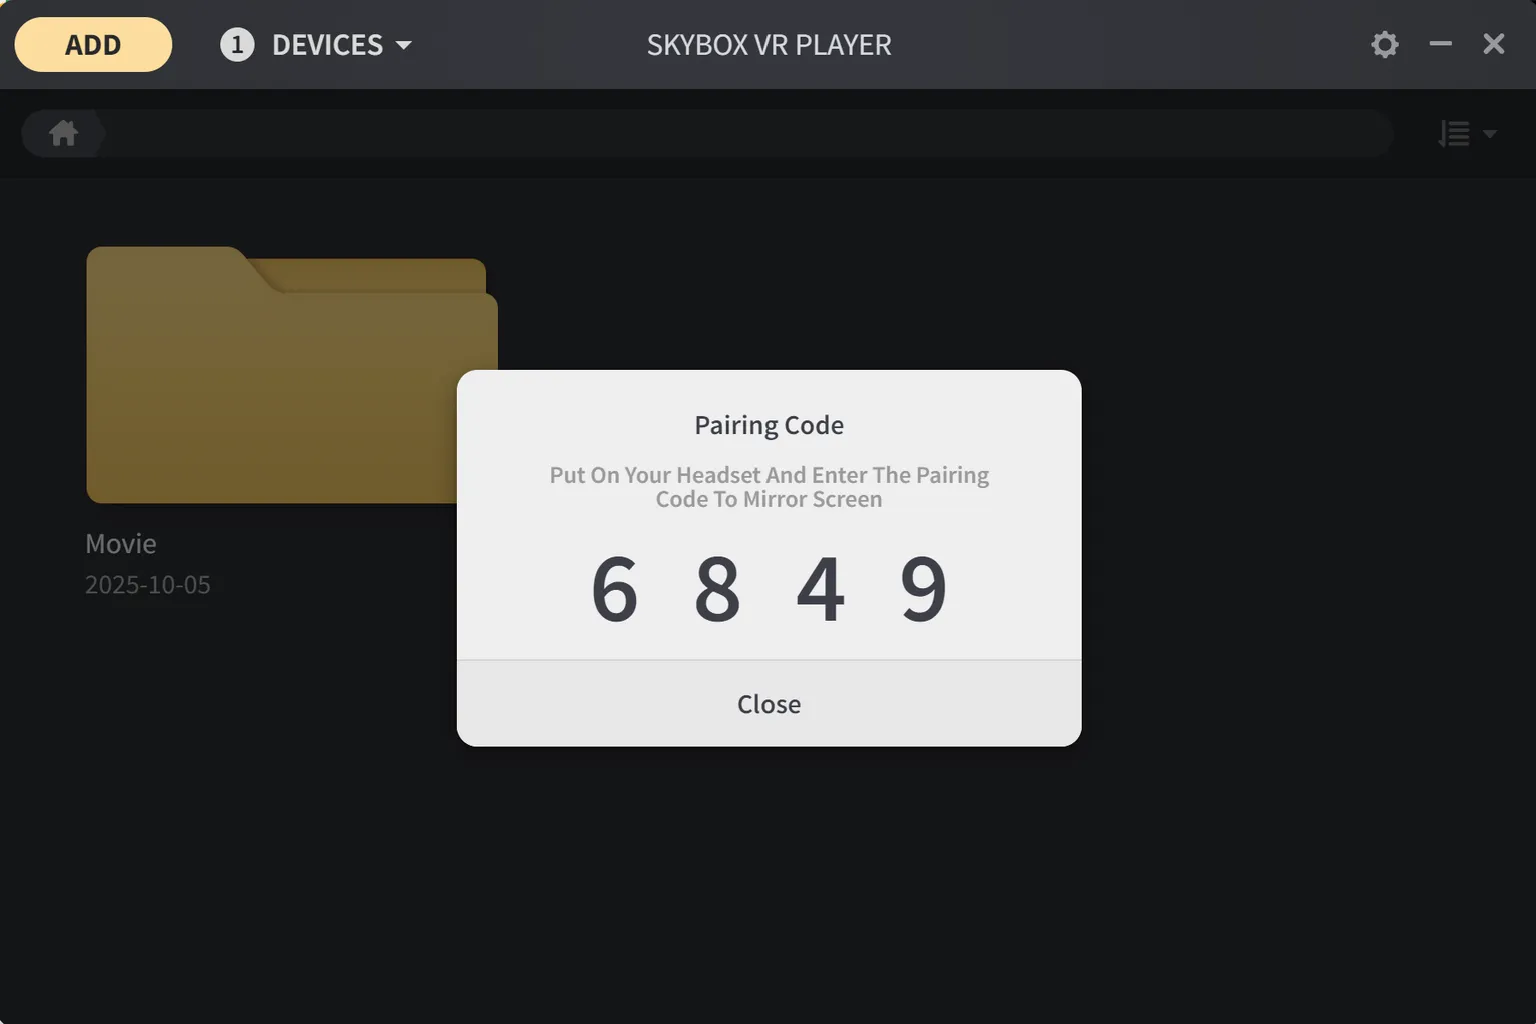
Once you enter the 4-digit code displayed on your PC, pairing is complete.

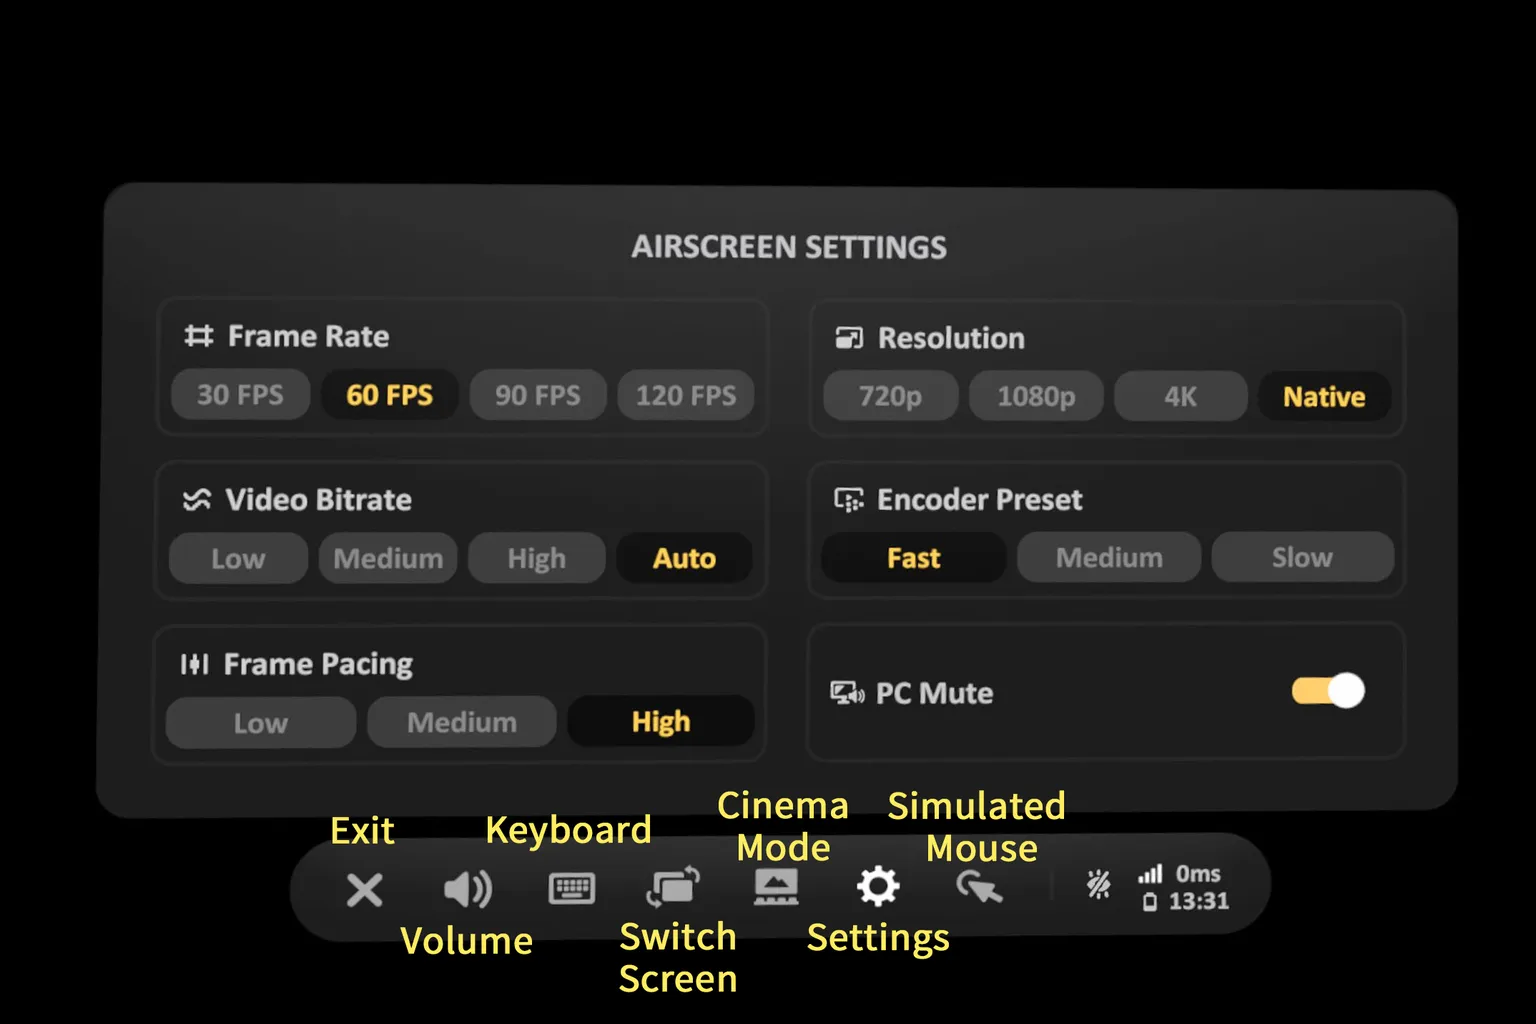
Step 3: Control menu overview
Once the PC connection is successful, a control menu appears at the bottom of the screen. From left to right, here’s what each icon does:
- ❌ : Exit the current connection mode
- 🔊 : Adjust volume
- ⌨️ : Open the virtual keyboard
- 🔄 : Switch screen orientation (portrait / landscape)
- 🖥️ : Change theater mode (switch scenes like cinema, space, etc.)
- ⚙️ : Settings (fine-tune things like frame rate and resolution, just like shown on screen)
- 🖱️ : Mouse emulation
Honestly, this one is pretty painful to use. Even clicking a single icon takes effort. If you’re connecting to a PC, using a real mouse is highly recommended.
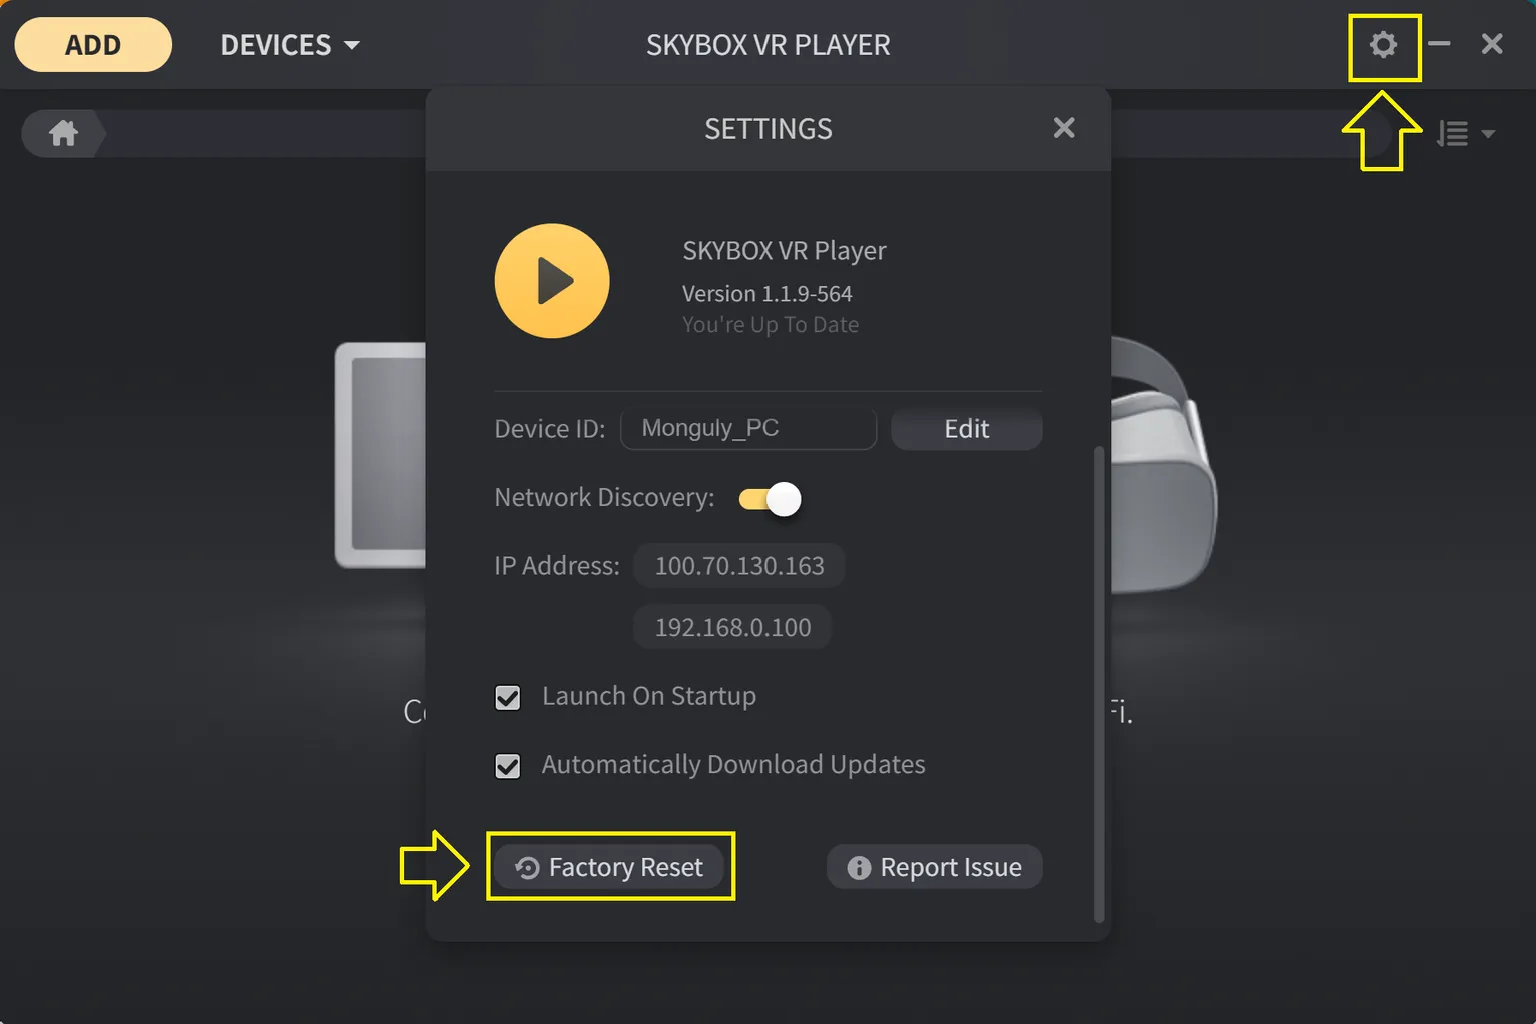
Since updating to version 2.0, PC connections have become noticeably slower.
It now takes around 10–20 seconds just to connect, and the latency is pretty bad — to the point where it’s honestly not very usable anymore.

If it keeps hanging and won’t connect, you can reset it directly from the settings inside the SKYBOX PC client.
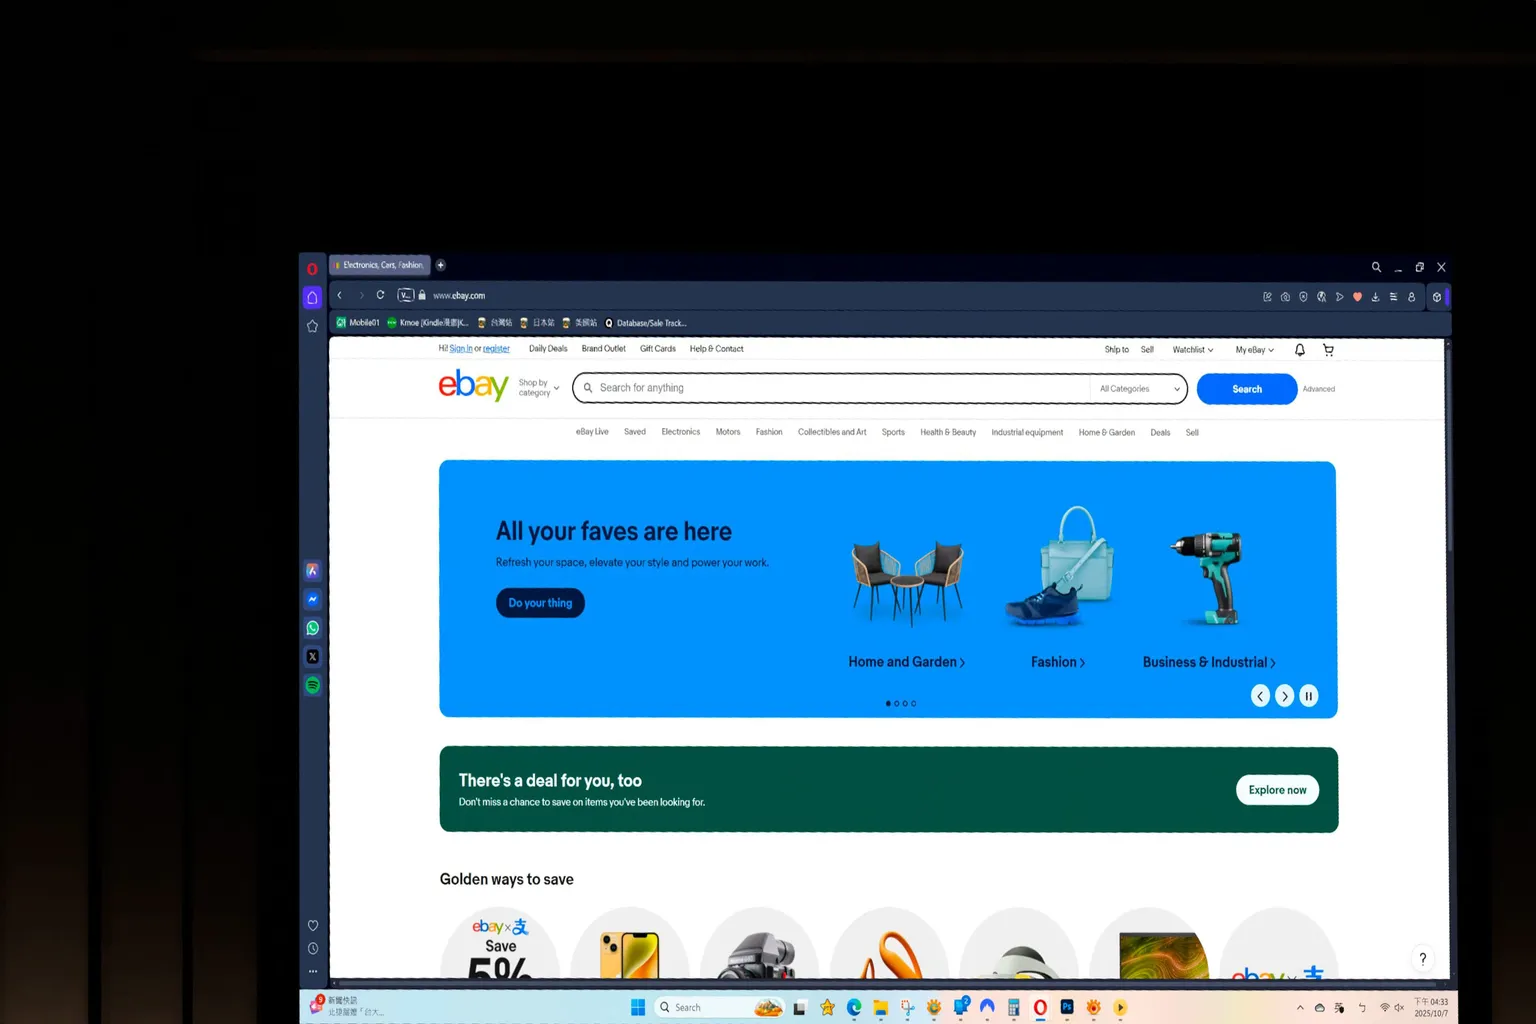
Step 4: Stream your screen
Once everything is set up, you can browse eBay on a massive theater-sized screen — it’s surprisingly comfortable.
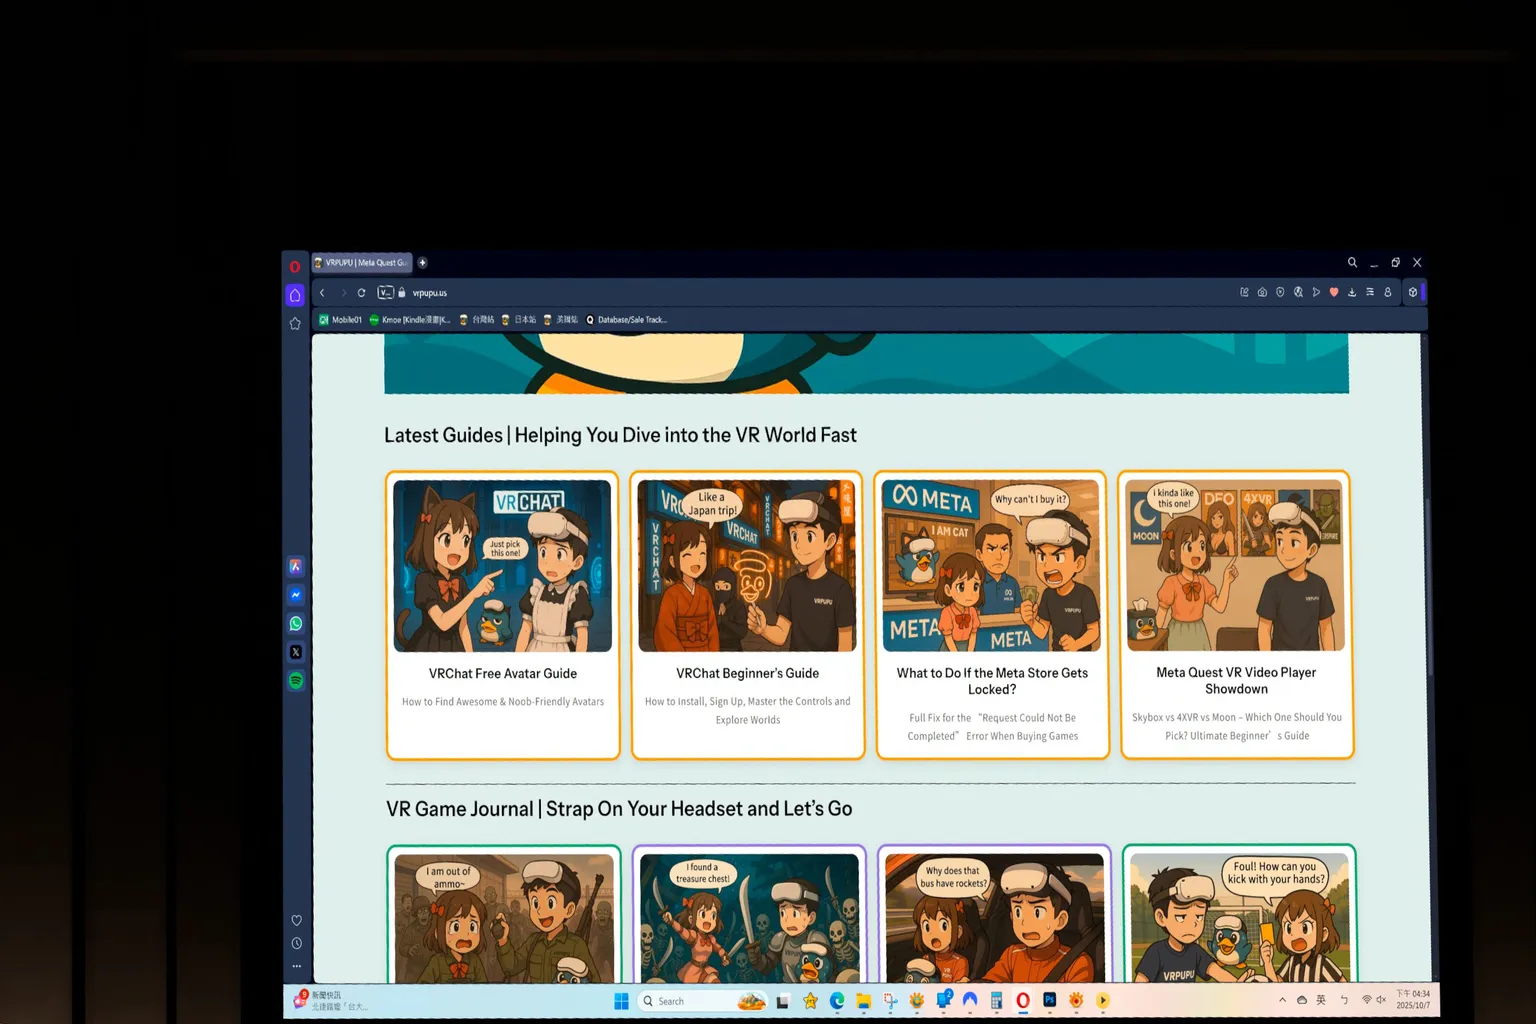
Checking the VRPUPU site on a cinema-scale screen is already wild — and reading comics on a screen this big? Yeah… that’s just pure fun.
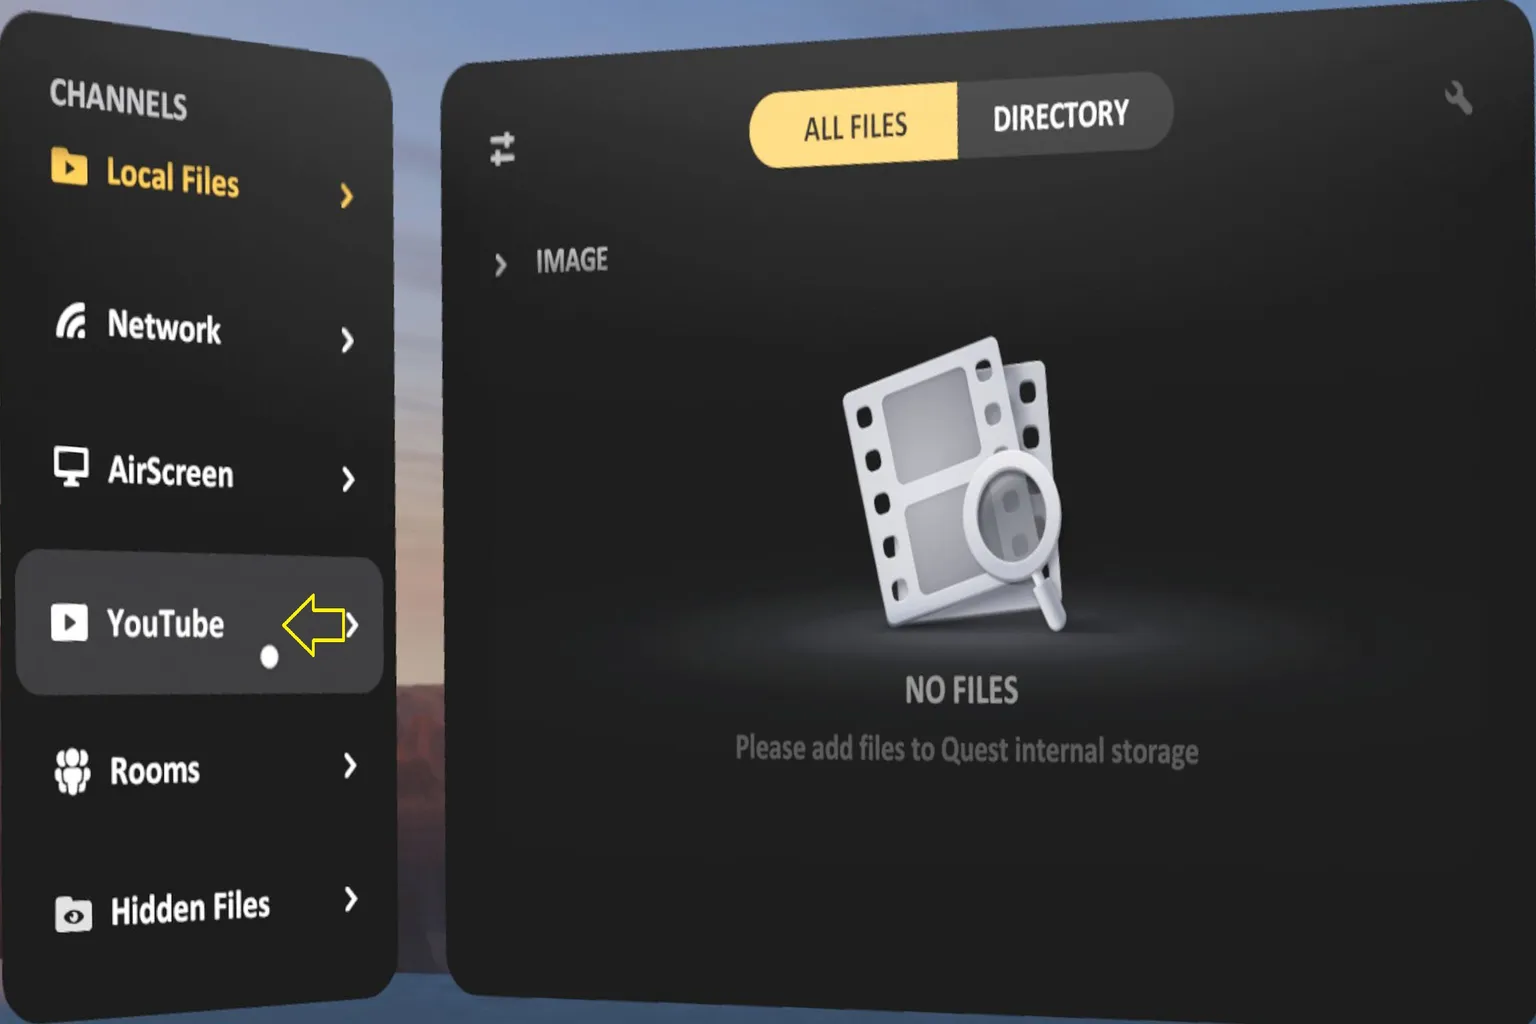
YouTube
Among all the video players out there, Skybox is basically the only one that really supports YouTube properly.
Meta Quest does come with a default YouTube app, sure—but the vibe is more like an “outdoor theater.”
Switch to Skybox’s YouTube feature, and it instantly feels like you’ve rented out a full movie theater just for yourself.
Step 1: Sign in to YouTube
Select YouTube to enter Skybox’s theater-style YouTube mode.
Step 2: Link your account
Sign in with the Google account and password you use for YouTube.
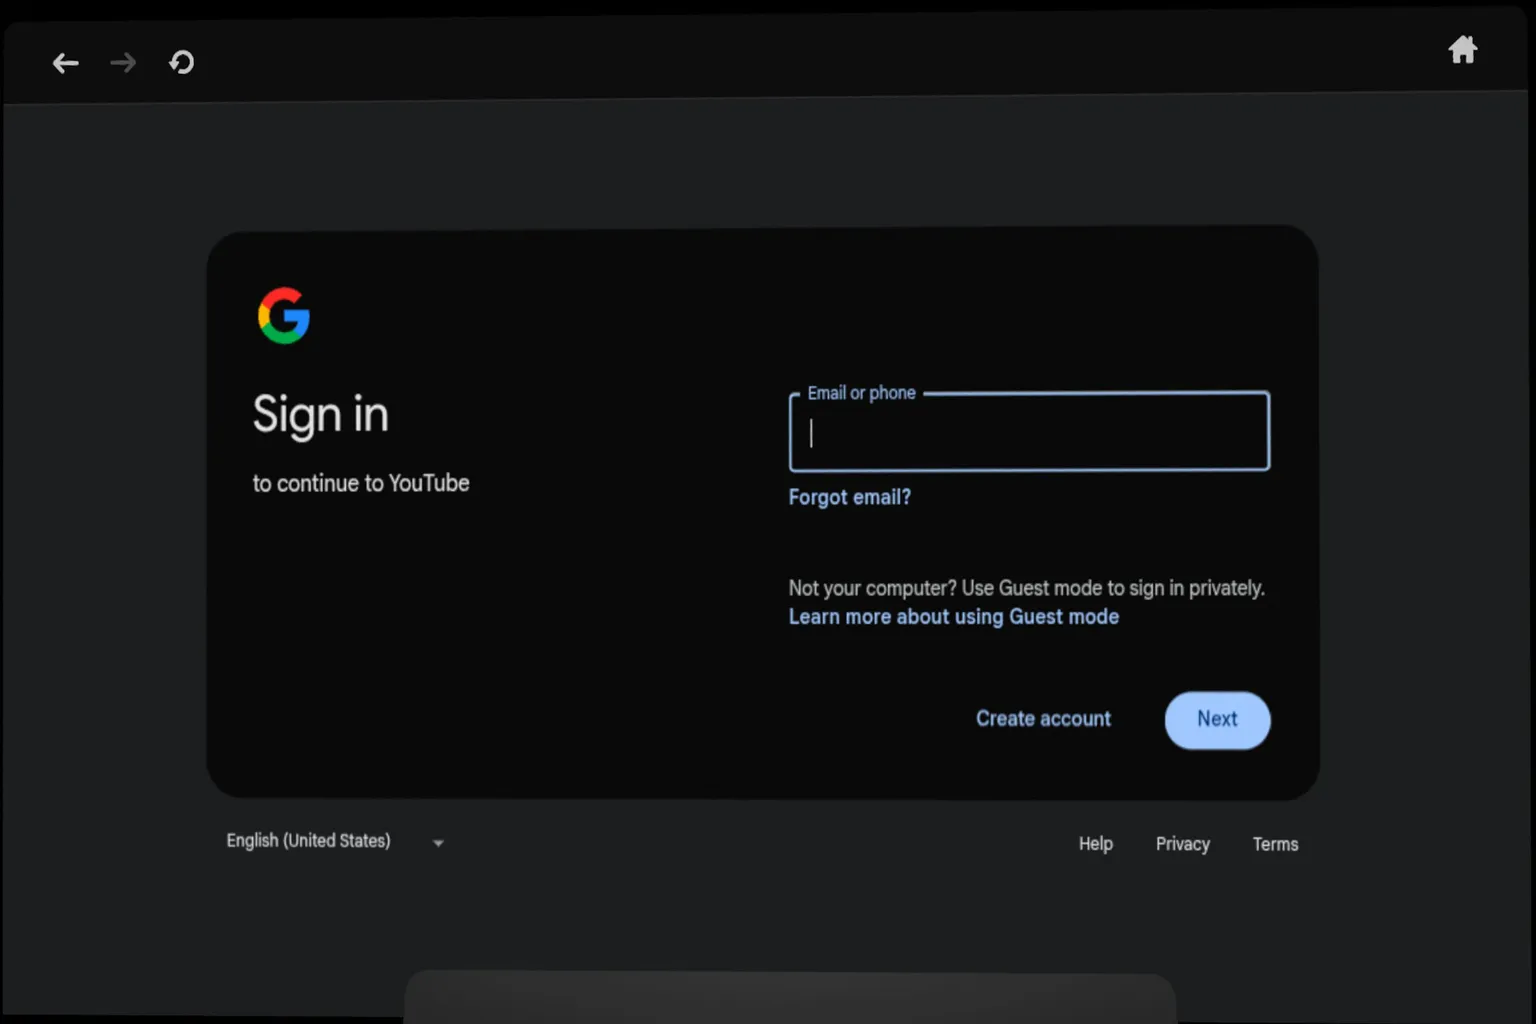
Step 3: Authorize and start watching
Complete the verification step by confirming the message sent to your phone or email.
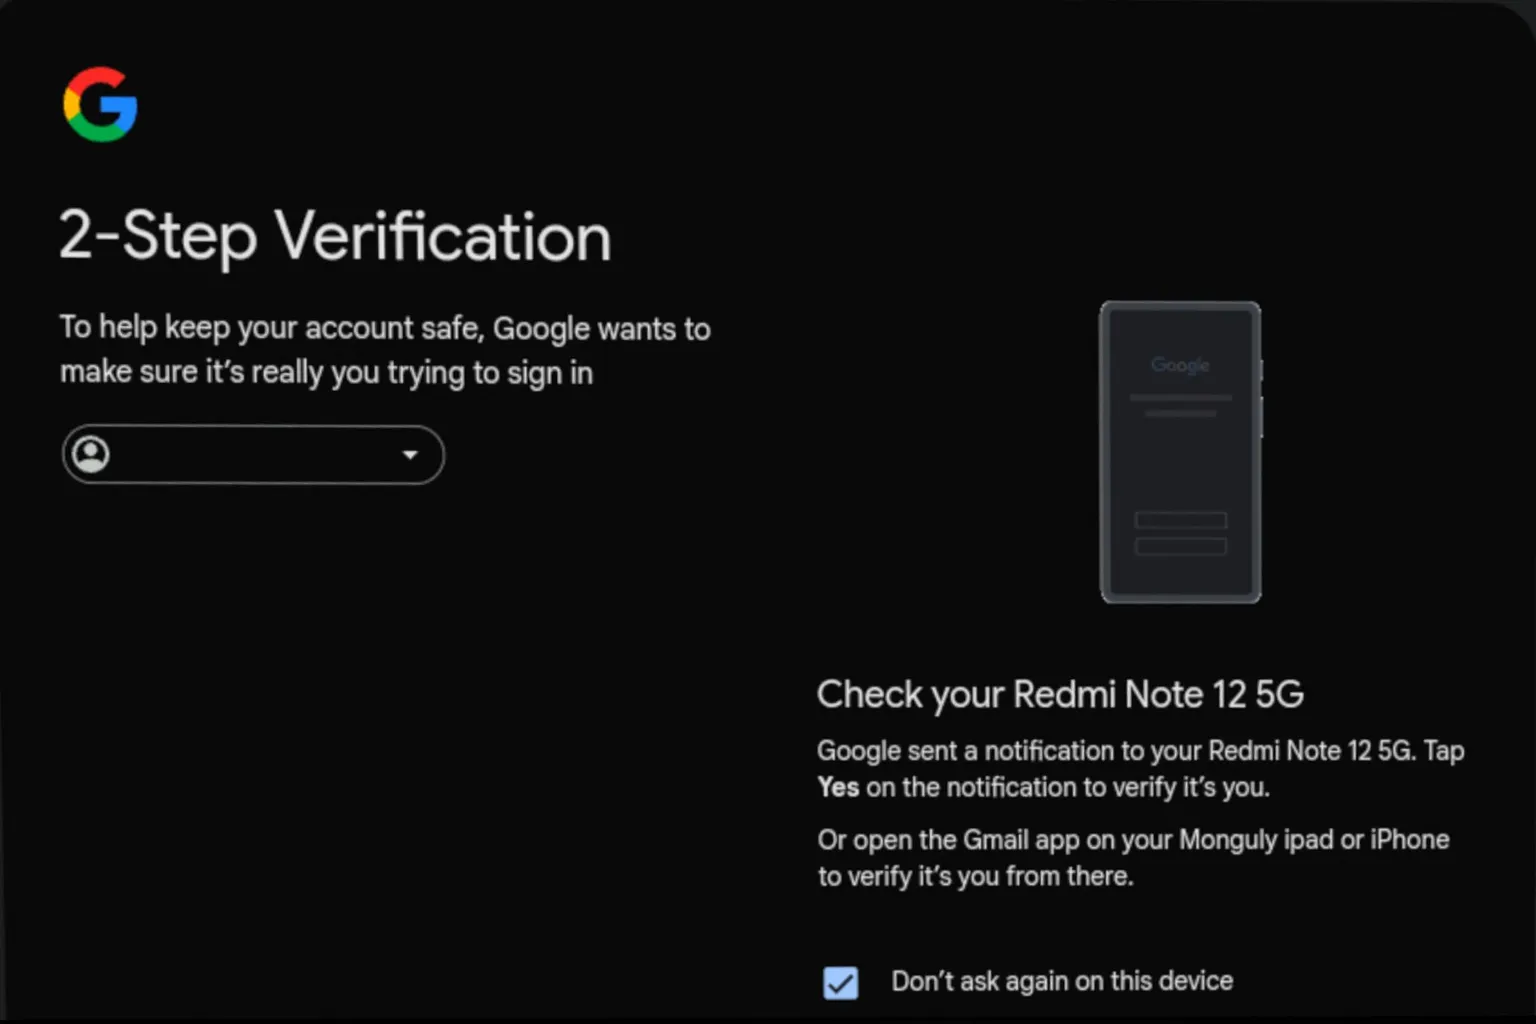
Once that’s done, head back to the headset. Your subscribed channels and your own YouTube videos will now show up, ready to watch.

Extra note: How this differs from the default Meta Quest YouTube app
The first image shows YouTube playing inside Skybox VR Player.
It honestly feels like you’ve rented out a whole movie theater just to watch YouTube.

The second image is the standard Meta Quest YouTube app.
To be blunt, it feels kind of underwhelming—more like a “slightly bigger screen,” nothing more.
If you watch YouTube a lot in VR, this feature alone already makes Skybox worth buying.

Rooms
This is a new feature added in version 2.0. It lets you invite friends and watch videos together.
Up until now, this kind of thing was basically exclusive to Bigscreen—but Skybox finally added it too.
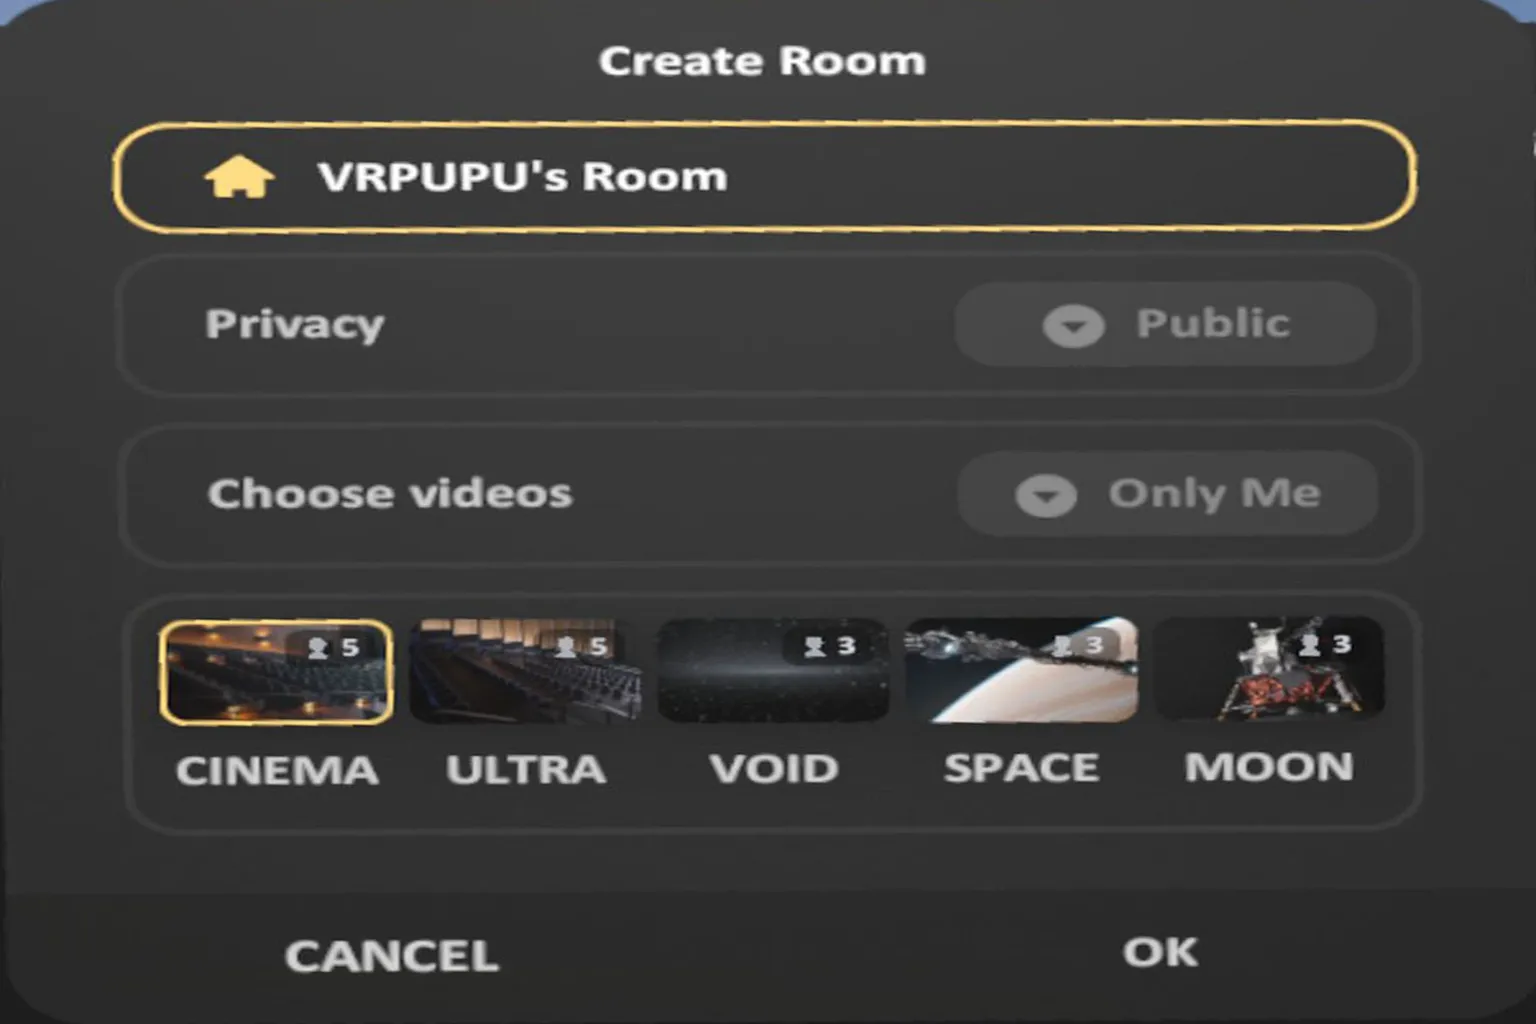
To use it, select the Rooms tab.
One important thing though: you must create your Meta avatar first. If you don’t have an avatar, you won’t be able to create a room or join someone else’s room.
And here’s a small gotcha.
If you already created an avatar but still can’t create a room, try changing your avatar’s appearance once and save it again. That usually makes the system recognize that your avatar exists.
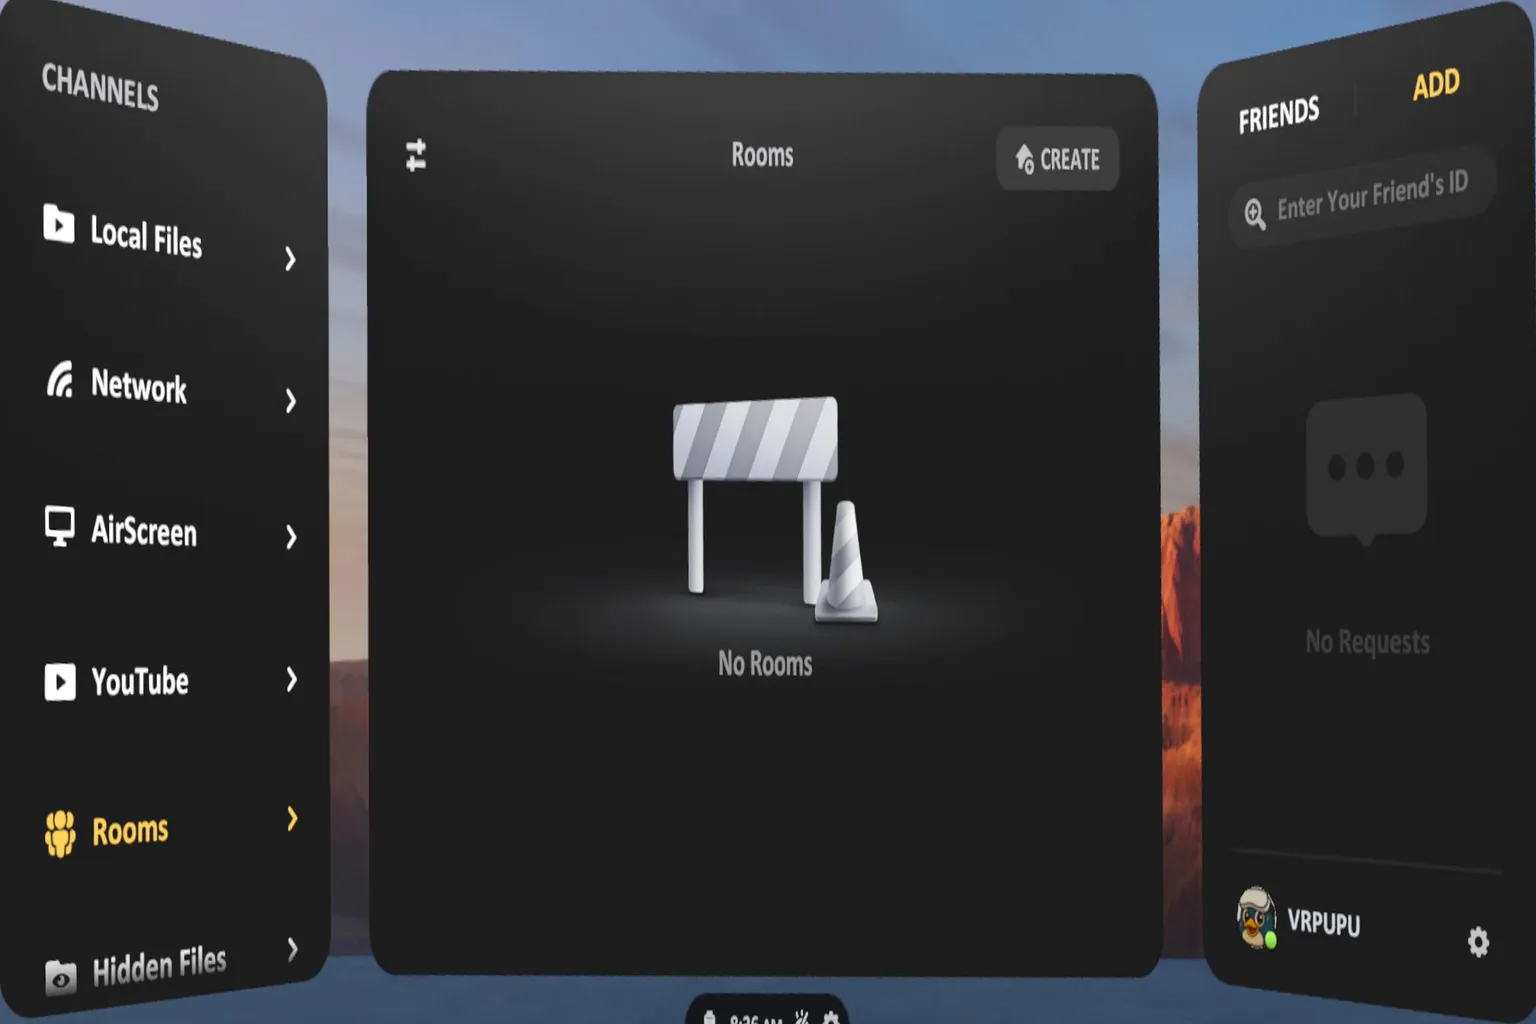
Each user is assigned a unique ID.
Tap the ⚙️ icon in the bottom-right corner and you’ll see your User ID on screen.
If you know your friend’s ID, tap Add in the top-right corner to add them as a friend.

Tap Create to open your own room.
At that point, you can choose the privacy setting—either make it visible to friends or keep it invite-only.
You can also control video permissions:
- Only the host can switch videos
- Everyone in the room can change what’s playing
Capacity depends on the scene.
The cinema scene supports up to 5 people, while other scenes are limited to 3.
When you create a room for the first time, Skybox will ask for microphone permission.
This lets you talk while watching, making it feel like your friends are sitting right next to you.
Just select Allow and you’re good to go.
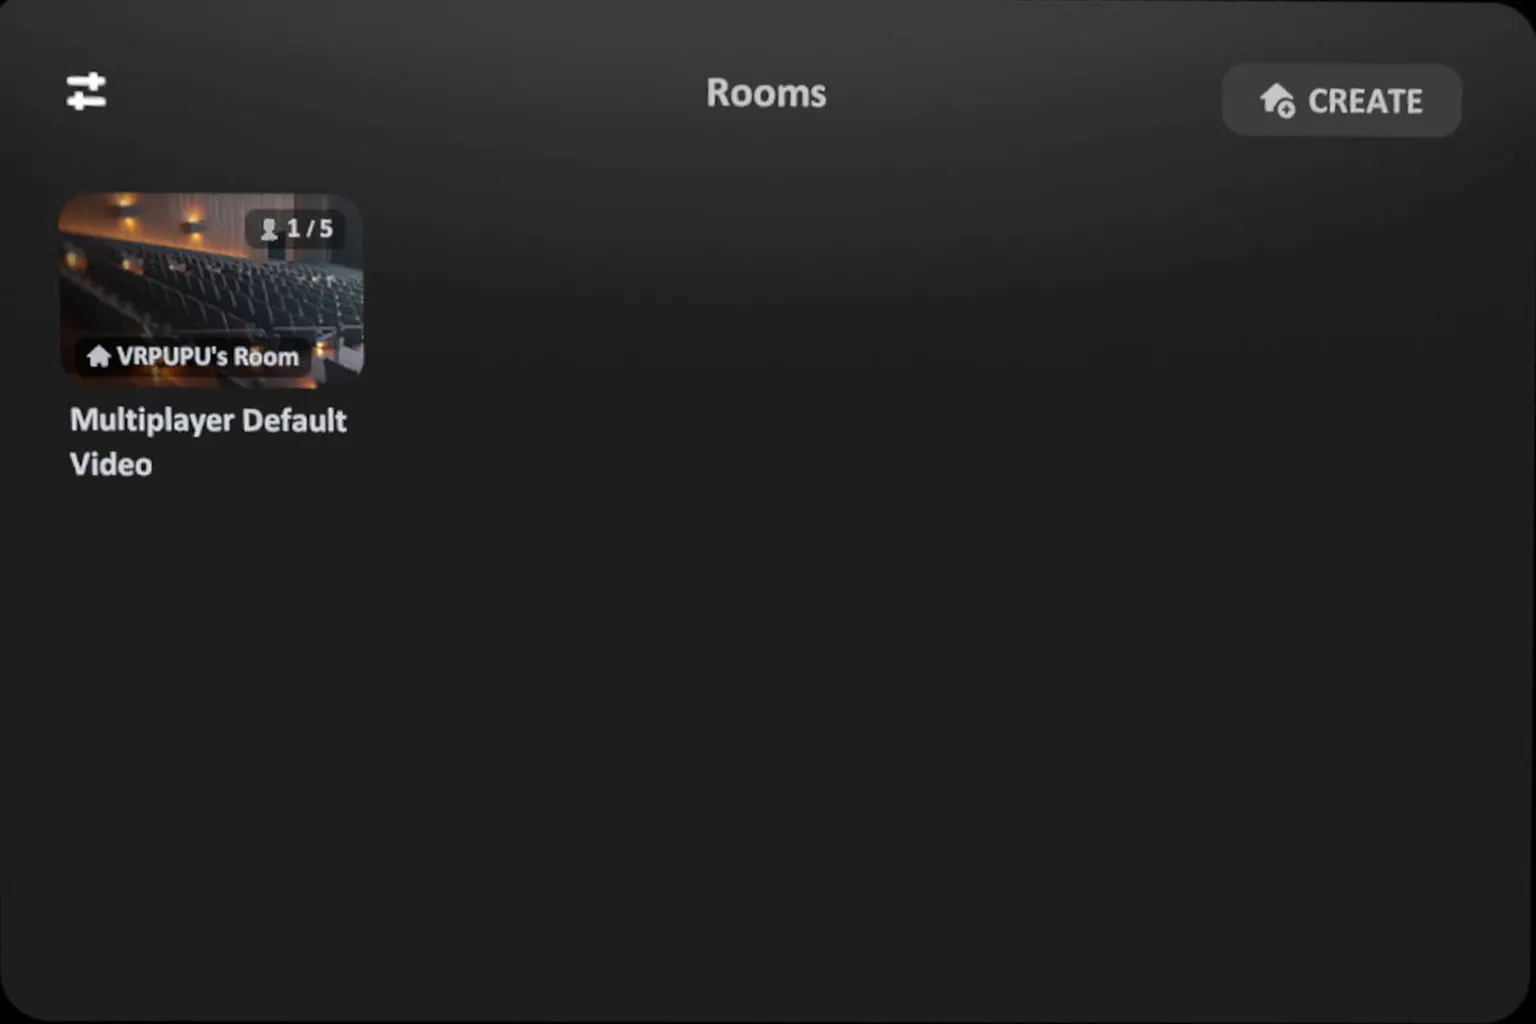
Once you create a room, it will show up on your friends’ screens as well.
All they have to do is click it and join—then you can start watching videos together.
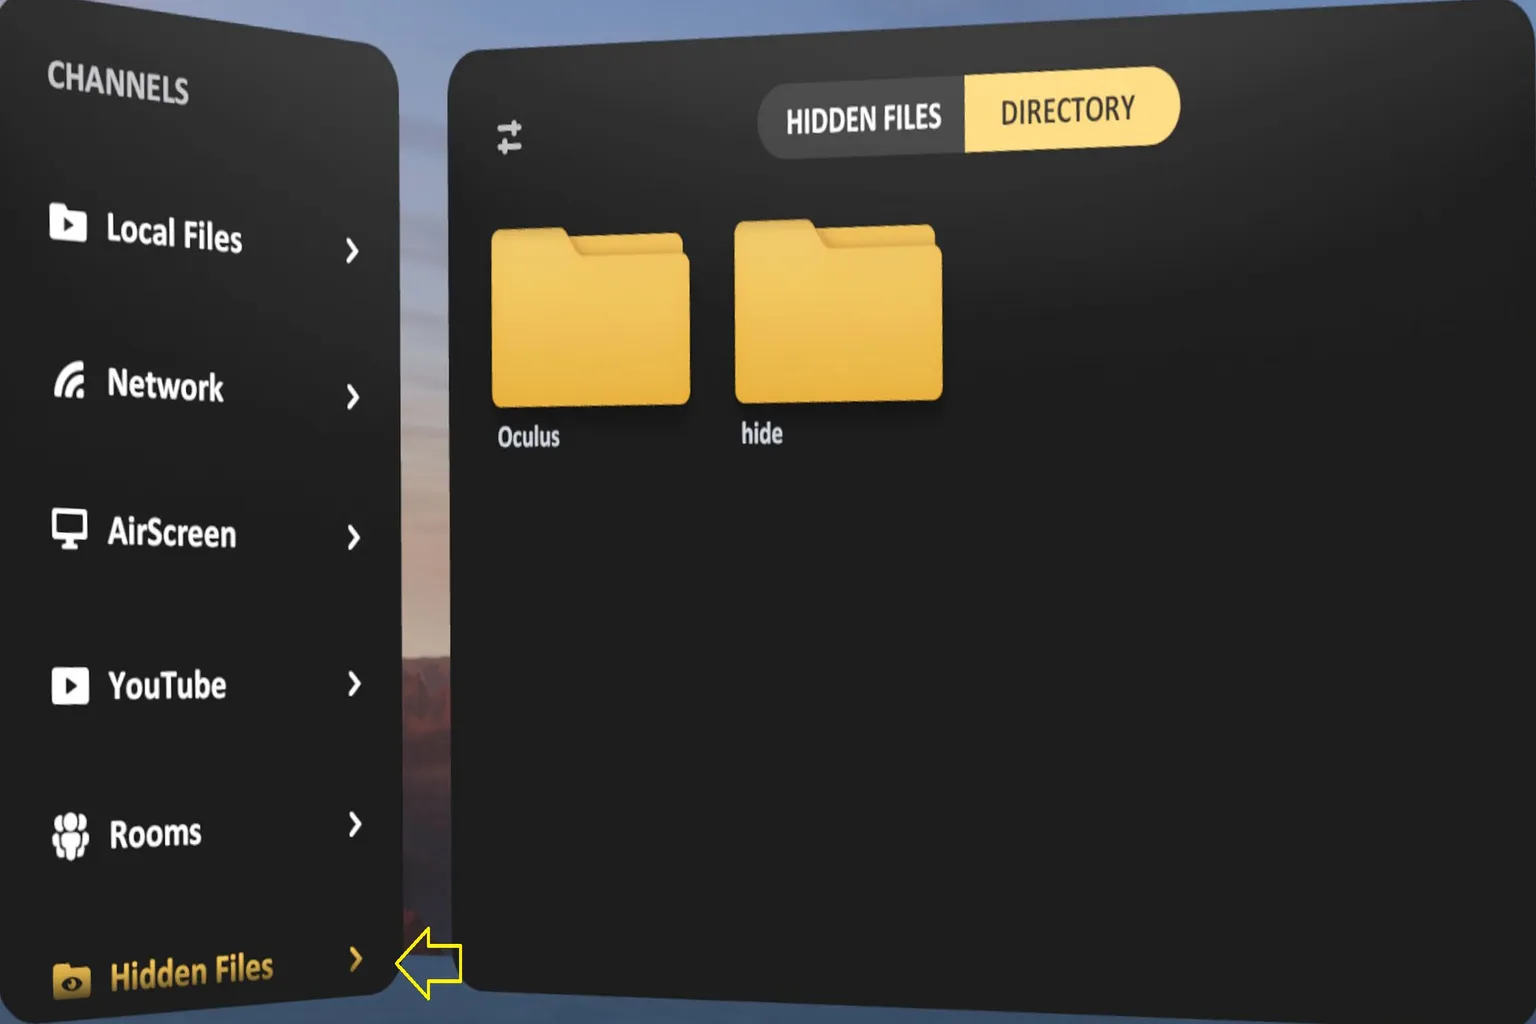
Hidden Files
By default, files stored on the headset are visible to anyone who uses it.
So if you’ve got private videos you really don’t want friends or kids stumbling across when you lend them the headset… yeah, that’s a problem.
Skybox has a handy Hidden Folder feature for exactly this situation. It lets you hide specific folders containing videos or images, so they won’t even show up when someone browses Skybox.
Just keep in mind: if you install another video player app, those files might still be visible there. If privacy really matters, it’s safest not to install multiple players.
Step 1: Choose the folder you want to hide
Go to Local Files, open the folder you want to hide, then tap the 🔧 icon in the top-right corner.
Then choose “Hide current folder.”
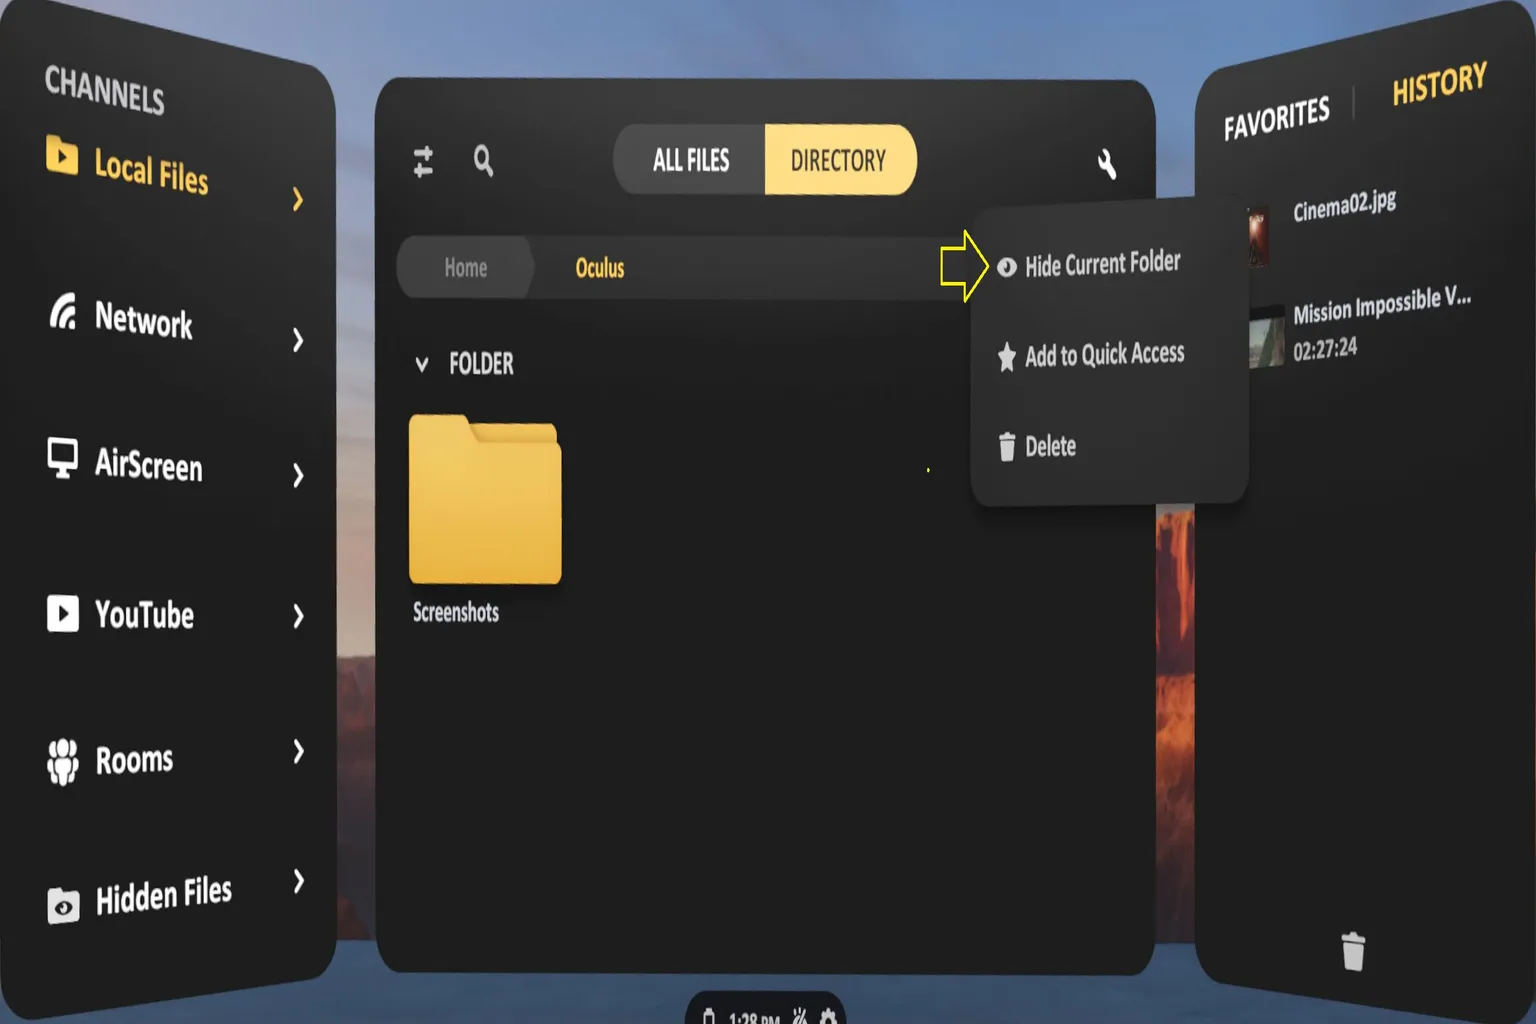
Step 2: Go to the Hidden Files area
Open Hidden Files from the channel list, and you’ll see the folder you just hid.
Any files or folders you hide will all end up here.
Step 3: Lock the hidden folder
From the bottom of the main menu, select the ⚙️ icon.
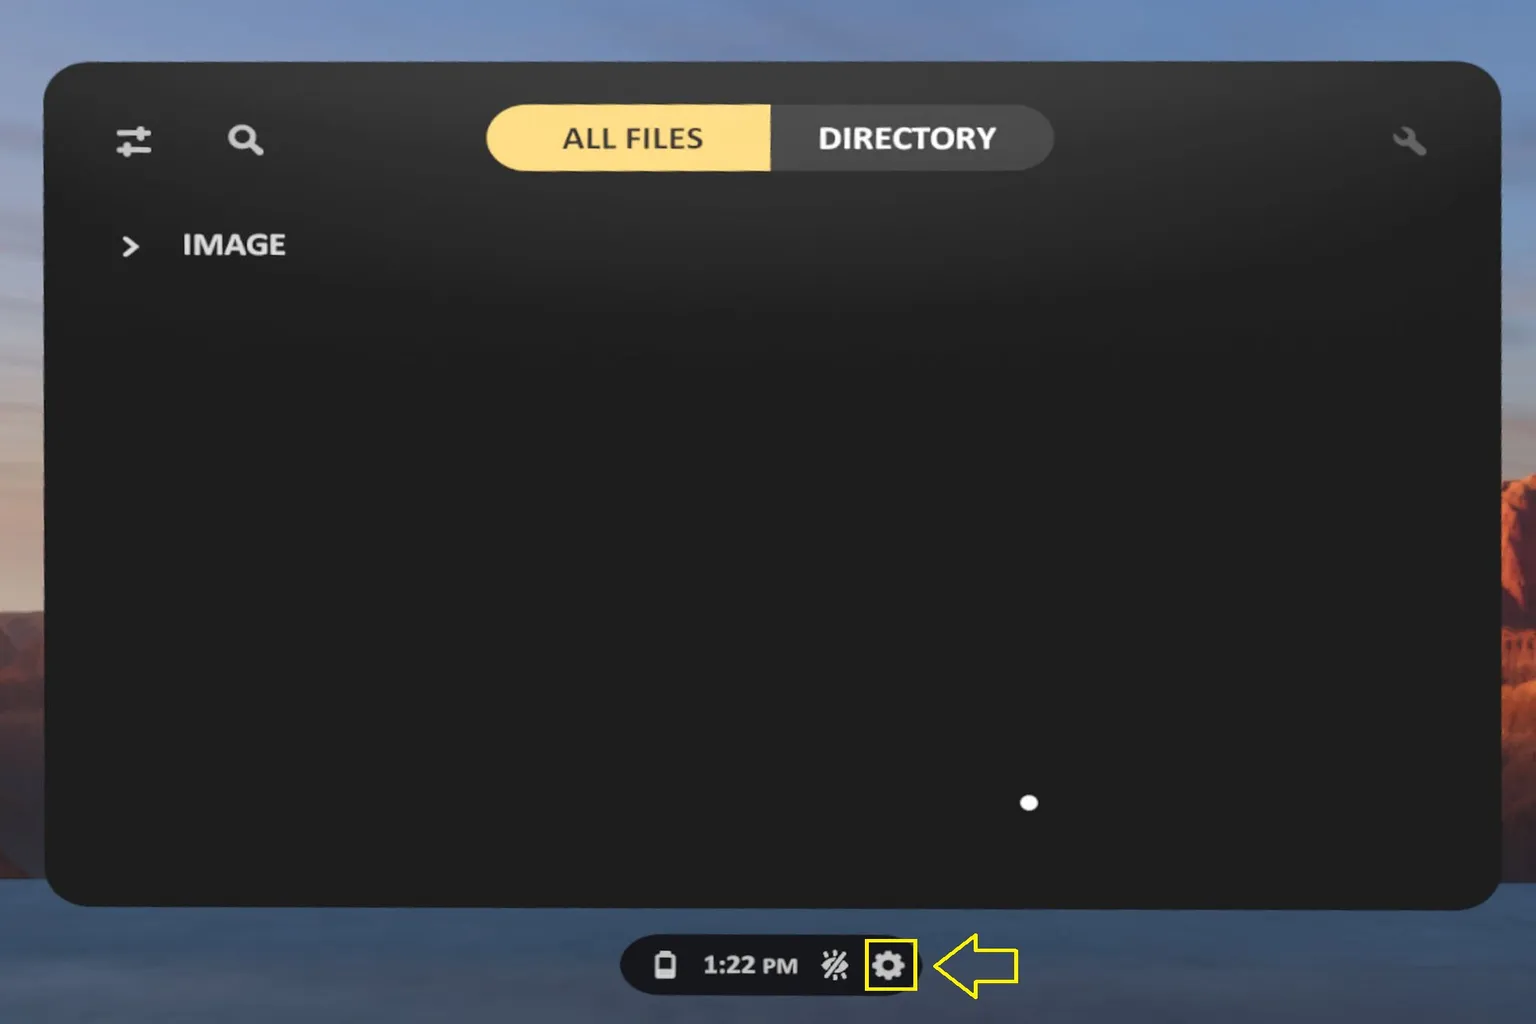
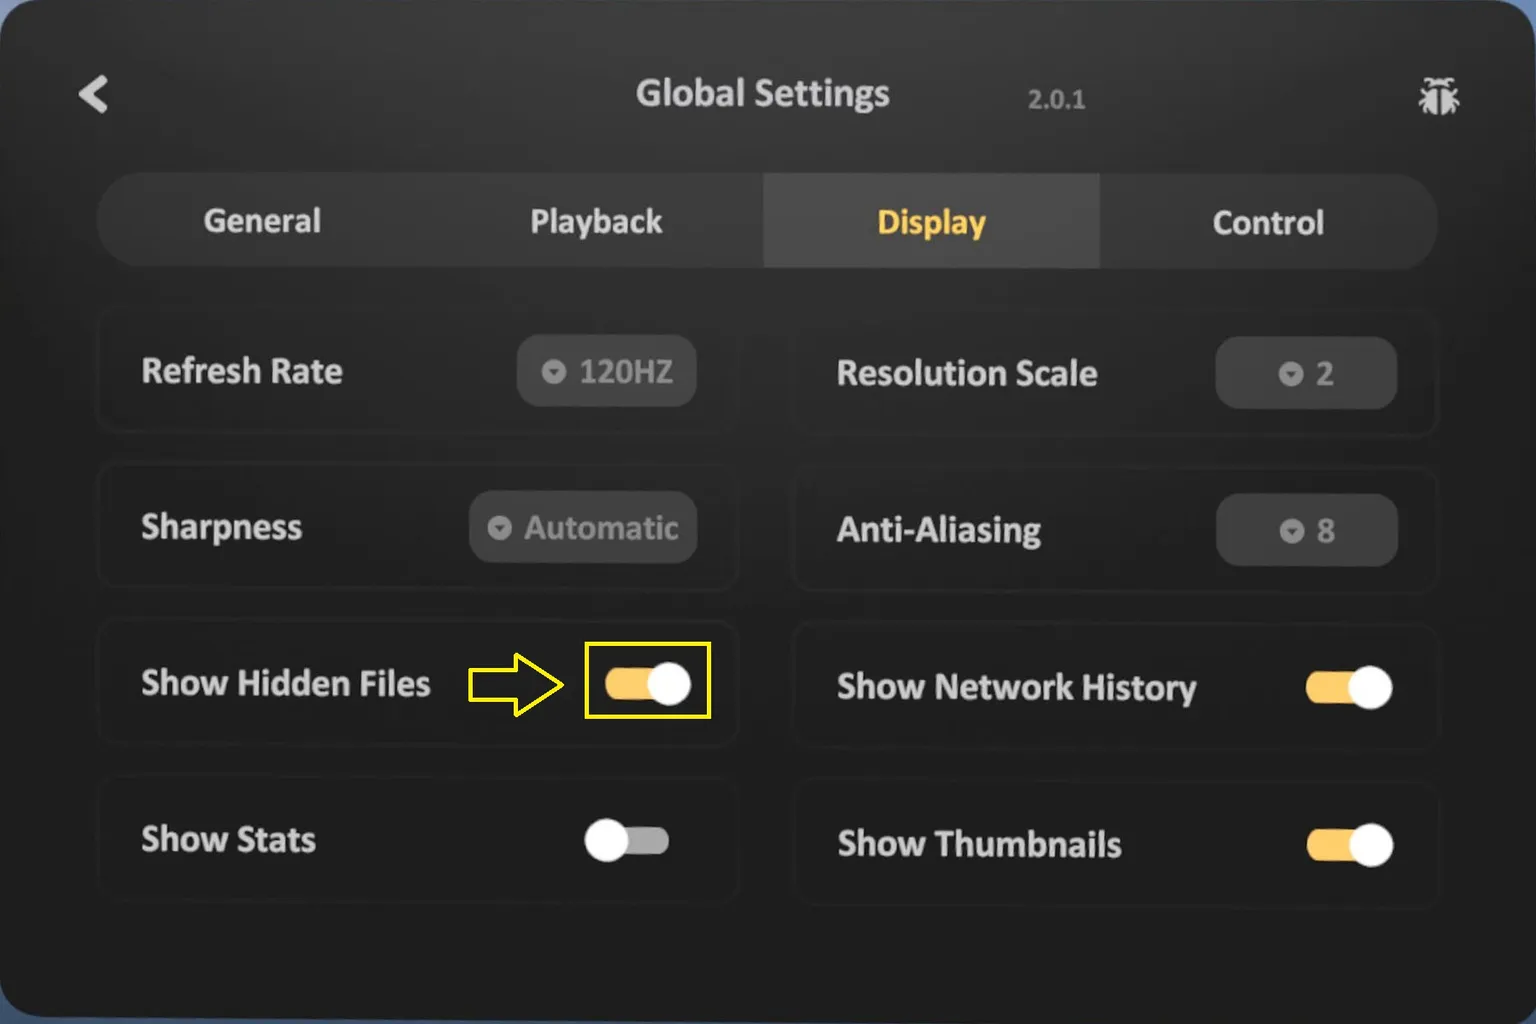
Turn off “Show hidden files” on the display settings screen.
Step 4: Set a passcode to fully hide it
At this point, the system will ask you to set a 4-digit security code.
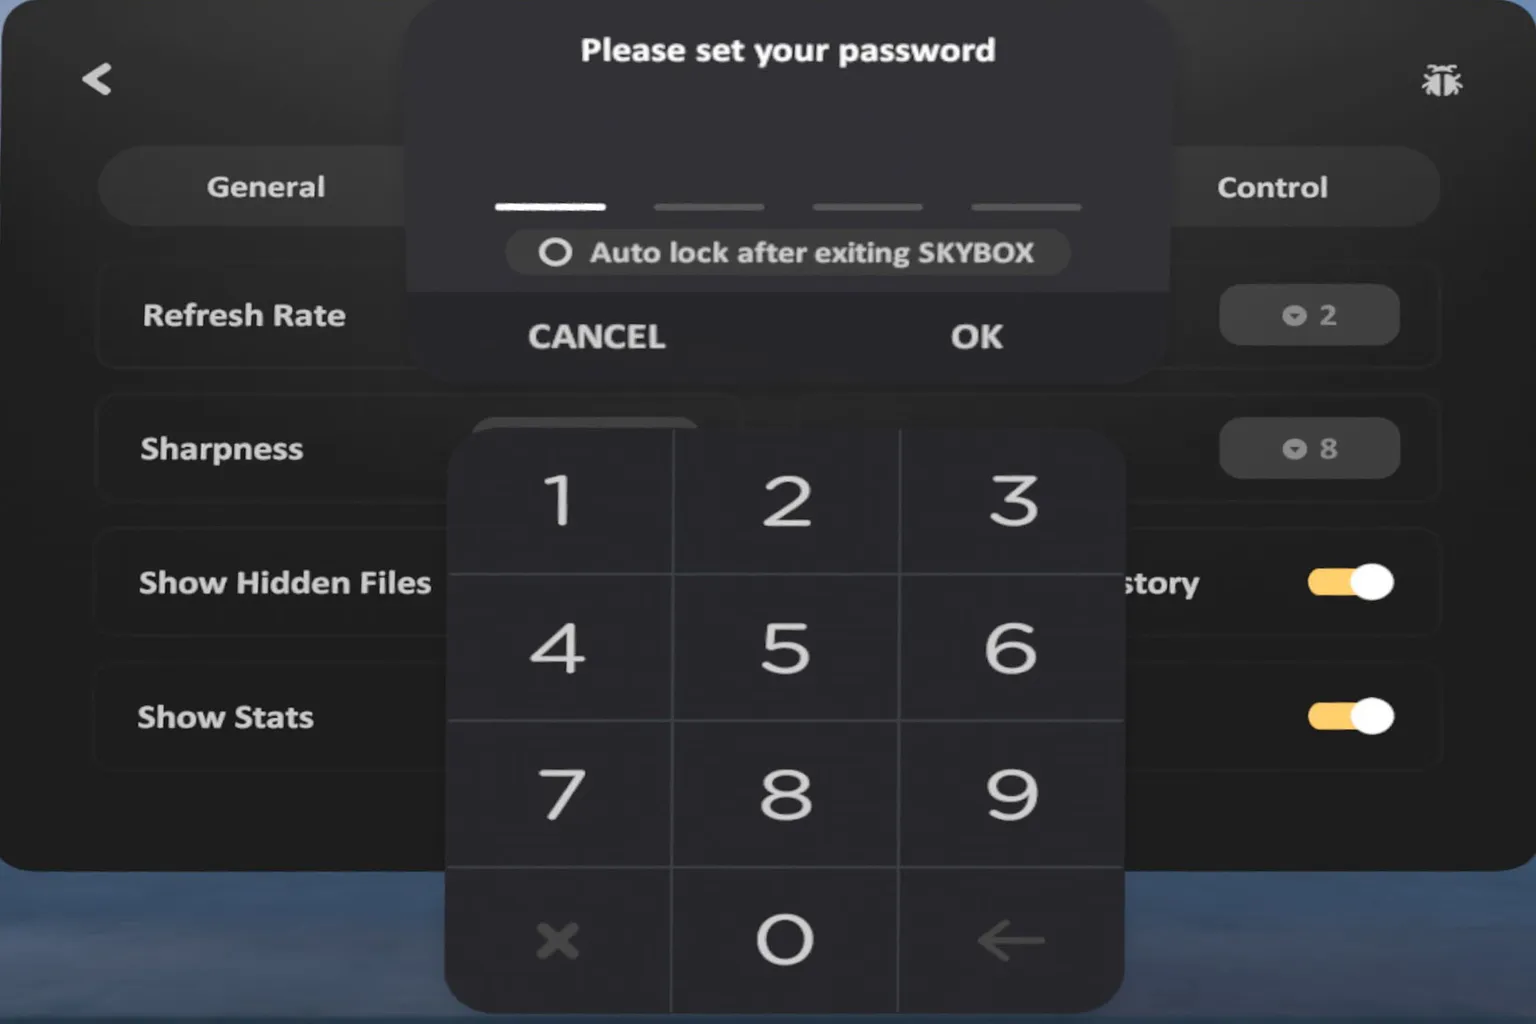
Once that’s done, the hidden folder will completely disappear from the home screen and the local file list.
If you ever want to bring it back, just go to the same settings, enter the passcode, and turn “Show hidden folders” back on.
System Settings
Here’s where you can fine-tune Skybox’s performance and behavior.
Tap the ⚙️ icon at the bottom of the main menu, and you’ll see four settings categories.
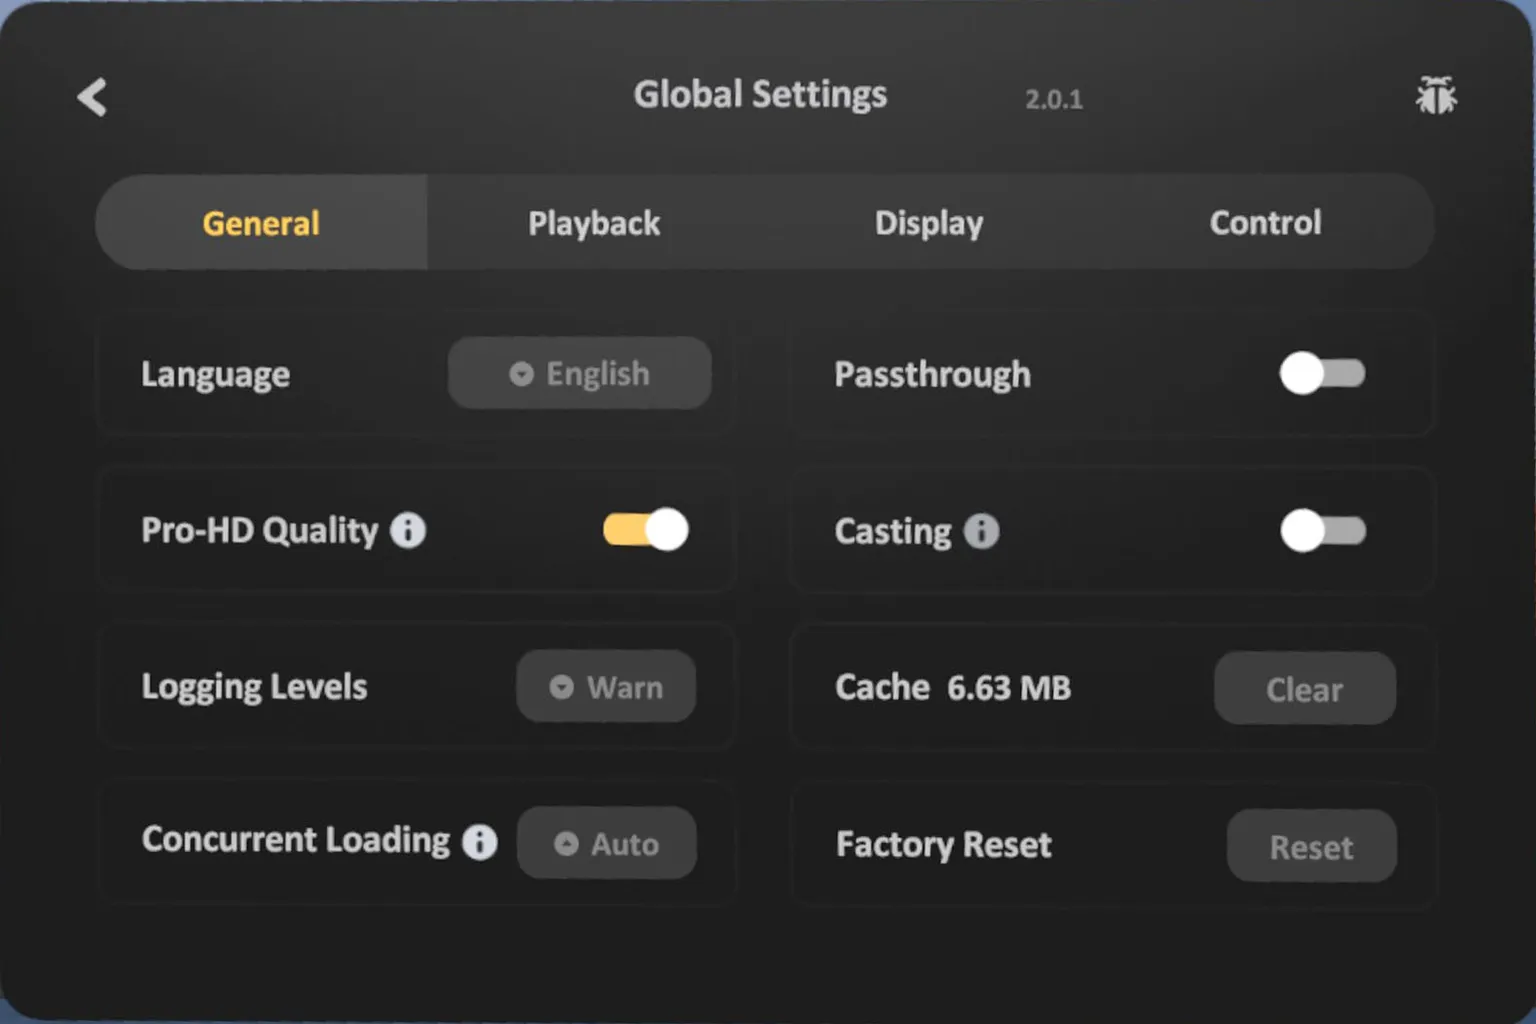
General
Adjust language settings, enable passthrough mode, and toggle Video HD Mode (which forces videos to upscale to Full HD).
Playback
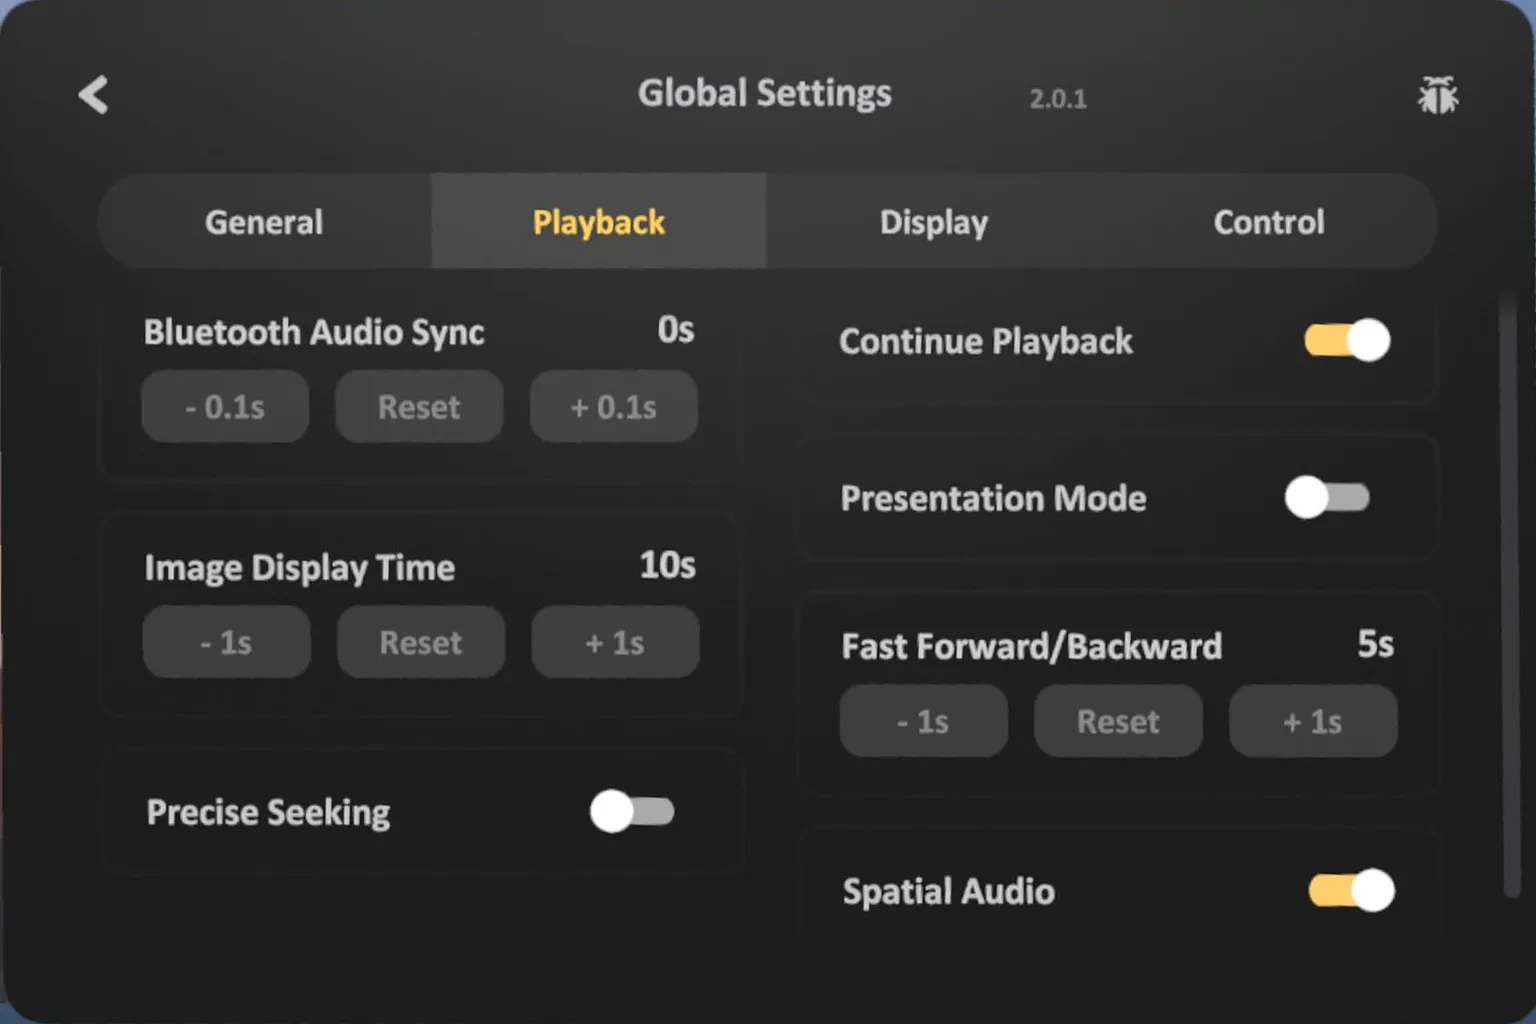
Fine-tune playback details such as audio delay for headphones and other video playback options.
Display
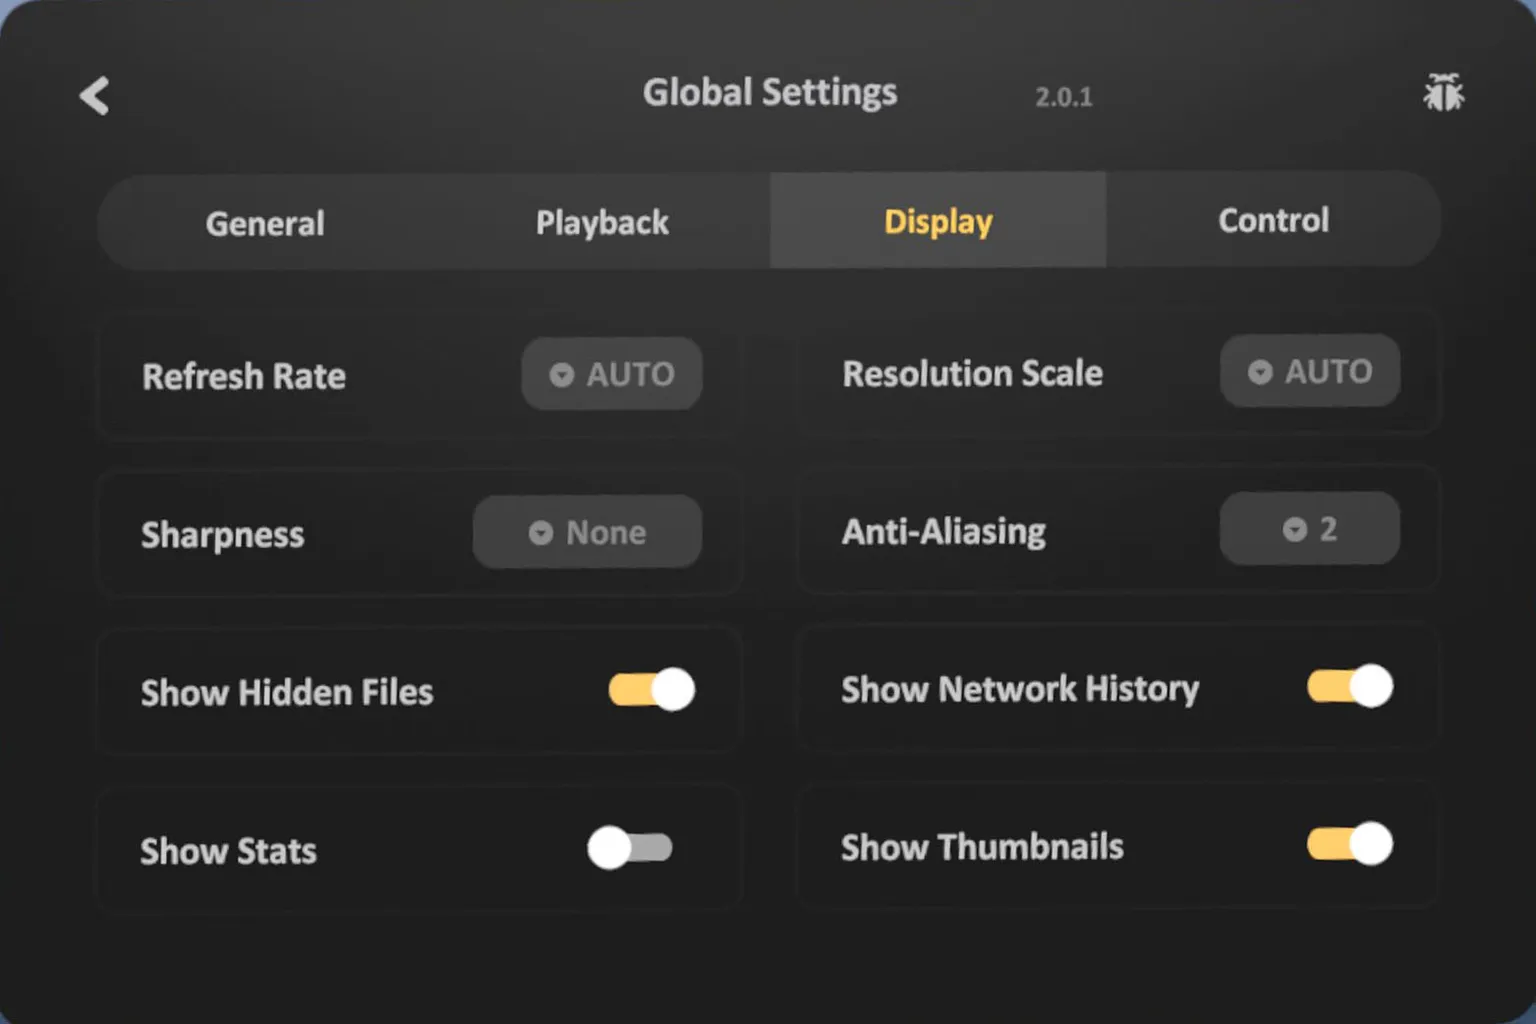
Change the headset frame rate, enable image sharpening, increase resolution, toggle anti-aliasing, and control whether hidden folders are shown.
Global Settings
Here you can toggle things like sound effects on/off and enable or disable hand tracking.
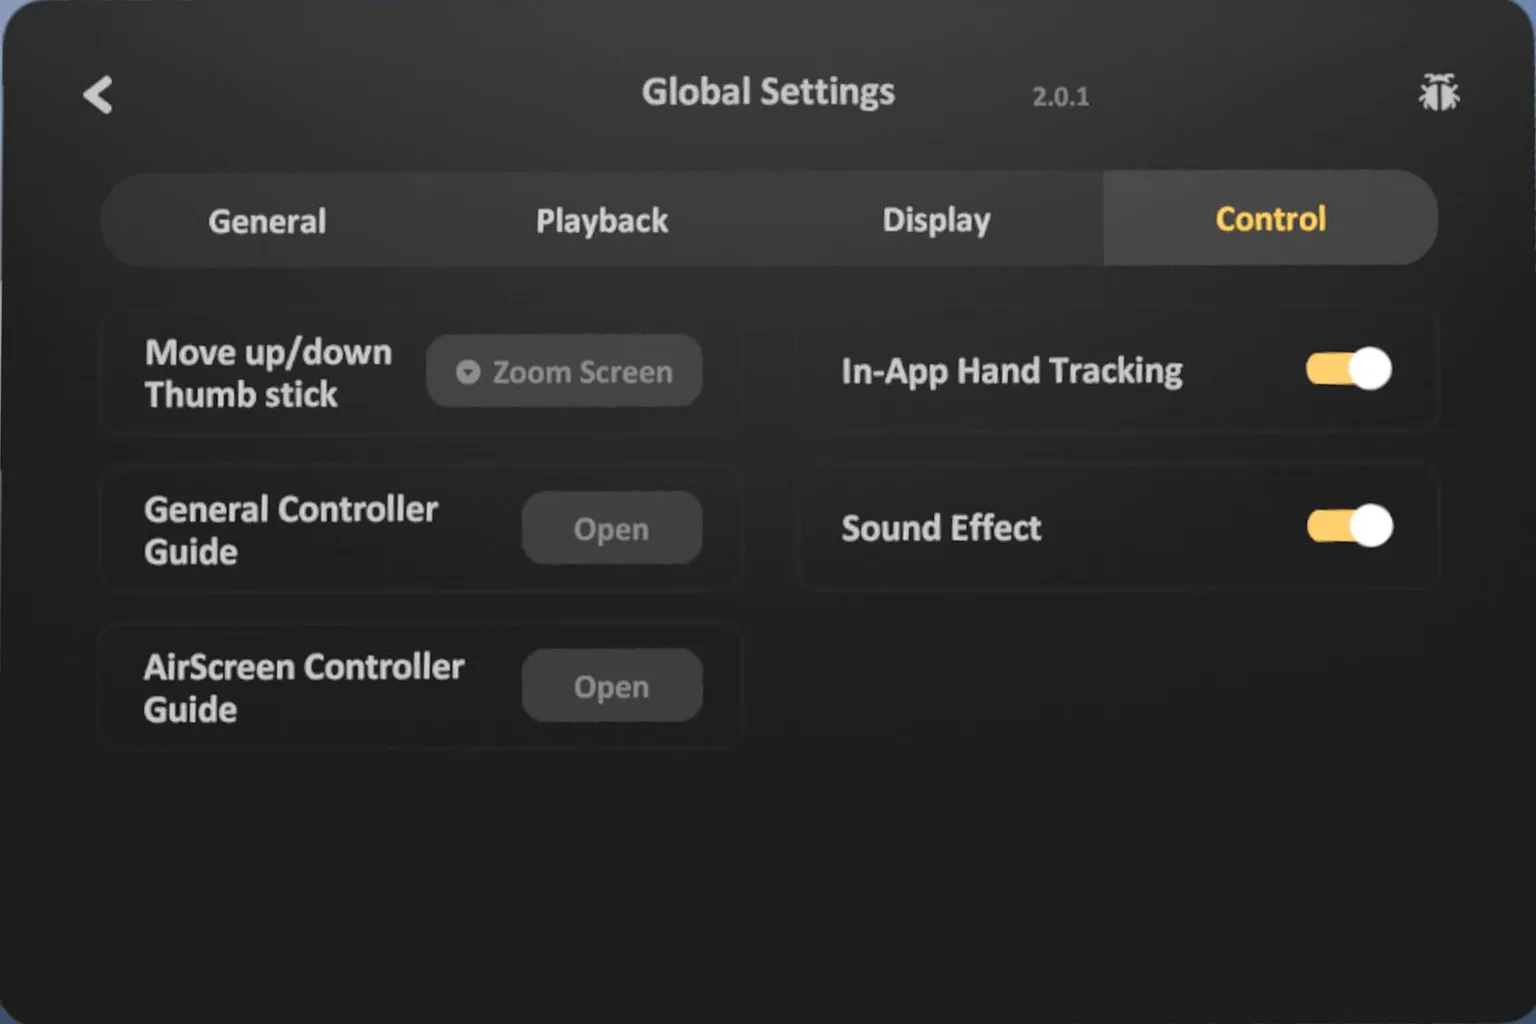
You can also set the headset’s refresh rate up to 120Hz, which does make motion feel a bit smoother.
As for anti-aliasing and resolution scaling—yeah, in theory, cranking those up should improve image quality. But honestly? I tried doubling the resolution scale and testing anti-aliasing at ×2, ×4, and ×8, and I couldn’t really see a big difference with my own eyes.
Playback Controls
When you start playing a video, a quick controller tutorial will pop up. The controls work like this:
- Double-click A / X / Trigger: Play / Pause
- Hold A / X / Trigger: Drag and move the screen
- Hold B / Y: Reset the screen position
- Thumbstick Up / Down: Adjust screen size
- Thumbstick Left / Right: Fast-forward / Rewind
- Hold Grip + Thumbstick Left/Right: Previous / Next video
- Hold Grip + Thumbstick Up/Down: Volume up / down
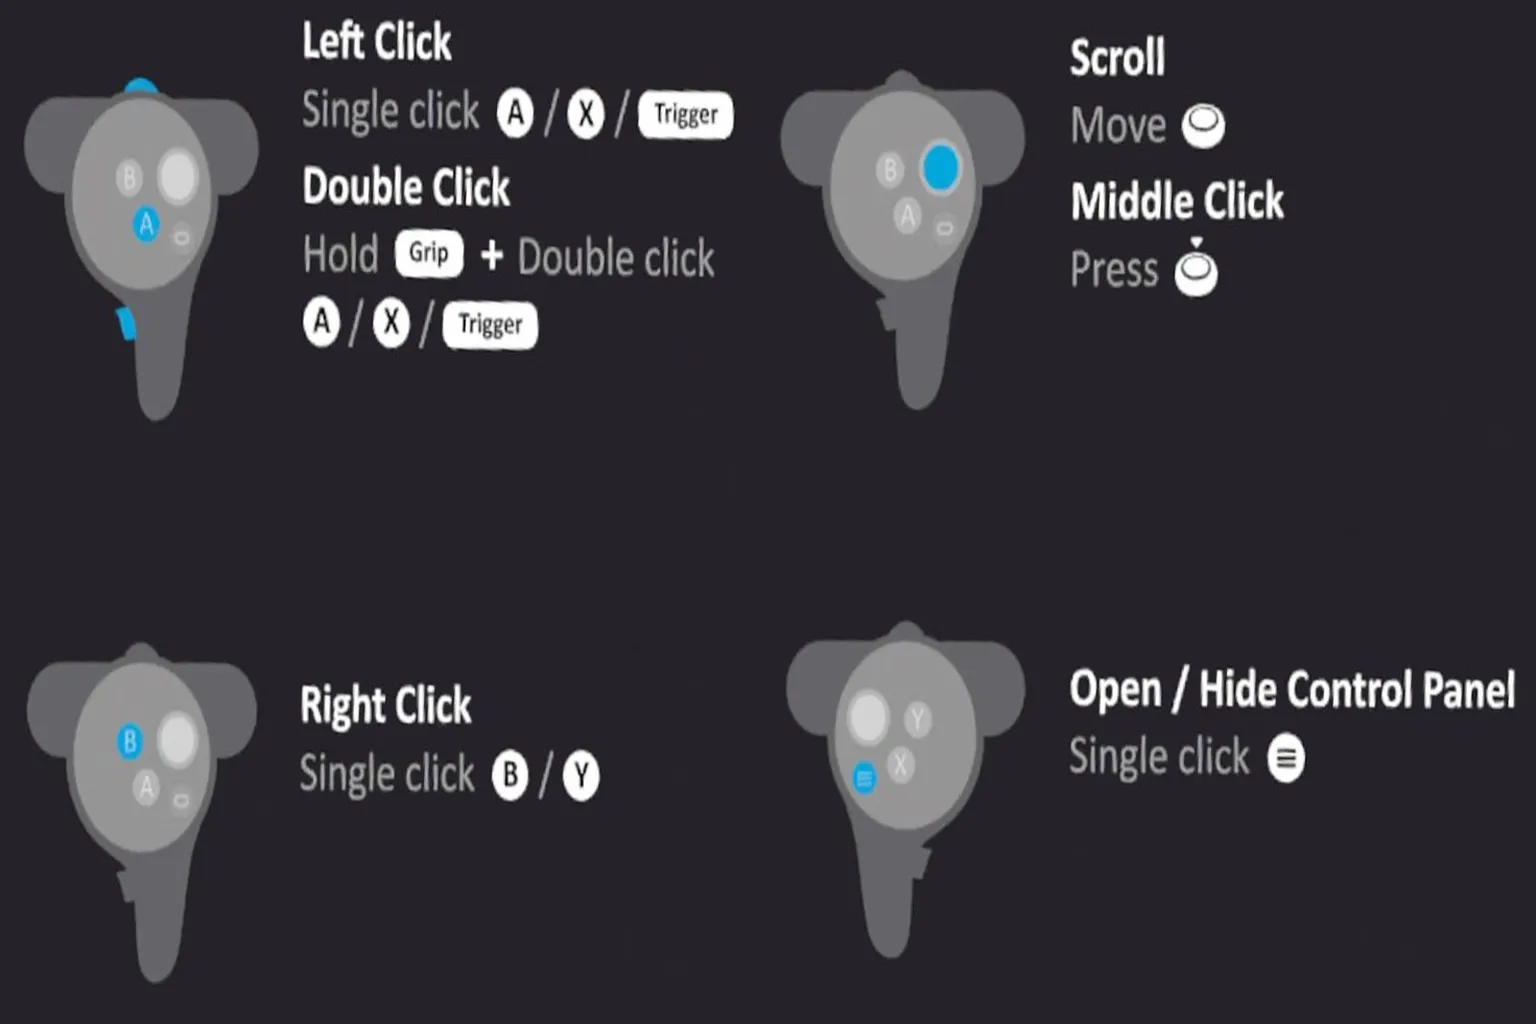
You can also press A or the Trigger on any empty area to bring up the control panel and operate everything from there.
Honestly, this way feels more intuitive and much easier to use.
Each function in the control panel is shown in the diagram below, and I’ll explain the details one by one next.
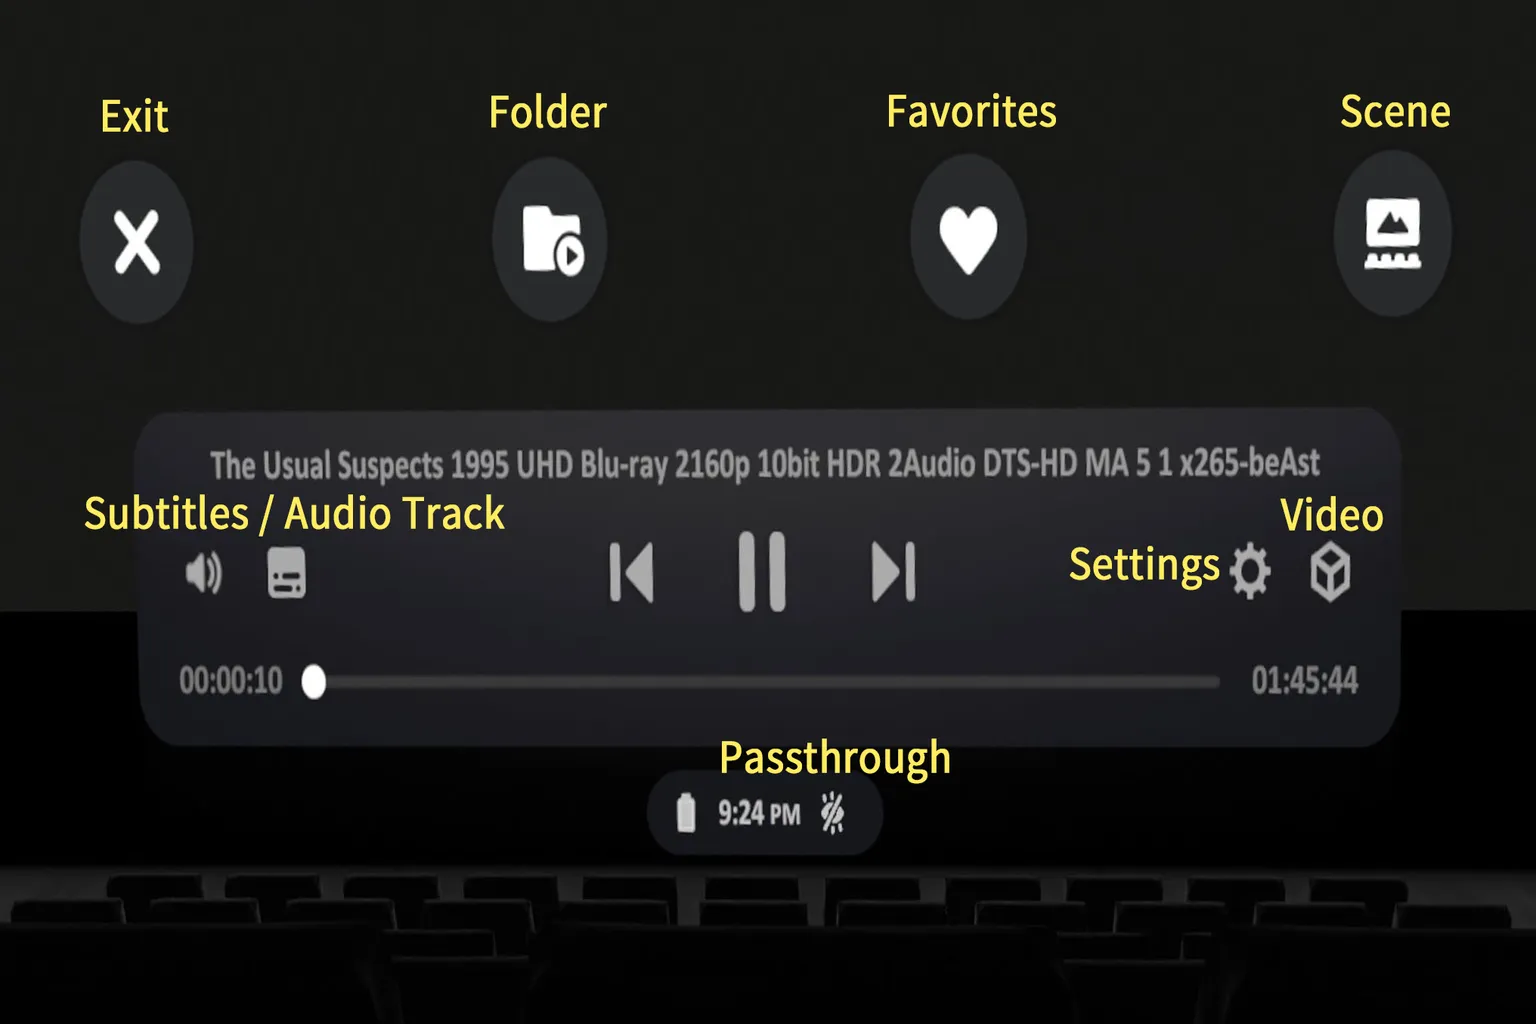
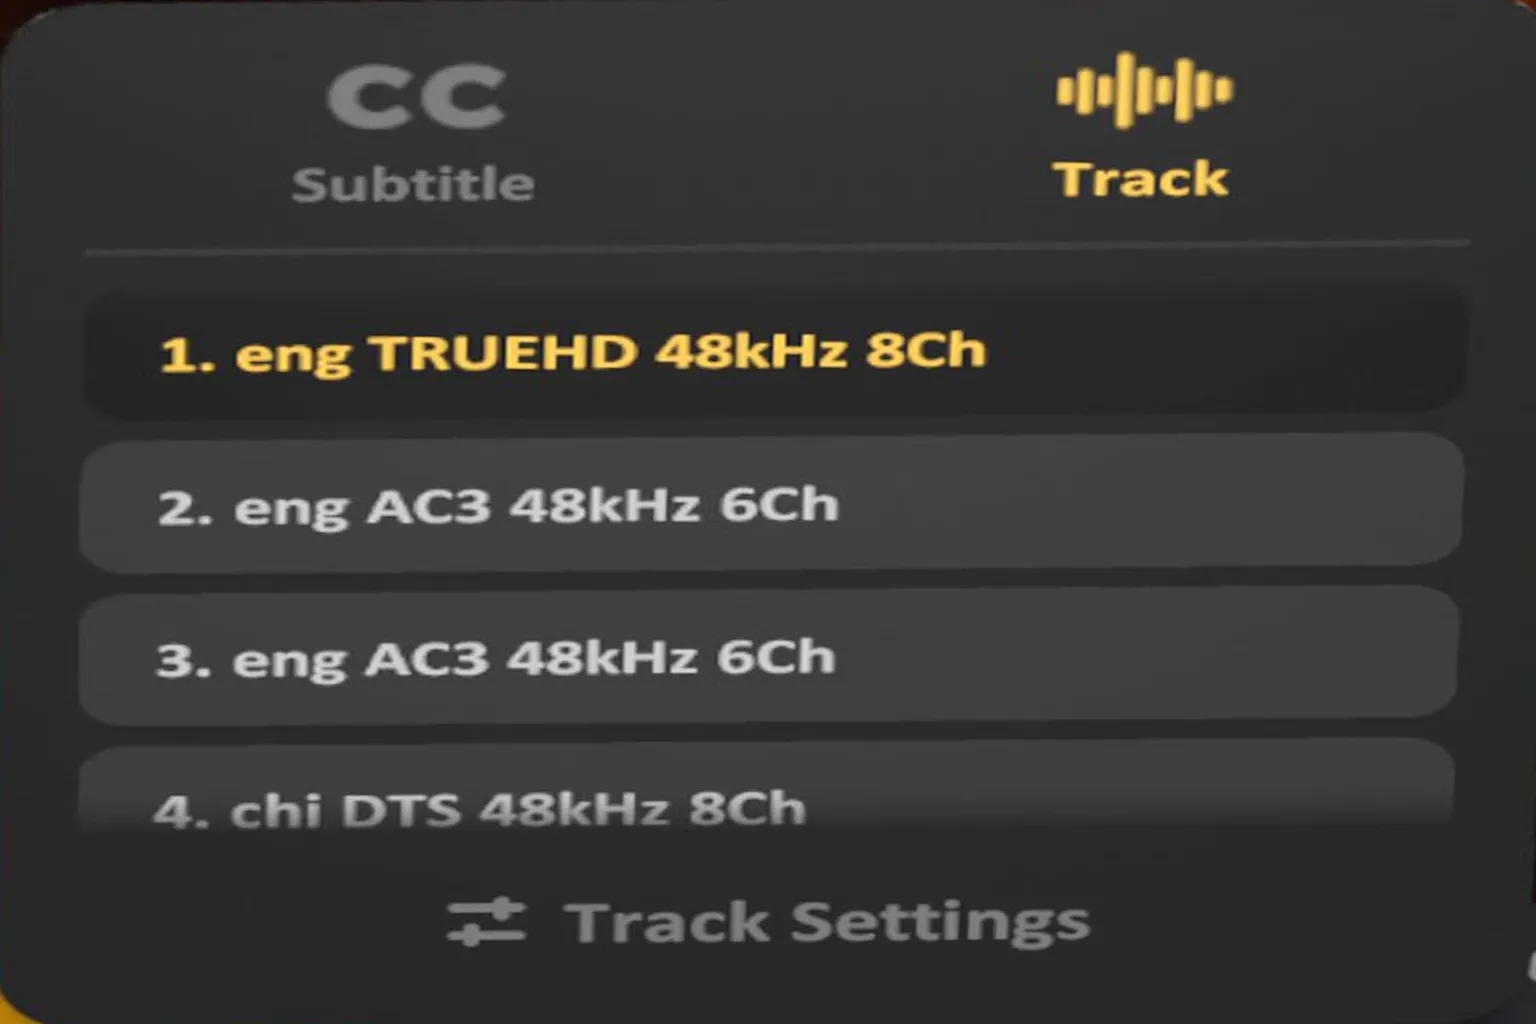
Subtitles & Audio Tracks
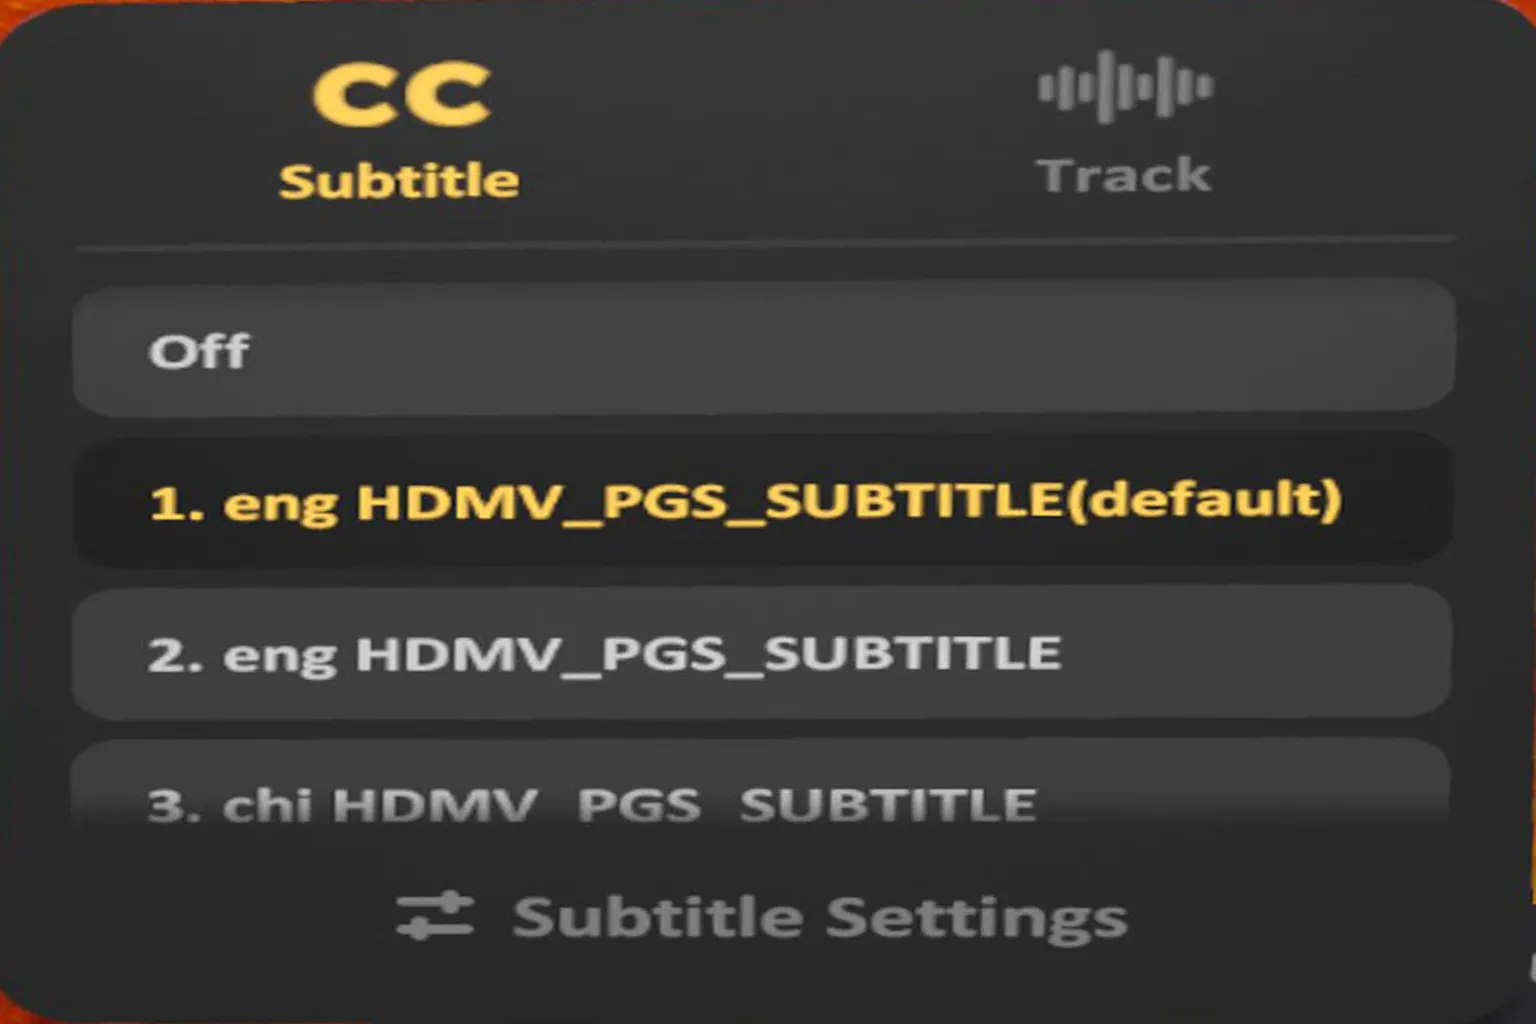
Subtitles
Subtitles are kind of essential when watching videos, right?
If you select CC Subtitles, you can turn subtitles on or off, or switch between the different subtitle tracks embedded in the video.
Skybox VR Player also supports external subtitle files. As long as the subtitle file has the same filename as the video, it’ll be loaded automatically.
One thing to keep in mind though: whether it’s embedded subtitles or external ones, you can’t change the subtitle position, font, or color. That part is fixed.
Audio Tracks
Skybox supports multiple audio channels, and formats like Dolby TrueHD and DTS Master Audio play without any issues. Audio quality is solid across the board.
Settings
The settings menu is mostly about adjusting how the screen looks.
Among all the options, the one I personally think really stands out is the curved screen mode. Everything else is honestly fine left at the default settings.
Lock Screen
Keeps the screen fixed directly in front of your eyes, even when you move your head.
Not really my thing—I prefer the default behavior since it feels more like sitting in a real movie theater.
Curved Display
Adds a slight curve to the screen, and this actually looks really good. It makes the image feel more immersive and just nicer overall.
There are four more settings here, including:
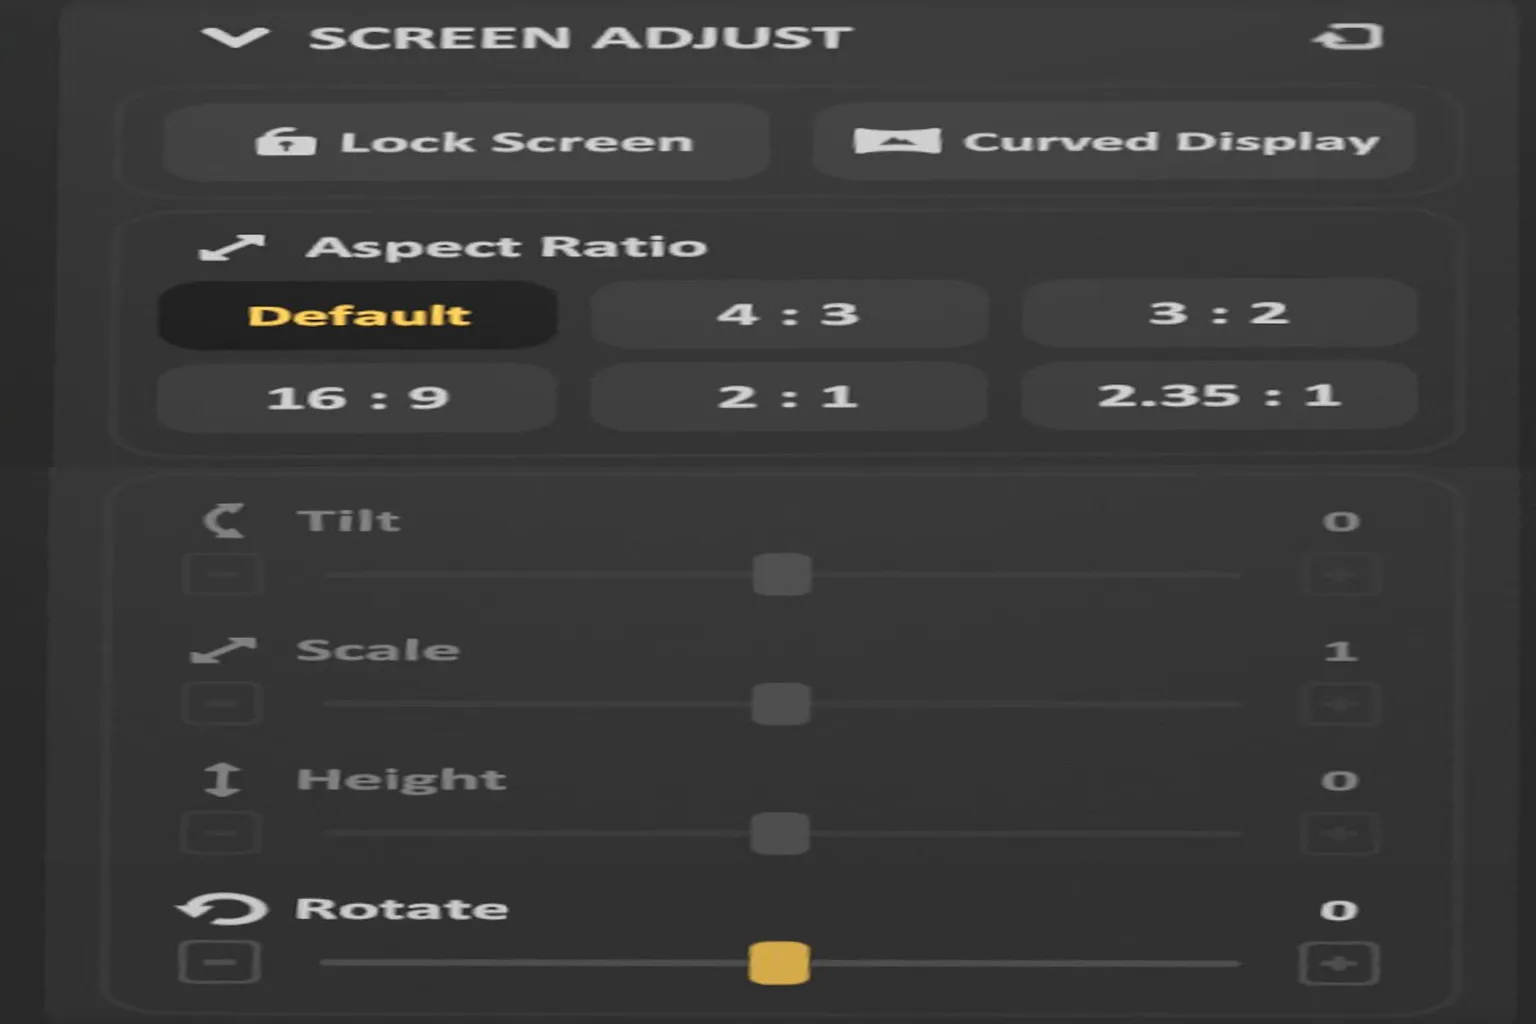
Screen Adjust
Lets you change screen size and aspect ratio. You can stretch the image or resize it manually, but in most cases, the default aspect ratio is the easiest on the eyes and works best.
3D Adjust
Here you can switch a 3D video into mono (single-eye) mode, so it plays like a normal 2D video, or swap the left and right images.
Honestly though, I couldn’t really tell much of a difference myself.
There’s also an option to adjust the eye separation for 3D videos, in case things feel a bit off or uncomfortable when watching 3D content.
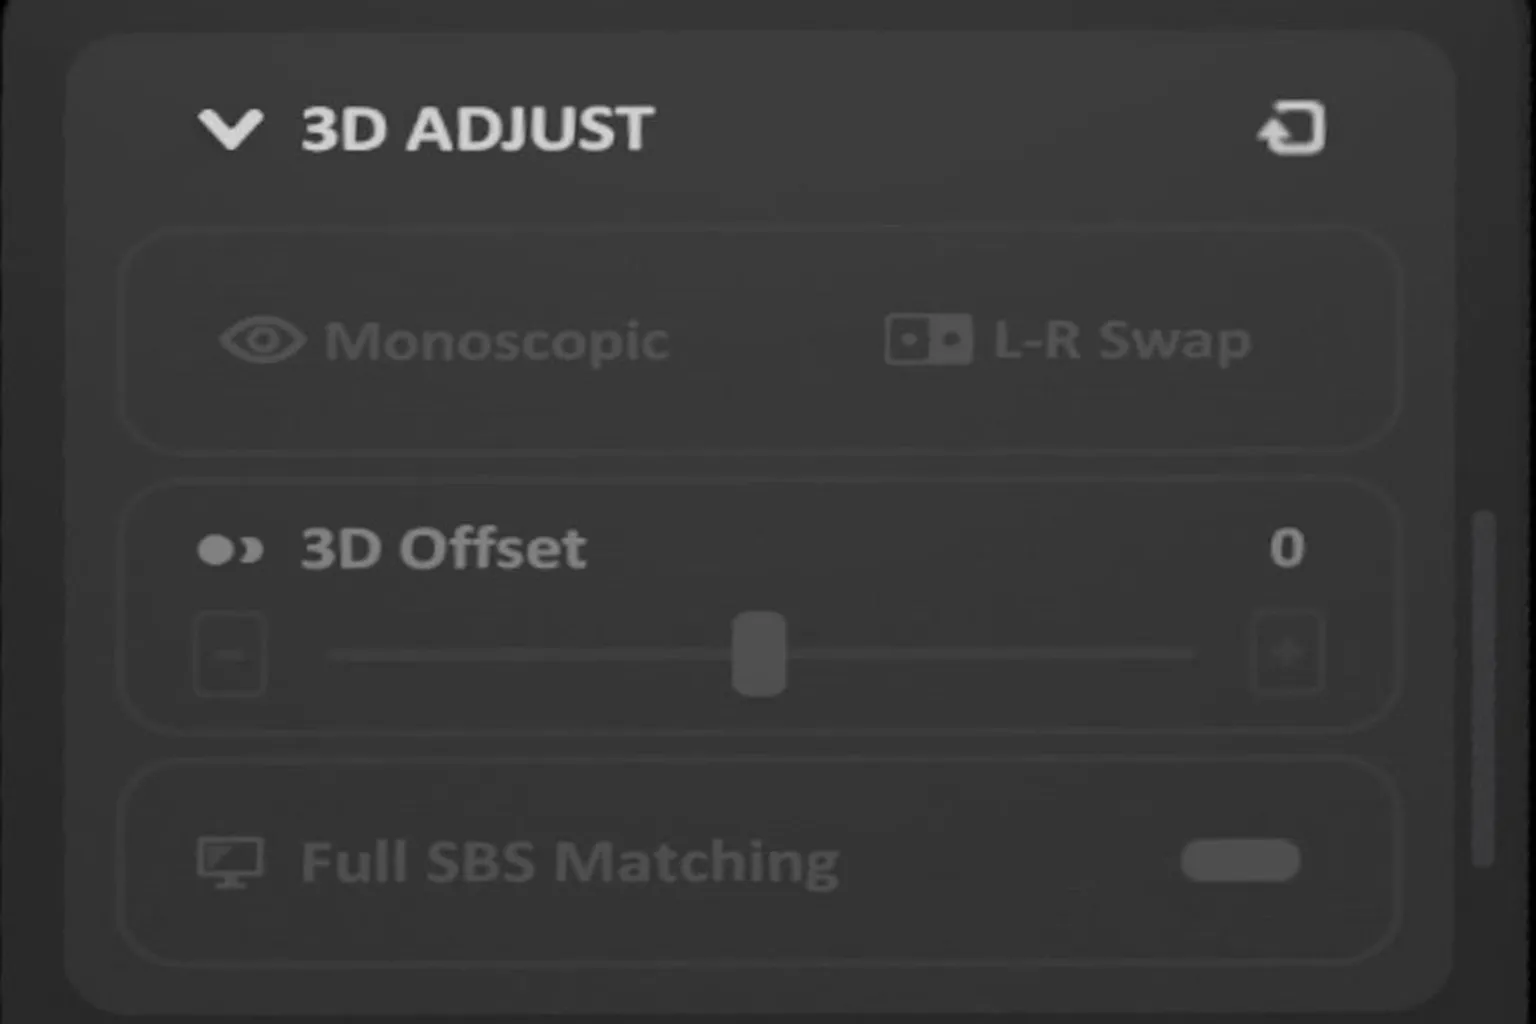
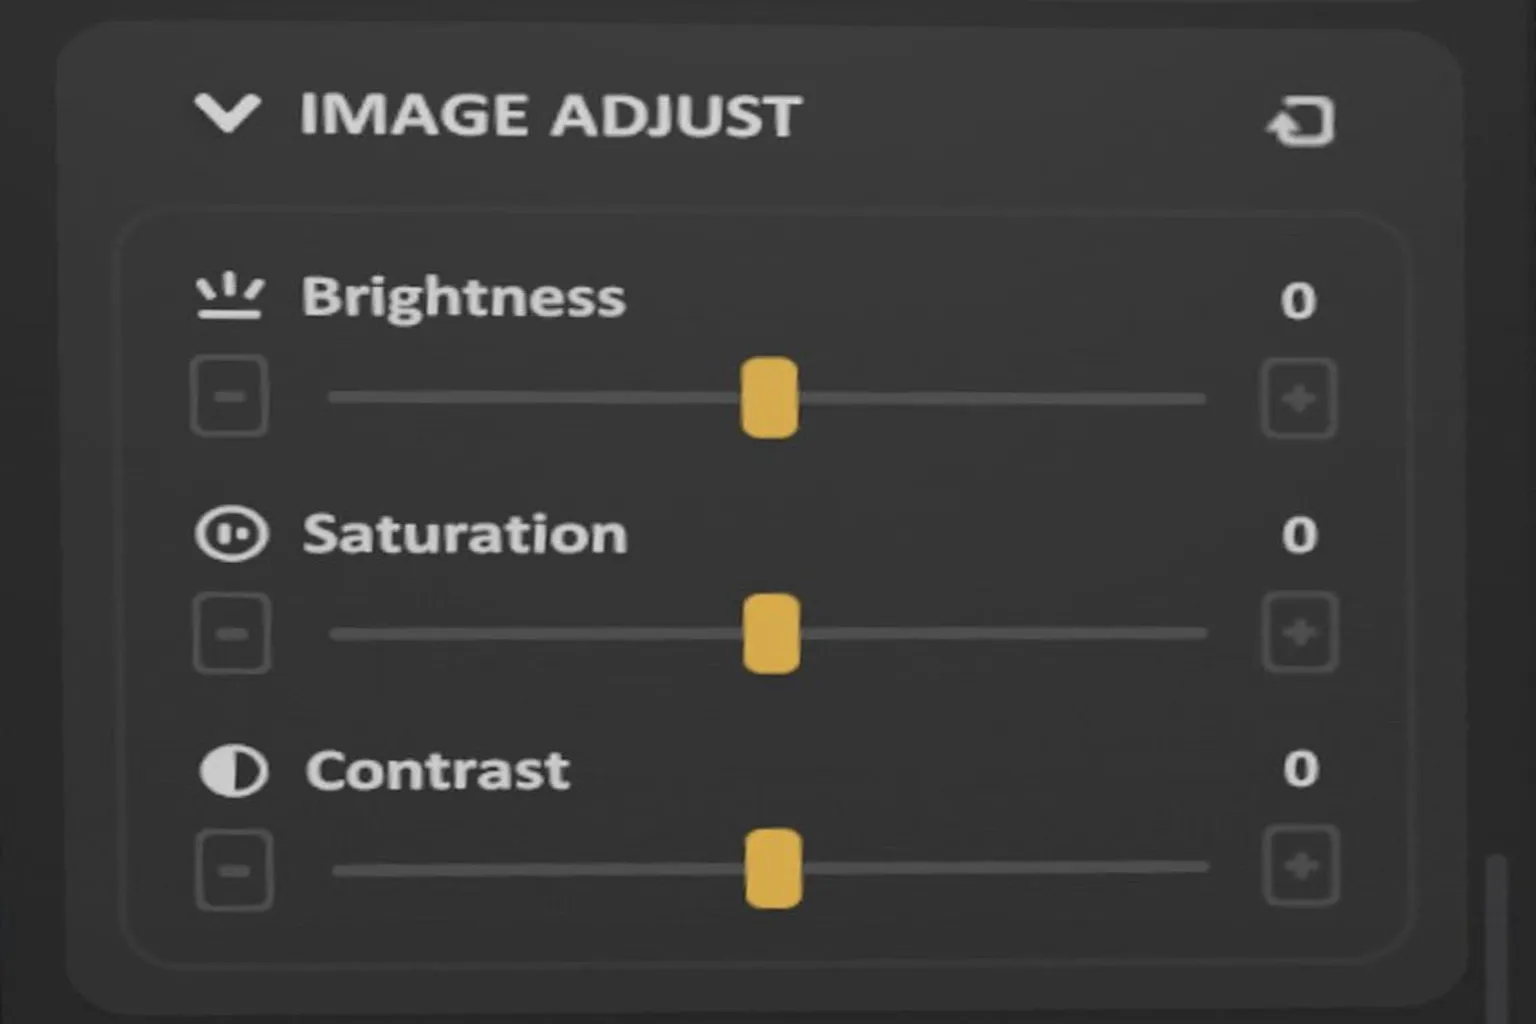
Image Adjust
You can tweak brightness, saturation, and contrast here, but honestly, the default settings are already good enough for most people.
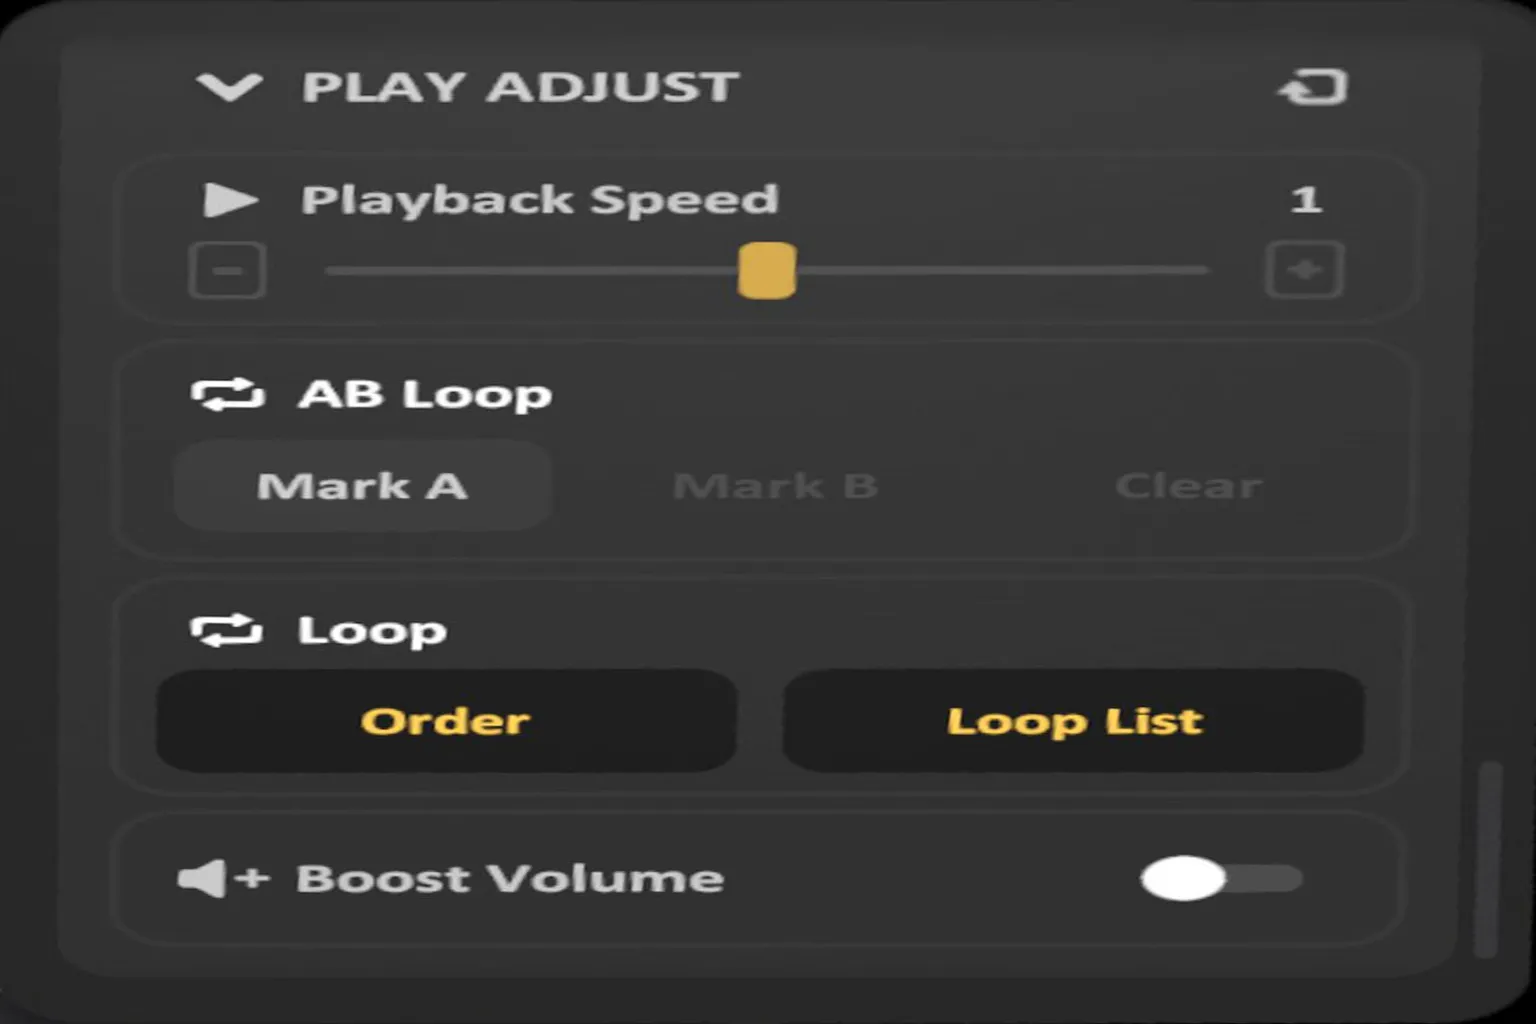
Playback Adjust
You can adjust the playback speed here—watch at 1.5× if you want—and also set up AB repeat to loop a specific section of the video.
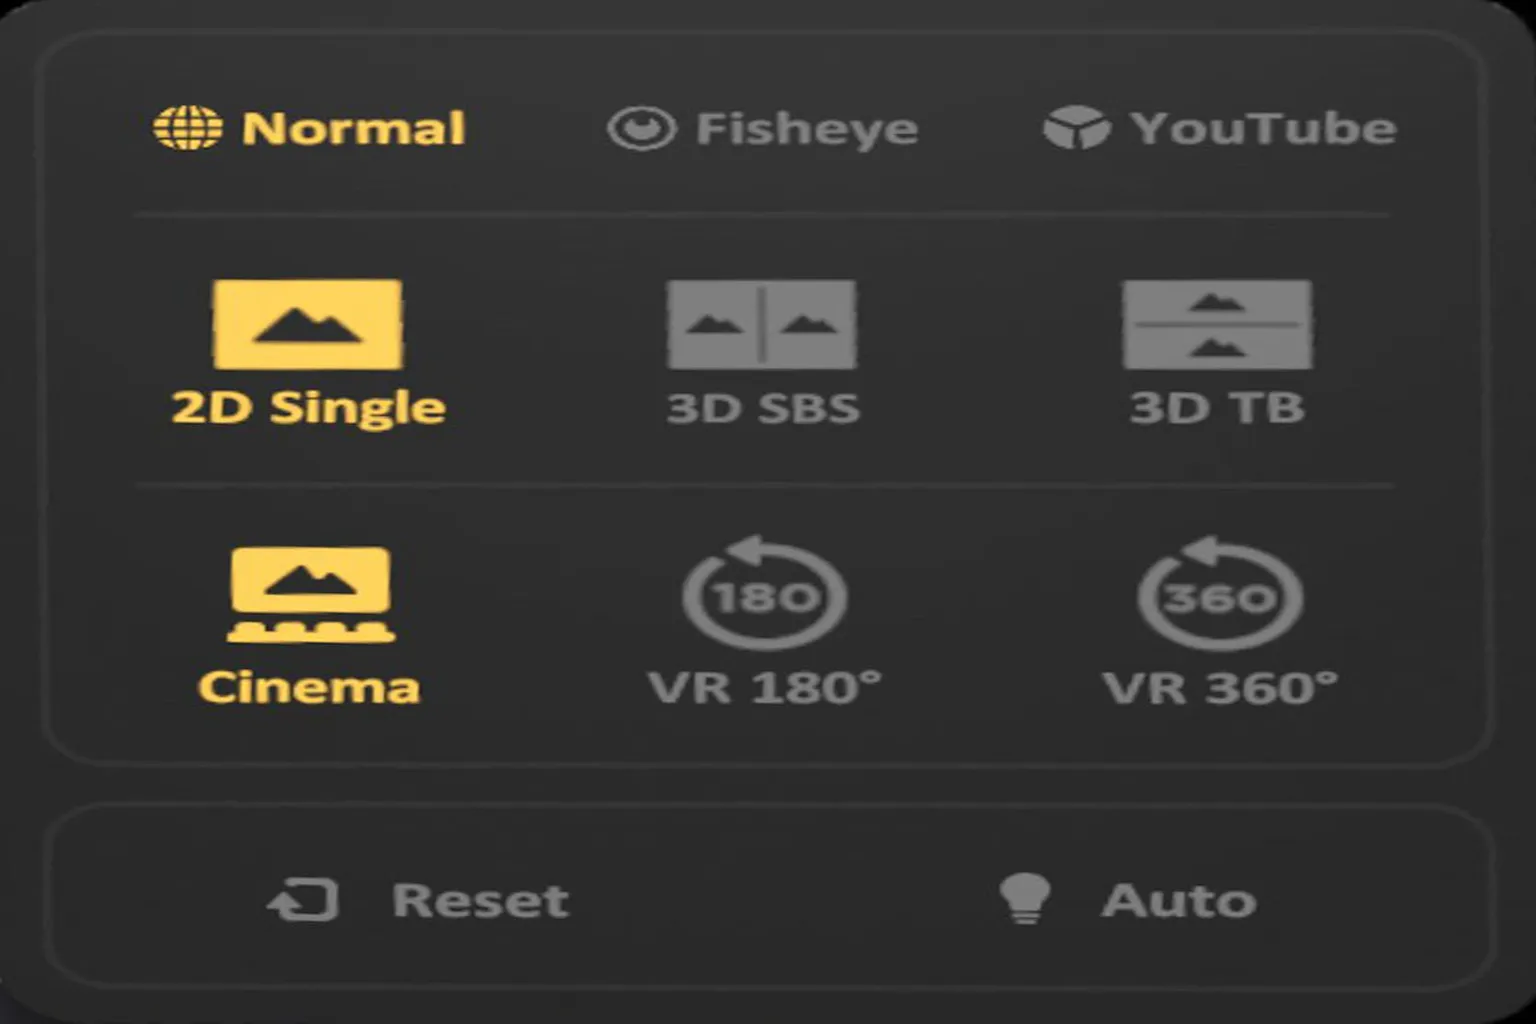
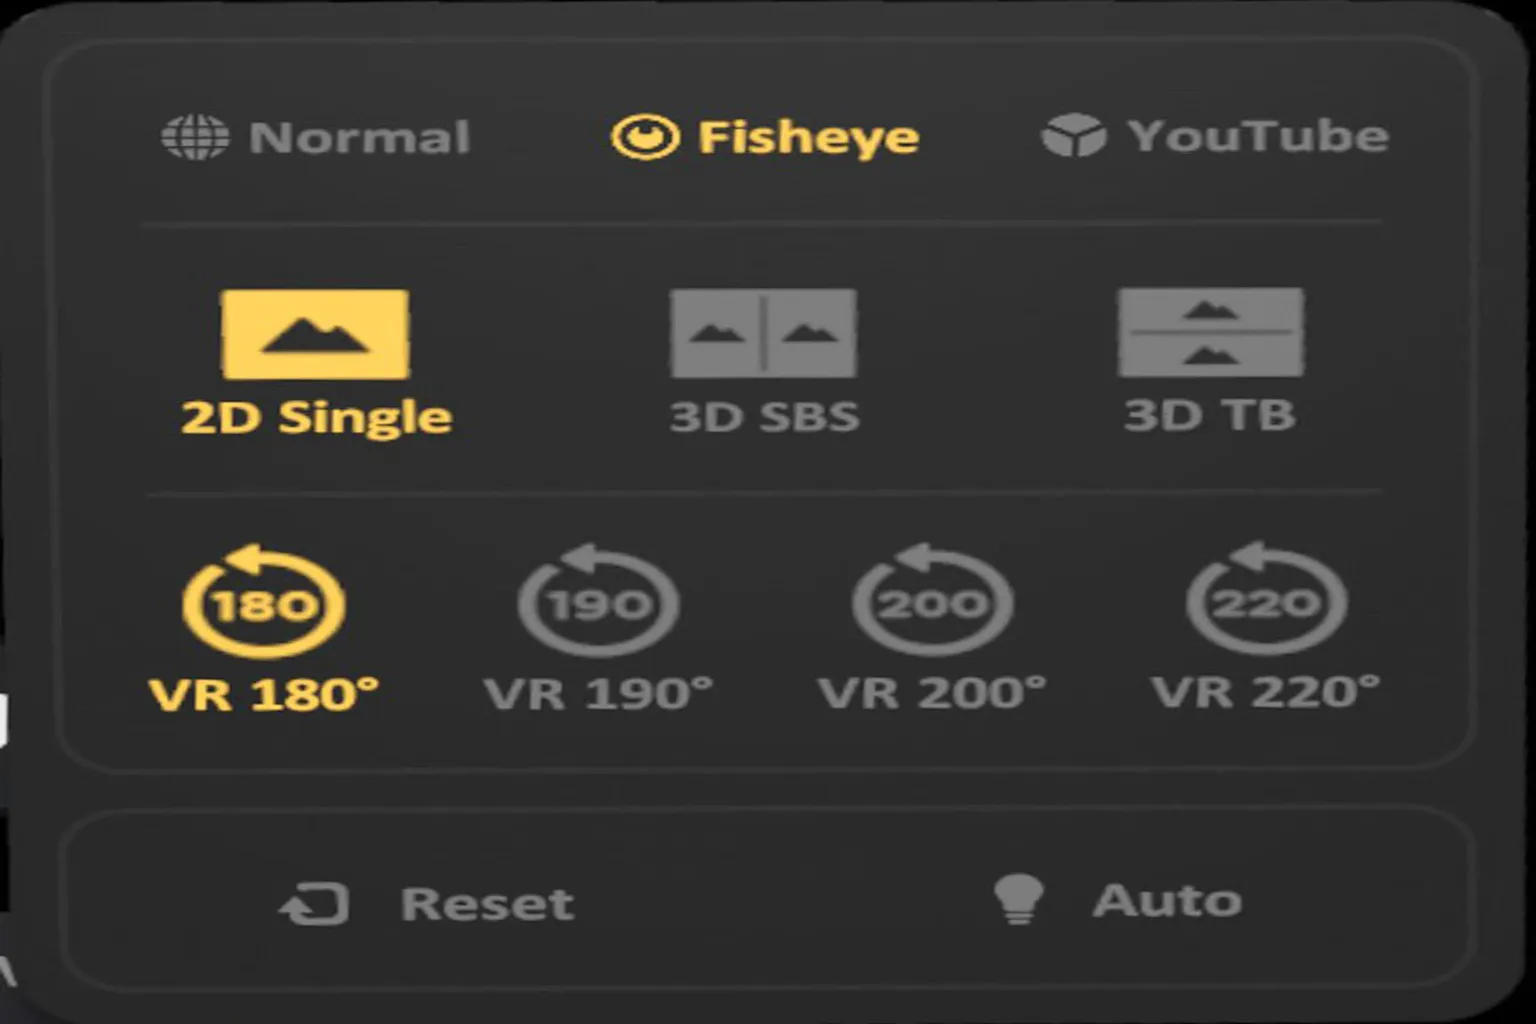
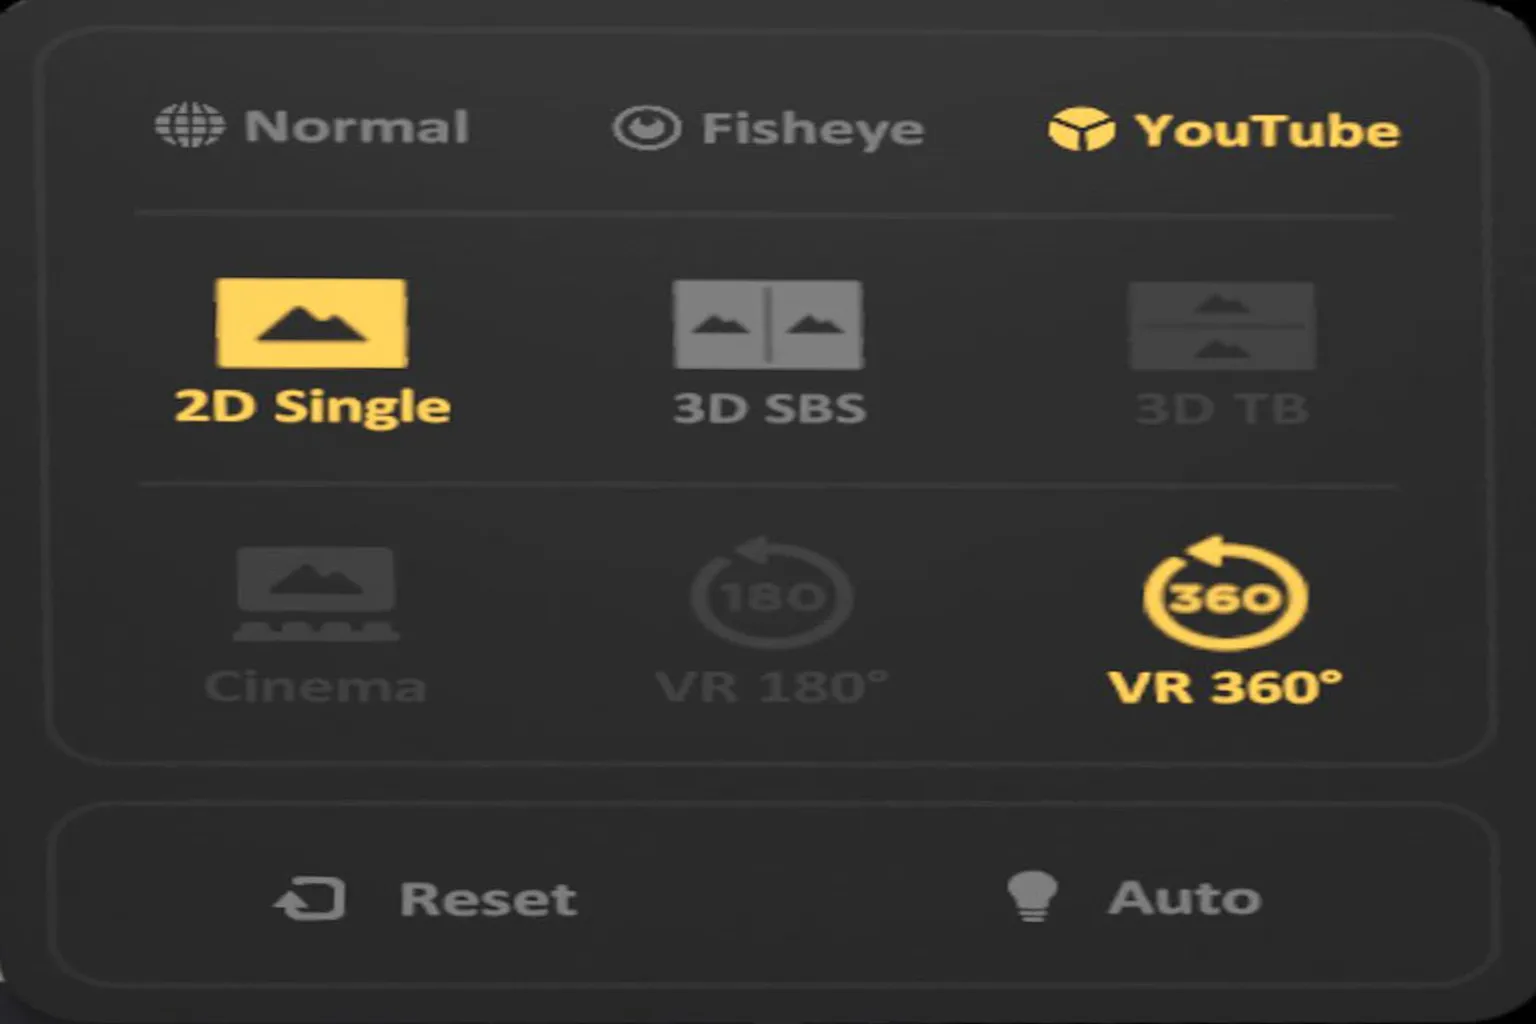
Video
This section lets you choose how the video is displayed: Normal, Fisheye, or YouTube mode.
Normal Mode
This is the default mode for most standard and 3D videos, and honestly the one you’ll use most of the time.
Tap the light-bulb icon in the bottom right and Skybox will automatically detect the best display format.
If needed, you can also switch manually between 3D layouts like side-by-side or top-and-bottom.
Fisheye Mode
This mode wraps the entire screen into a fisheye-style view, giving everything a wide-angle, bulging-lens look.
Honestly, I wouldn’t recommend it. Once you turn it on, the image gets hard to look at, and it’s not comfortable for long viewing sessions.
YouTube Mode
In this mode, the ceiling, floor, and walls all turn into screens, making it feel like you’re trapped inside the video itself.
The image gets split and heavily distorted, so watching videos properly is basically impossible.
On paper it sounds super immersive, but in reality it feels more like your soul is being judged. Personally? Not recommended at all.
Scenes
Skybox VR Player comes with five different scenes: Cinema, Ultra Cinema, Void, Space, and Moon. You can also adjust seat height and position to fine-tune the view.
My personal favorite is Ultra Cinema—the atmosphere feels a lot like a high-end AMC Dolby Cinema or IMAX-style theater in the US, with a huge screen, wide field of view, and that premium “best seat in the house” vibe.
In terms of perceived seating distance:
- Front row: feels like sitting around row 6–7 in a real theater
- Center: roughly the sweet spot, around row 11–12
- Back row: closer to row 18–20, more relaxed and easy on the neck
You can dial it in depending on whether you want that IMAX wow factor or a more laid-back movie night feel.

User Review
This review is based on Skybox version 2.0. In this release, I didn’t run into any noticeable bugs—the playback is smooth, and the features are simple and easy to use.
It offers things you don’t usually get in other video players, like built-in YouTube playback, hidden folders, and PC desktop streaming, while still keeping the price at an affordable $9.99.
If you’re going to pick just one VR video player for Meta Quest, Skybox VR Player is a very strong contender.
But keep in mind, the player itself does not come with any videos. If you think hunting down content is a hassle, you might want to check out the features in DEO VR and SLR instead.

SexLikeReal Ultimate Guide
Hidden Discounts, Japanese VR & Passthrough Review

Moon VR Player Ultimate Guide
PC Streaming, WebDAV & Web Theater DLC

DEO VR Complete Guide
AI Passthrough, 8K Videos & Mixed Reality Setup
FAQ – Common Questions
Is Skybox VR Player free?
No. Skybox VR Player is a paid app priced at $9.99. That said, compared to other players, it offers a lot of features for the price and is very good value.
What video formats does Skybox support?
Skybox supports most major formats, including MP4, MKV, AVI, MOV, WMV, WEBM, TS, FLV, 3GP, and M4V. It has built-in H.264 and H.265 (HEVC) decoders and can play 2D, 3D, 180°, and 360° videos.
Can Skybox load external subtitle files?
Yes, Skybox supports external subtitle files like .srt, .ass, and .ssa, as long as they share the same filename as the video file.
Does Skybox support AirPlay or Chromecast?
No. Skybox uses its own streaming system called AirScreen and does not support Apple AirPlay or Google Chromecast.
What is AirScreen? Does it support audio?
AirScreen is Skybox’s proprietary streaming feature. It lets you stream videos or mirror your entire PC desktop into the VR headset, with audio synchronization supported. To use it, you need to install the official AirScreen client on your PC.
Does Skybox support voice commands or gesture controls?
Skybox does not support voice commands at the moment. Basic gestures like dragging the screen and using the virtual keyboard are available, but most operations are designed to be done with controllers.
Is there lag or stuttering when streaming?
When playing videos locally via USB-C, latency is almost zero. With AirScreen streaming, performance depends heavily on your Wi-Fi quality. A Wi-Fi 6 router is recommended, and you should avoid using the 2.4GHz band.
I’ve already created an avatar, but I still can’t create a room. Why?
Try changing your avatar’s appearance slightly and saving it again. This usually forces the system to re-register the avatar correctly, after which the room feature should become available.