The Meta Quest 3 has incredible hidden power, but default settings leave much of it unused. Enter the Quest Games Optimizer (QGO). This complete guide shows you how to unlock drastically better game graphics, enable 4K recording and stereoscopic VR recording, and easily organize your messy app library.
Quest Games Optimizer Overview
Quest Games Optimizer is an unofficial performance tuning tool that can improve game visuals and make some games run more smoothly by adjusting CPU/GPU performance levels, render resolution, refresh rate, and other parameters. With these tweaks, jagged edges in VR games are greatly reduced, which noticeably improves immersion.
Because this software directly changes performance and rendering parameters on the headset, it isn’t distributed through the Meta Store or the SideQuest store. The only place you can get it is on itch.io.
Since the purchase and installation process is a bit complicated, I’ve prepared three separate articles that walk through those steps in detail. Start by checking those first.
How to Enable Meta Quest Developer Mode
Fix Errors and Sideload Apps Fast
How to Install SideQuest on Meta Quest
Sideload Games & Custom Apps
Quest Games Optimizer Introduction
How to Buy, Install & Boost Graphics (2025)
Feature Overview
In the early development stages, it could only handle basic system performance tuning. But as the developer kept rolling out updates and adding new features, it’s grown into a pretty powerful tool. The current version of Quest Games Optimizer also supports recent Meta Quest firmware versions.
Here’s what it can do:
System performance tuning
Improves visual quality and makes gameplay smoother
VR stereoscopic video and 4K recording
Supports high-quality recording directly on the headset
App management
Create folders, organize apps, and change the display names shown inside QGO
File management when connected to a PC
Easily organize data stored on the headset
APK installer
Install custom apps directly, without going through SideQuest
OVR real-time performance monitor
Check frame rate and system load while playing
Since this is an unofficial tool that changes performance and rendering parameters on the headset, demanding profiles may increase heat and battery consumption. It is better to understand what the settings do before pushing profiles too high.

Boosting System Performance to Upgrade Visual Quality
This is the core of what QGO does. Under Meta’s default settings, the headset usually balances performance, heat, and battery life instead of pushing every game to the highest possible settings. Most VR games are designed to run smoothly on Quest 2, so if you play them as-is on Quest 3, the difference often doesn’t feel like “wow, this is next level.”
But if you’re using Meta Quest 3 or Meta Quest 3S, this is something you should know. Both are powered by the Snapdragon XR2 Gen 2. Meta mainly highlights that Quest 3 and Quest 3S offer about twice the GPU performance compared with Quest 2. If a game sticks to Quest 2–level graphics settings, all that extra power just goes unused.
That’s where QGO comes in. It lets you unlock that sleeping performance. So what does the difference actually look like after enabling it? Take a look at the three comparisons below. They show before-and-after examples from Tiny Archers and A Fisherman’s Tale.
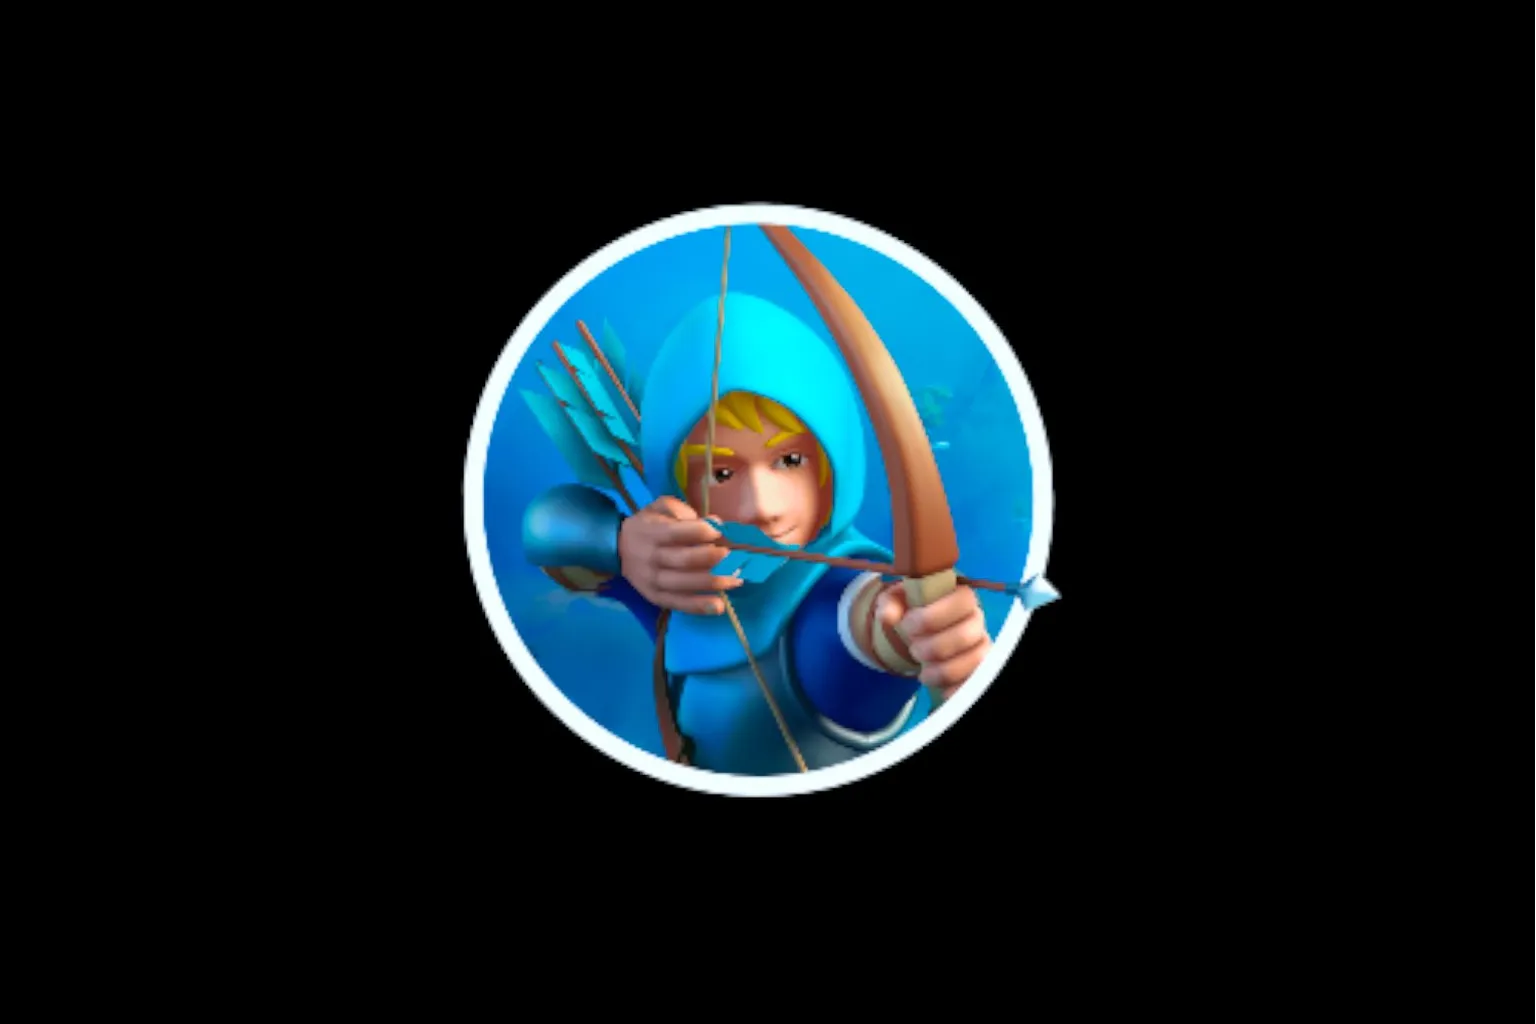
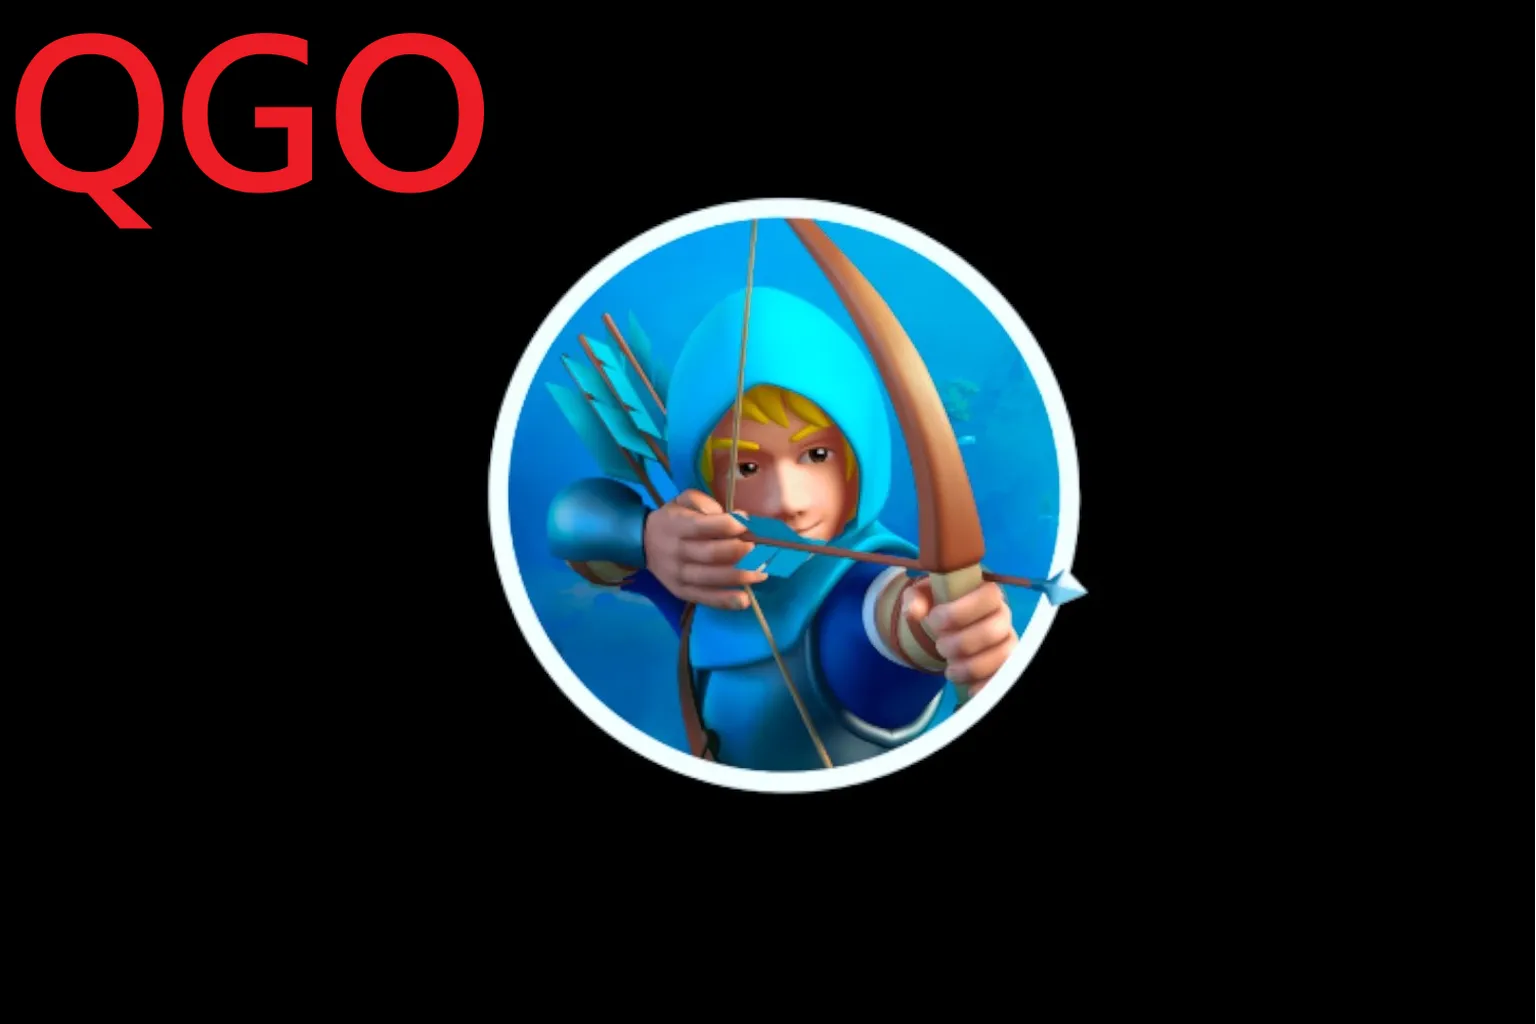




The jagged edges in the image are reduced, and overall sharpness is noticeably improved. Changes like this make VR games feel much more immersive. That said, QGO has very little effect on content that is not rendered in real time by the headset, such as movies or regular video playback. You should not expect a visible improvement there.
Now let’s walk through the actual setup and how to use it.
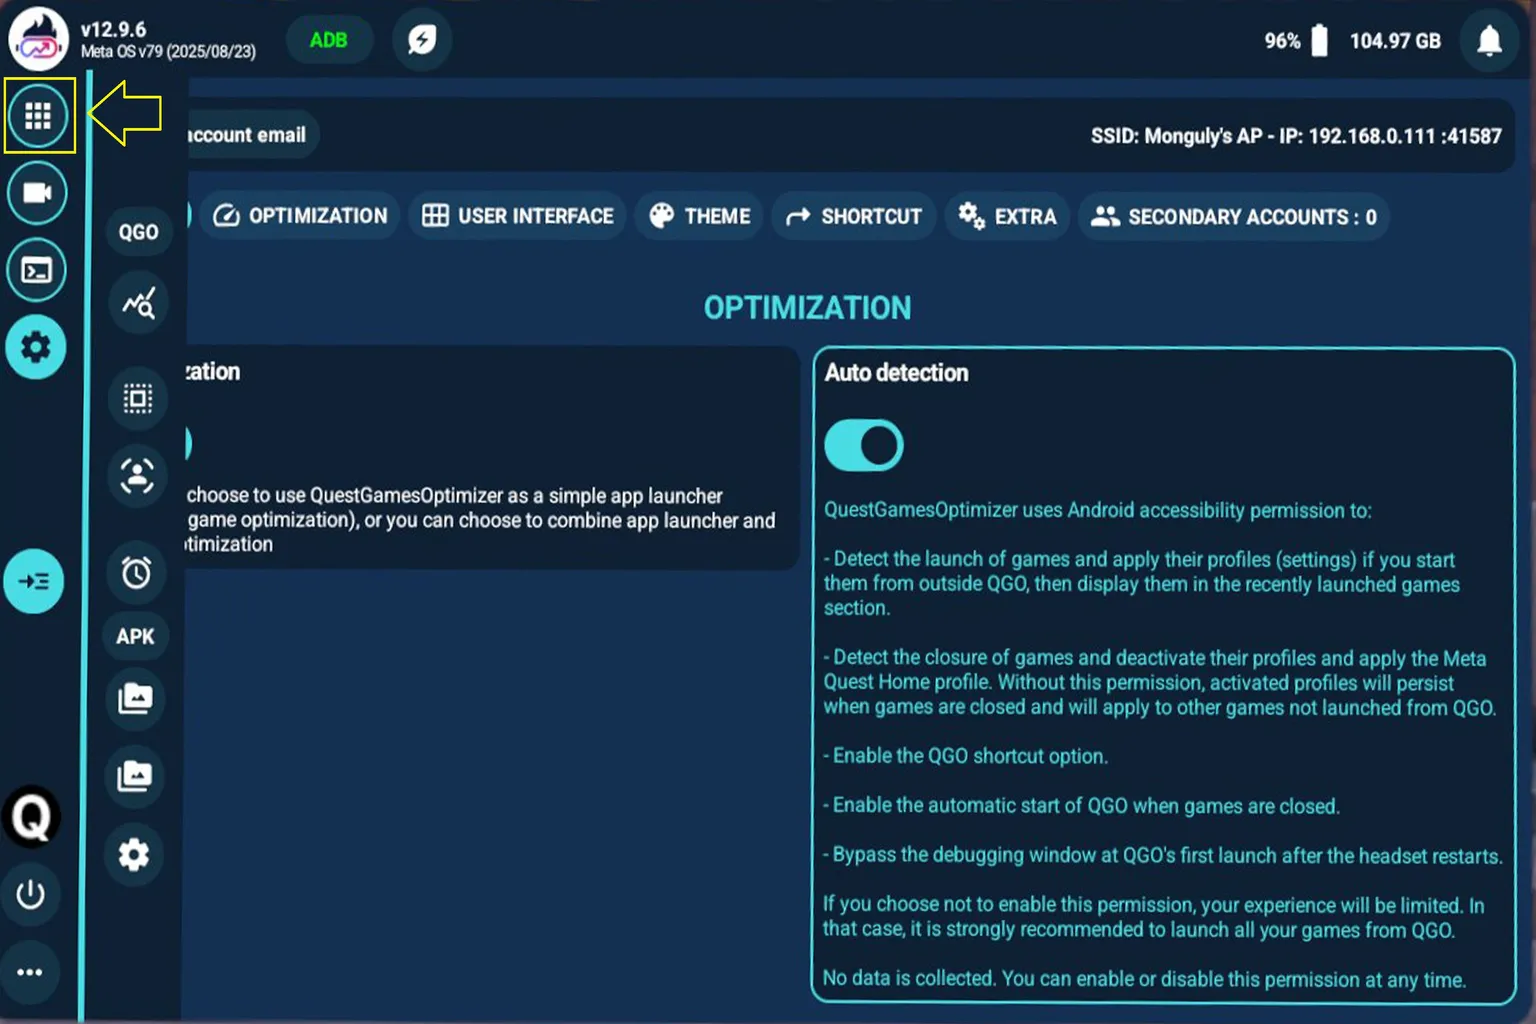
Step 1: Enable Quest Games Optimizer
After launching the app, tap the icon in the top right to enter your game library.
Step 2: Per-Game Performance Settings
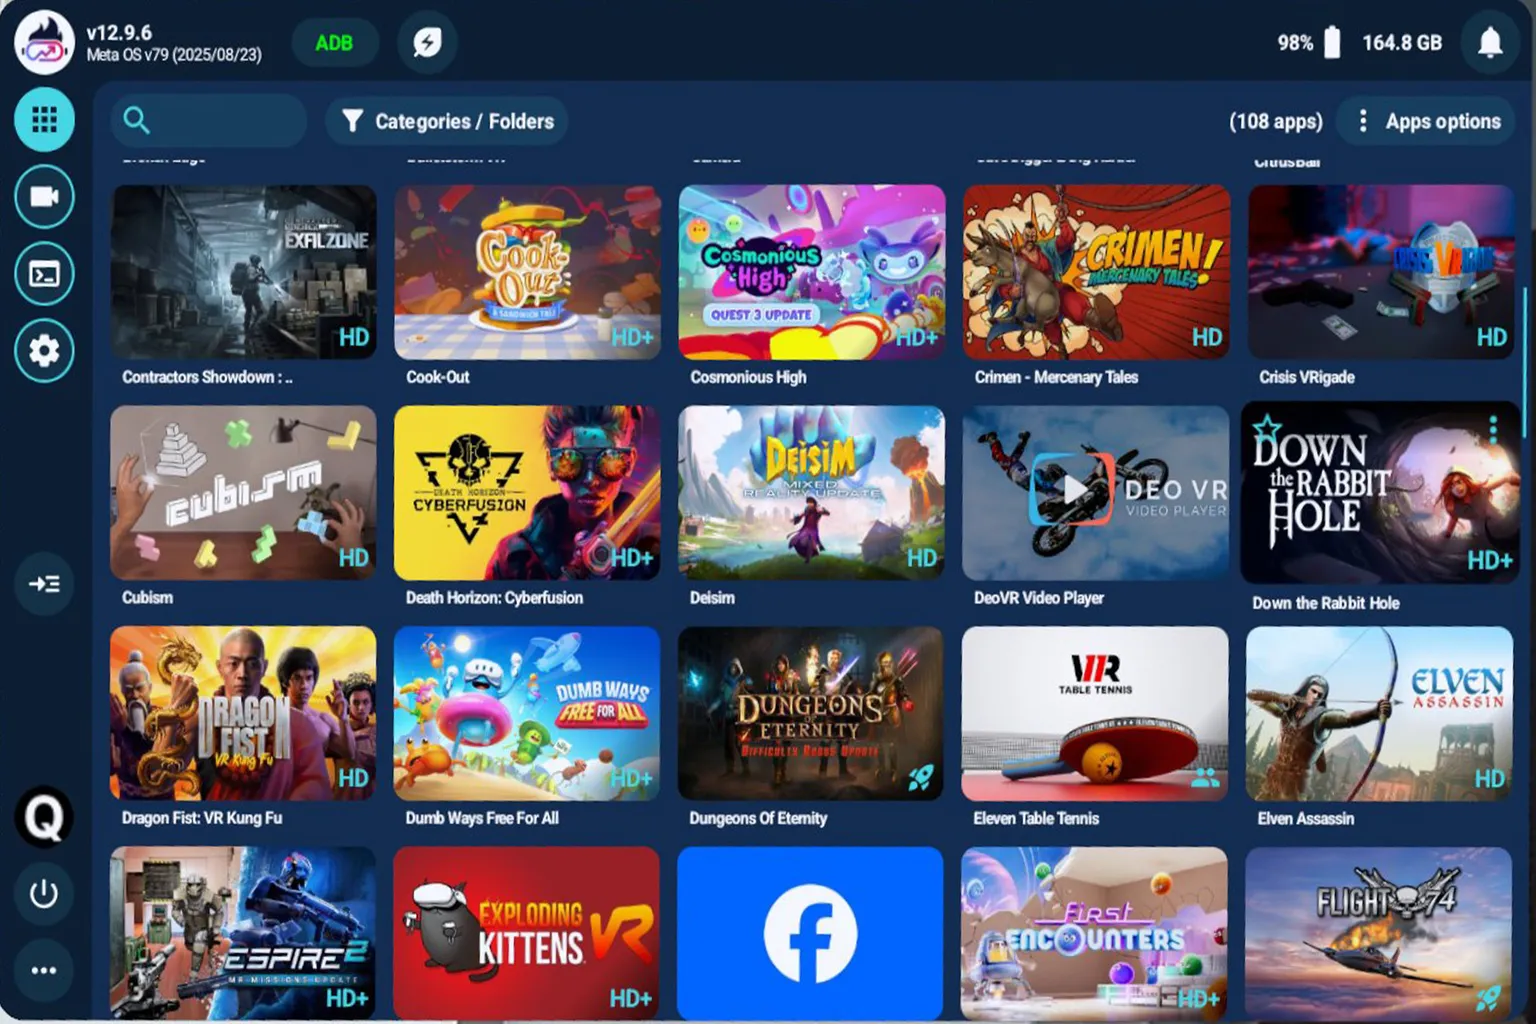
Here, you’ll see several icons displayed in the bottom right of each game. These mean the developer has already prepared optimized presets for that title, so you can apply them as-is.
HD+
Further increases screen resolution
HD
Increases screen resolution
Rocket (🚀)
Keeps the resolution unchanged while greatly improving rendering stability at the current image quality. This helps reduce stutter and frame drops during gameplay, and in many cases allows for a slightly higher refresh rate, resulting in much smoother overall motion.
By using these presets, you can feel the benefits right away without having to tweak detailed settings yourself.
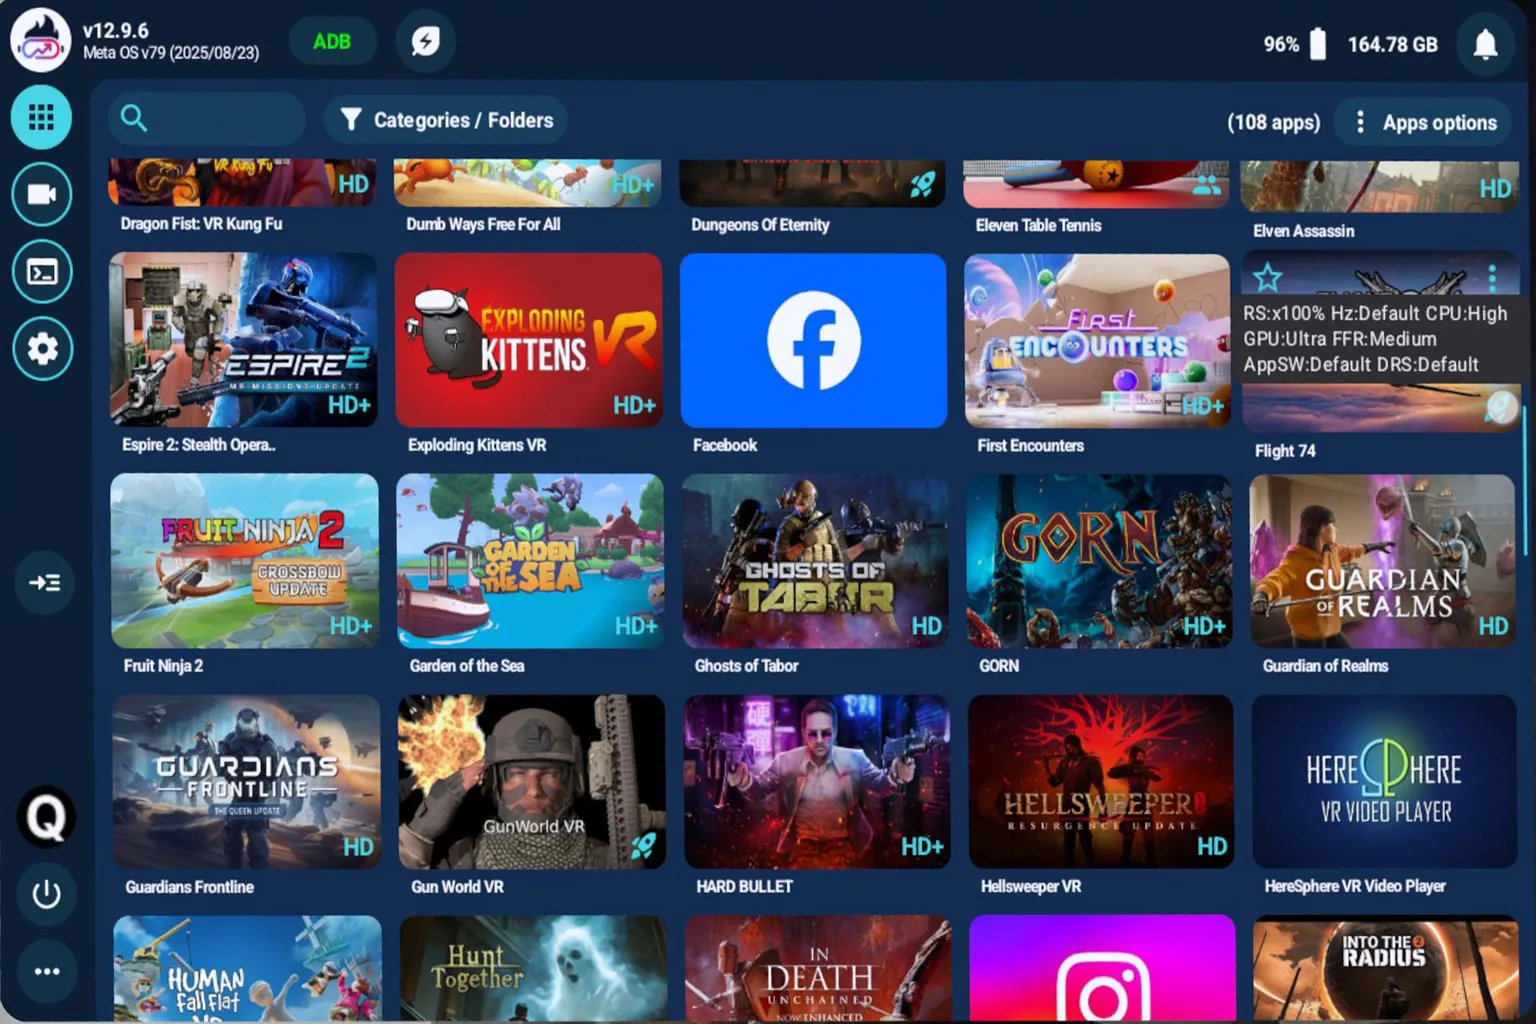
Step 3: Per-Game Performance Breakdown
Take the game “Flight 74” as an example. Even at default settings, it already looks decent. But the preset boosts both GPU and CPU performance and improves rendering stability. Thanks to these tweaks, frame drops are reduced and controls feel smoother during play.
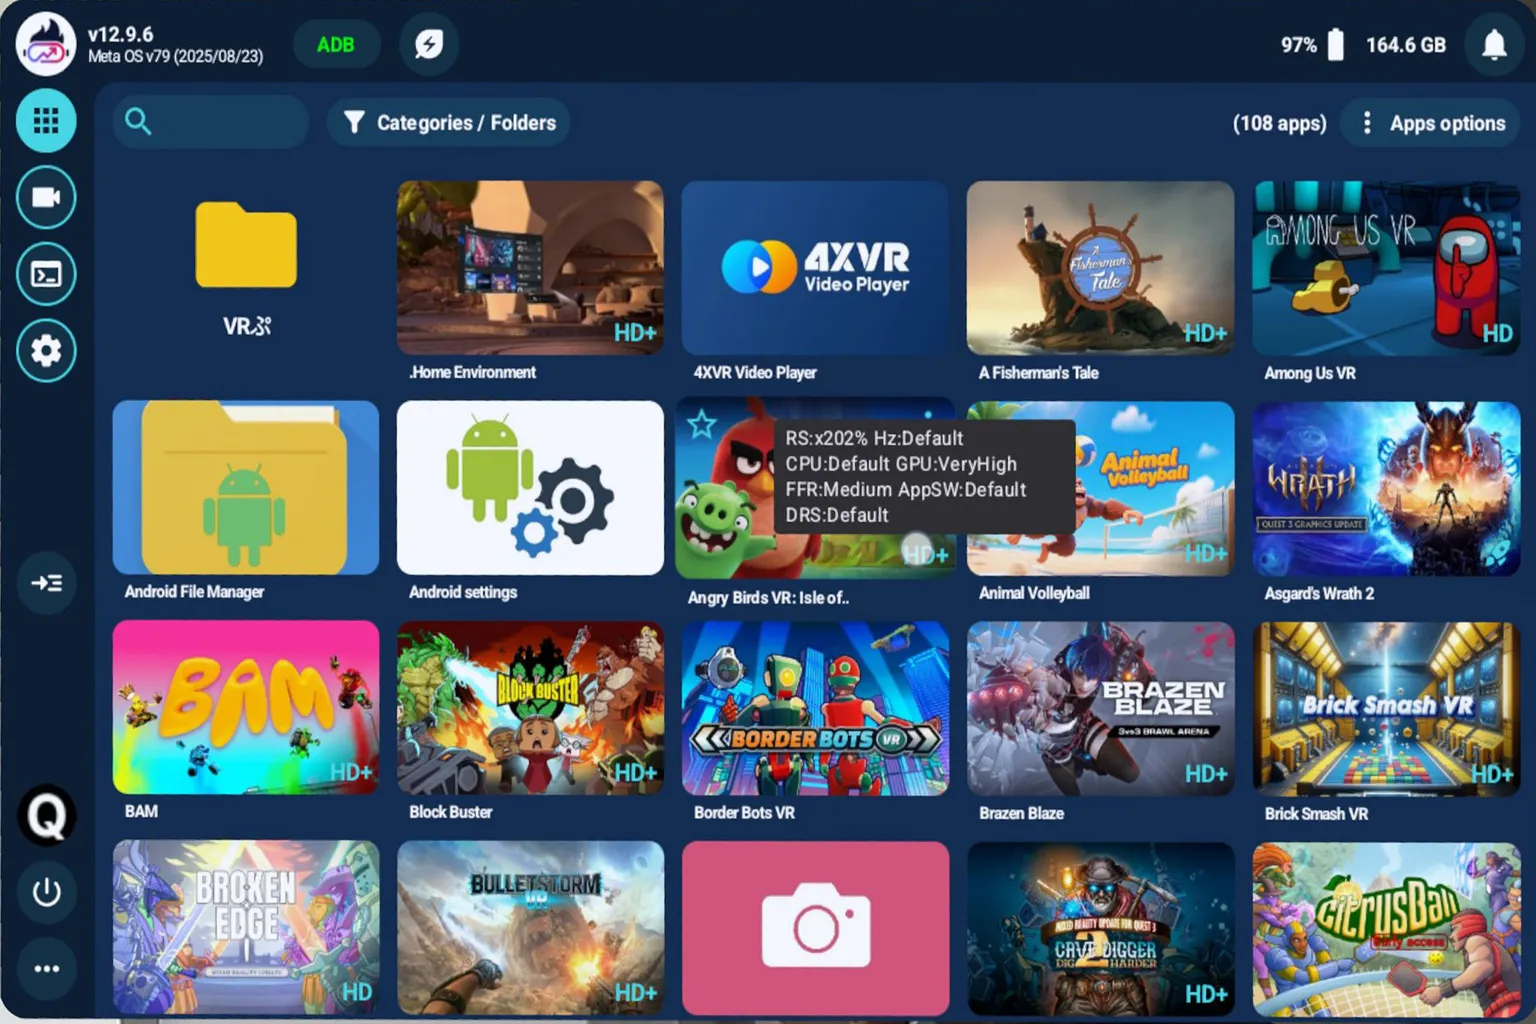
On the other hand, in “Angry Birds VR,” the resolution is pushed all the way up to 202 percent to significantly improve image quality. This makes small objects and background details much clearer, letting you sink deeper into the game’s atmosphere.
Step 4: Switching On and Off
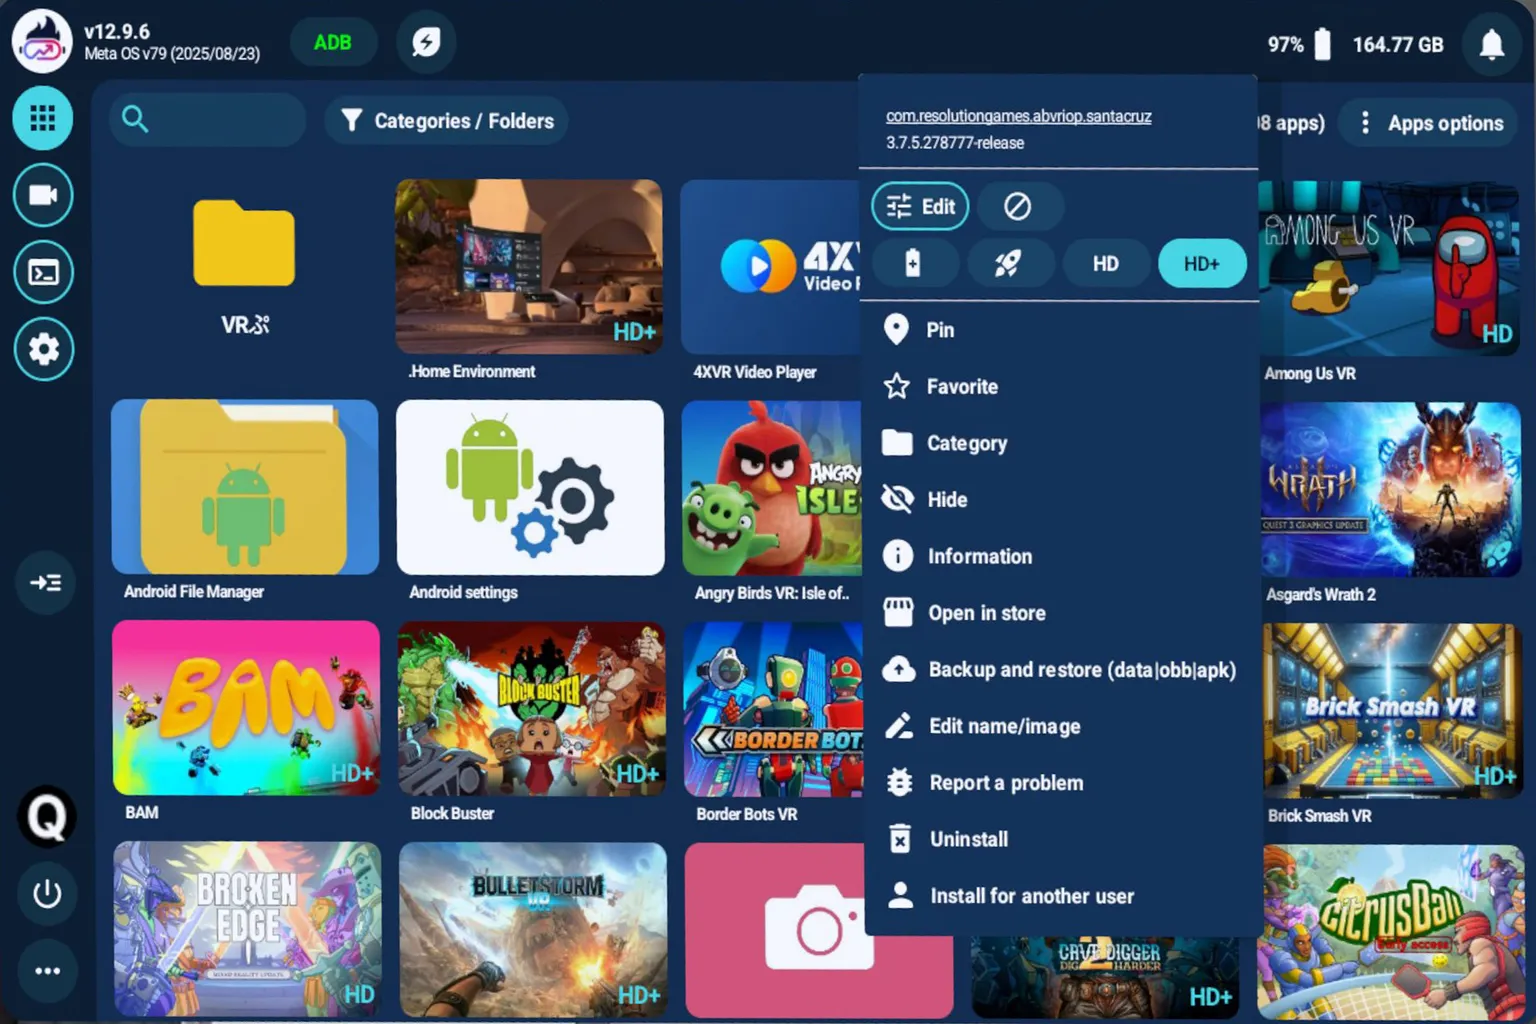
When you point the controller laser at a game, a “⋮” icon appears in the top right. Click it to open the menu, where you can choose performance settings for that game.
- Edit: Manually customize image quality levels and GPU / CPU performance
- 🚫: Play using Meta Quest default settings
- 🔋: Power-saving mode. Lowers CPU and GPU performance to extend playtime
- 🚀: Improves rendering stability without changing resolution
- HD+: Further increases screen resolution
- HD: Increases screen resolution
Being able to switch these quickly based on the game or situation is what makes this really convenient.
Custom Performance Settings: On / Off
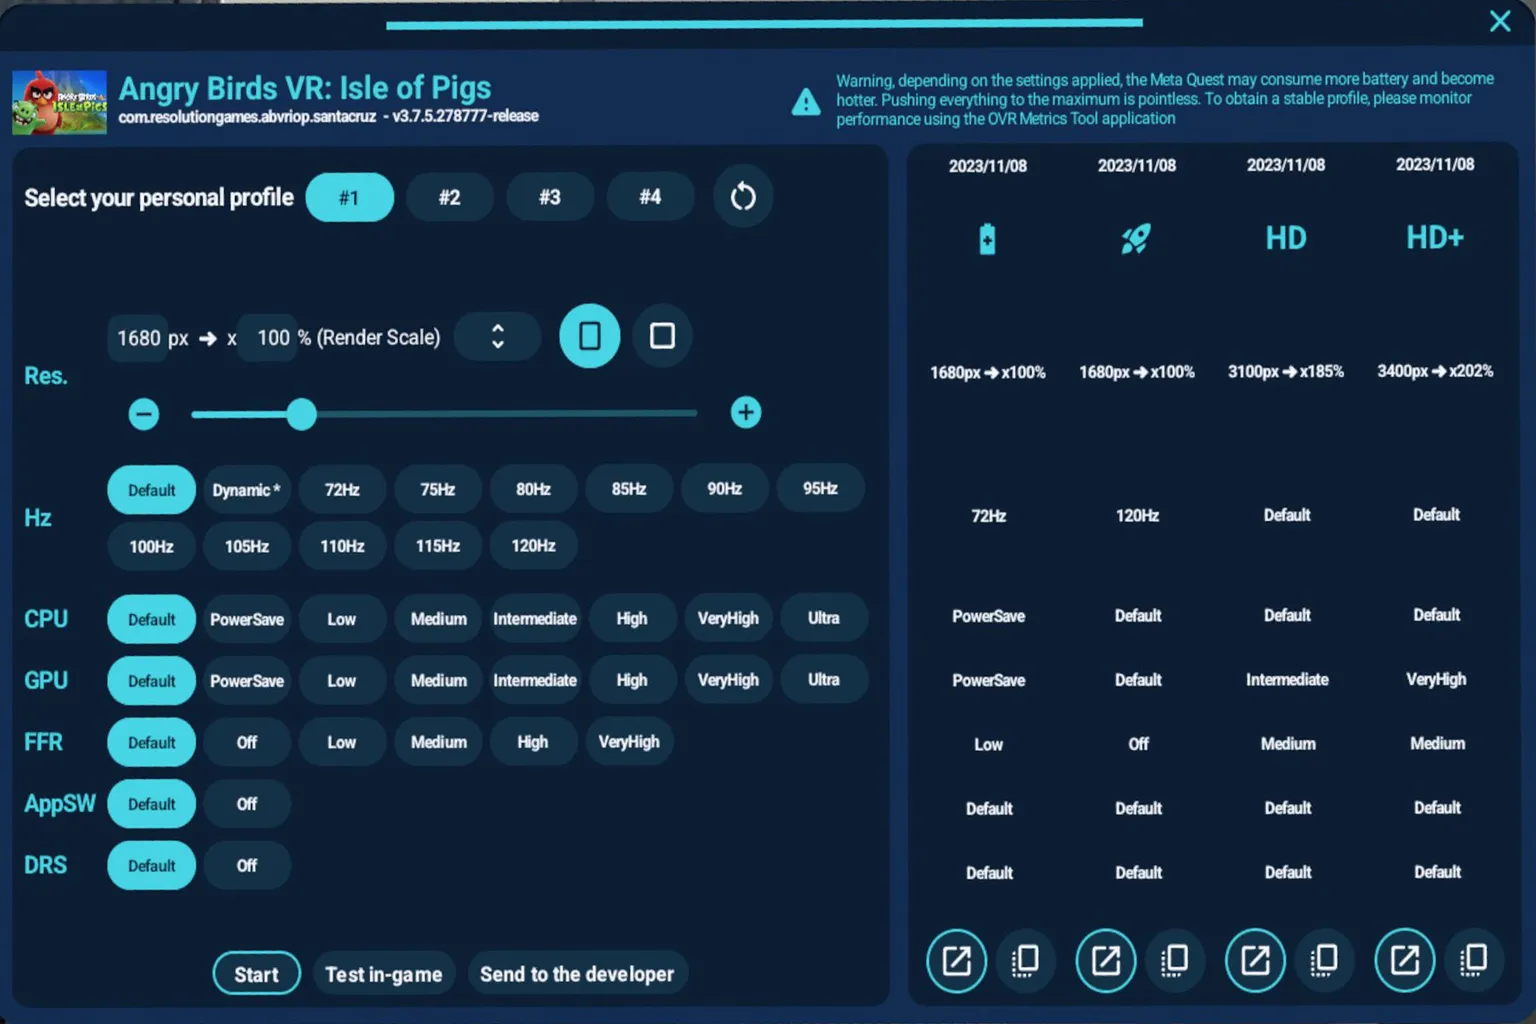
Here you can freely adjust each parameter, but pushing values too high can cause freezes or overheating, so be careful. In most cases, using the developer-tested presets is more stable.
Personal profiles
You can save up to four different settings per game
RES. (Render scale)
Increases overall screen resolution
Hz (Refresh rate)
How often the headset refreshes the image. Higher values reduce latency but increase performance load
CPU / GPU
Performance level of the headset. Moving to the right increases performance, with Ultra being the maximum level.
FFR (Fixed Foveated Rendering)
Keeps the center of the screen high resolution and lowers resolution around the edges to balance performance and image quality.
AppSW (Application Spacewarp)
For example, interpolates 36 FPS to 72 FPS to improve smoothness. Only available in supported games.
DRS (Dynamic Resolution Scaling)
Automatically lowers resolution to prioritize stable FPS depending on the situation. Only available in supported games.
FFR (Fixed Foveated Rendering)
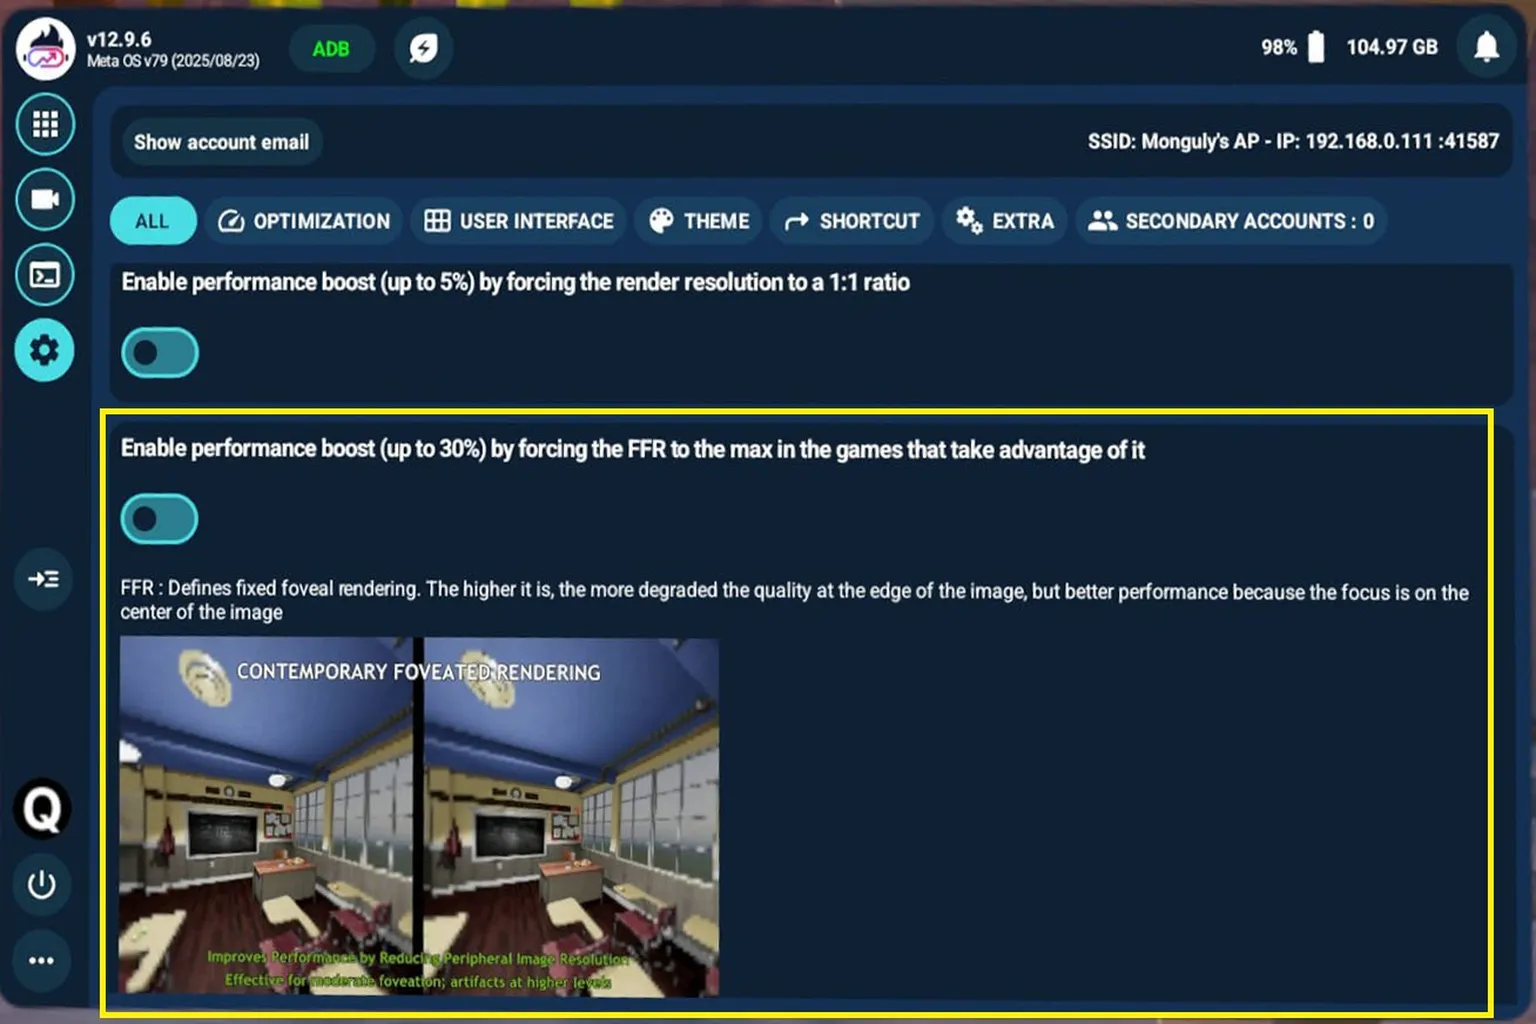
This technique keeps the center of the screen at high resolution while lowering resolution toward the edges, so the area you’re actually looking at stays as sharp as possible. The key point is that it reduces performance load without sacrificing visual quality in your main field of view.
Enhanced Capture and Recording Features
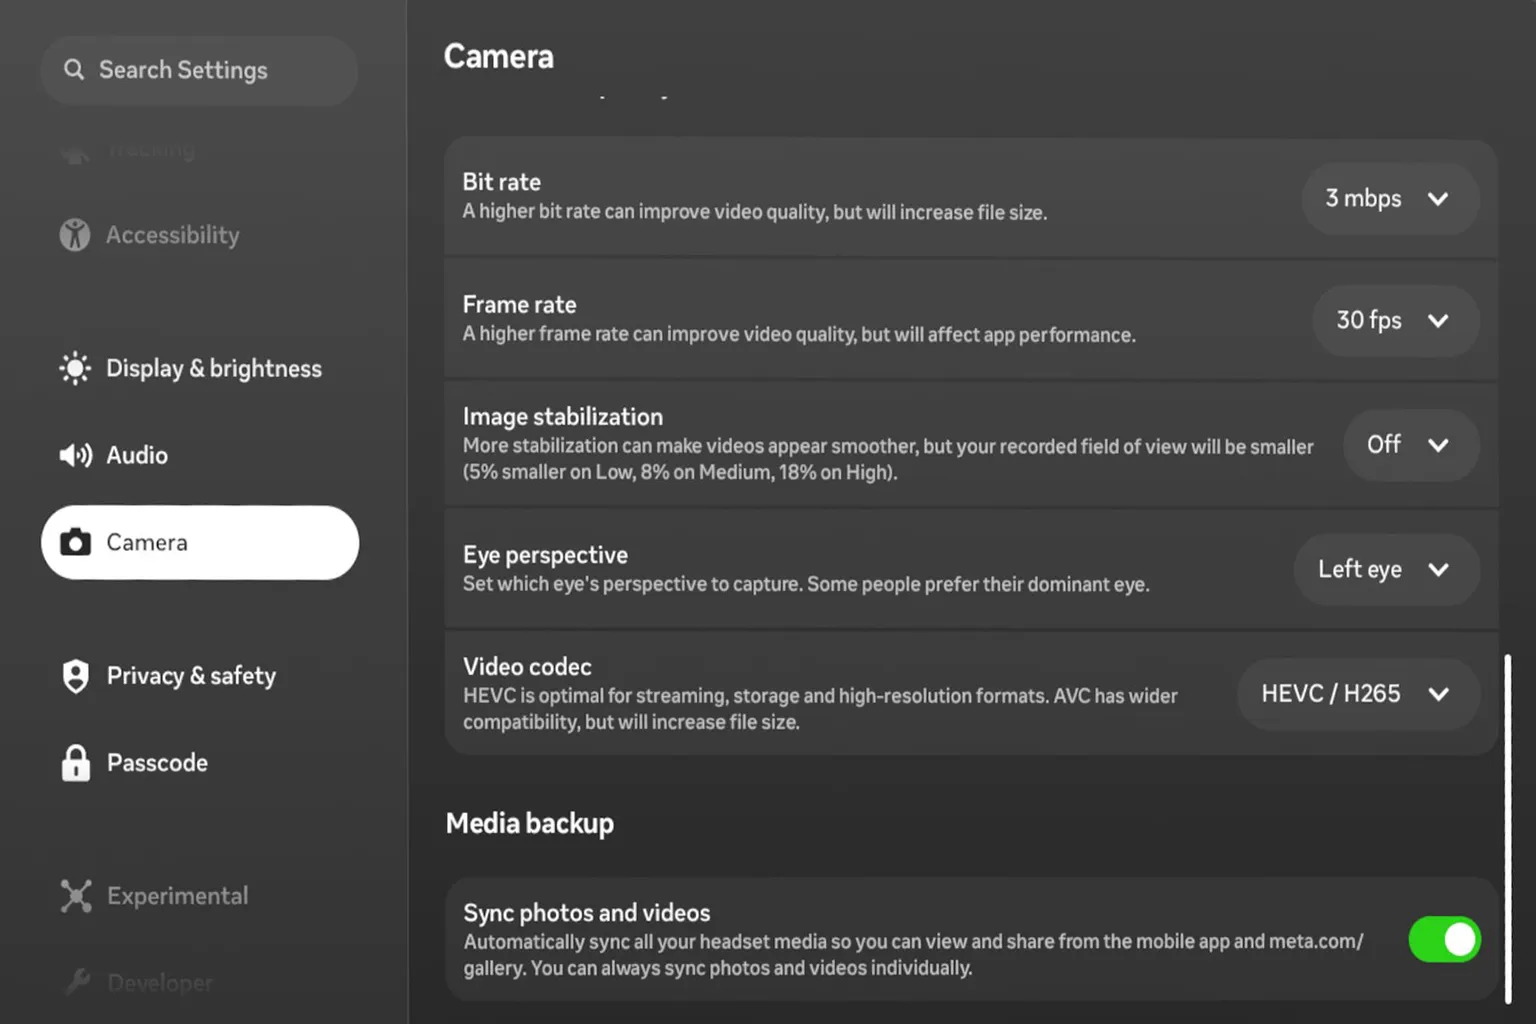
Meta Quest already includes built-in features for taking screenshots and recording videos. In recent system versions, Meta Quest capture settings have improved a lot, with options that can go up to 4K depending on the headset model and system version.
However, recording is still captured from only one eye. In other words, you still can’t record true stereoscopic VR video using the headset’s built-in features alone.
Quest Games Optimizer significantly loosens these limitations with its recording features:
- Resolution: Supports up to 2560×1440 (2K) and 3840×2160 (4K)
- Video bitrate: Up to 100 Mbps
- Eye selection: Setting it to 3D enables stereoscopic VR recording
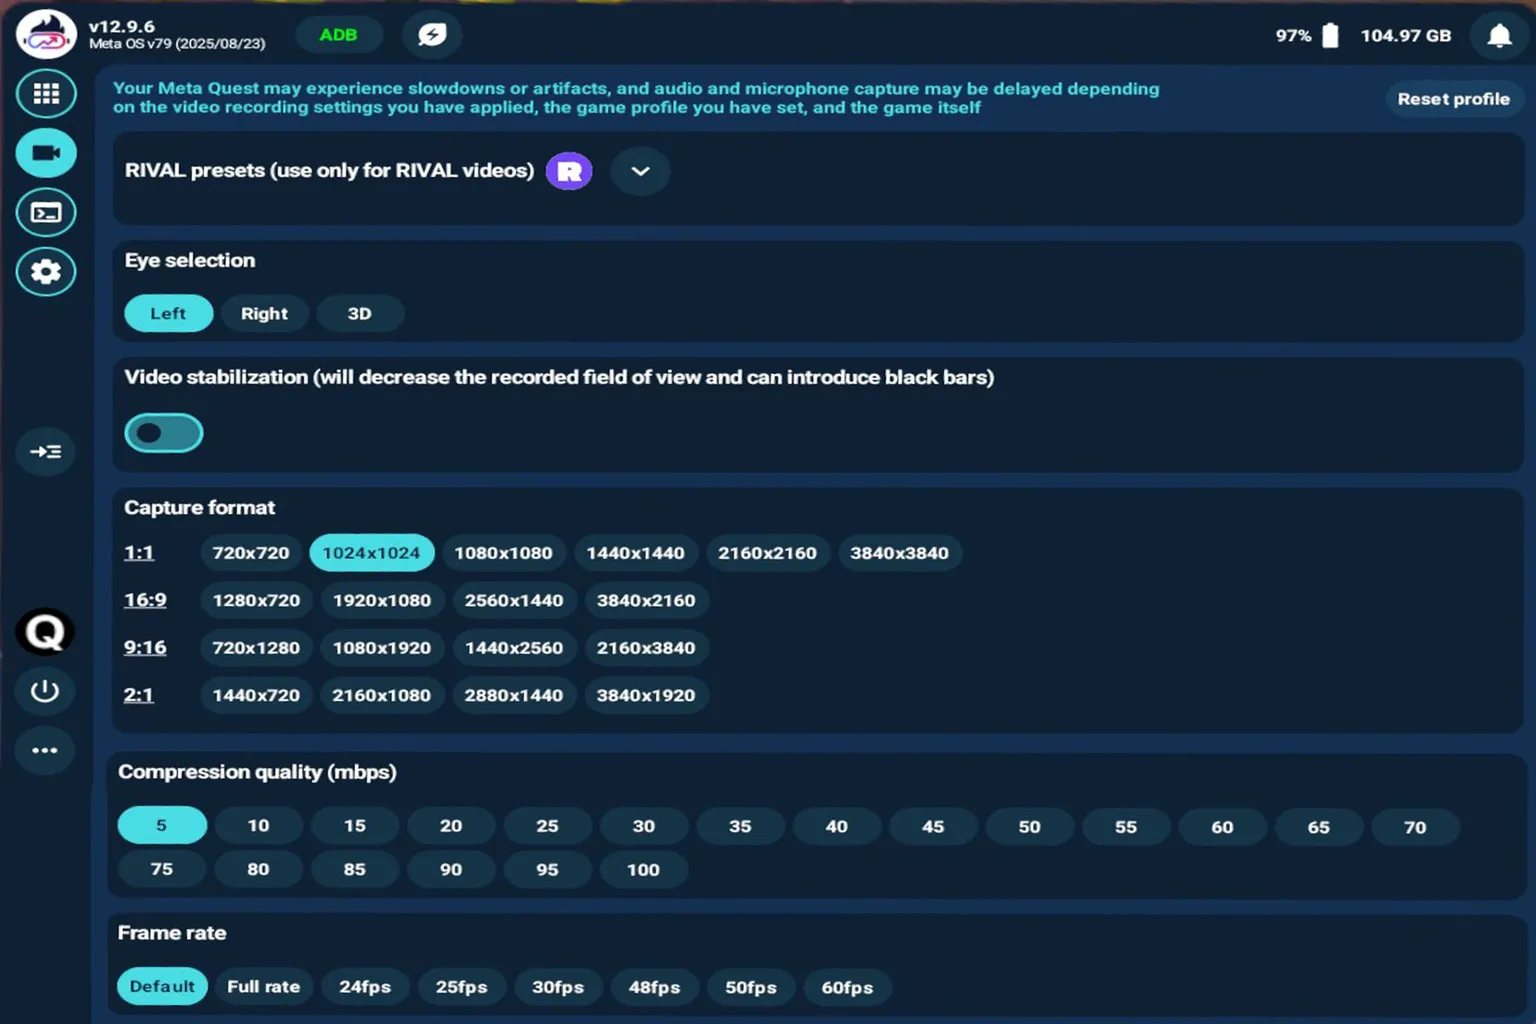
With this, you can properly capture the intensity and depth of your gameplay, instead of losing that VR feel in flat recordings.

Example of recorded stereoscopic VR gameplay footage:

For someone like me who writes guides and game previews, this feature is honestly a game-changer. Screenshots taken from 4K recordings are incredibly sharp. And when you upload stereoscopic VR videos to YouTube or share them with other VR players, you can really convey what it feels like to actually be inside that VR world, not just watching it on a flat screen.
When you set video resolution or capture modes in QGO, it overrides Meta’s default photo and video settings. So if you want to change those settings later, you’ll need to adjust them again inside QGO.
That said, uploading VR videos to YouTube requires extra conversion and preparation, and even then, the final video quality isn’t always ideal. This is where the Meta Quest app DeoVR comes in handy. With DeoVR, you can upload your own VR videos to their servers, keep them as a personal collection, or share them with friends.
For detailed steps on how to upload videos to DeoVR, refer to the guide linked here.
Game Library Management
The default Meta Quest game library is honestly pretty messy. There’s no way to categorize games, rename them, or even change their order. Once you buy a lot of games, the library turns into clutter and finding a specific title becomes a hassle. Quest Games Optimizer fixes all of that by putting proper management tools in one place.
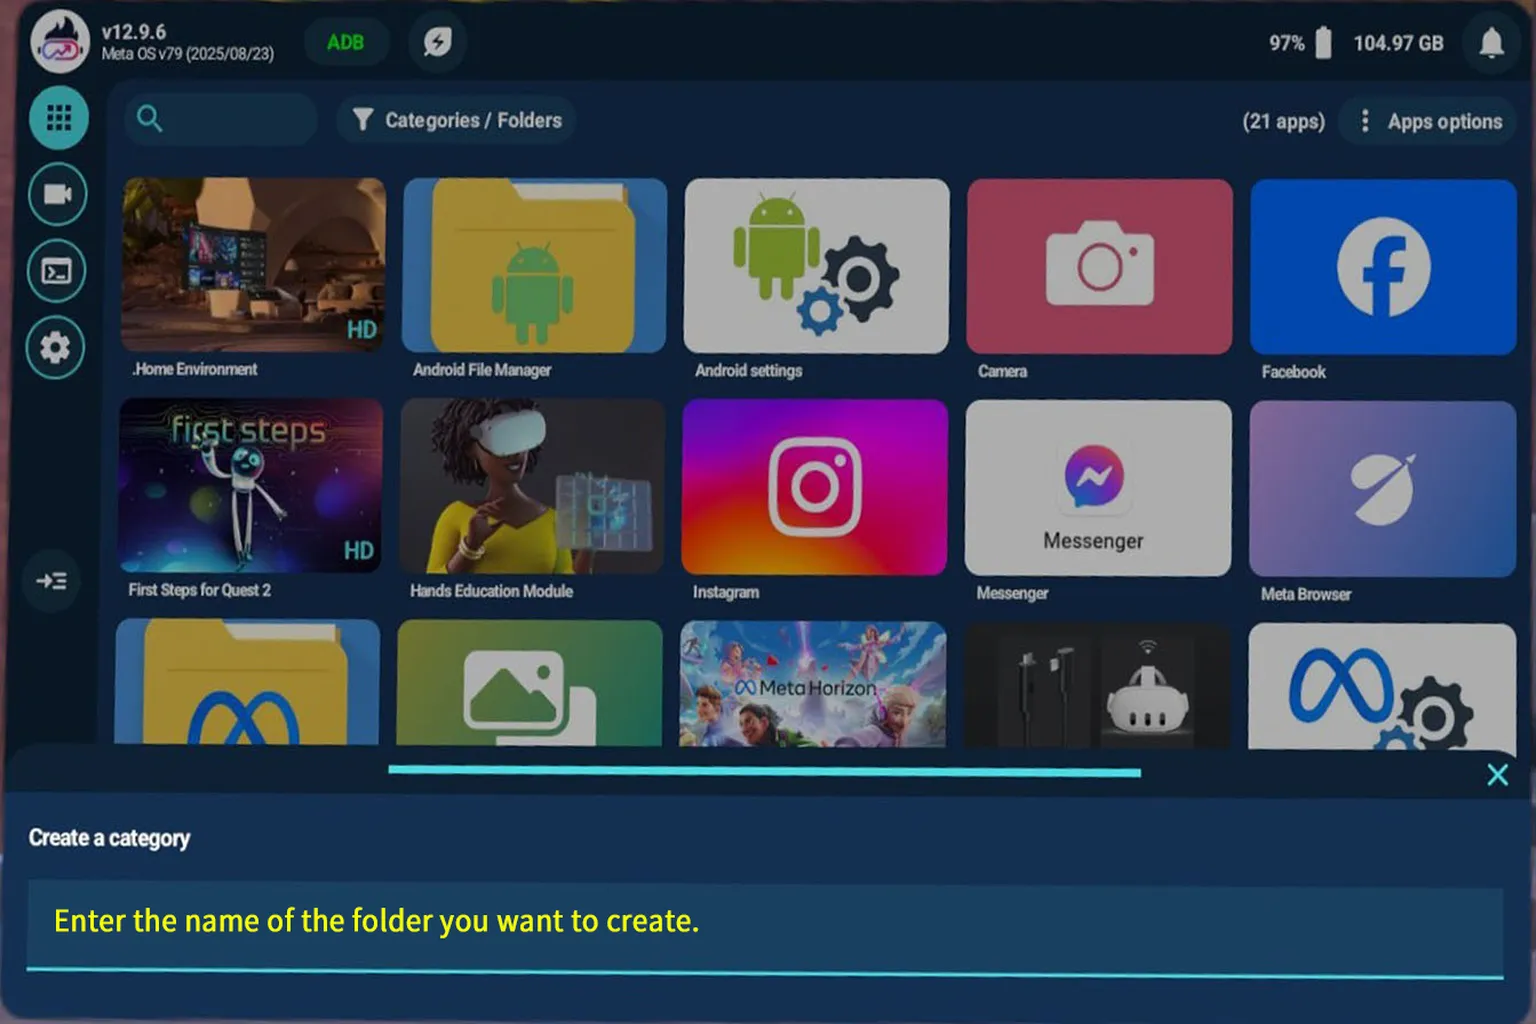
Step 1: Create a Folder
Open App Options in the top right of the game library, then select Create Category.
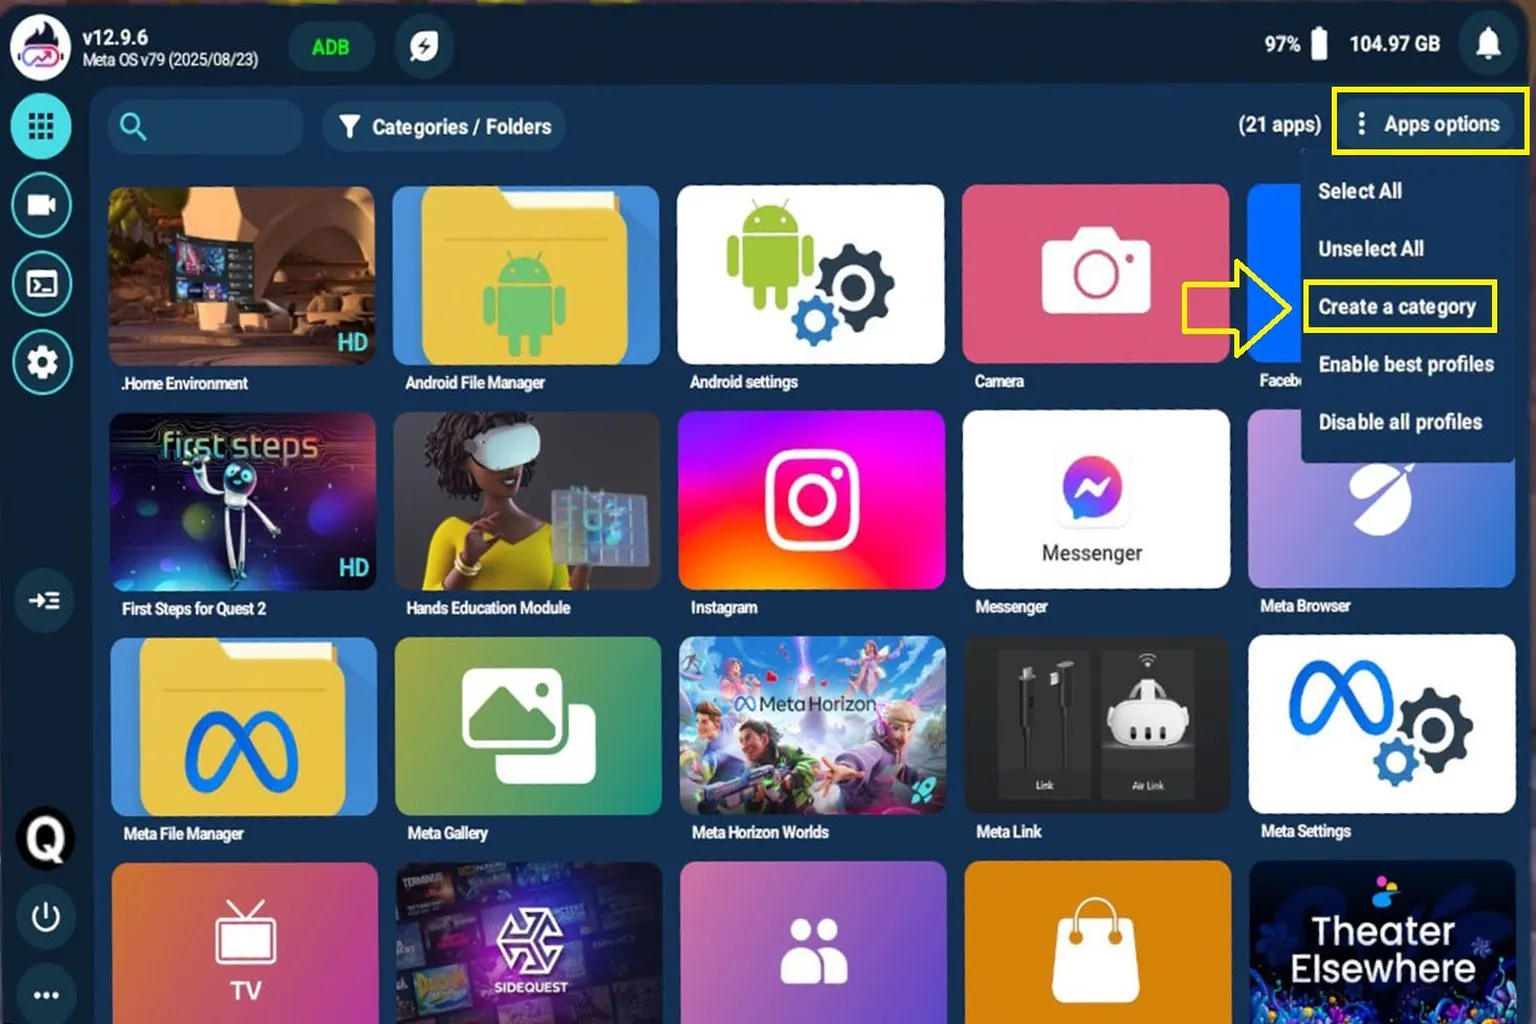
Once you enter a name, a folder for that category is created right away. From there, just drop in the games you want, and you’ll have a clean, organized library that fits how you play.
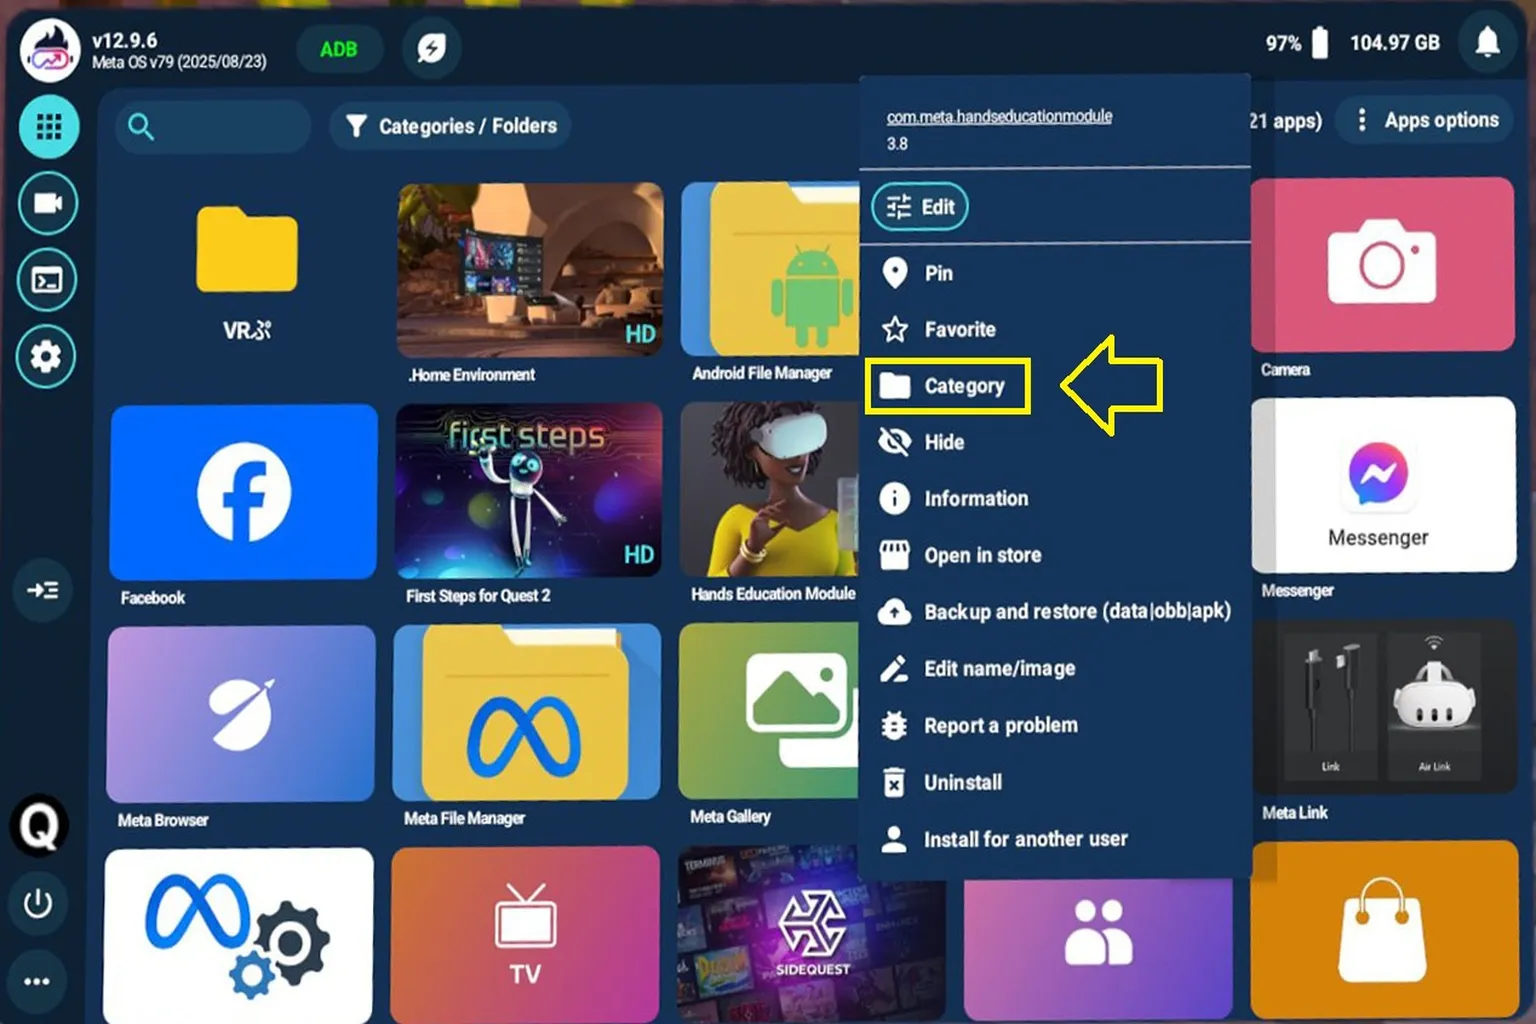
Step 2: Add Games to a Category
Point the controller laser at a game and you’ll see a “⋮” icon appear in the top right. Click it to open the menu, then choose a category. Just pick the folder you want, and organizing your library goes quickly.
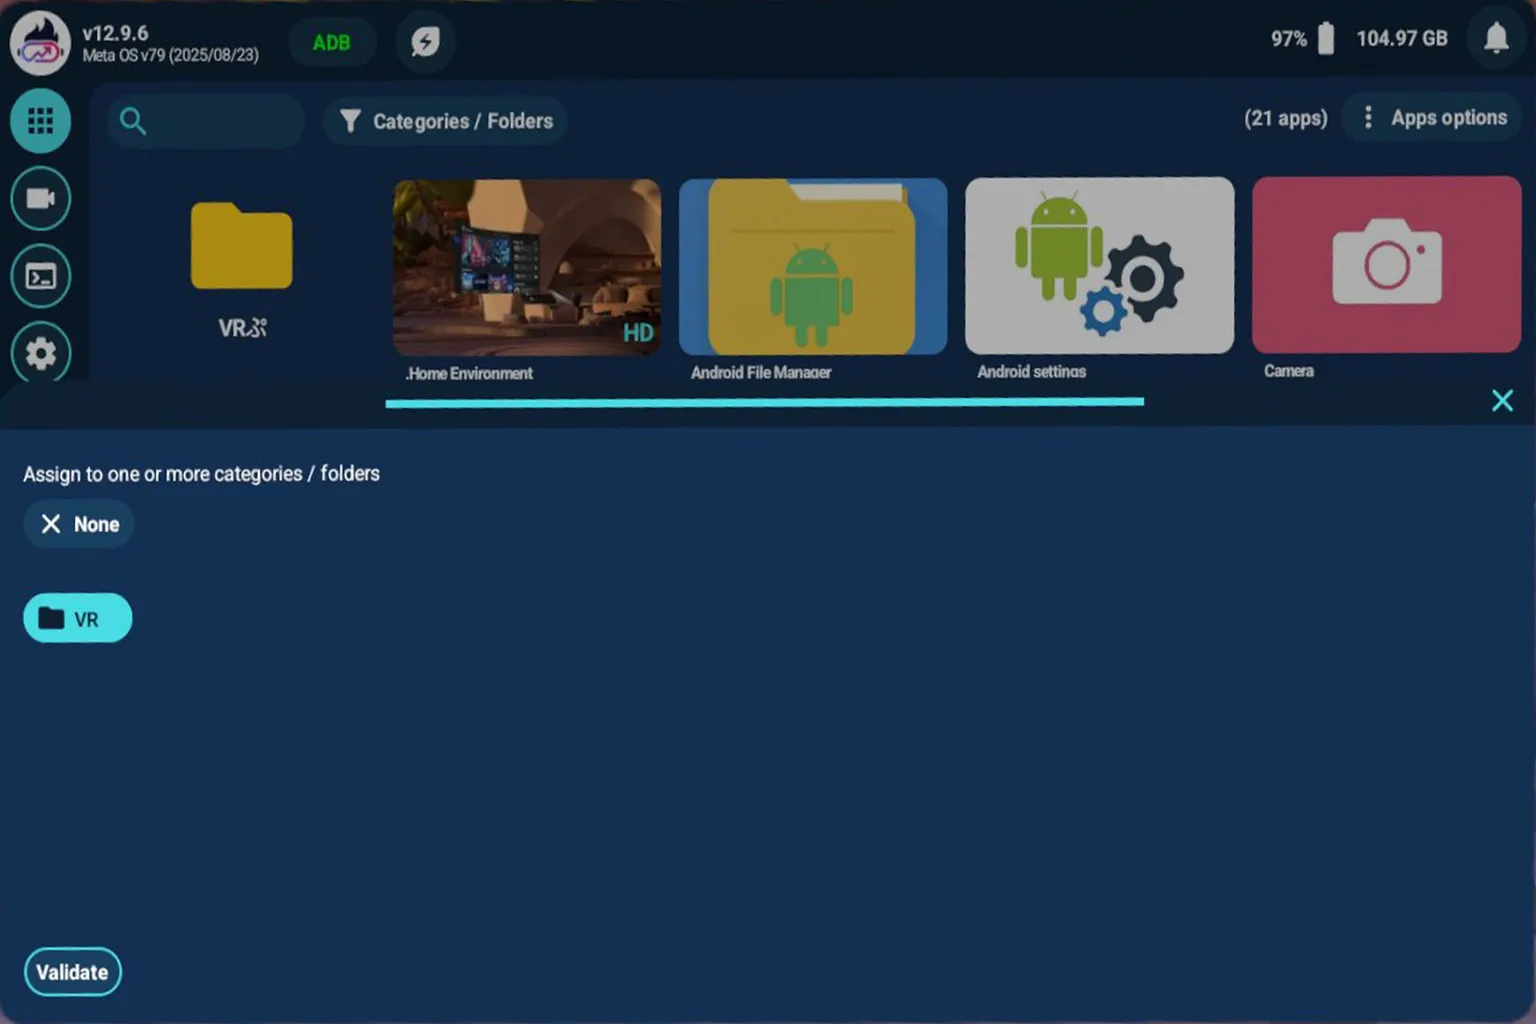
After selecting the folder, press Confirm and the game will be categorized. The Edit name and image option below lets you freely change the icon image and title shown inside QGO. This doesn’t affect how the game appears in the standard Meta Quest library.
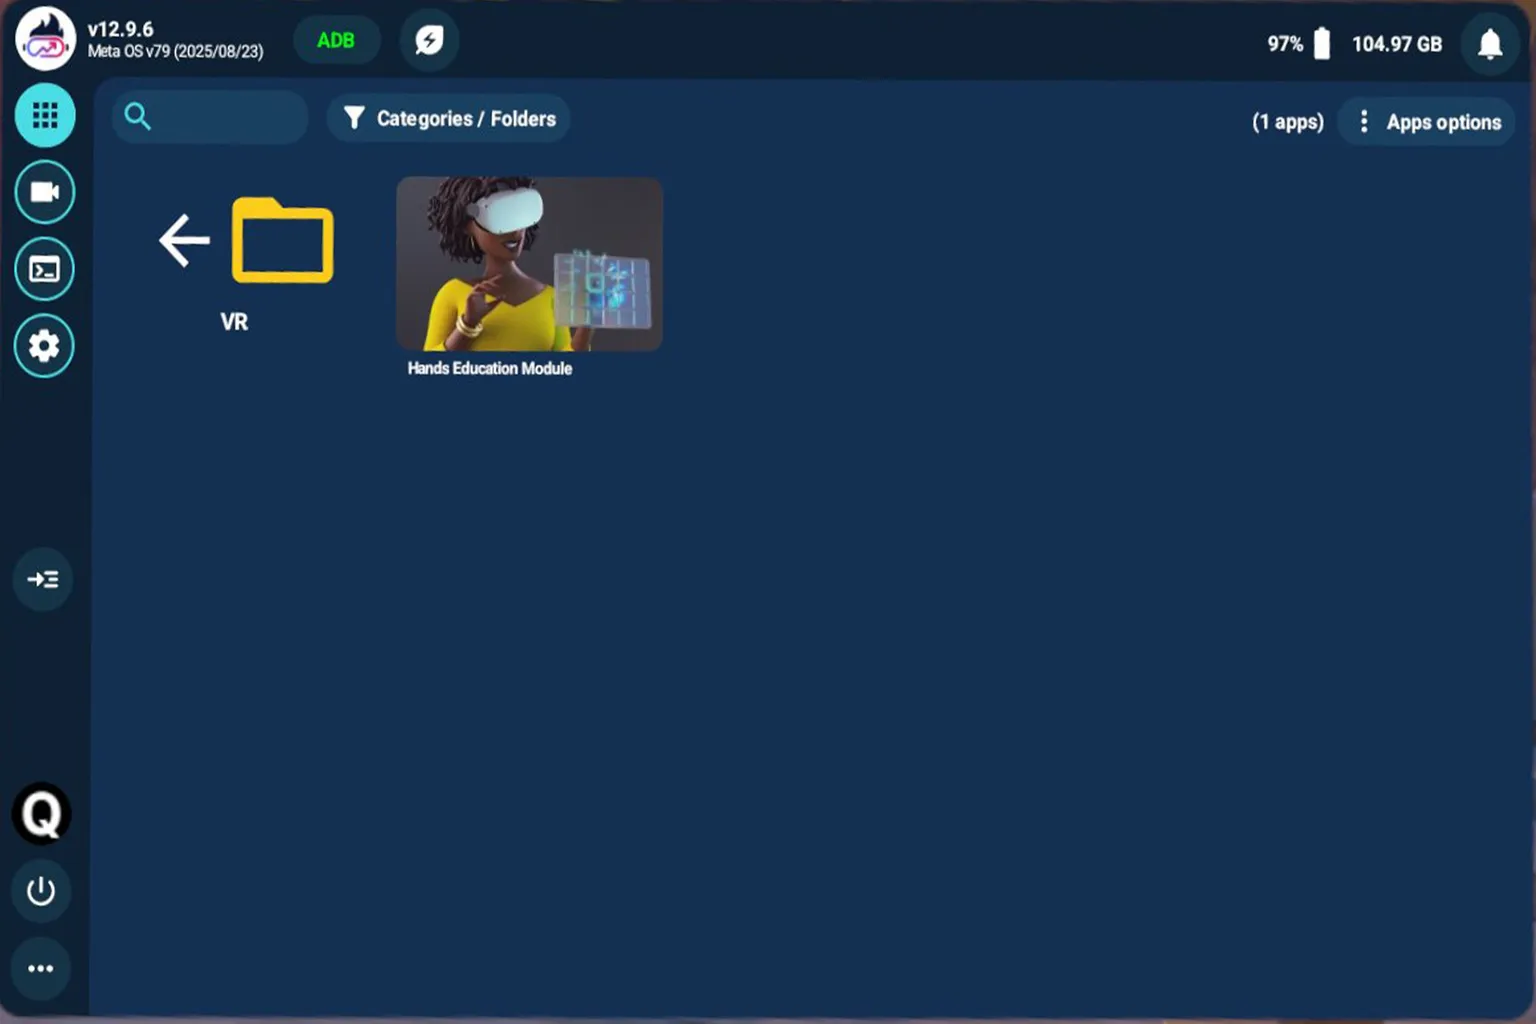
That’s it, the game is now categorized. From now on, everything is grouped by category, so finding the title you want to play next becomes quick and effortless.
Quick PC Connection
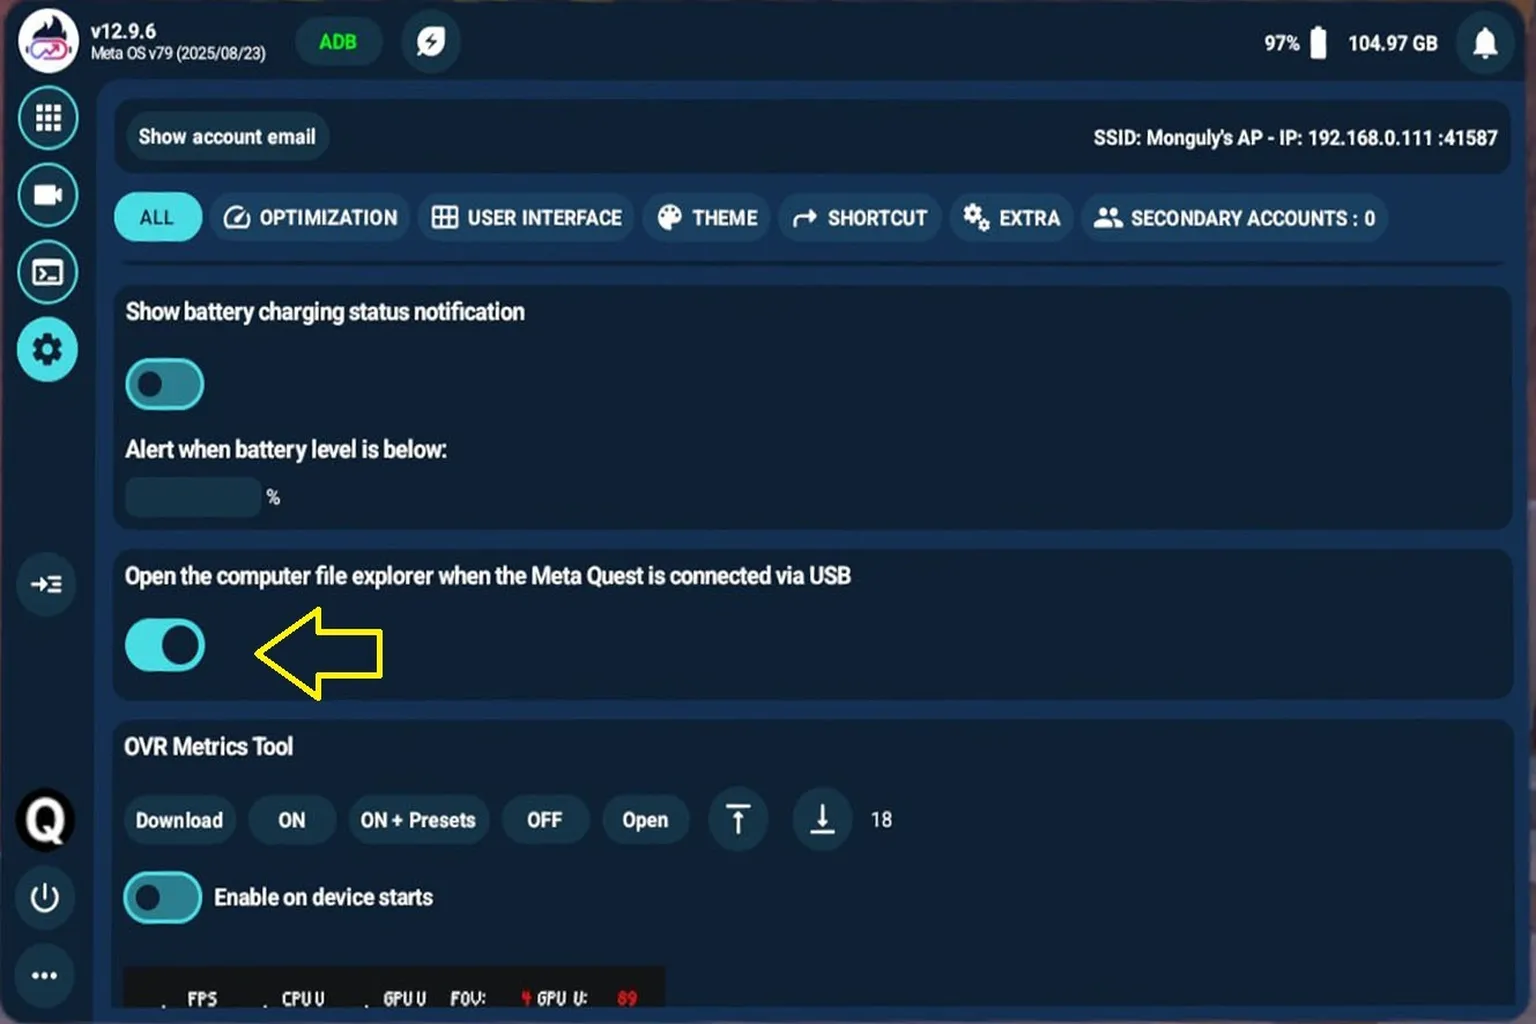
The official instructions say that “when you connect the headset to a PC with a USB cable, the folder will open automatically,” but in reality, nothing happens a lot of the time. That’s where this Quest Games Optimizer feature comes in handy. With it enabled, simply connecting the headset lets you instantly access files on the device, making it much easier to save or copy videos.
Step 1: Enable the File Explorer Feature
In the settings screen, turn on Open PC file explorer when connected via USB.
Step 2: Open the Folder on Your PC
When you connect the headset to your PC with a USB cable, the Meta Quest drive will appear.

Inside the Oculus folder, you’ll find your video recordings and screenshots. The Download folder contains files downloaded through the headset’s built-in browser.
If you want to install an APK file, you can simply copy it into the Download folder using this method, and you’re good to go.

APK Installer
This is a tool that lets you install Android APK files directly, without going through SideQuest. From the Quick Toolbar, select APK, and you’ll be taken to the installation screen.
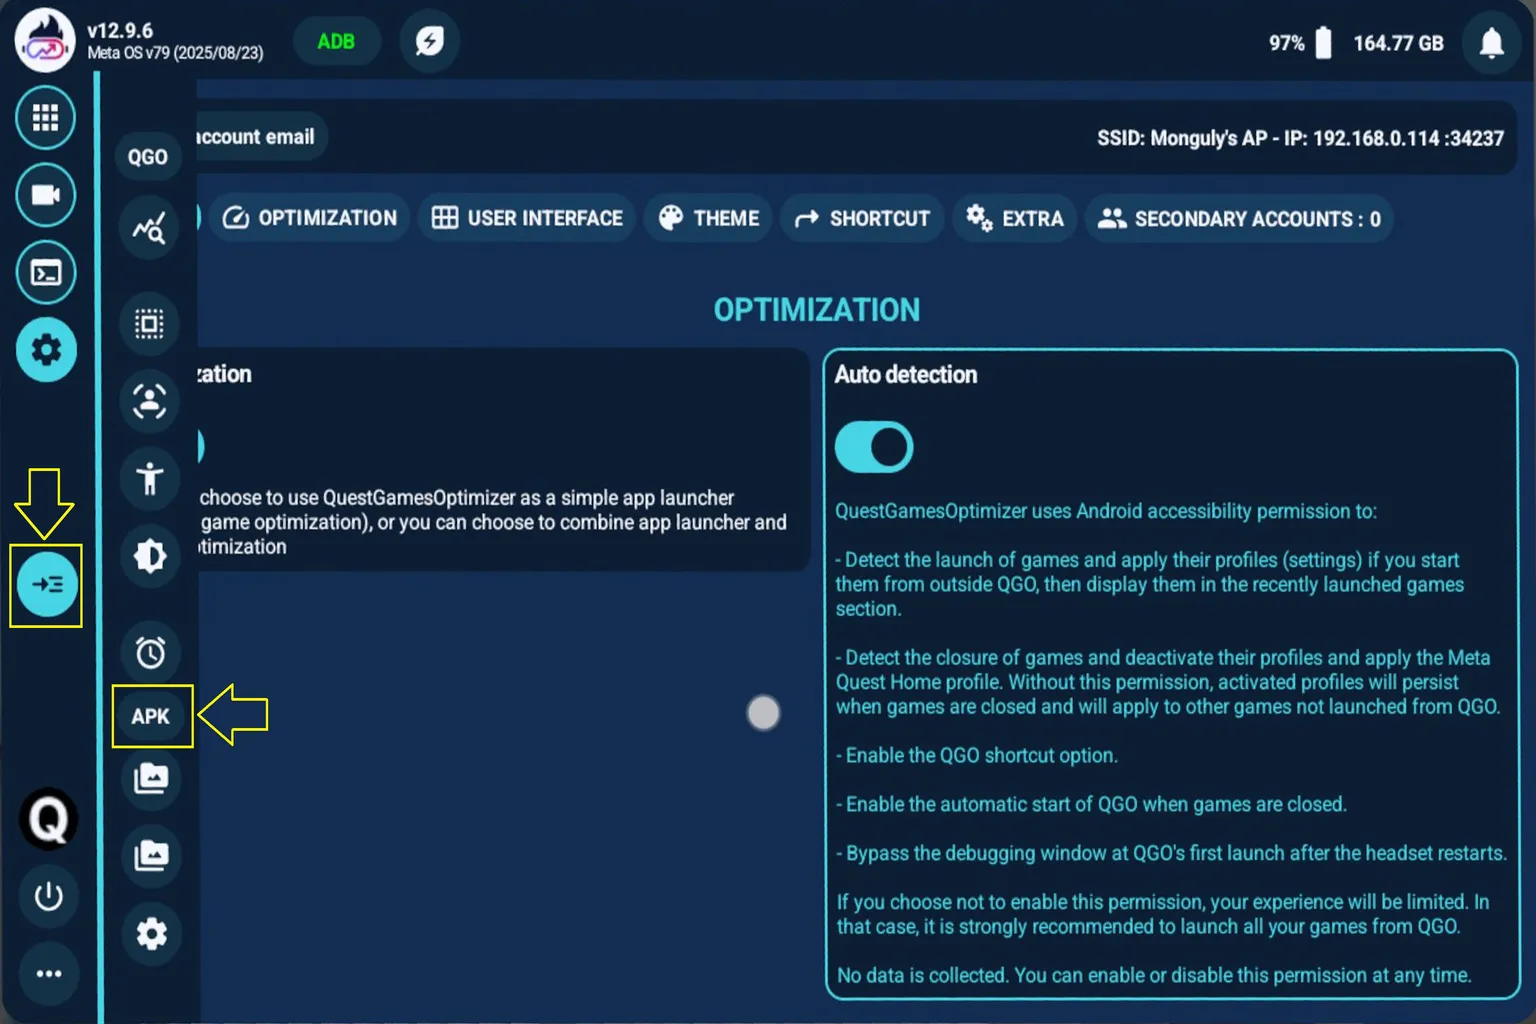
Click APK, choose the app you want to install, then select the file. Once you do that, the app will be installed on the headset right away.
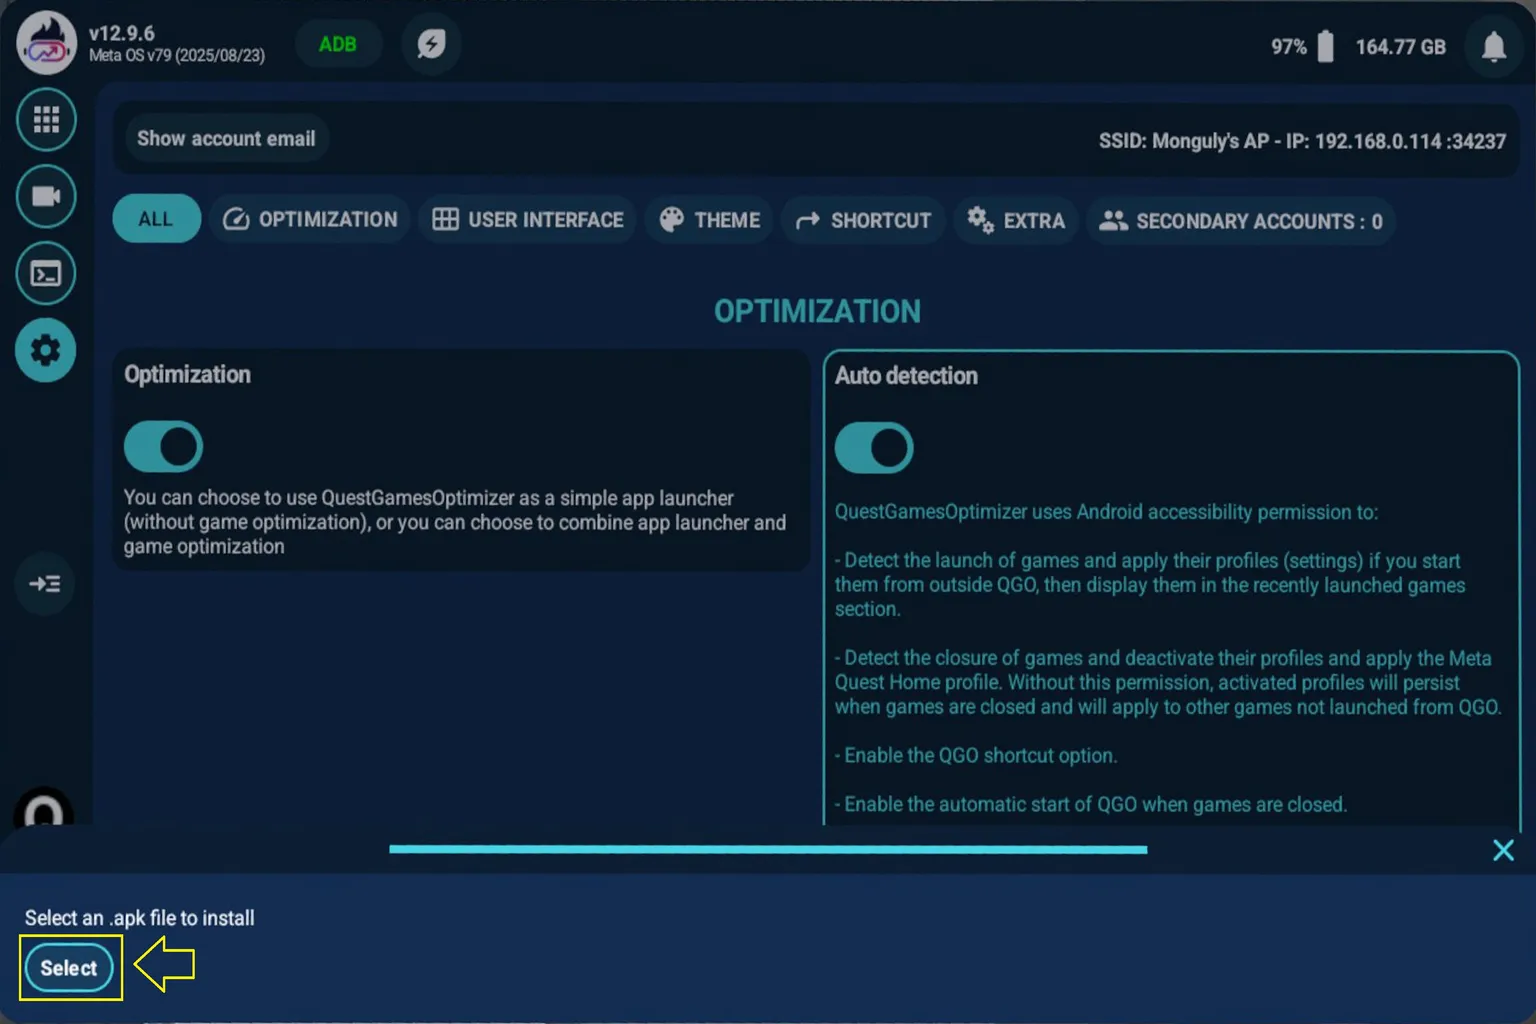
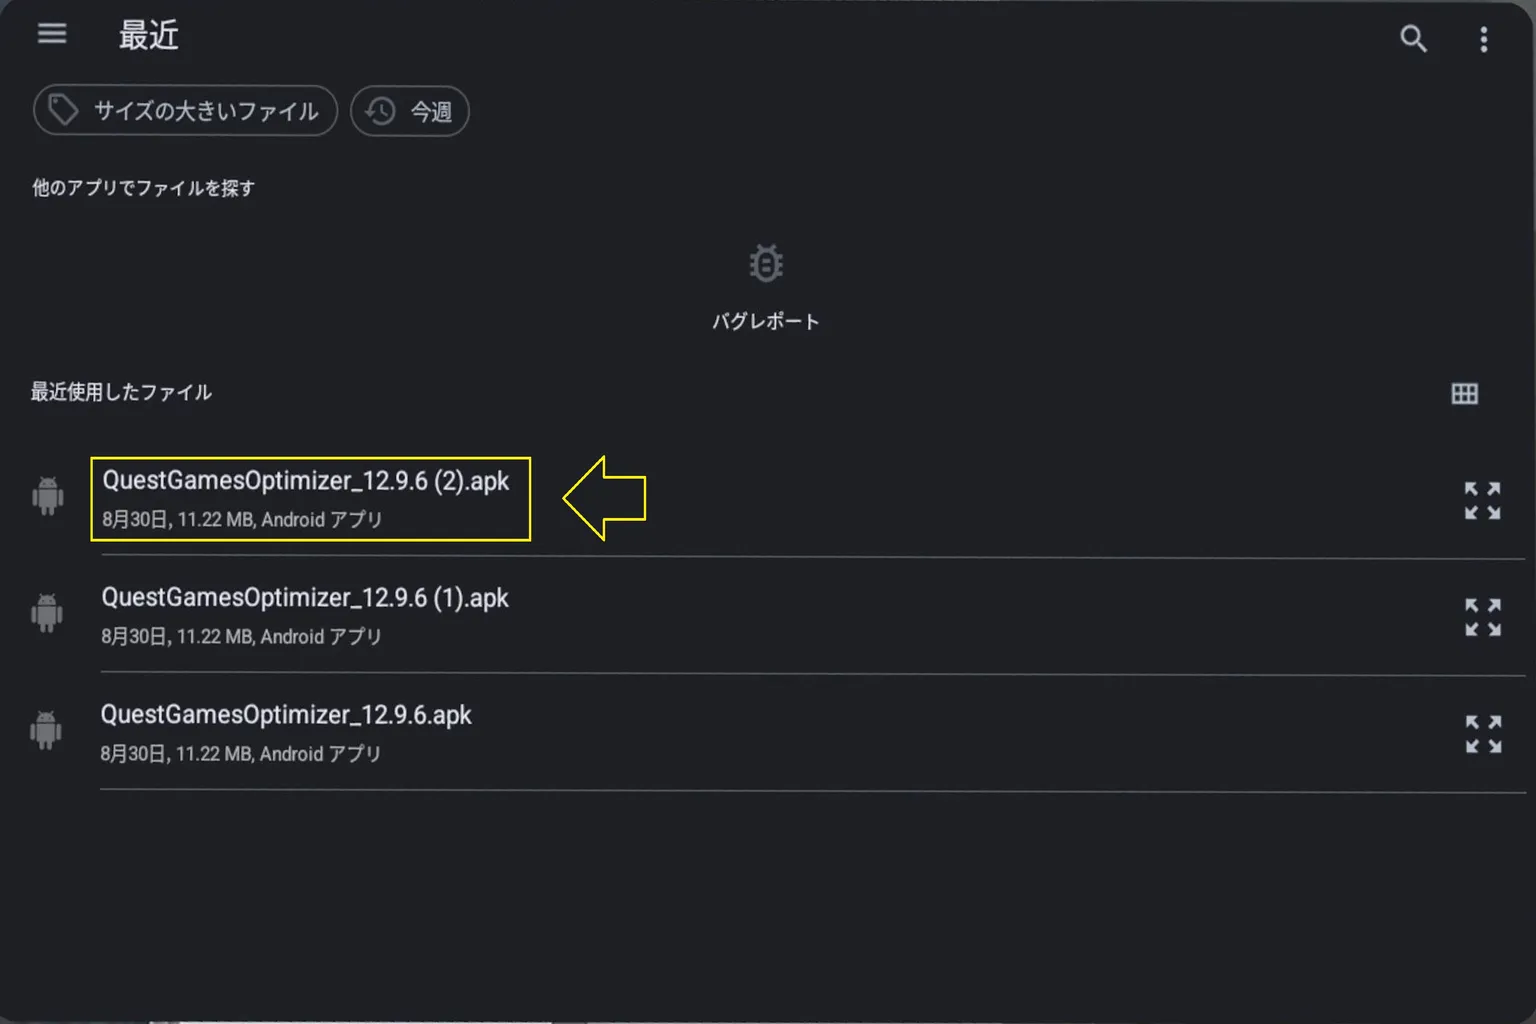
From here, you can install APK files that are already stored on the headset. However, formats like .xapk distributed on sites such as APKPure aren’t supported, so those can’t be installed.
OVR Performance Monitor
This is one of those features that’s worth trying once, just so you know it exists. Keeping it on during actual gameplay isn’t recommended, since having performance data always visible really hurts immersion. What it shows is similar to what you see in PC game benchmarks, things like CPU and GPU load and on-screen FPS.
Step 1: Install and Enable OVR
In the settings menu, go to OVR Metrics Tool and select Download to install the tool.
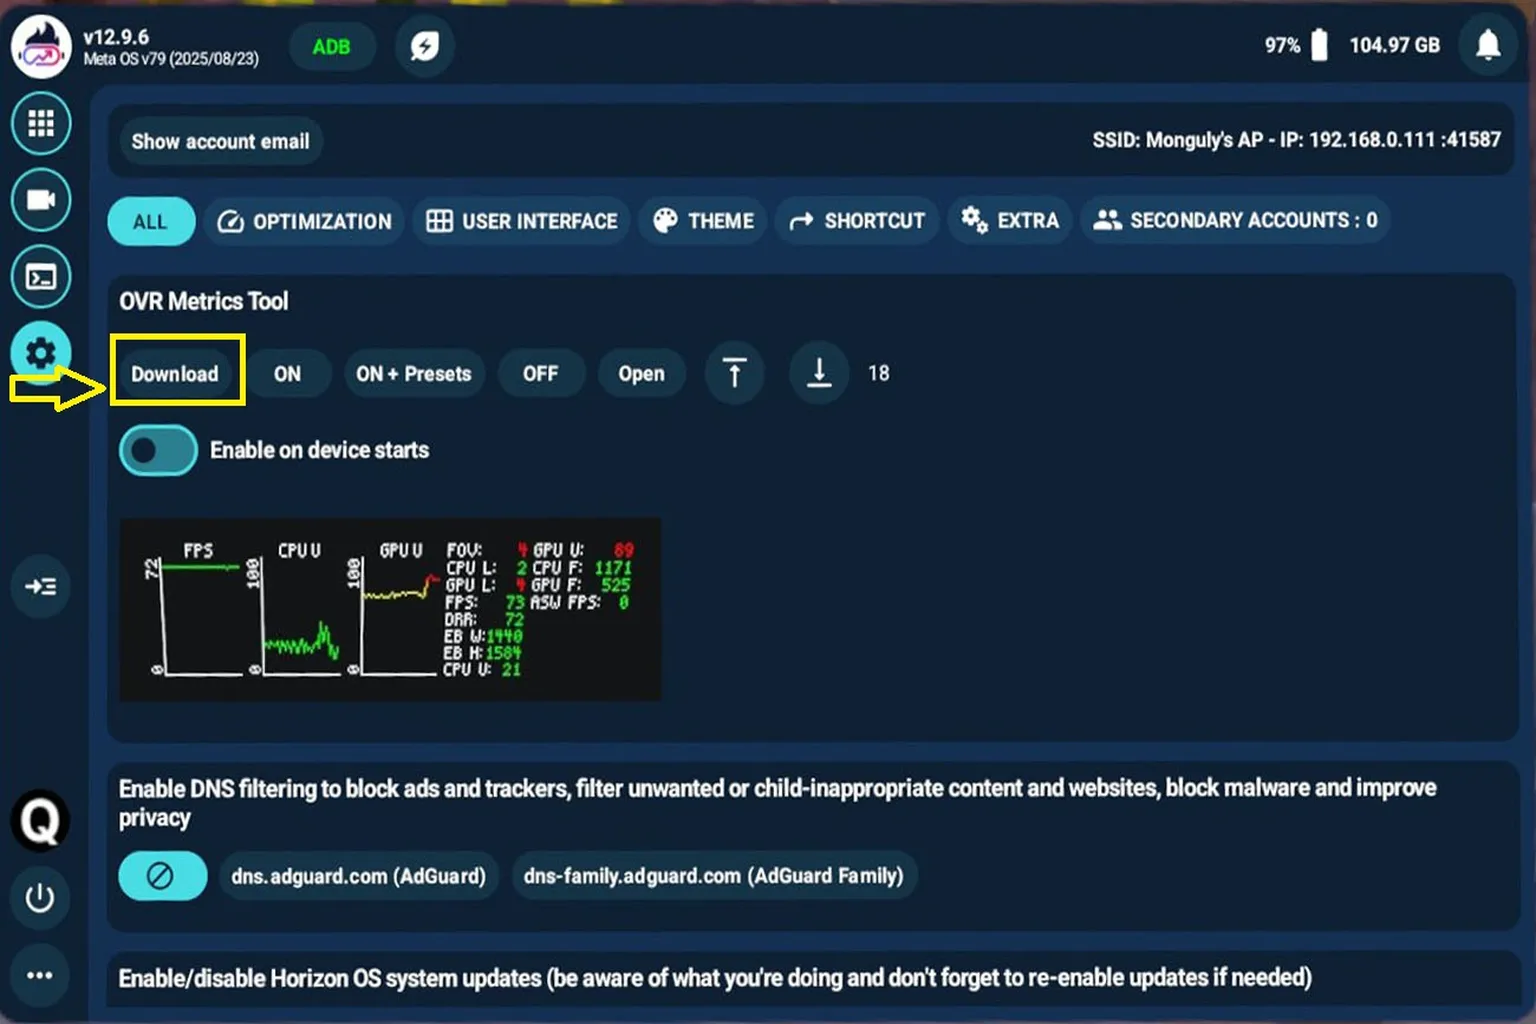
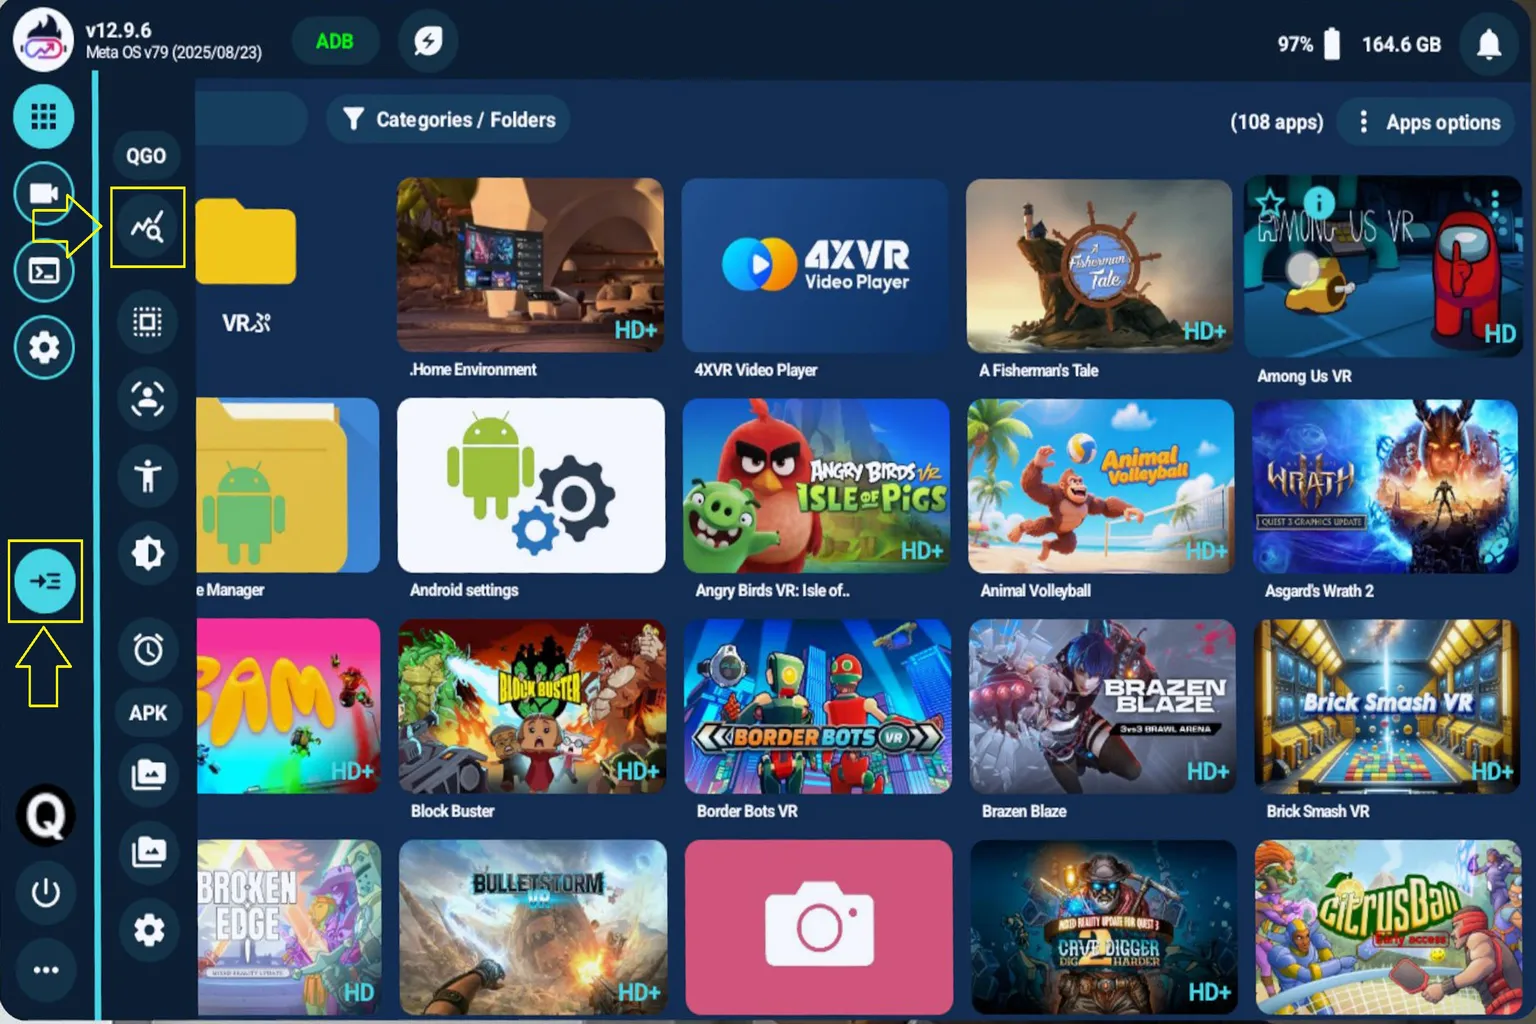
Once the installation is complete, select the 📈 icon from the quick toolbar to turn on OVR. After that, CPU and GPU load as well as FPS information will be displayed inside VR.
Once it’s enabled, various stats appear along the edge of the screen, but honestly, seeing it once is enough. When you’re actually trying to enjoy a game, it just gets in the way, so I wouldn’t recommend leaving it on all the time.
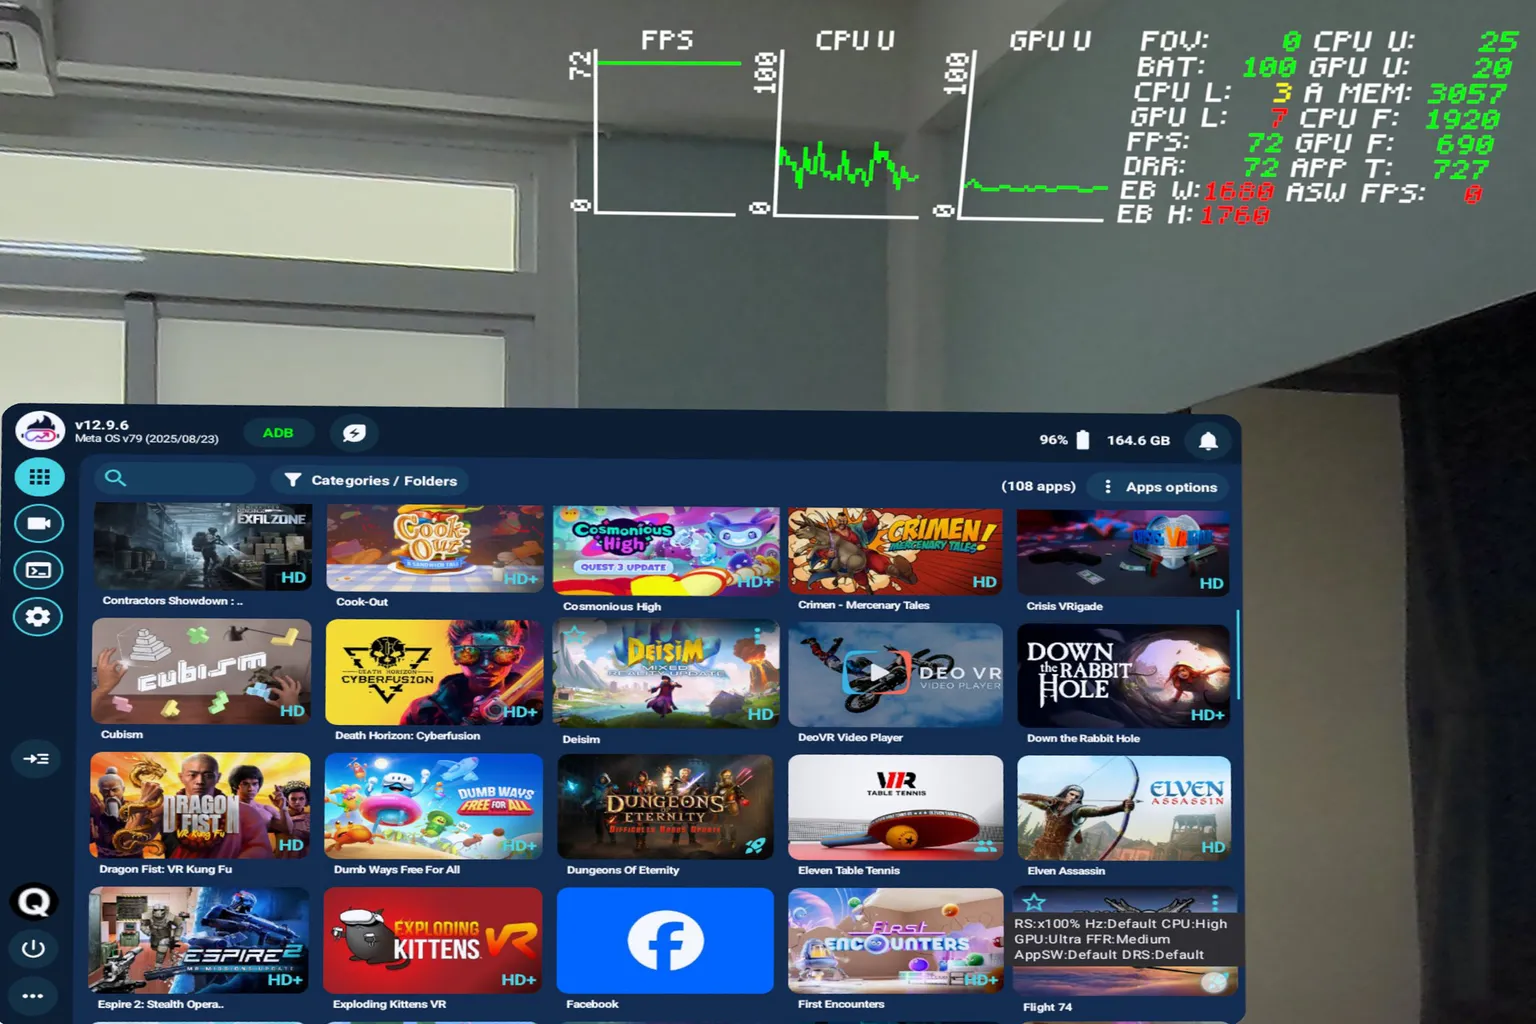
During gameplay, a floating window shows up at the top of the screen, displaying real-time CPU and GPU usage along with FPS.
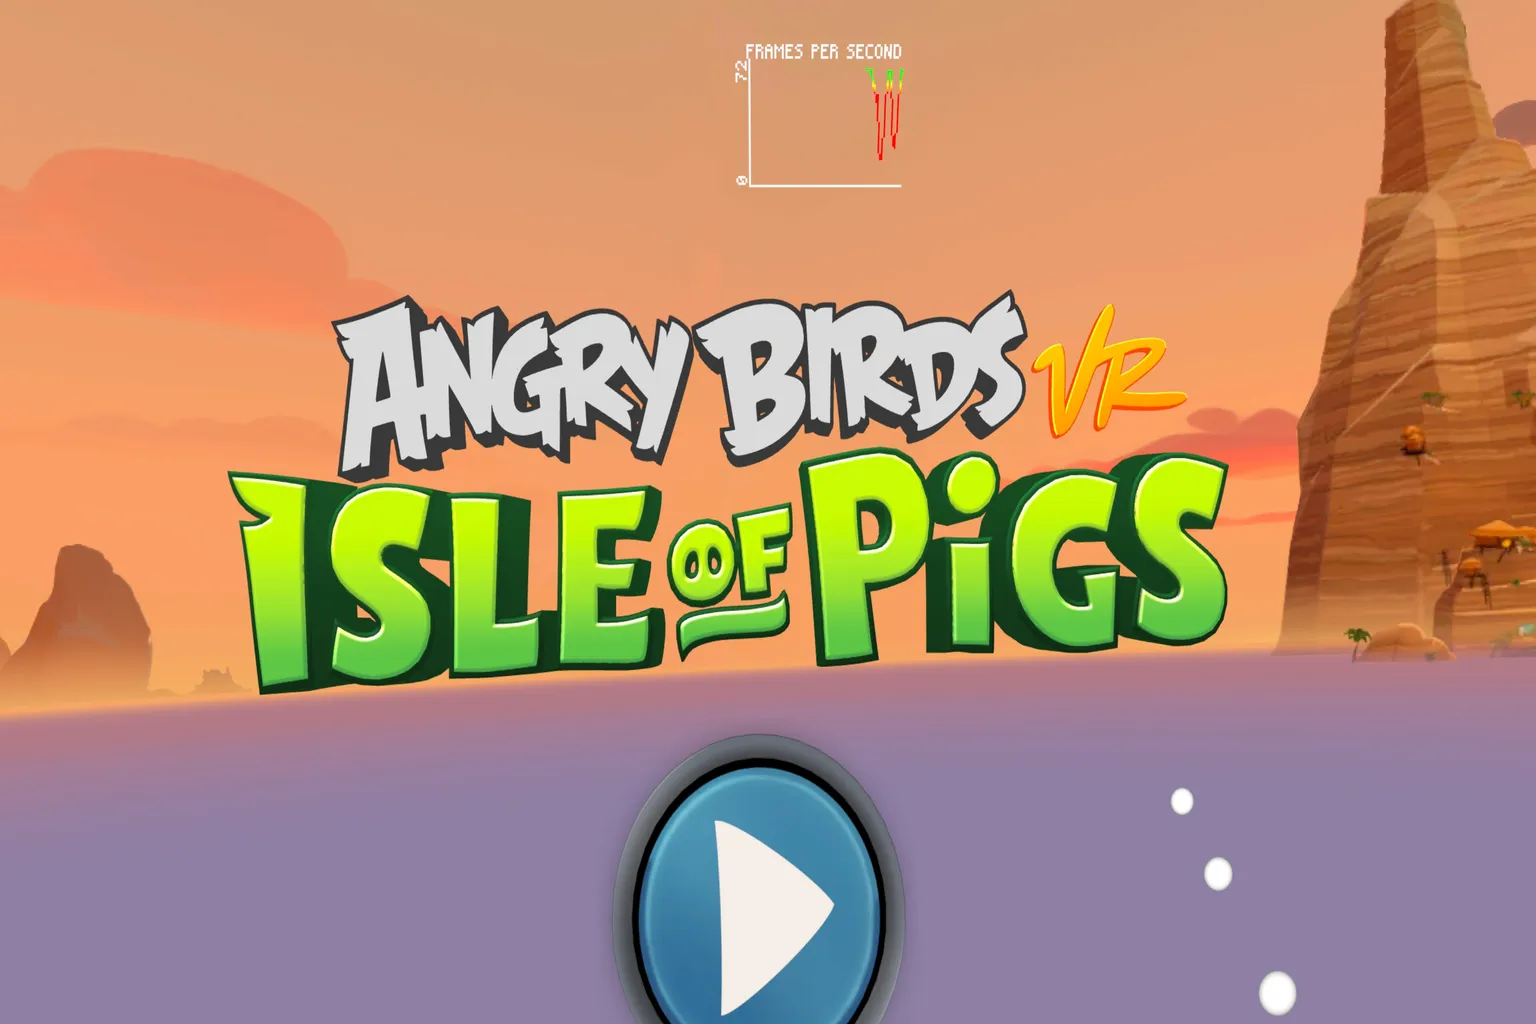
You can also set it up like I do, so it only shows the FPS.
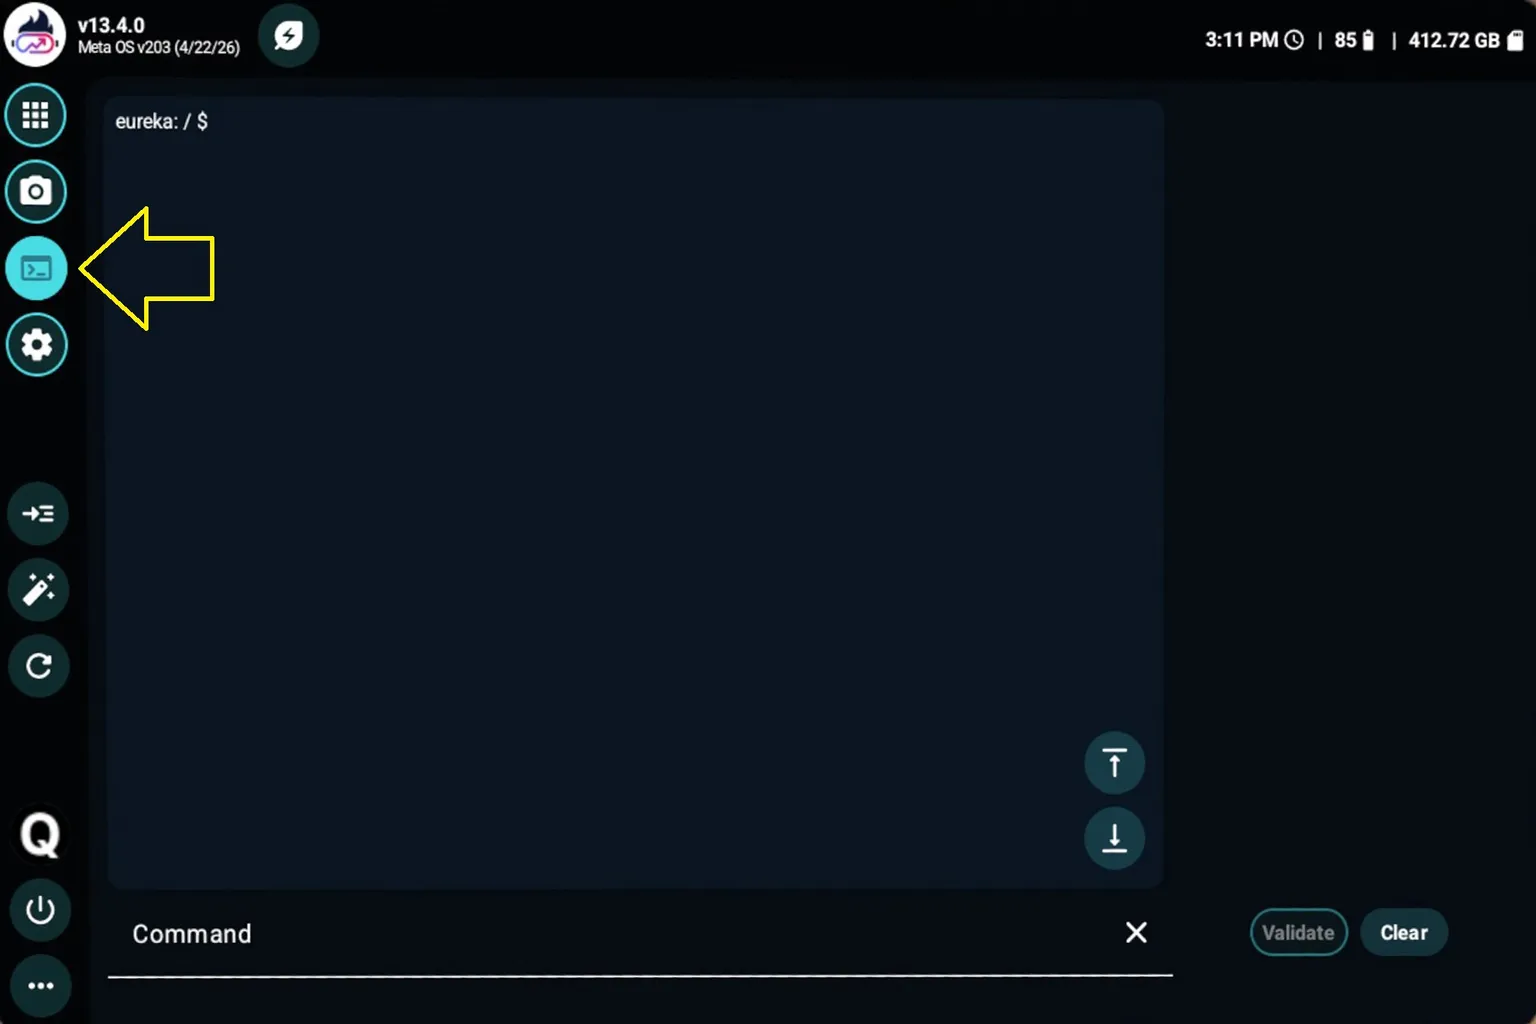
In addition to the features covered above, QGO also includes a built-in ADB function that lets you control the device by manually entering commands.
That said, this isn’t really something most users will want to touch, and honestly, I don’t fully understand how to use it myself either. So I’ll skip explaining this part.
That wraps up the overview of Quest Games Optimizer. After seeing everything it can do, it’s hard not to feel a little excited. If you want to get better image quality and more convenience out of your Meta Quest, QGO is definitely an enhancement tool worth trying at least once.
FAQ – Common Questions
Will installing QGO get my account banned?
QGO is a third-party tool. If you use it only for features like image quality improvements, recording, or library management, the risk of account suspension is very low.
Which headsets support QGO?
QGO supports major standalone Meta Quest headsets, including Quest 2, Quest Pro, Quest 3, and Quest 3S. Exact compatibility can also depend on the firmware version and current QGO updates.
What’s the difference between QGO and SideQuest?
QGO focuses on improving the play experience, such as performance optimization, game library management, and 4K recording. SideQuest, on the other hand, focuses on adding content, like installing in-development apps or apps distributed outside the official store.
Does QGO make the headset run hotter?
Yes, demanding profiles can increase heat and battery consumption. This is not because QGO performs classic overclocking, but because it pushes the headset’s performance and rendering parameters harder.
Does QGO really improve image quality?
Yes. This article includes before-and-after comparison images from multiple games. Improvements like higher resolution and reduced jagged edges are clearly visible.
What can you install with the APK installer? Is there any risk of breaking the system?
Only standard .apk files are supported. Formats like .xapk from sites such as APKPure are not supported. In general, it should not damage the system, but you should only install apps from trusted sources.
Does QGO improve video playback quality?
Not really. QGO can improve VR games by adjusting rendering, 3D models, and textures, but already encoded video files and video streams can barely be improved.
Does QGO improve image quality in PC-connected VR games?
Not at all. When streaming from a PC, the image is rendered by the PC’s GPU and the headset works only as a display. Because of that, QGO has no effect in this case.