
Want to unlock hidden games and tools like the Quest Games Optimizer? This step by step guide shows you exactly how to install SideQuest on your Meta Quest headset and PC. Learn how to approve USB debugging, sideload APK files, and download custom VR apps easily, with zero coding required.
How SideQuest Is Used
SideQuest is a third-party tool for Meta Quest, and it has two main functions:
Installing Custom Apps
By default, Meta Quest is a closed system built on a customized version of Android.
Once you enable Developer Mode seeing, you can install your own custom apps.
That said, installing Android apps on a headset by running ADB commands on a PC is honestly a huge hassle.
That’s where SideQuest comes in. With SideQuest, you can install apps using simple window-based controls, no command-line work needed at all. Even if you’re new to this, you can get everything done with just a few clicks.
SideQuest Store
To publish a game on the Meta Horizon Store, you have to go through a long review process: concept, development, App Lab, then full release. That process usually takes months.
On top of that, if an app changes how the hardware behaves, like overclocking or increasing voltage, it almost never passes Meta’s review.
That’s where the SideQuest store comes in. It gives visibility to apps that are still waiting for release, as well as apps that can’t be listed on the Meta Store at all.
A good example is Quest Games Optimizer (QGO).
It’s a very useful tool that adjusts headset performance to make visuals sharper and higher resolution, improving VR immersion. However, it’s not sold on the official Meta Store.
Because of that, the only way to get it is to buy it directly from the developer and install it through SideQuest.
Getting Ready to Install SideQuest
Before installing SideQuest, make sure you have the following ready:
- A Meta Quest headset with Developer Mode enabled
- A USB cable that connects your PC to the headset via USB-C
- A USB cable that supports data transfer, preferably USB 3.0
- A PC connected to the internet
- A Wi-Fi router that your Meta Quest is connected to. This isn’t strictly required, but it makes things more stable
If you haven’t enabled Developer Mode yet, check the linked article first and set that up before continuing.

Next, log in to the official SideQuest website, then follow the steps below on both your PC and your Quest headset.
On the headset installation
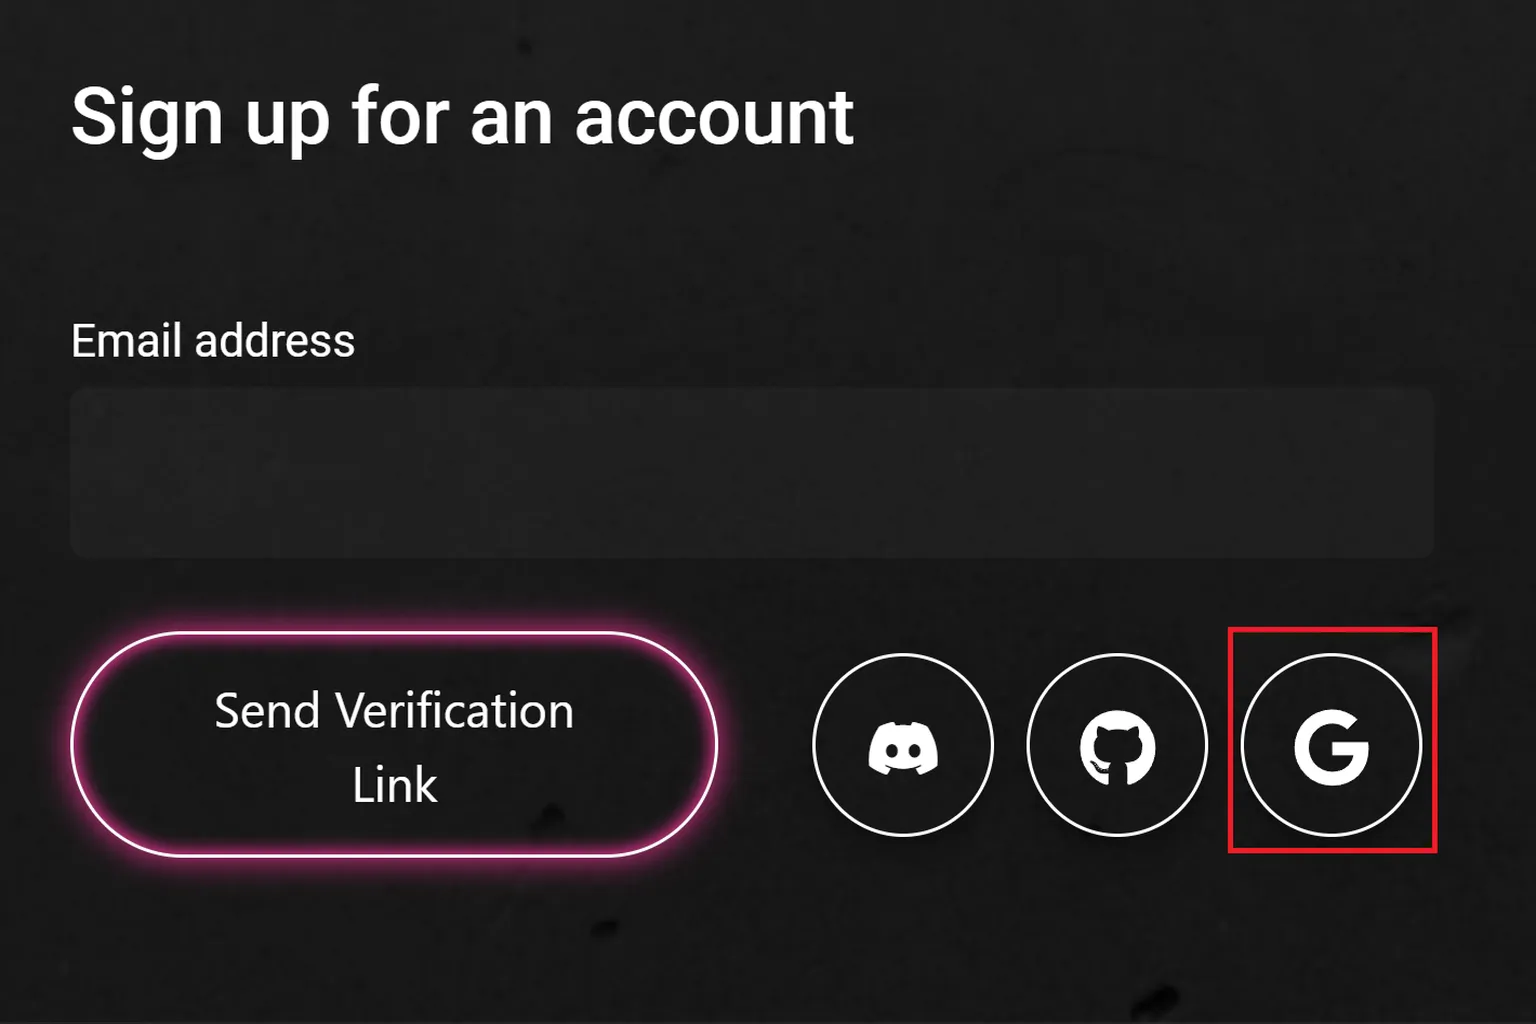
Step 1: Create an Account
Click Sign up now at the top of the official SideQuest website, then register using either your email address or a Google account.

If you sign up with an email address, a verification link will be sent to your inbox. Click that link to continue to the registration page.
If you use a Google account, you’ll be taken directly to the registration page after logging in.
Step 2: Complete Account Registration
Enter the username you want to use, select your user role (the default is Gamer), choose your country, and enter your date of birth.
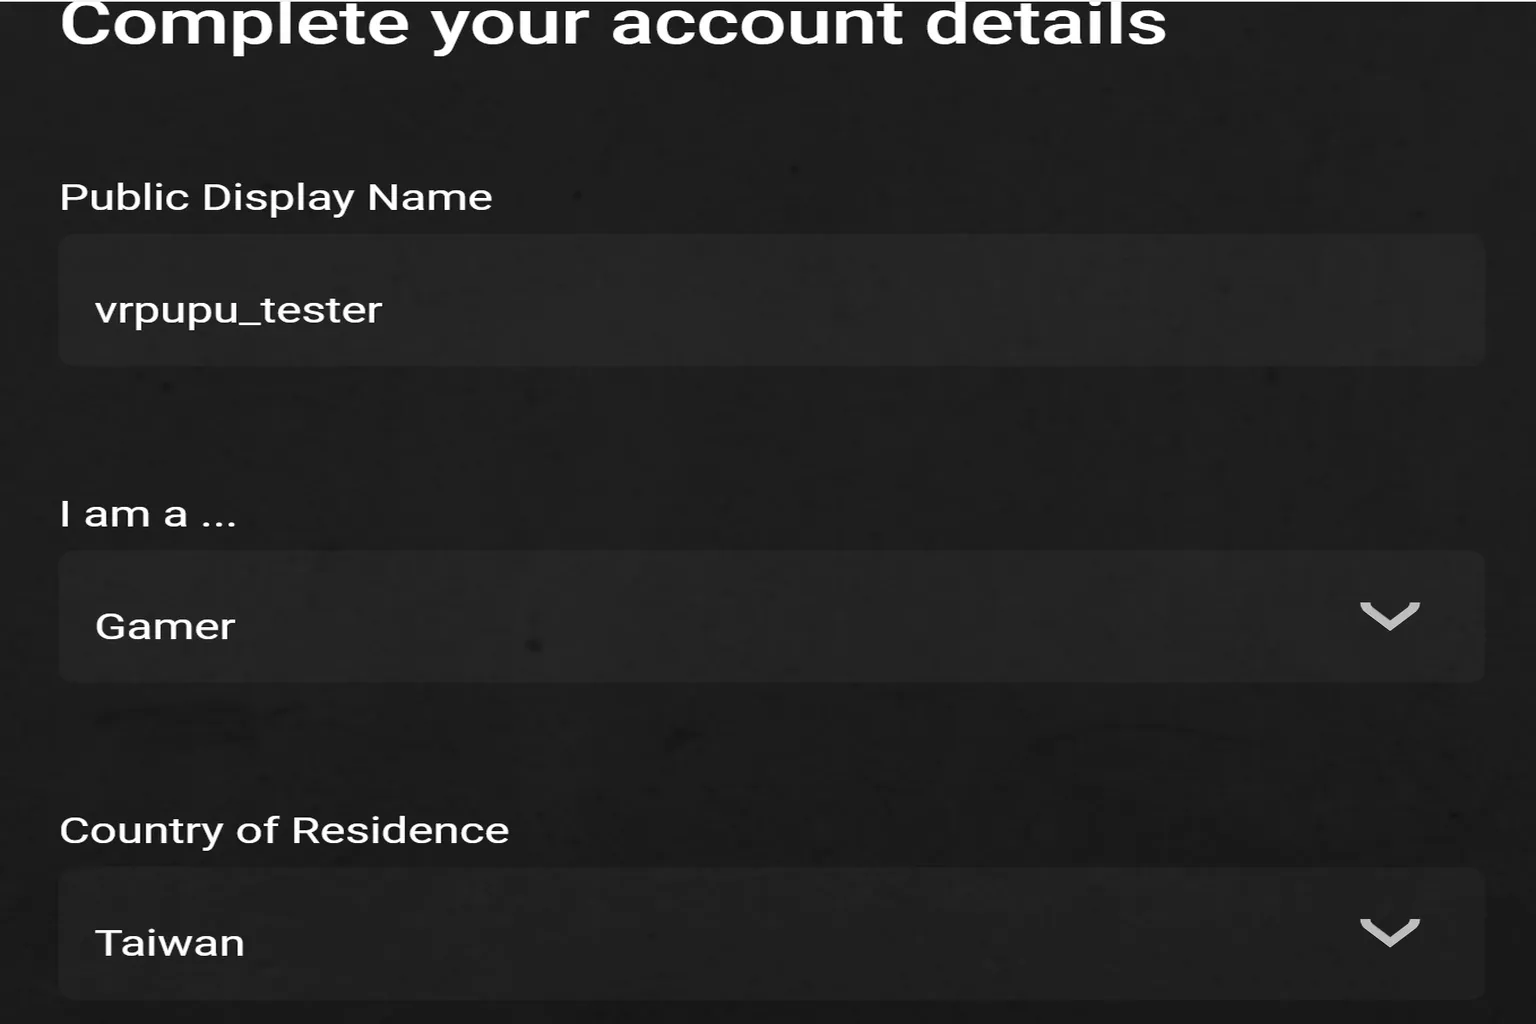
Once everything is filled in, click Sign Up.

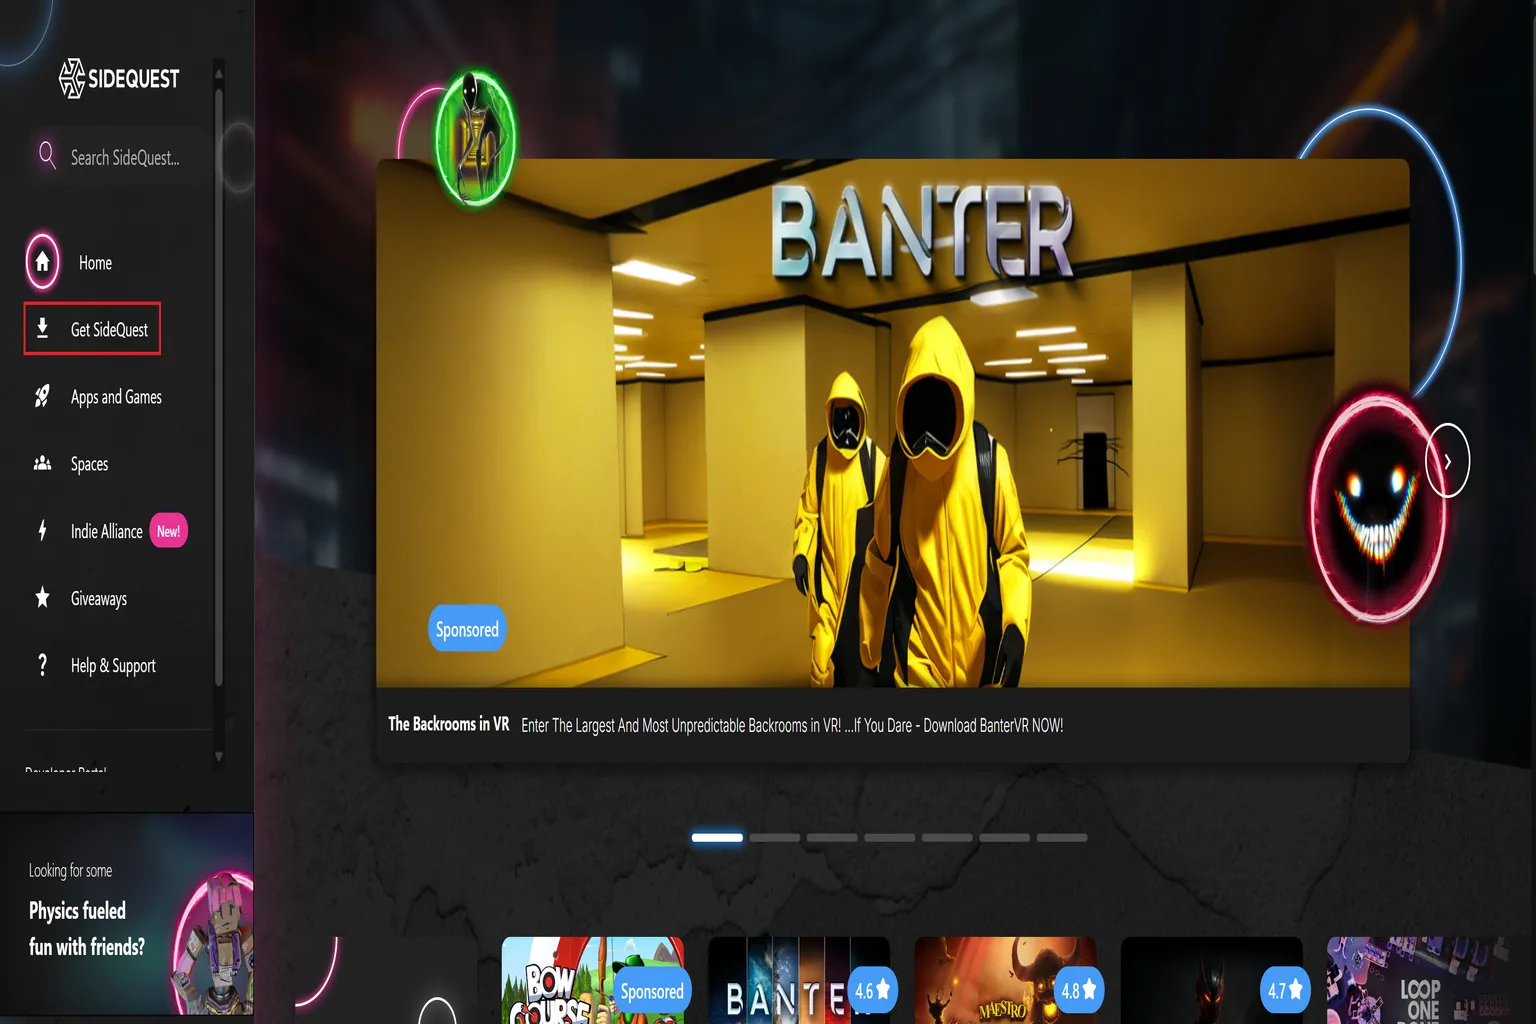
Step 3: Go to the SideQuest Installation Page
After registration is complete, the main menu will appear. From the left side of the screen, select Get SideQuest to go to the installation page.
Step 4: Choose Which Version of SideQuest to Install
The lizard icon on the left is the version that installs SideQuest directly on the headset. The main advantage is that you don’t need a PC when downloading apps from the SideQuest store.
The bird icon on the right is the version that installs SideQuest on your PC. This one is very convenient when you want to transfer custom apps from your PC.
This guide uses the left option, which installs SideQuest directly on the headset, so click Select at the bottom left.

Step 5: Start Installing SideQuest
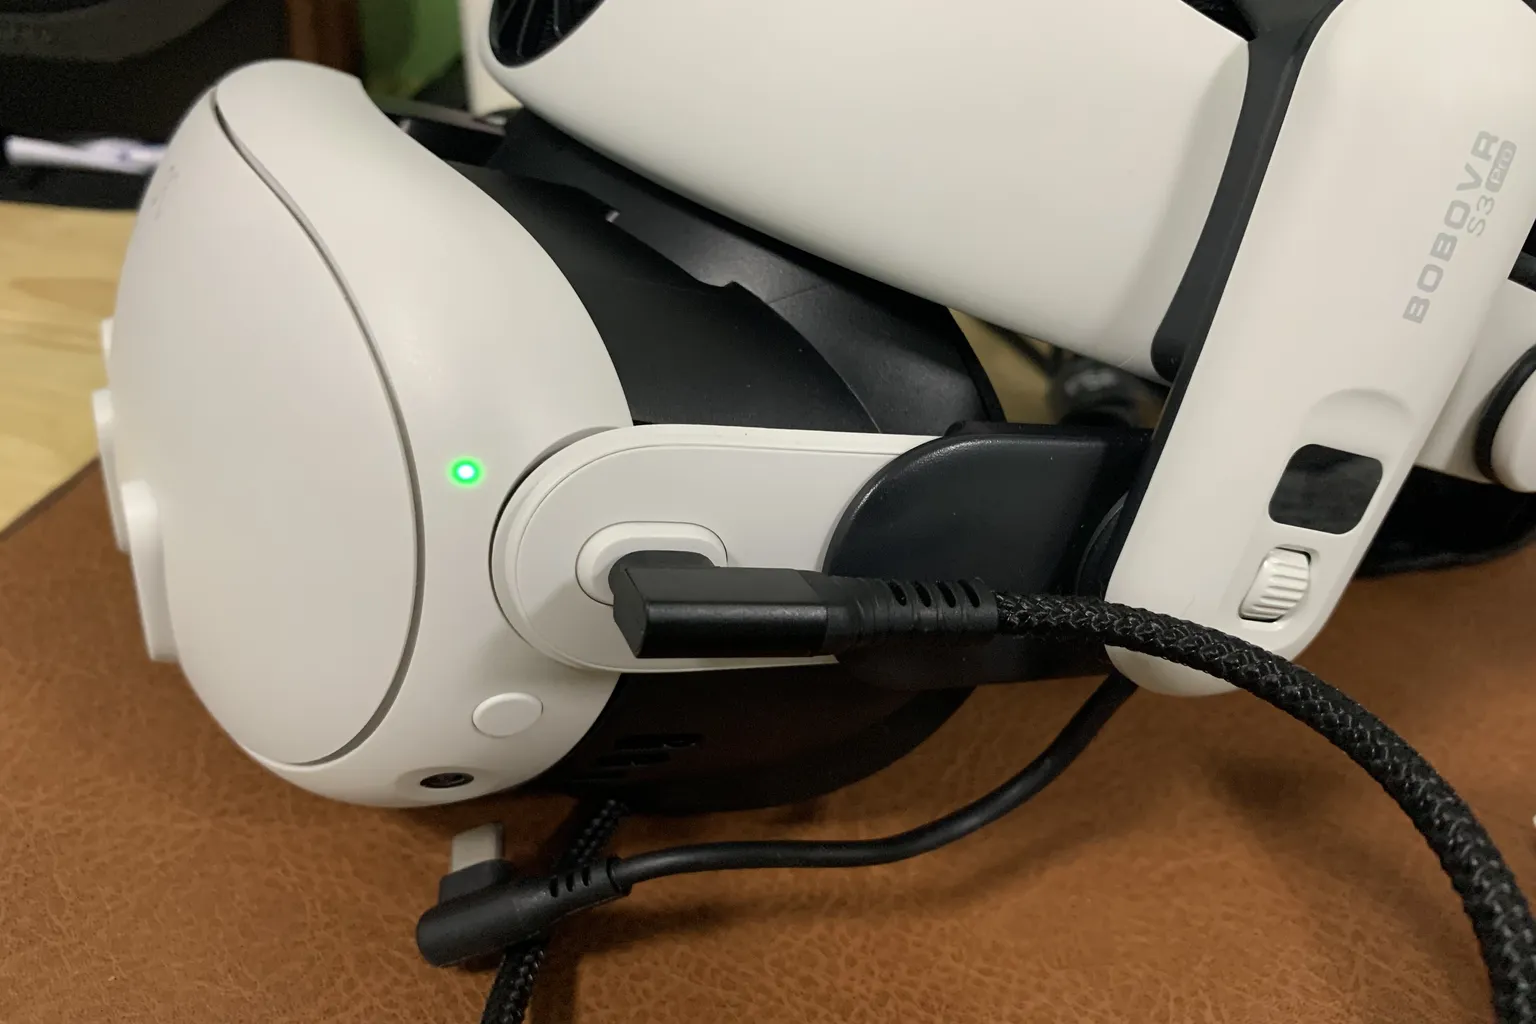
At this stage, you’ll see instructions explaining the installation process. Since Developer Mode is already set up, all you need to do here is plug a USB-C cable into the headset. Make sure the other end of the cable is connected to your PC.
Once the connection is ready, click Next Step.
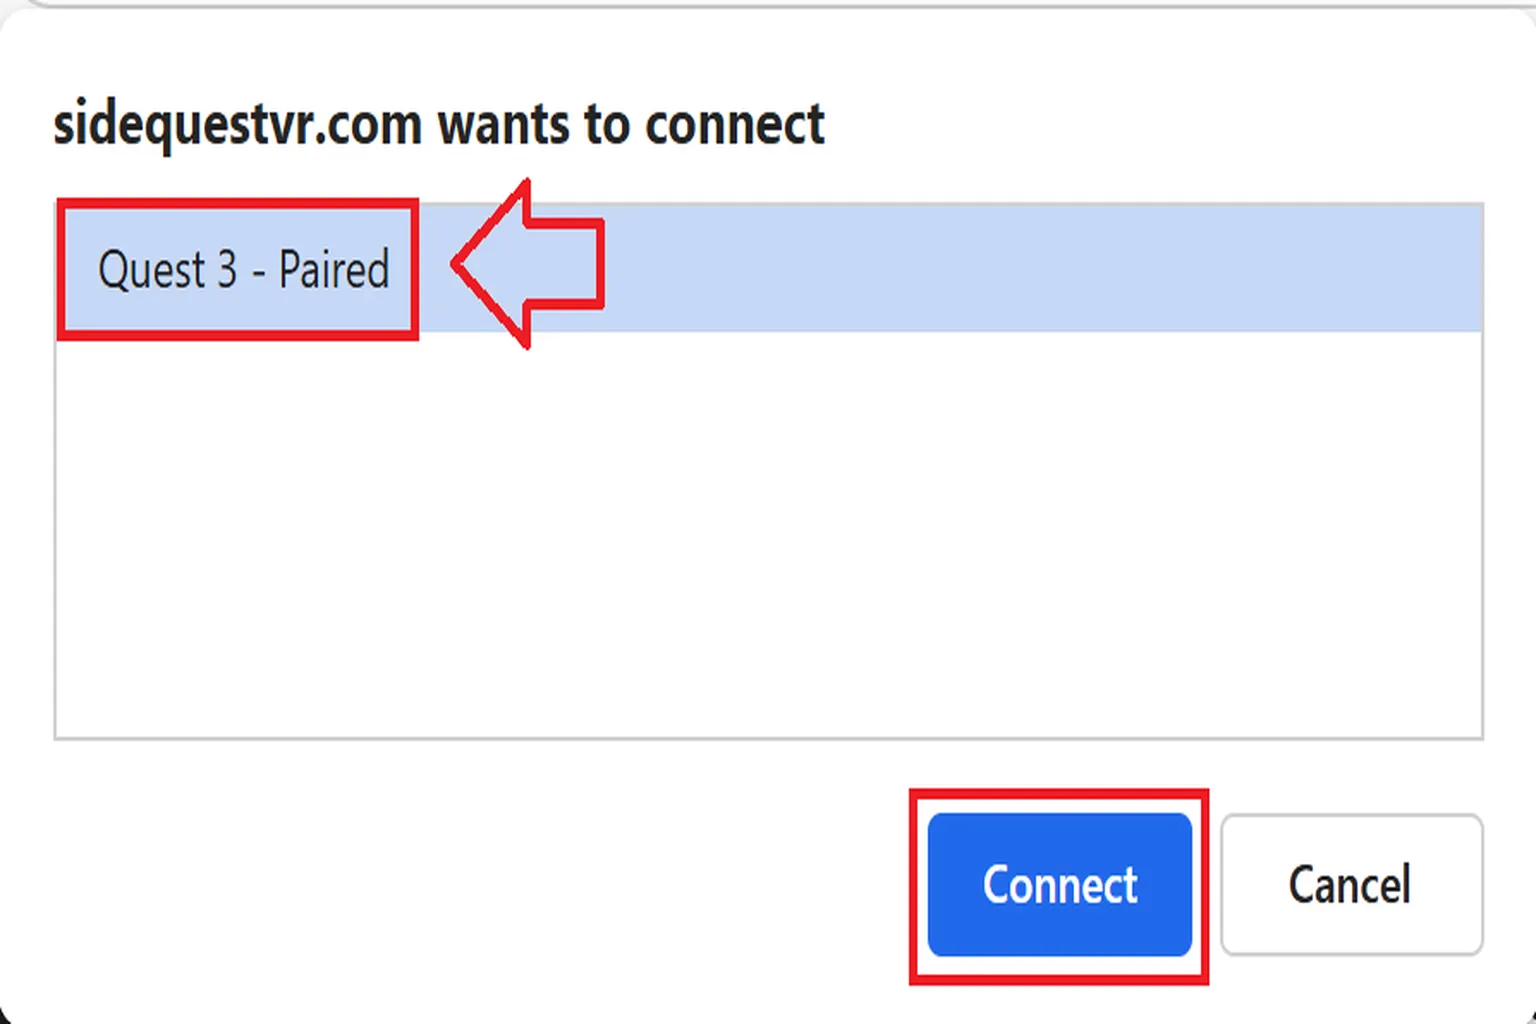
Step 6: Connect the PC and Headset
Click Select Device on the screen.

A small window will pop up on your PC saying that sidequestvr.com is requesting a connection. Select your headset from the list and click Connect.
Step 7: Allow the Connection on the Headset (Read This Carefully Before You Act)
Put on the headset and grab your controller. You should see a message asking, “Allow USB debugging?” in your view.
Make sure you check Always allow from this computer first, then select Allow. Doing this means you won’t be asked again every time you connect the headset to the same PC.
If that screen doesn’t appear, there are usually two possible reasons:
- Developer Mode isn’t enabled.
- There’s an issue with the USB cable, such as not supporting data transfer or being damaged.

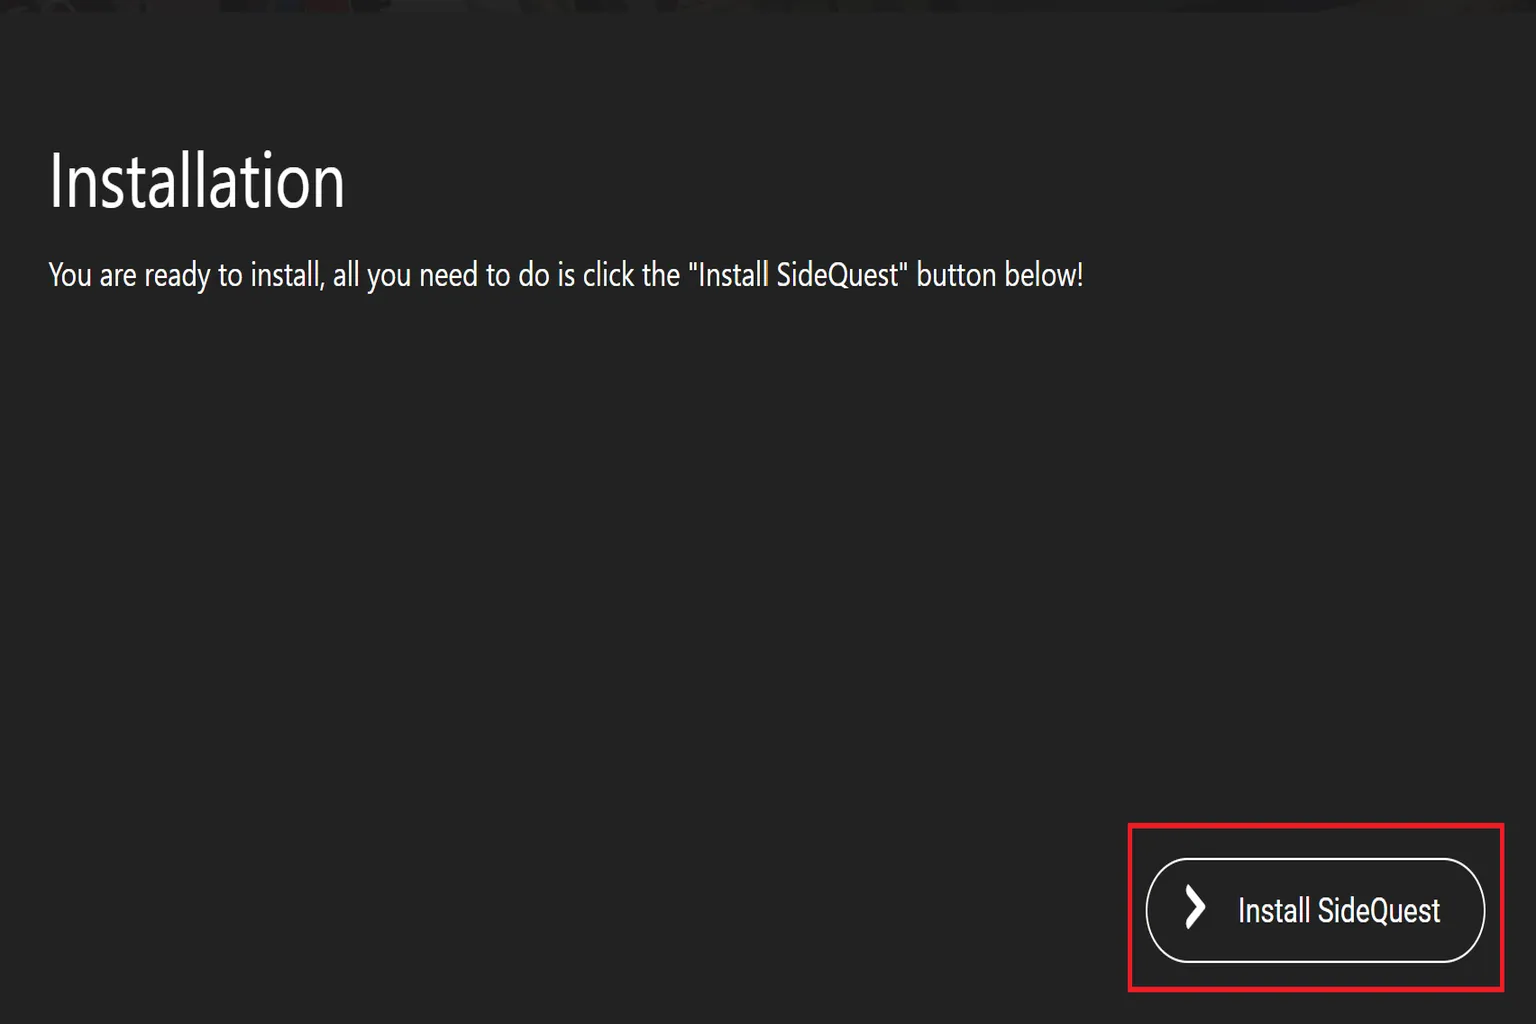
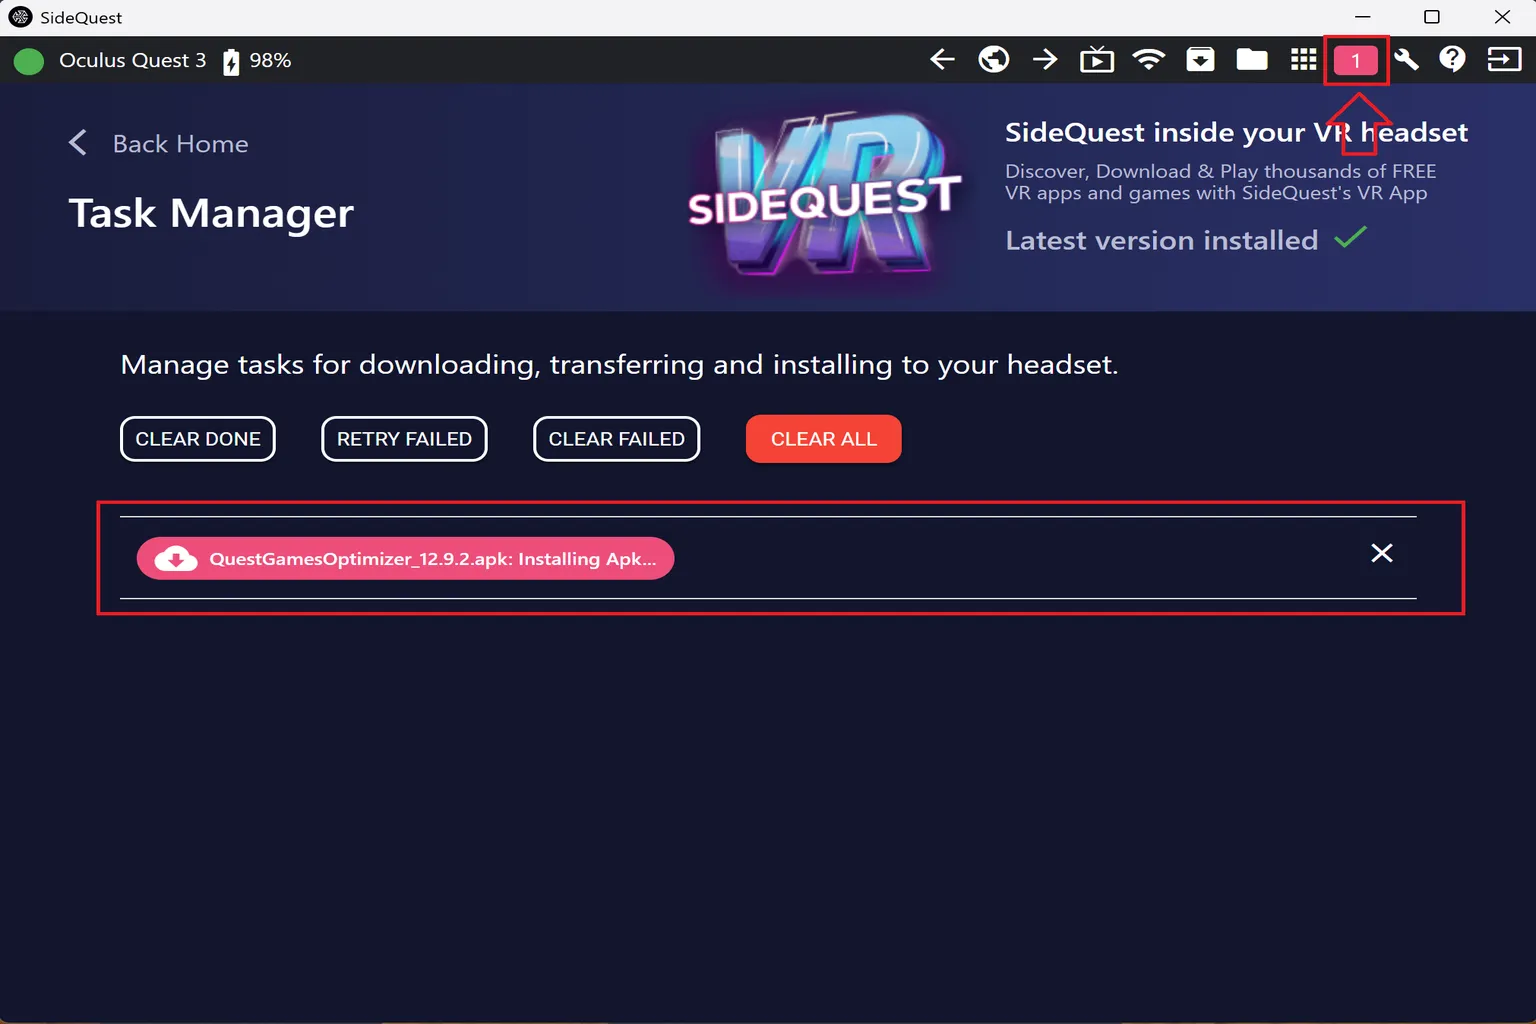
Step 8: Install the SideQuest App
Once the headset connection is complete, take off the headset and go back to your PC. You should see the Installation screen. From there, click Install SideQuest.
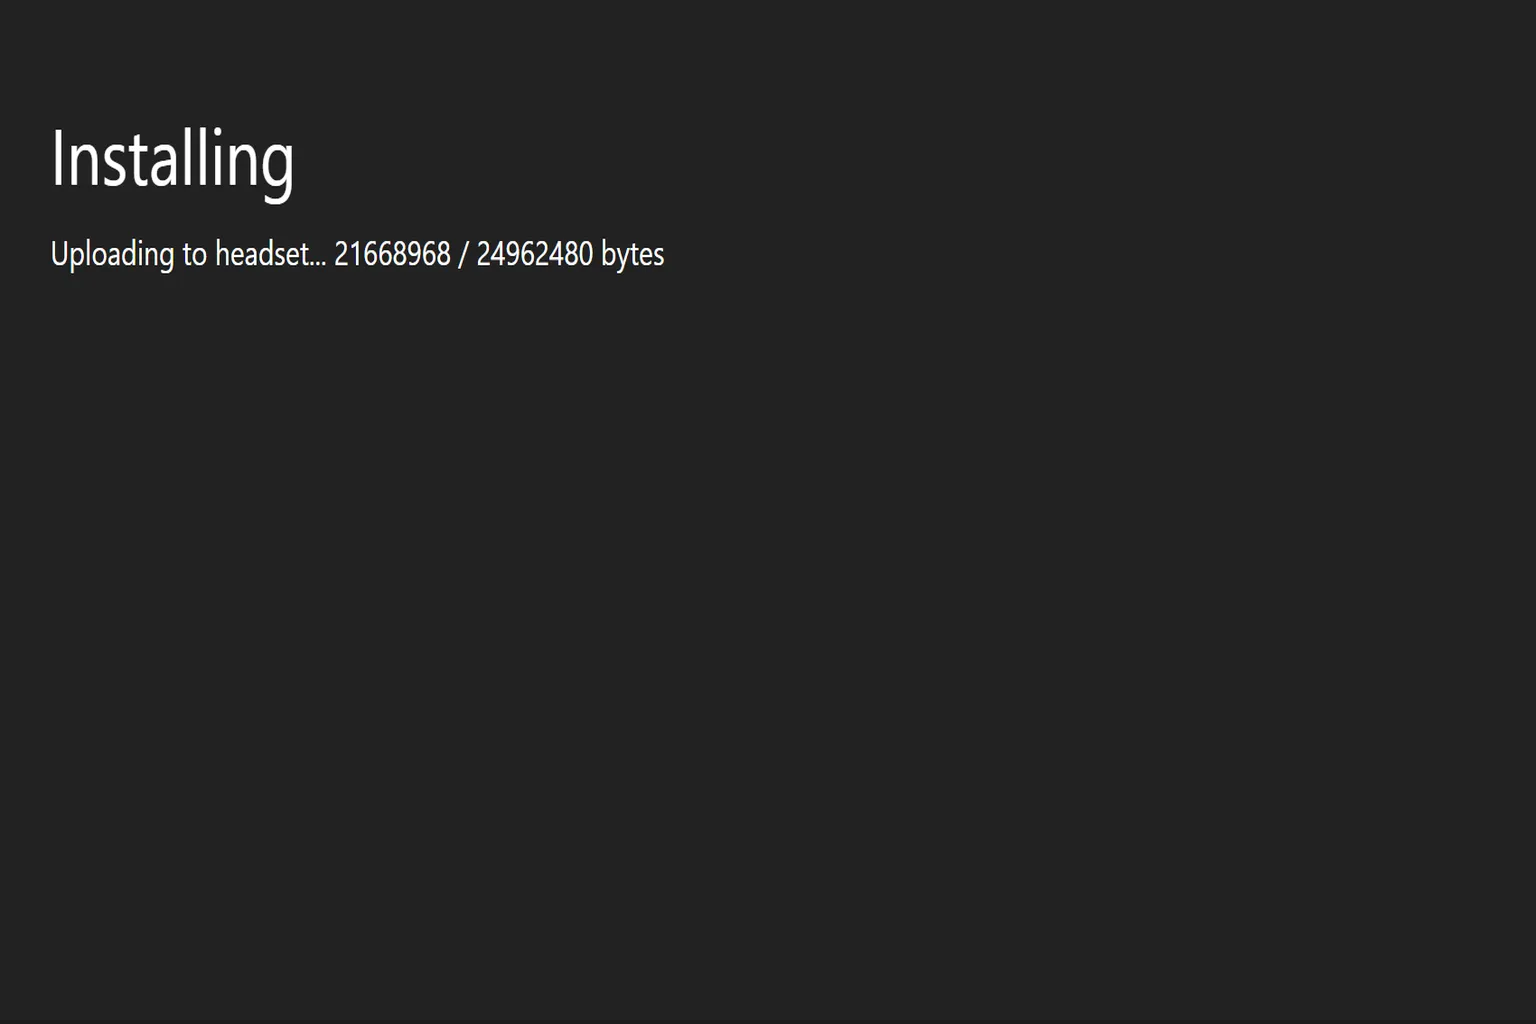
The download will start, and SideQuest will be installed on the headset automatically.
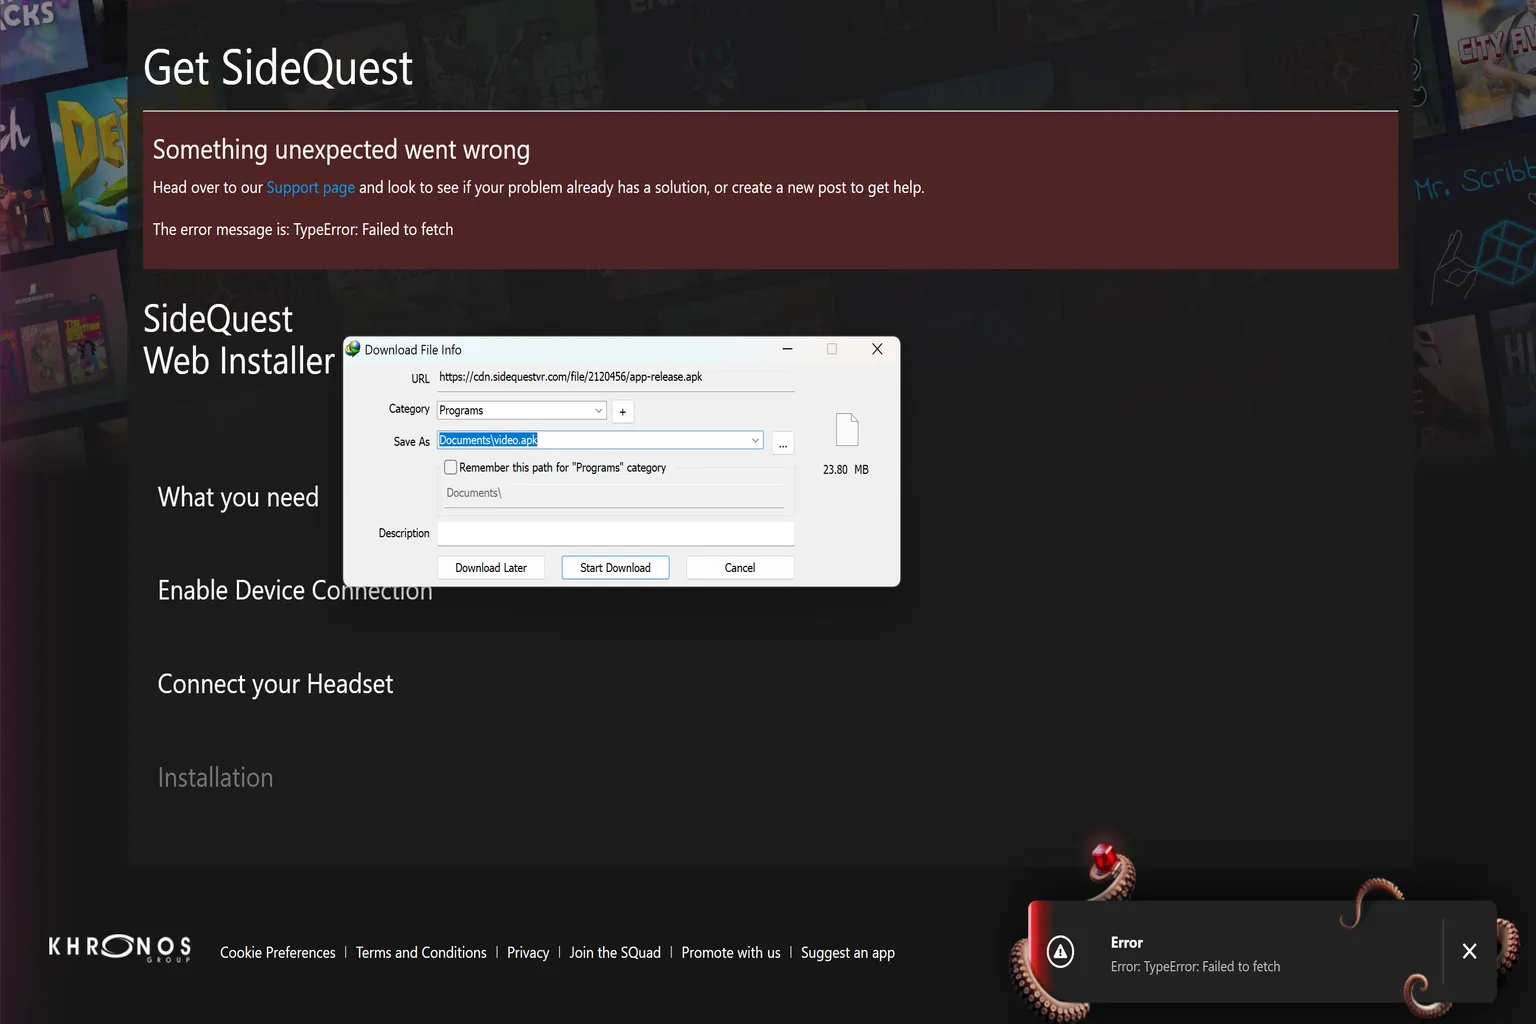
If you see an error like “Error: TypeError: Failed to fetch,” the most likely cause is that you’re using a proxy or download-related tool on your PC, such as Internet Downloader.
Close any proxy or download helper software, then try the download again using just your browser, with no extra add-ons or tools. In most cases, the installation will proceed normally after that.
Once the installation finishes successfully, you’ll see a screen that says “Installed.” Click the blue Link button there to move on to linking the headset.
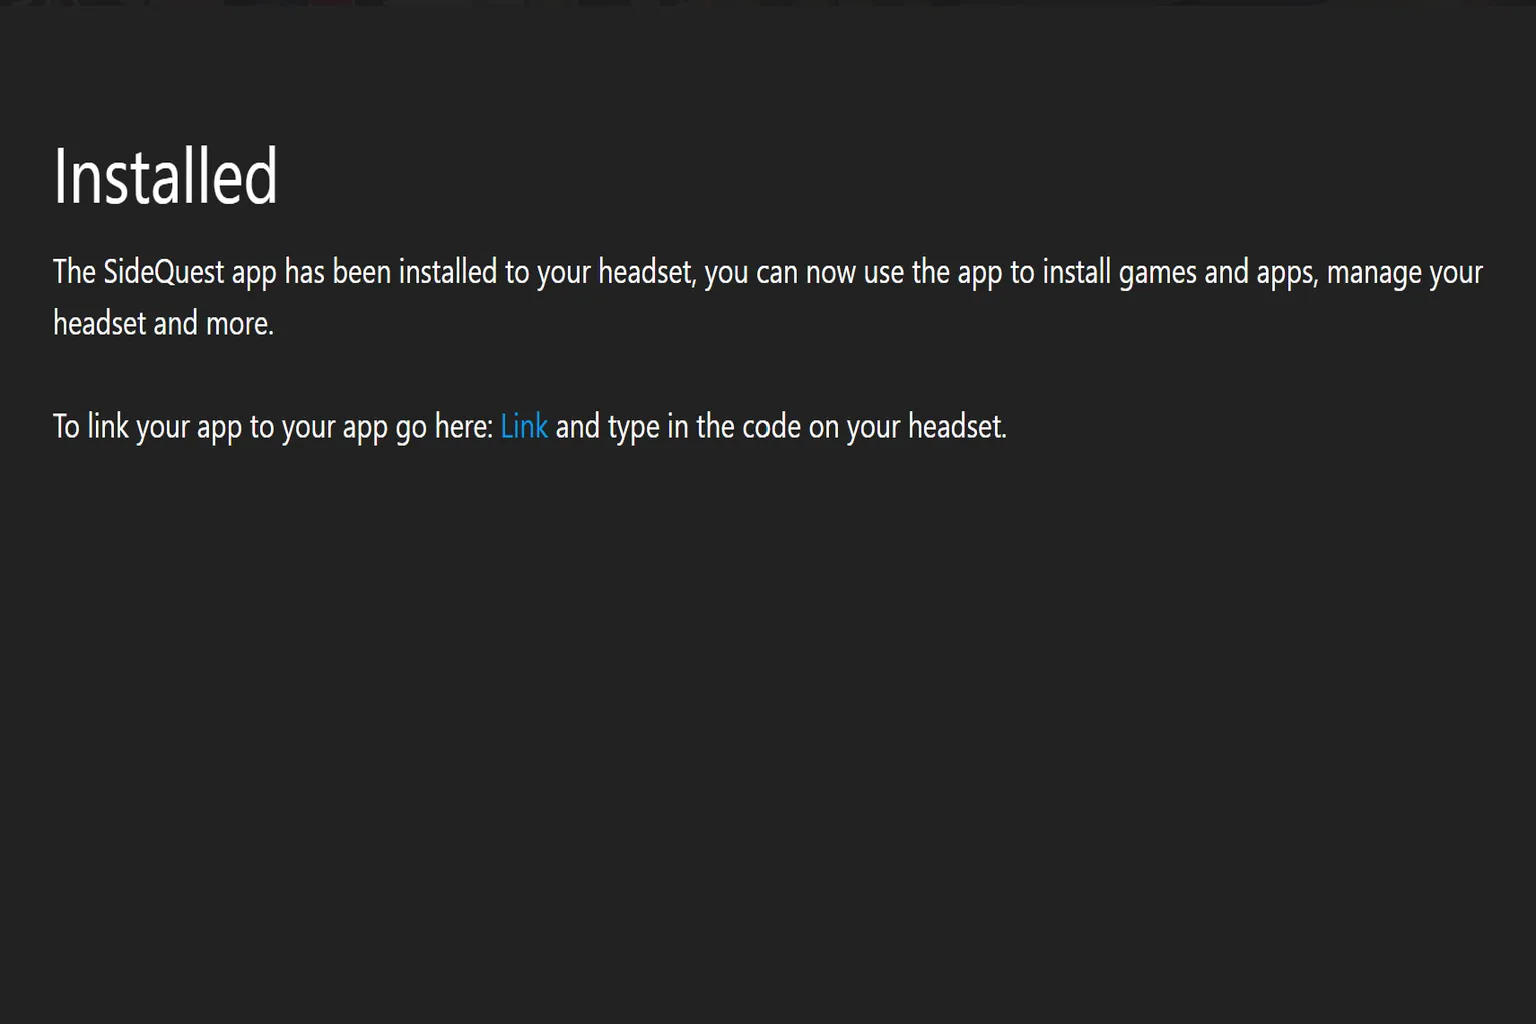
Step 9: Link the Headset
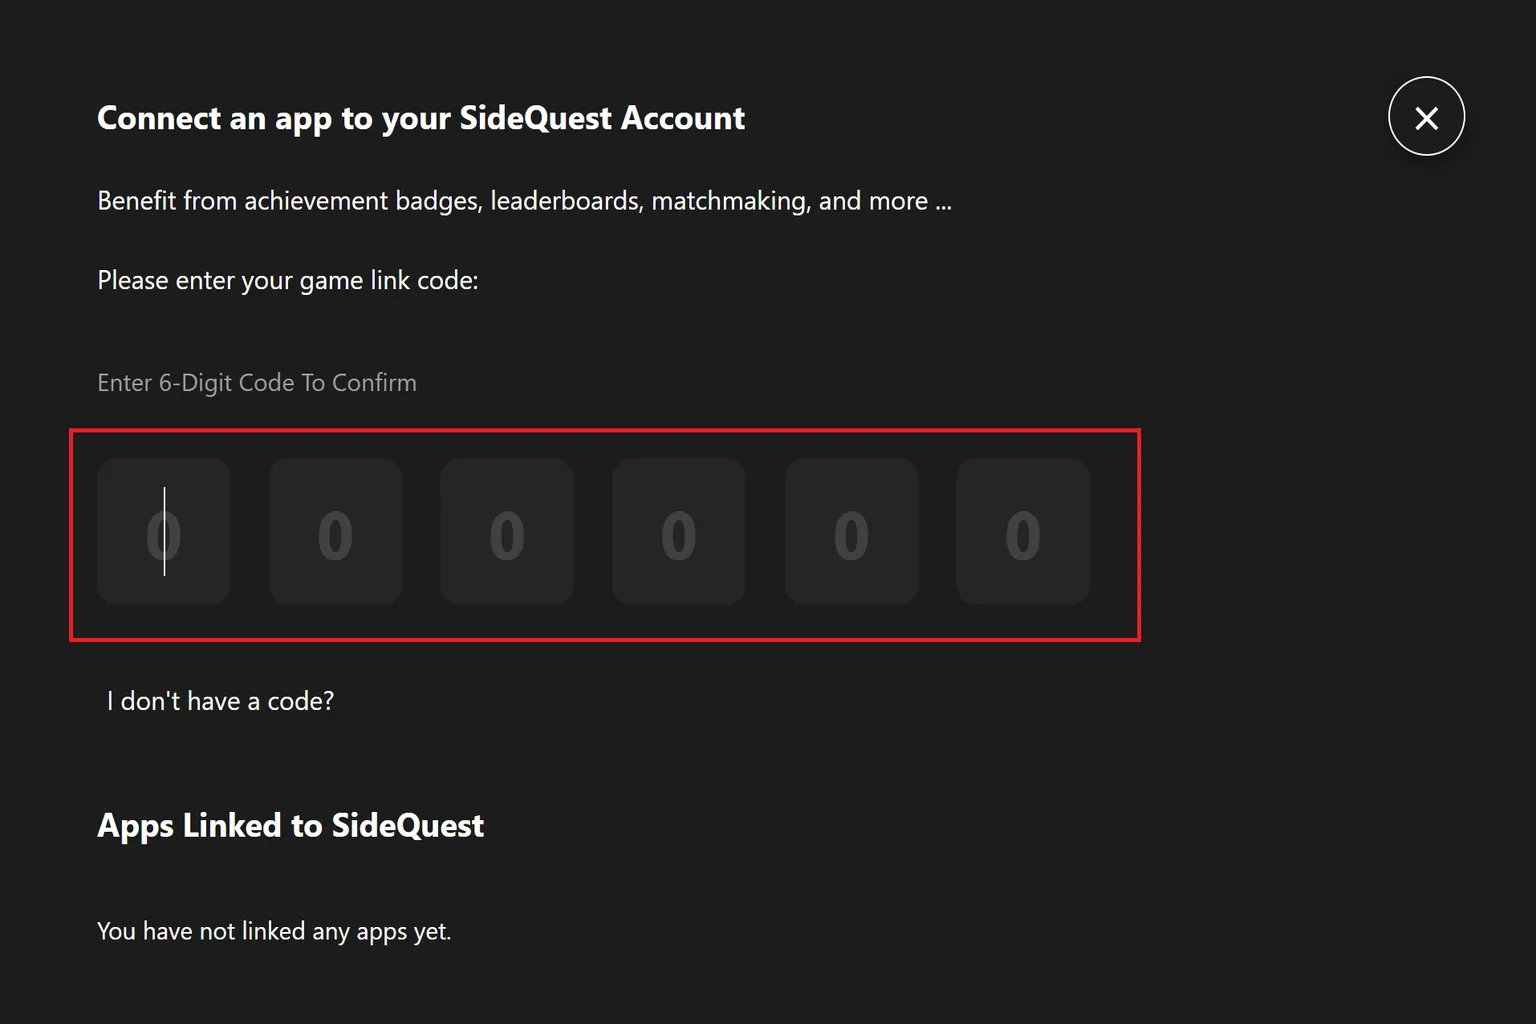
When you put the headset back on, you should see a six-digit code displayed on the screen.
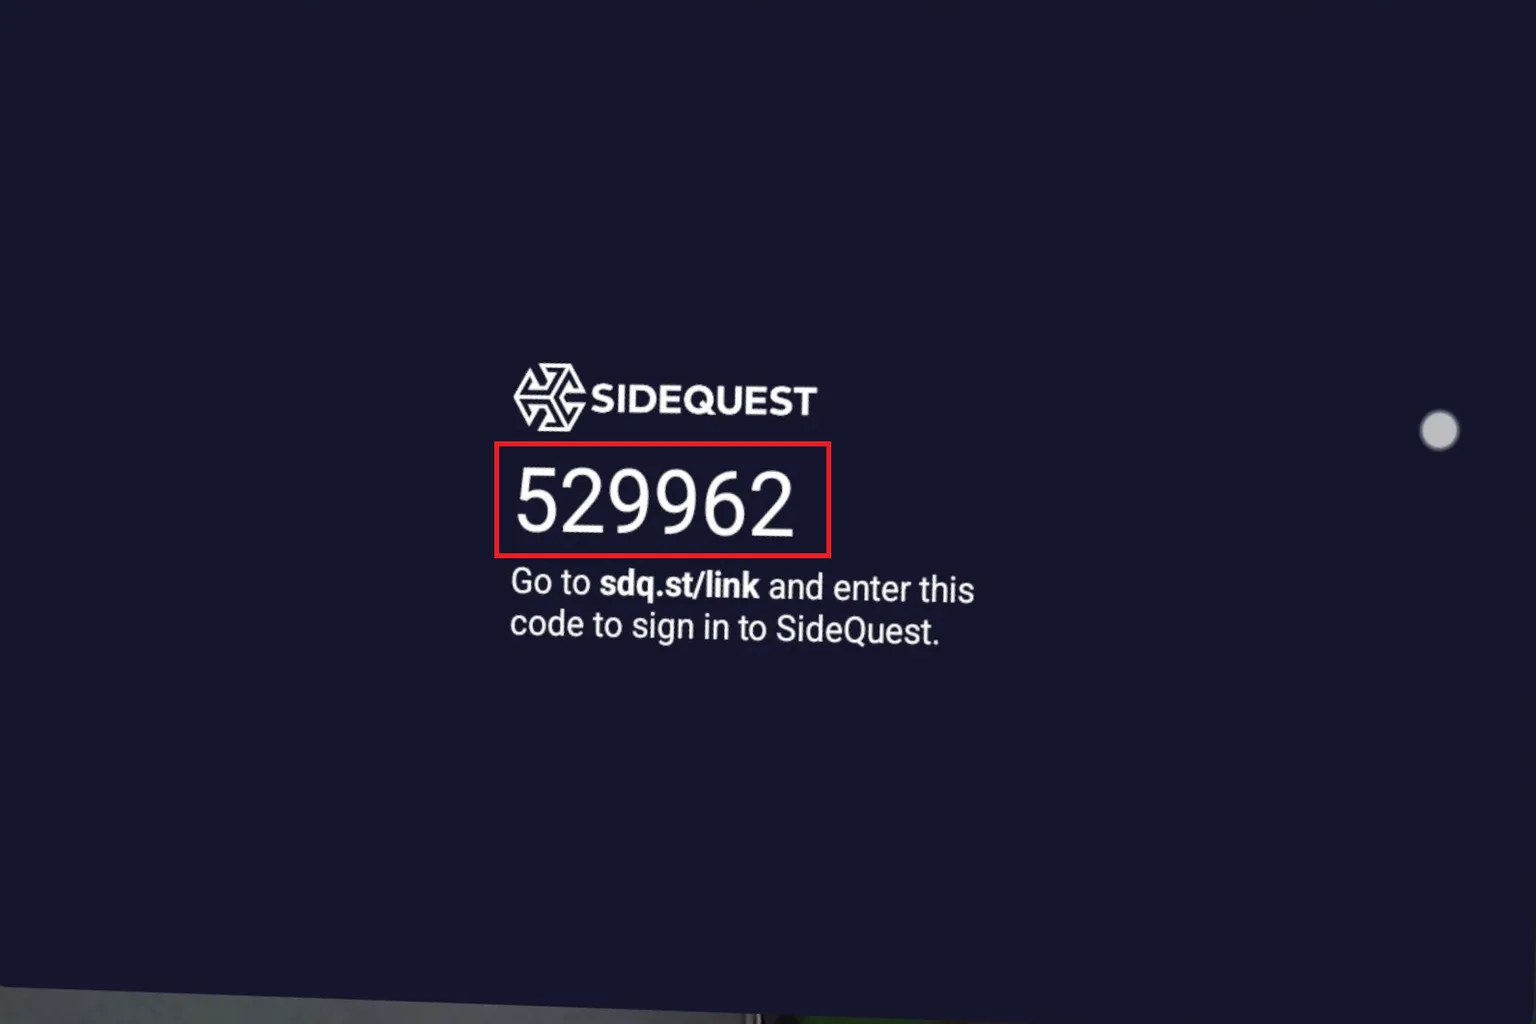
Enter that six-digit code on your PC, and the headset authentication will be completed.
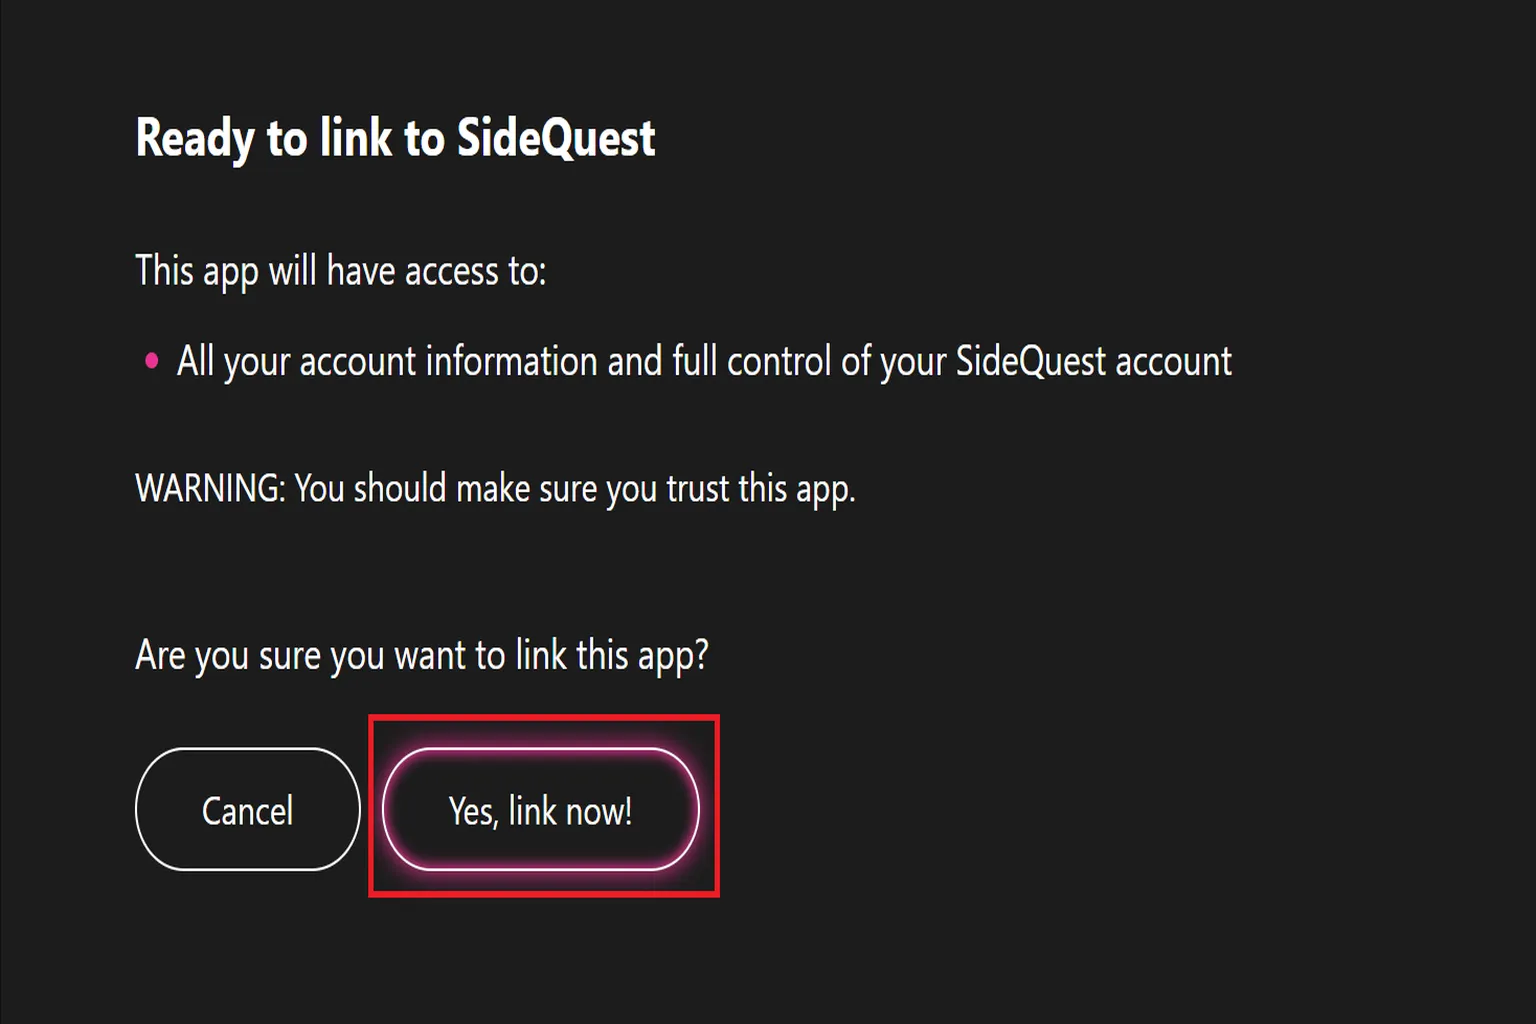
Step 10: Finish Linking
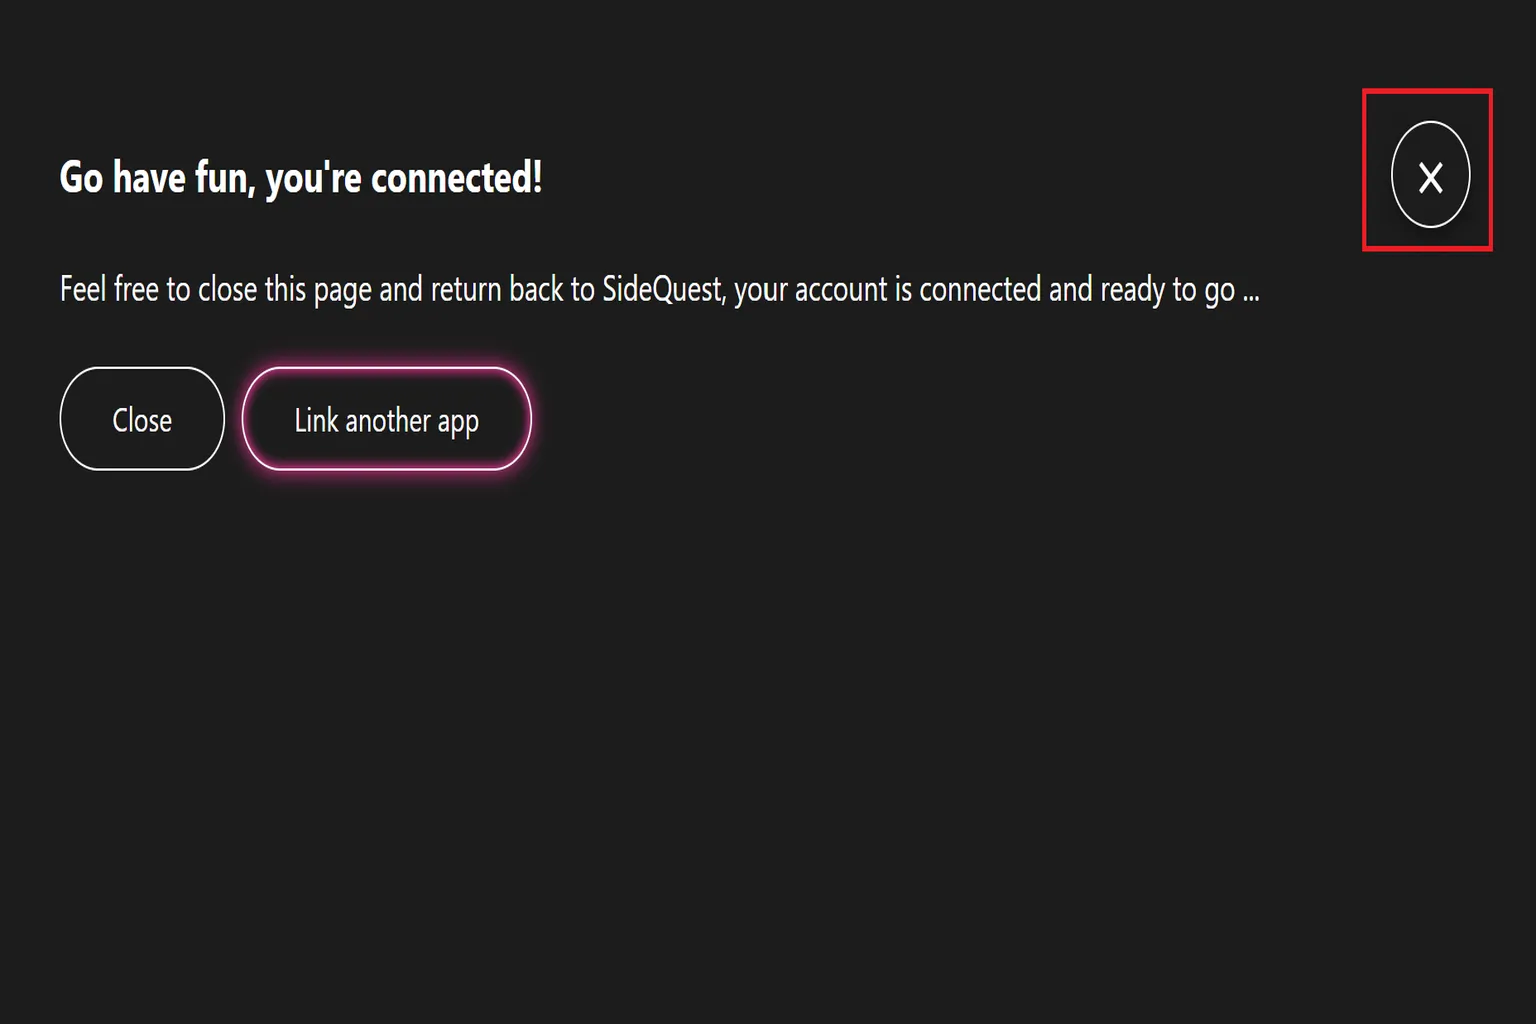
After you enter the code, you’ll be asked, “Do you want to enable SideQuest on this headset?” Select Yes, Link Now. This completes the installation process.
When you see a screen that says “Go have fun,” you can close it by pressing the X button. At this point, the SideQuest installation is fully complete.
Step 11: Launch SideQuest Inside the Headset
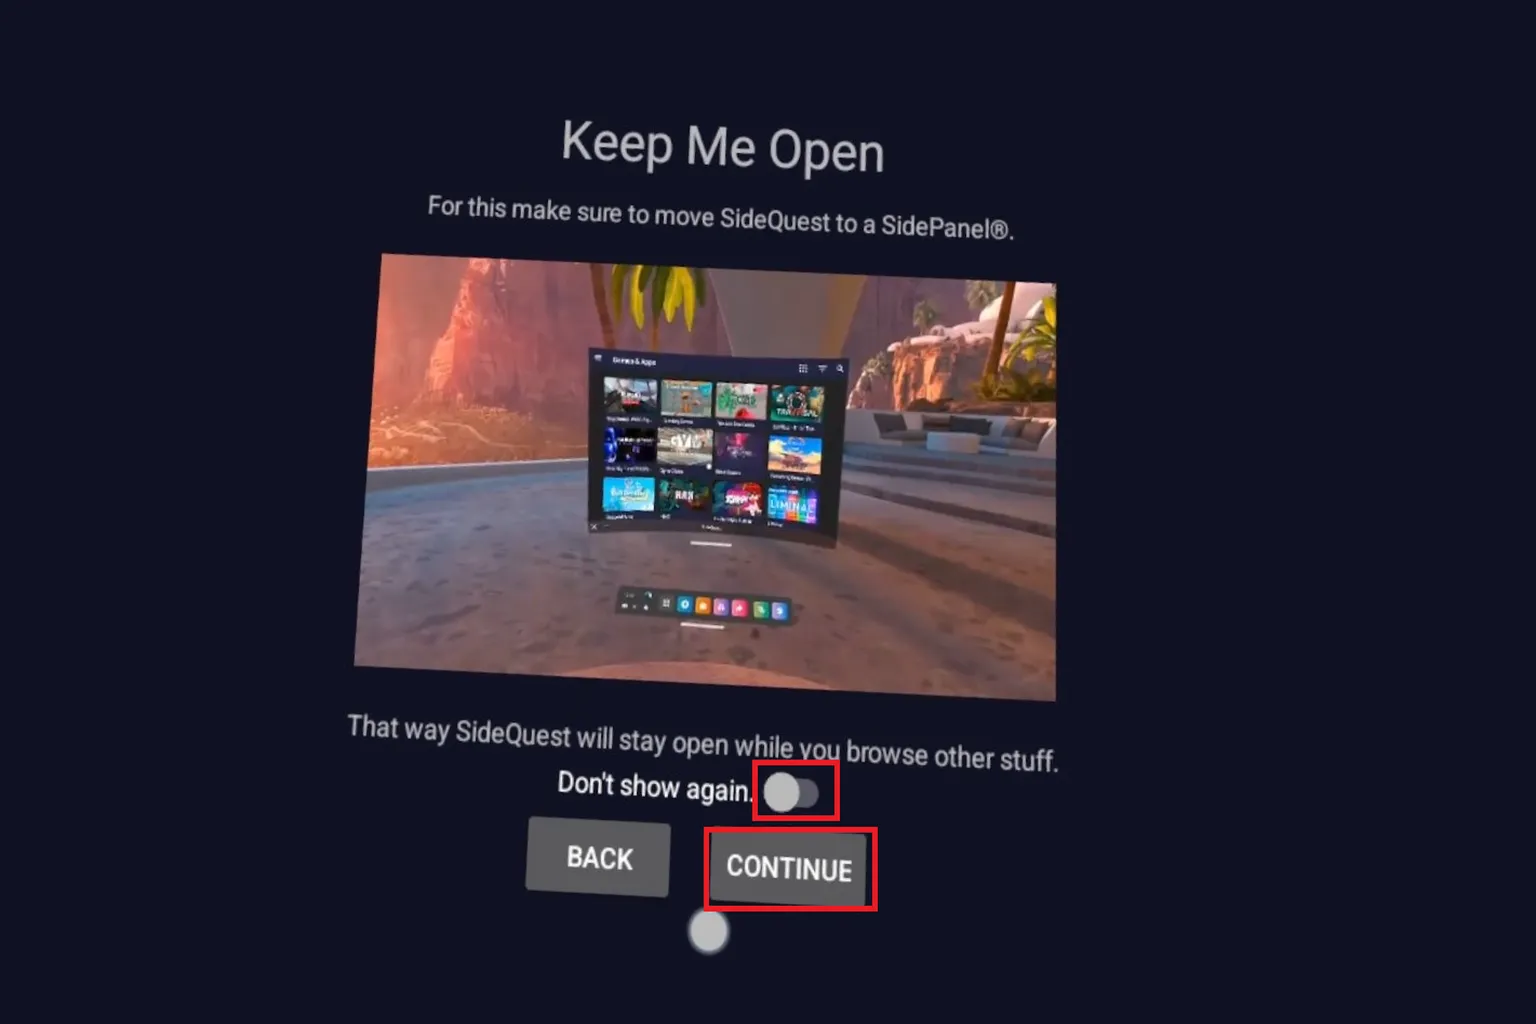
Put the headset on and you’ll see the SideQuest welcome screen. Check Don’t show again, then select Continue.
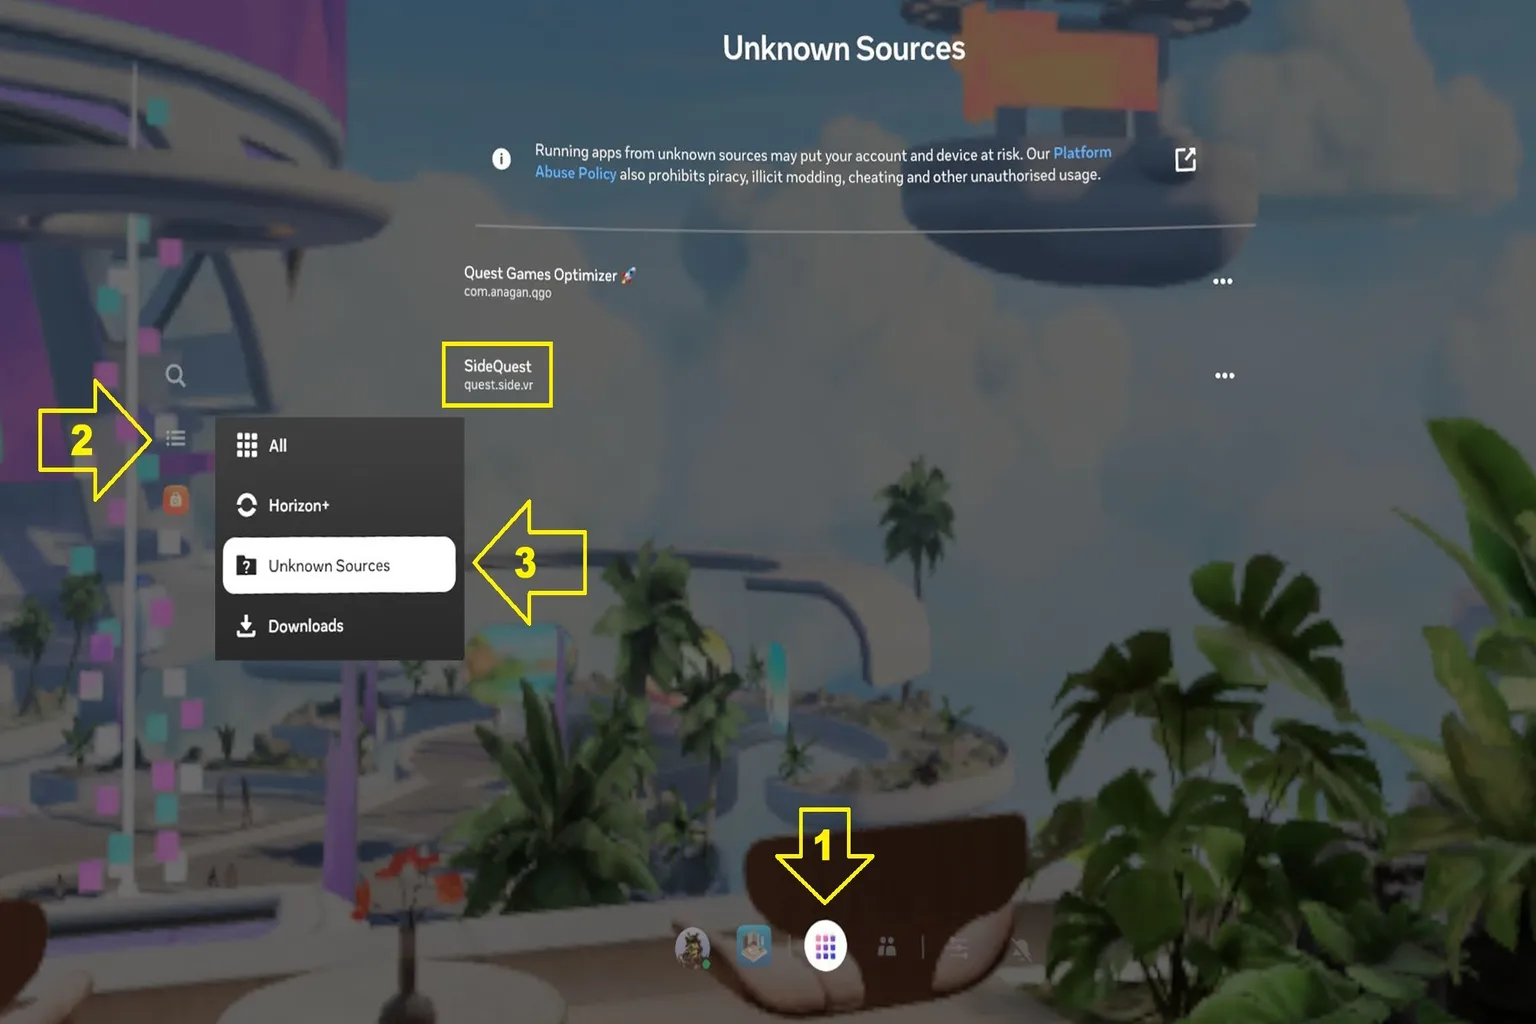
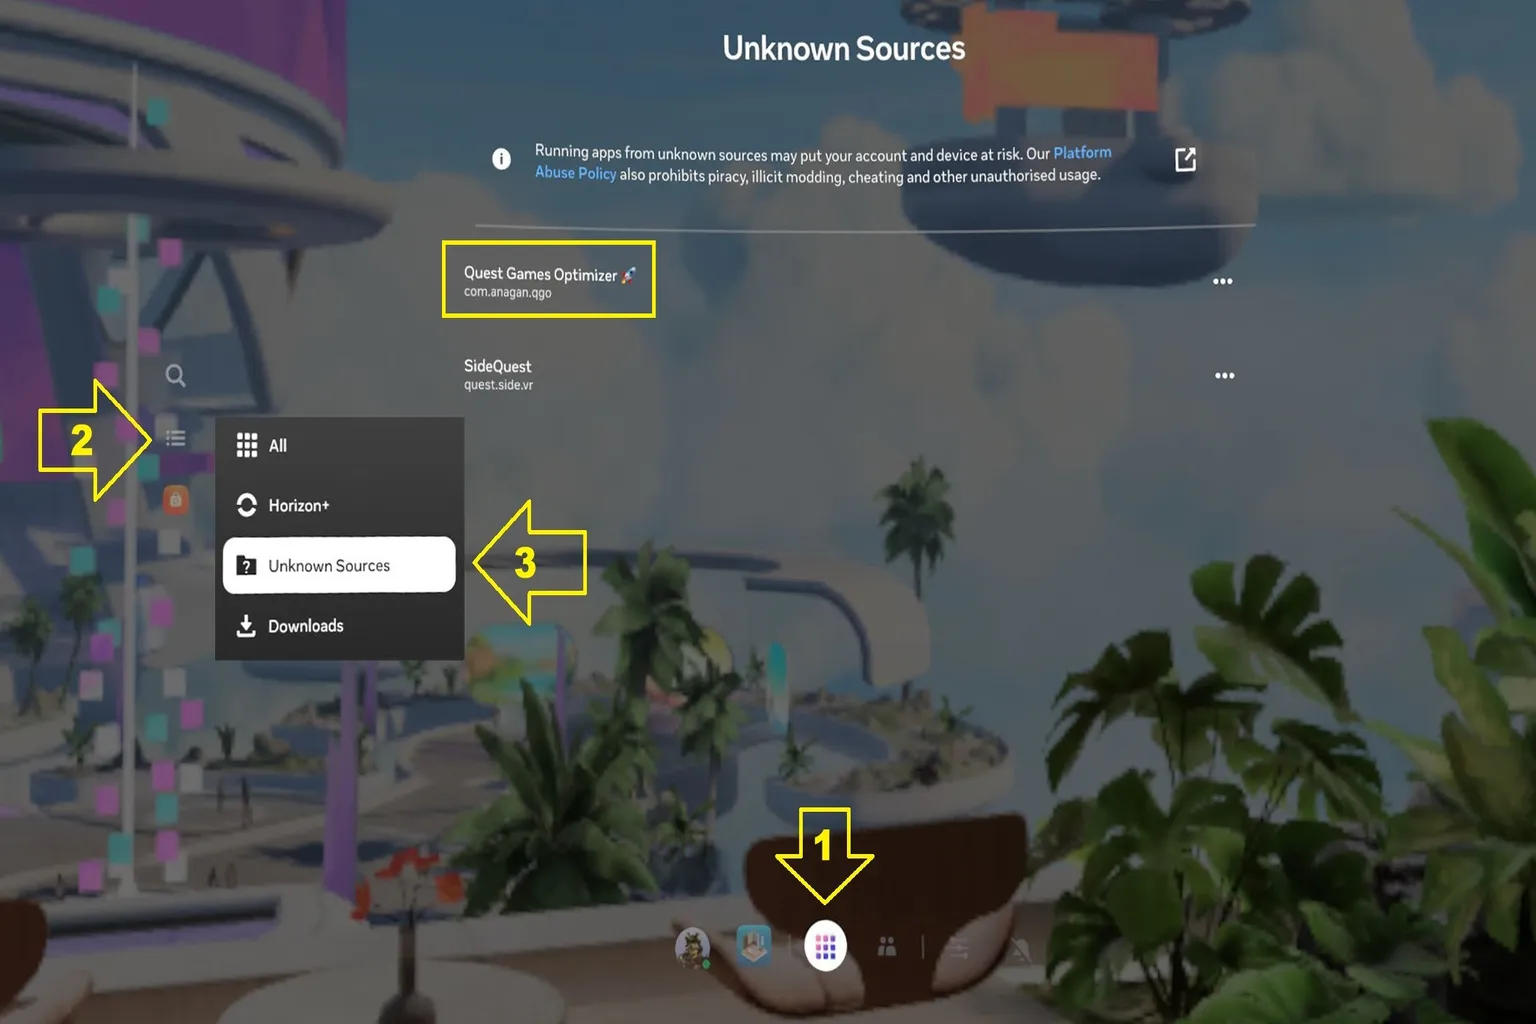
Open your app library and you should see a category called something like Unknown Sources. SideQuest will be listed there.
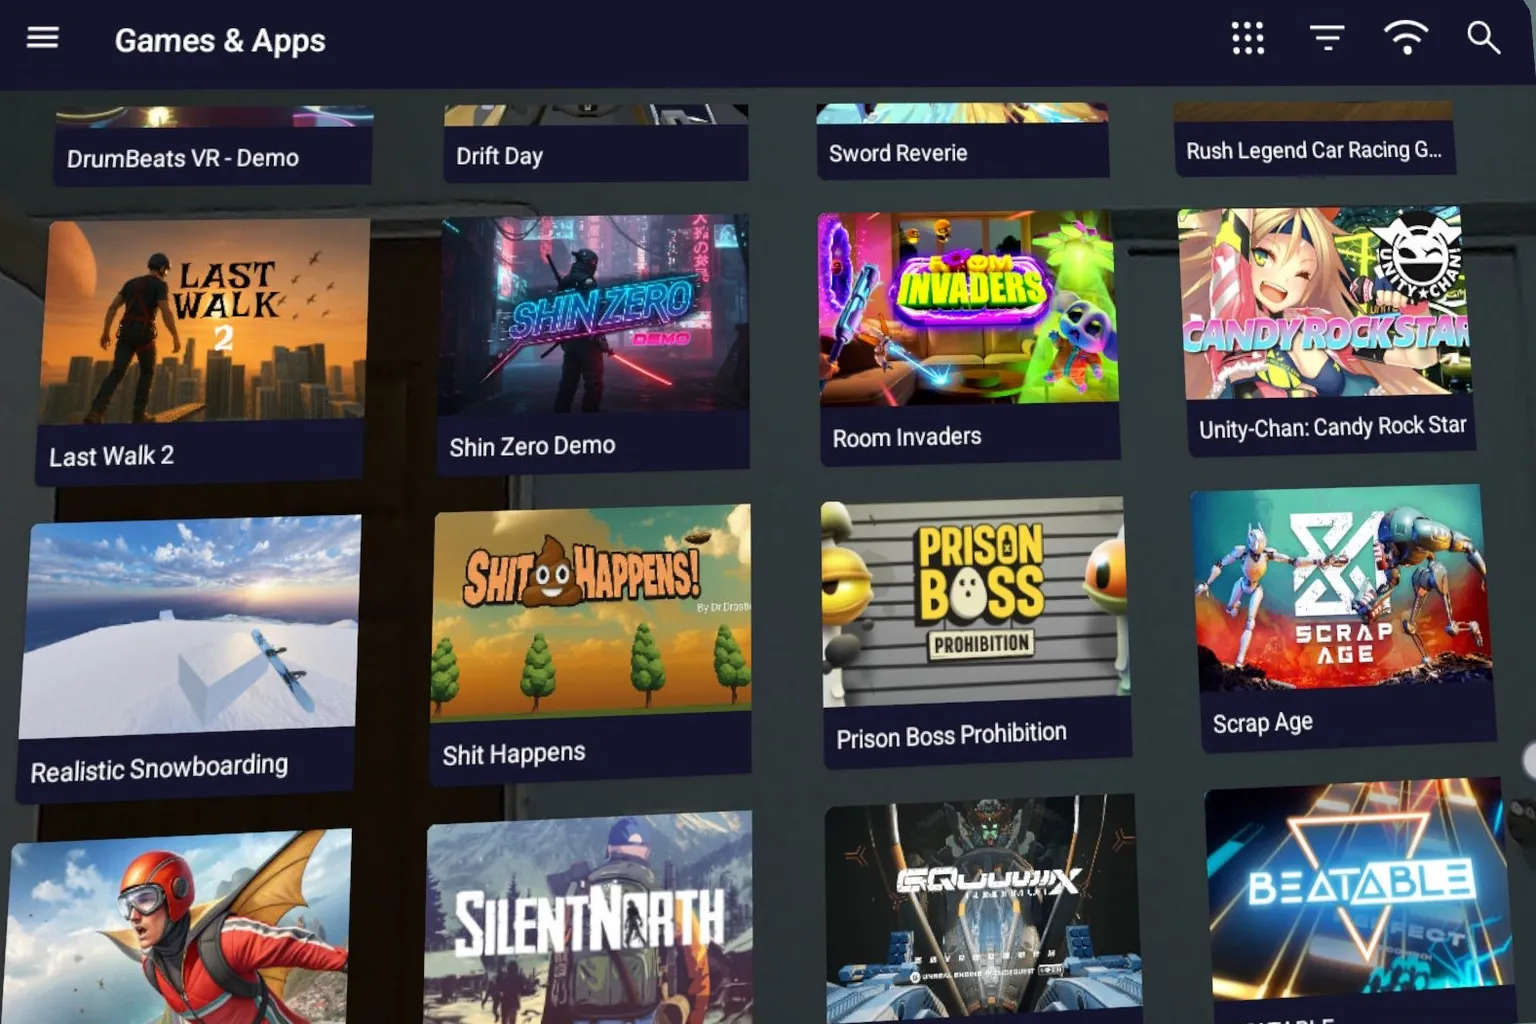
Step 12: Try the SideQuest Store
Once SideQuest launches, you’ll see a screen filled with apps and games. From here, you can freely browse different titles and start exploring anything that catches your interest.
How to Install SideQuest on a PC
If you want to install the PC version and manually upload apps yourself, continue from Step 4 above and follow the steps below. The PC version only supports 64-bit Windows 10 and Windows 11.
Step 1: Install on Your PC
Click Download for Windows 10/11 X64 at the bottom right of the screen to download and install the software.
Step 2: Installer Settings
During installation, you’ll be asked whether SideQuest should be installed only for you or for anyone who uses this computer. Choose the option that fits how you plan to use it.
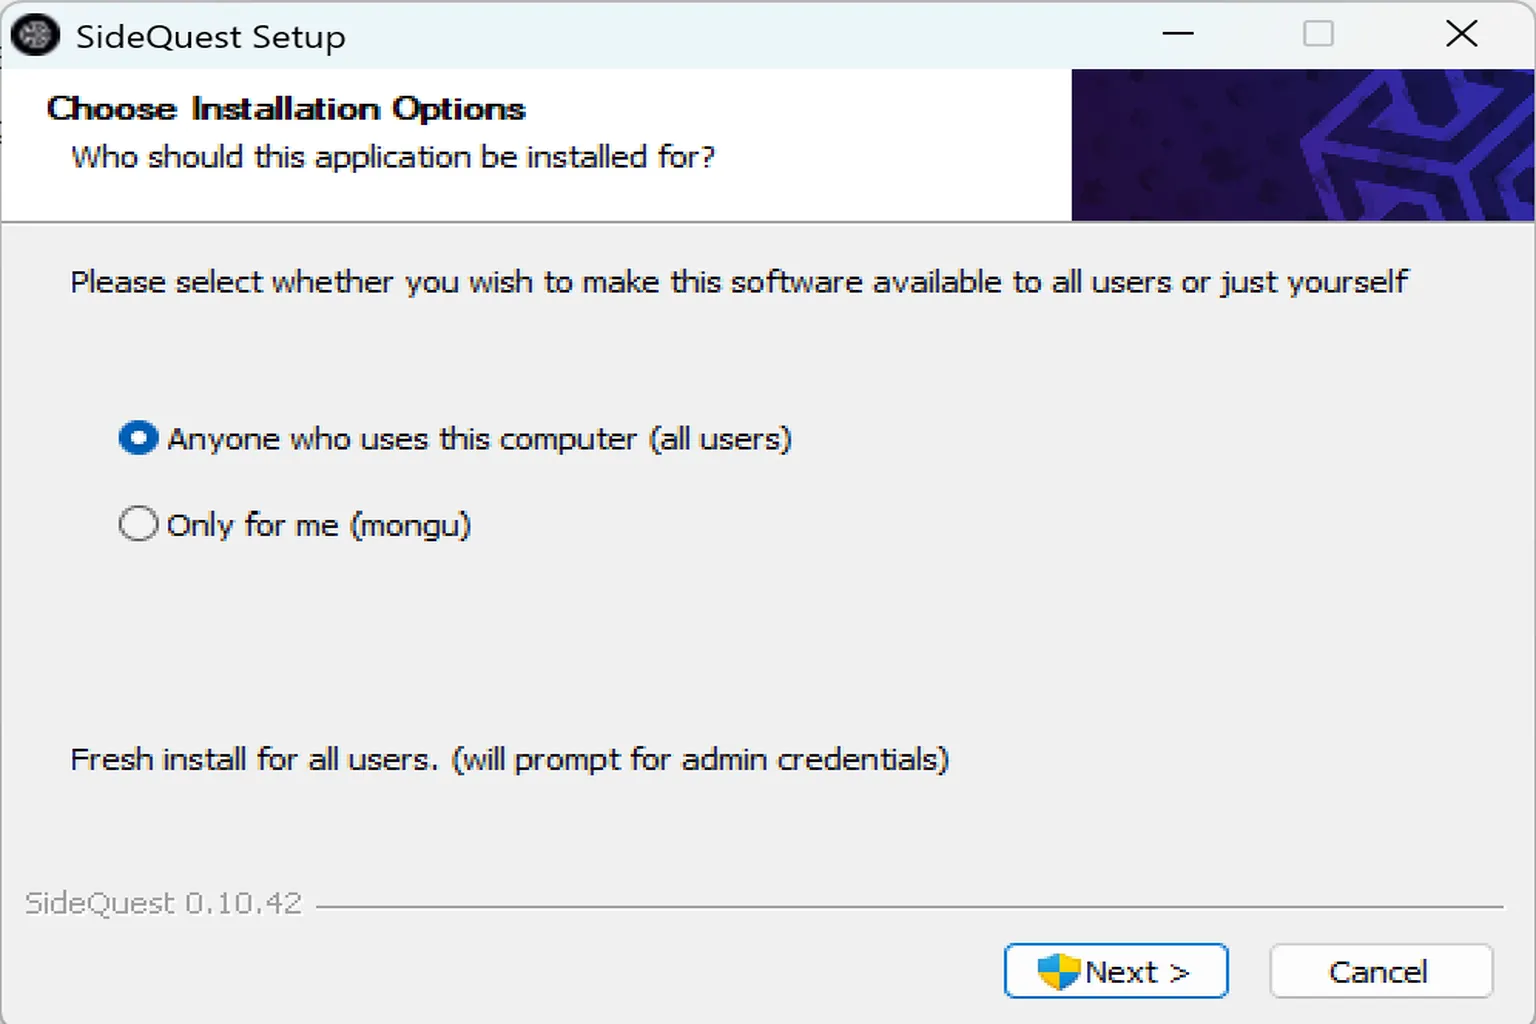
Once installation finishes, the SideQuest app should appear on your PC.
Step 3: Accept the Privacy Policy and Sign In
Launch the SideQuest app and first click Accept All to agree to the privacy policy. After that, click Sign up now at the top of the screen to sign in to your account or create a new one.

Step 4: Log In to Your Account
Don’t click the Email or Google buttons at the top, those are for creating a new account. Instead, click Log in here at the bottom.
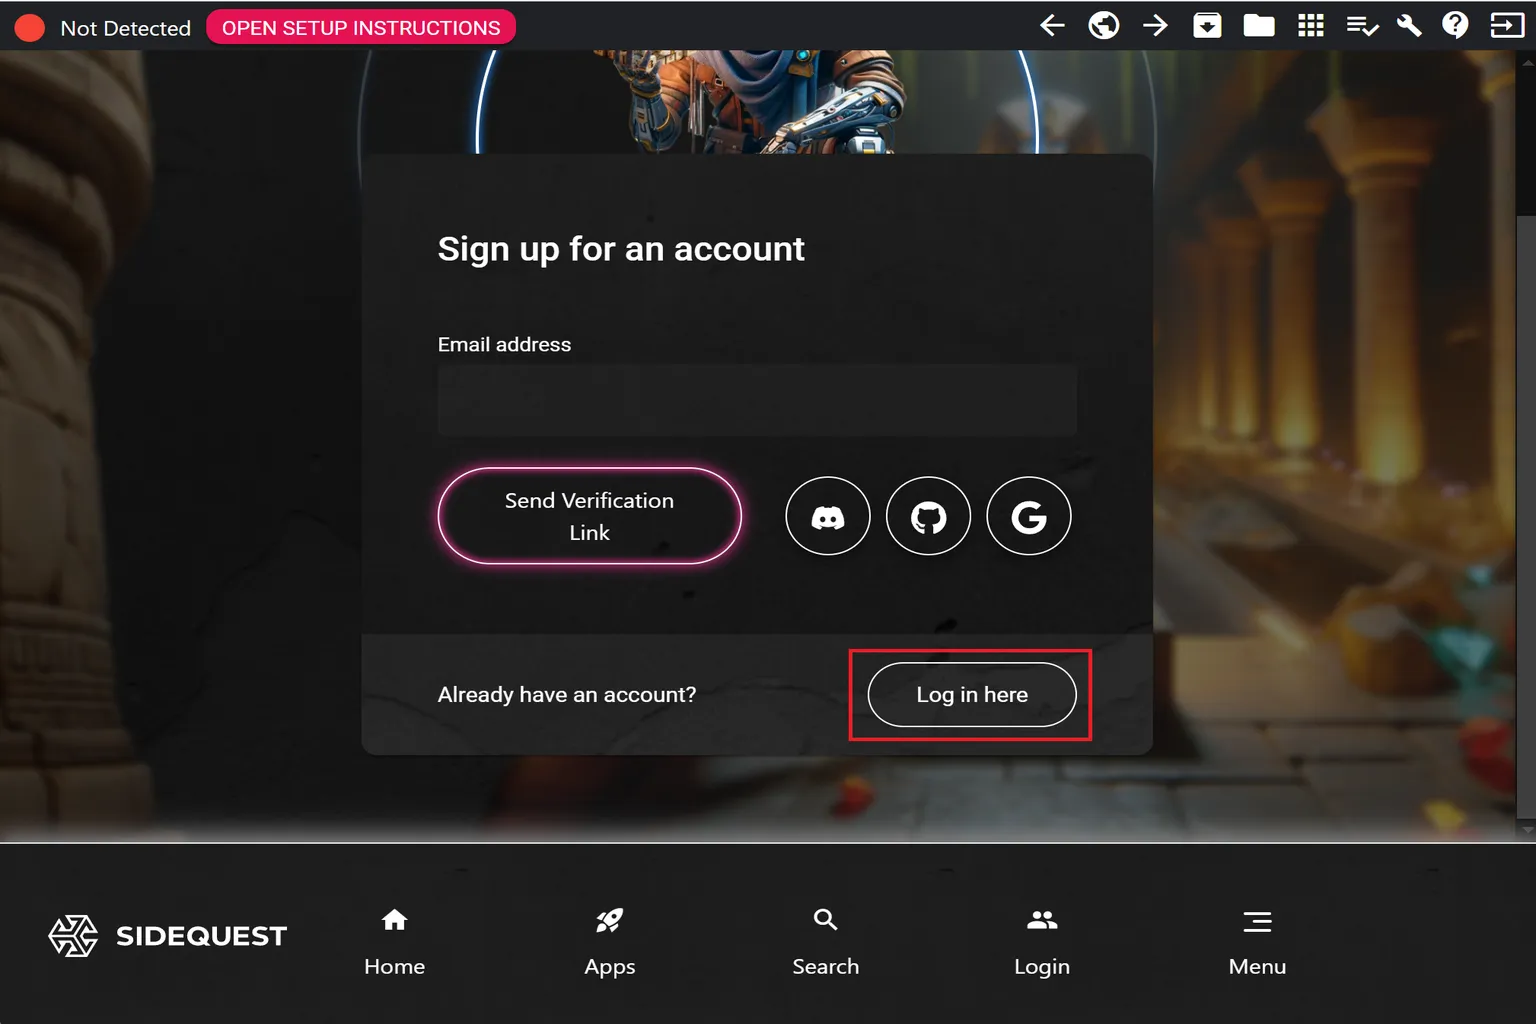
On the next screen, sign in using either Google or Email.

Step 5: Connect
When you return to the main screen, you should see Not Detected in the top left. This means the headset isn’t connected to the PC yet.
Click Open Setup instructions at the top of the screen.

Step 6: Connection Setup
Once the setup screen opens, you’ll see four connection checks, all marked with red indicators.

Since Developer Mode is already enabled, plug the USB cable into the headset, then click Step 3 to proceed with authentication.
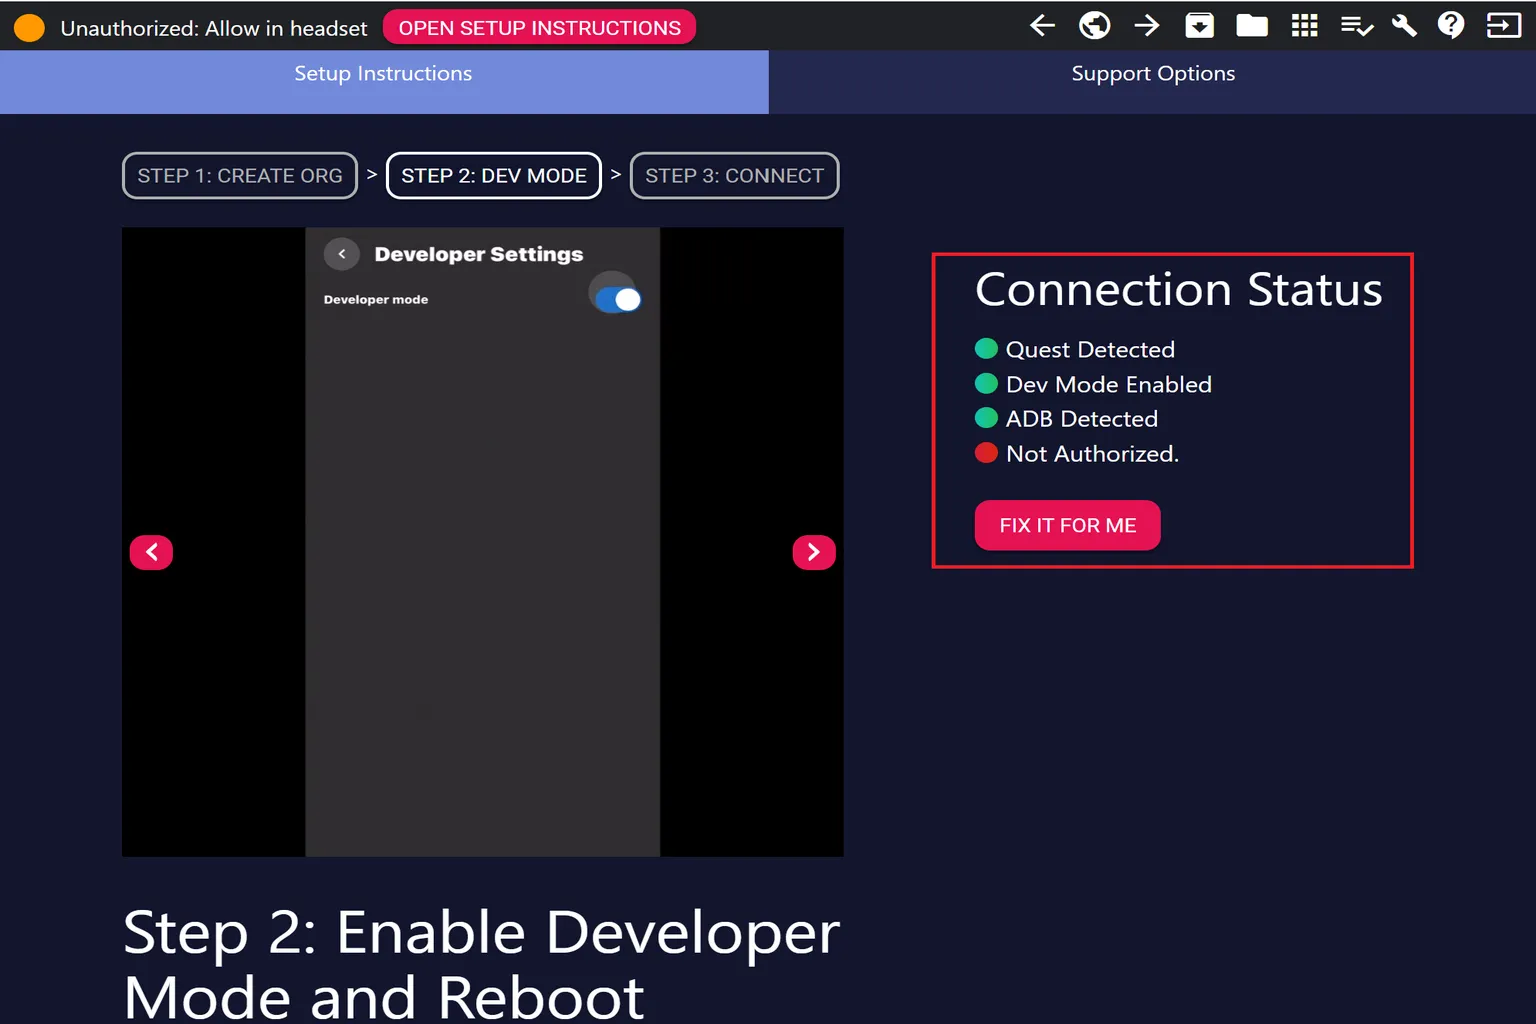
Step 7: Connect the Headset
Put on the headset and grab your controller. You should see a message asking, “Allow USB debugging?”
Make sure you check Always allow from this computer first, then select Allow. This way, you won’t be prompted again the next time you connect the headset to the same PC.
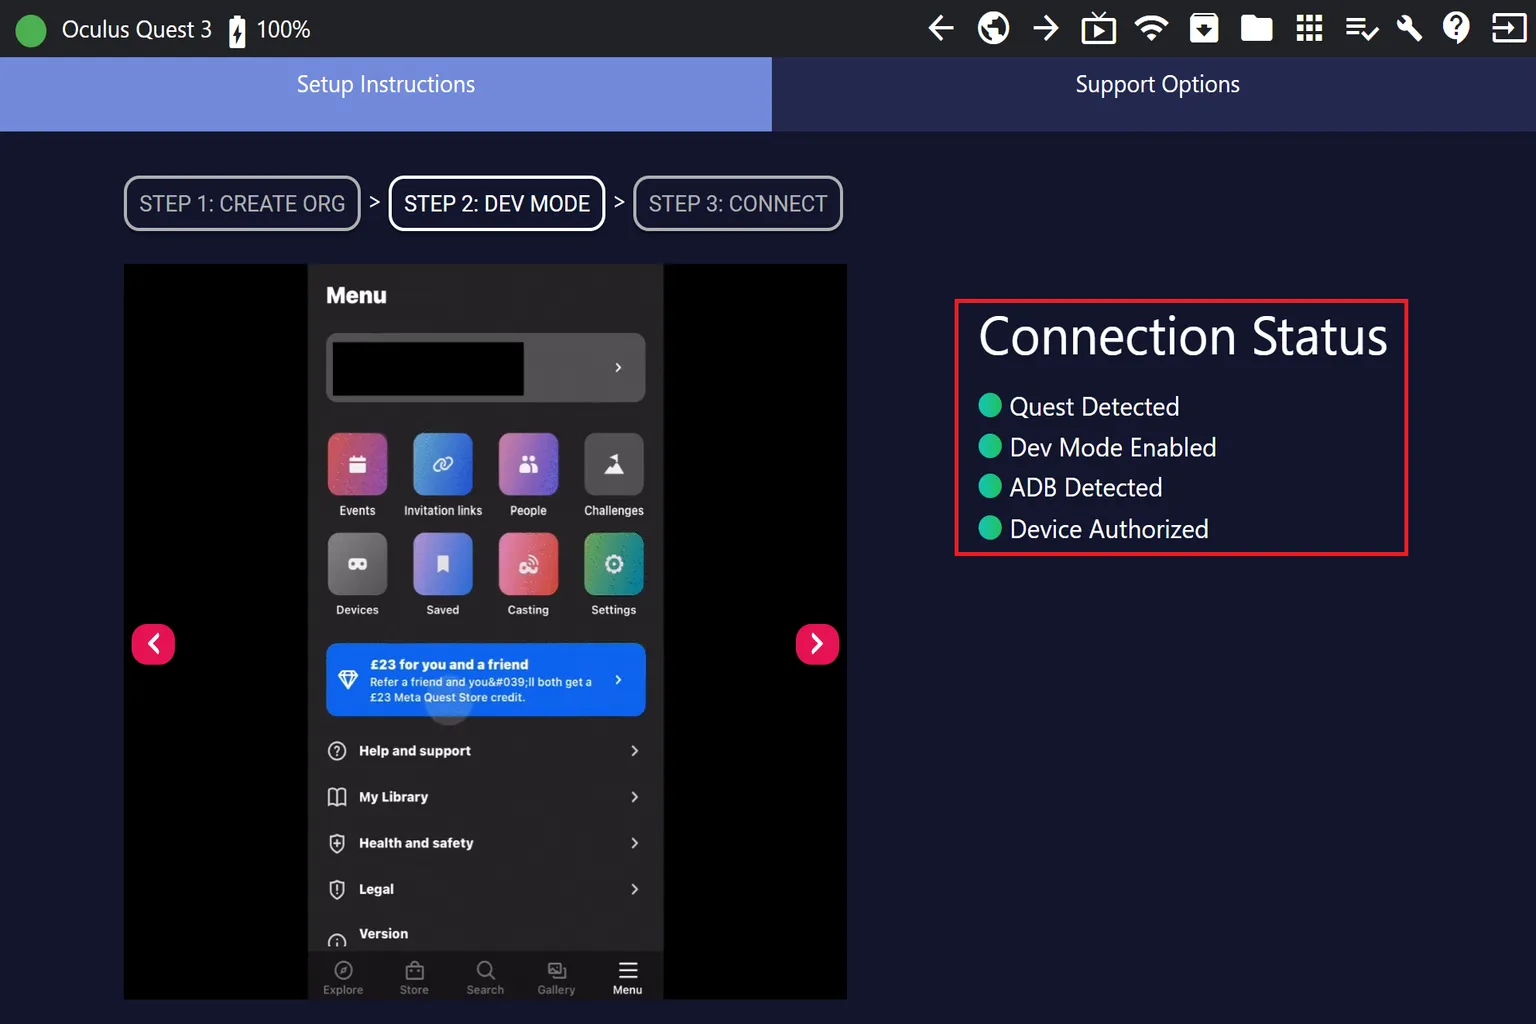
Once everything is set up, you should see a green indicator and your device name displayed in the top left of the screen.
How to Install Custom Apps with SideQuest
After installing SideQuest, if you just want apps or games from the SideQuest store, you can download them directly from the headset or the PC app. The flow is almost the same as the Meta Store. Just keep in mind that Quest Cash can’t be used for payments there.
So what if you want to install your own custom app, an APK file? Follow the steps below. Before you start, make sure you have these ready:
- A PC with SideQuest installed, connected to your Quest headset using a USB cable
- The APK file you want to install, saved on your PC
Step 1: Check the Headset Connection
Launch the PC version of SideQuest and first check the indicator in the top left. If it’s green, everything is connected correctly and you can go ahead and click the install button on the screen.
If it’s not green, it usually means the USB cable isn’t connected properly or the SideQuest setup hasn’t been completed yet. In that case, go back and review the steps in “How to Install SideQuest on Meta Quest” and make sure everything is set up correctly.

Step 2: Install the App
Select the app you downloaded on your PC, the APK file, and start the installation.

Step 3: Confirm the Installation
Once the installation finishes, you should see a message on the SideQuest screen indicating that the installation was successful.
Step 4: Launch the App Inside the Headset
Open the app library on the headset and select Unknown Sources. You should see the app you just installed listed there.
That’s it. At this point, you’re all set to use SideQuest apps and the SideQuest store on both your headset and your PC.
After installing SideQuest, you’ll probably start thinking, “Since I’ve got this set up, I want to try something a bit different on my Quest.”
One option worth checking out is Quest Games Optimizer. It lets you increase resolution and improve image quality, which makes the overall experience feel much more immersive while you’re playing.

Quest Games Optimizer Introduction
How to Buy, Install & Boost Graphics (2025)

Quest Games Optimizer Guide
Unlock Better Graphics & 4K Recording
FAQ – Common Questions
What is SideQuest, and why should you install it?
SideQuest is a platform that lets you install unofficial games, test builds, and advanced tools on Meta Quest. It’s a handy tool commonly used by developers and hardcore players.
Do you need a developer account to install SideQuest?
Yes. Before installing SideQuest, you need to enable Developer Mode. To do that, you must register a Meta developer account and create and activate an organization. Without this, the headset won’t connect or work properly.
Where do games installed with SideQuest show up?
Apps you install will appear under the Unknown Sources category on the Quest Apps page.
What if SideQuest shows “Not Detected”?
This means the device hasn’t been authenticated or the connection failed. Check that USB debugging is allowed and Developer Mode is enabled. If needed, reconnect the cable or restart the headset.
What if SideQuest says “No compatible devices found” when connecting the headset?
Not necessarily an error. Quest DB is only reference information, and in practice, some titles can’t be downloaded through the Meta PC store.
What if a game shows as downloadable but the download fails?
This usually means the USB cable you’re using doesn’t support data transfer. Switch to a USB cable that supports data transfer. Using a USB 3.0 cable is recommended for more stable results.