
Want to install SideQuest or the Quest Games Optimizer? You need to unlock your headset first. This step by step guide shows you exactly how to enable Developer Mode, verify your Meta organization, and bypass Two Factor Authentication errors in minutes.
What is Developer Mode used for?
On a normal Meta Quest, you’re basically in “store mode”—you download games and apps from the store and play them. You can’t install your own software.
But Meta provides Developer Mode so VR developers can install what they’ve built onto a headset and test it.
Most players don’t need to write code, but if you want to use third-party apps that can’t be distributed through the Meta Store, you may need to turn on Developer Mode before you can install them.
For example, something like Quest Games Optimizer (QGO), which pushes the headset’s performance closer to its limits and makes the image noticeably sharper. Having tools like that can take VR immersion up a level.
In this article, I’ll walk you through how to enable Developer Mode step by step.
How to enable Developer Mode
To turn on Developer Mode, you need to meet these three requirements first.
- You must register an organization with a developer account
- You must pass security verification (either two-factor authentication or adding a payment method)
- Your headset firmware must be updated to the latest version
Until all three are completed, the Developer Mode toggle won’t appear at all, so keep that in mind.
The process itself only takes about 5–10 minutes. You just need these three things ready.
- A Quest headset updated to the latest firmware
- A smartphone with the Meta Horizon app installed and already paired with the headset
- A credit card added to your Meta account
Step 1: Open the settings screen in the Meta Horizon app
Tap the ☰ icon in the bottom-right corner to open the menu.
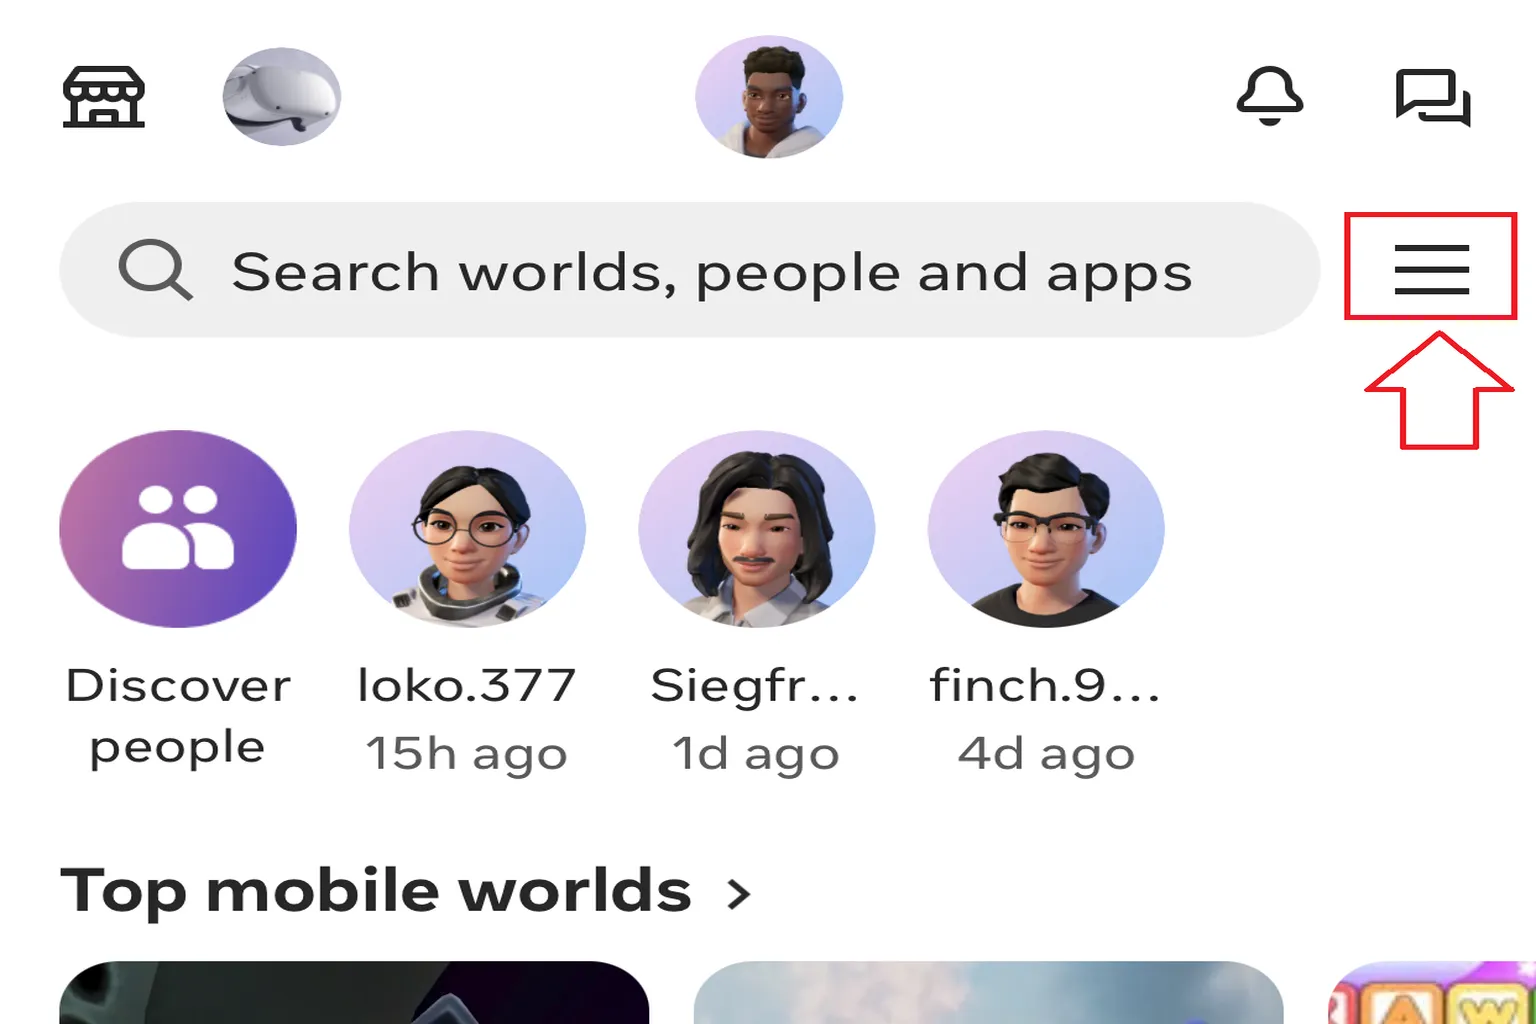
Select Devices.

Step 2: Open the headset settings
Choose your headset from the list.
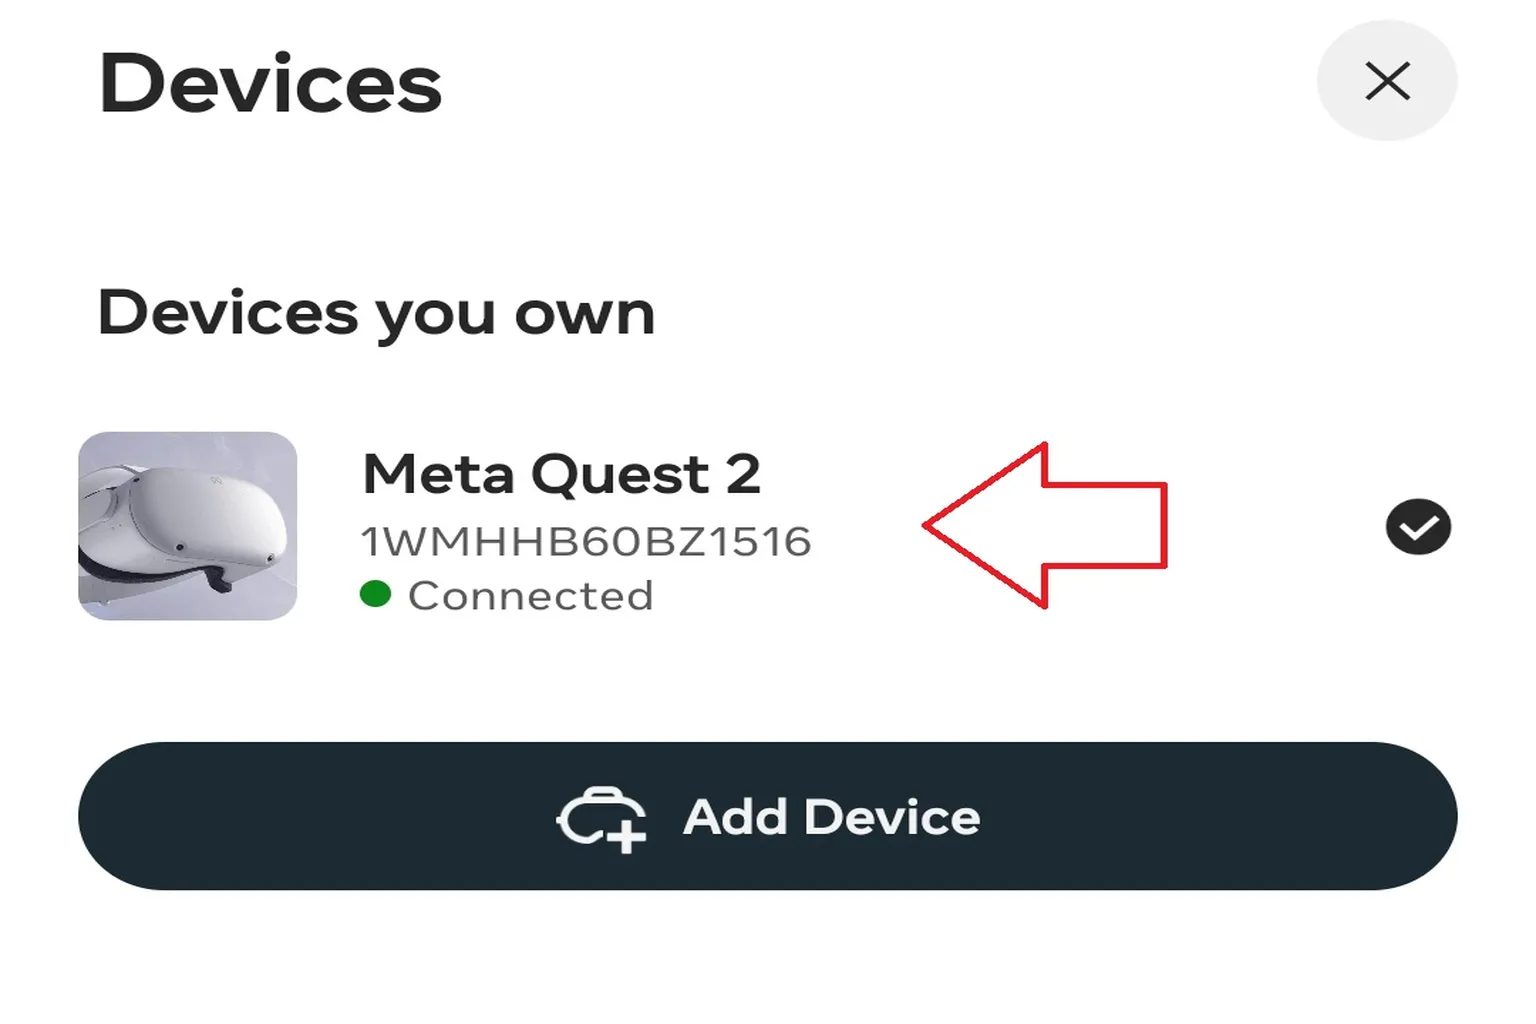
Tap Headset settings.

Step 3: Go to developer settings
Select Developer Mode.

At this point, the toggle to enable it won’t appear yet. You’ll first be prompted to apply for a developer account.

Step 4: Access the developer site
Click the Login button in the top-right corner and sign in.

Step 5: Log in to your account
Click Log in with an existing Meta account at the bottom of the screen.

Then log in using your Meta account.

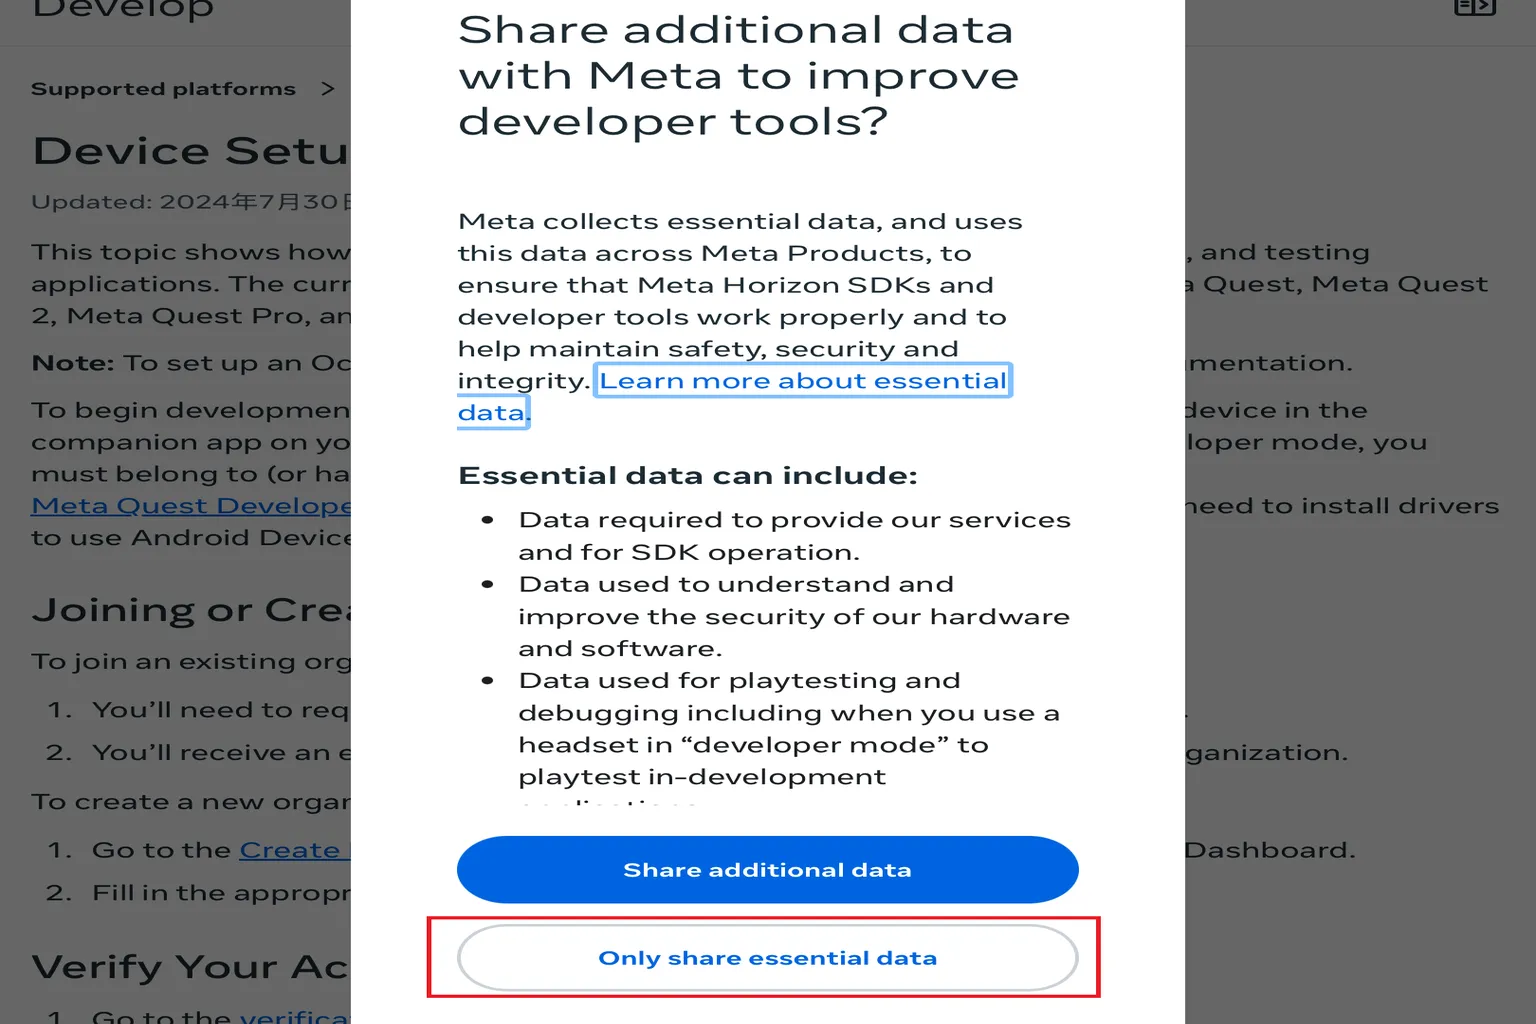
Step 6: Choose how much development data to share with Meta
The option “Share additional data” lets Meta see detailed information about your development activity. The white option shares only the minimum required information. Unless you have a specific reason, it’s fine to choose the white option.
Step 7: Apply for a developer account
Go back to the developer application page and click Create New Organization at the bottom.

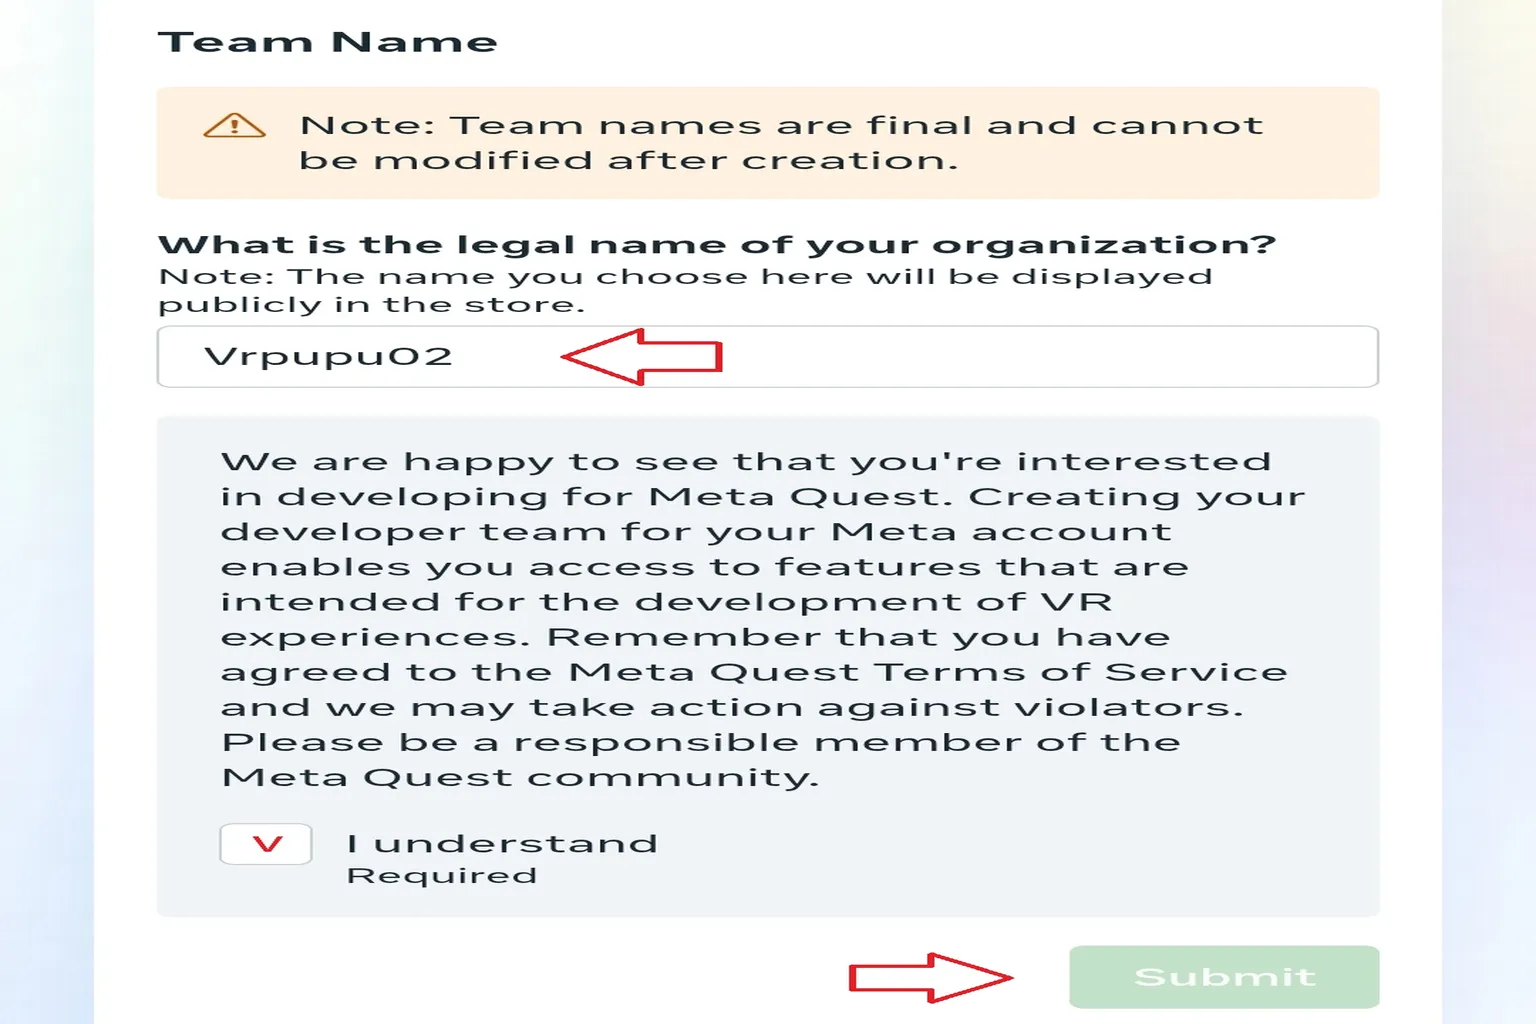
Step 8: Create a developer organization
If you see a checkmark next to “Verified,” that means a credit card is already registered on your account. In other words, verification is complete, and all that’s left is setting up the organization.
Enter any English name you like in the highlighted field, check the box that says you understand and agree to the required terms, then click Submit to finish.
Step 9: Turn on Developer Mode
Go back to the Developer page in the mobile app (the same place as Step 3), and you should now see the Developer Mode toggle. Turn the switch on to enable it.

Also check the consent agreement related to Meta’s data collection.

Step 10: Developer Mode enabled
If the switch turns blue, Developer Mode is now active. This means you can use third-party apps like SideQuest.

Why Developer Mode might not enable
If the steps above do not work, it usually comes down to two common reasons:
- Credit card verification issues
- Two-factor authentication setup incomplete
In the earlier steps, the flow assumed you had already added a credit card. If you haven’t registered one, you’ll need to complete two-factor authentication instead. Once you finish Step 8, just continue on to the next steps.
Step 1: Verify your account
Go to the developer application page, open the Verification tab at the bottom, and start the verification process.

Step 2: Apply for two-factor authentication
Click Set up two-factor authentication.

Then press the Two-factor authentication button.

Step 3: Set up two-factor authentication
There are two verification methods available: using the Google Authenticator app or using SMS (text messages). If you don’t have a preference, SMS verification is simpler and recommended.

After choosing SMS verification, enter your mobile phone number.

Step 4: Complete two-factor authentication
Enter the six-digit verification code sent to your phone to finish the setup.

Once this is done, two-factor authentication is enabled. Go back to Step 8 and continue with the Developer Mode activation process.

If your headset firmware is outdated
Even if you follow all the steps, you might see an error message saying, “There was a problem loading this content. Please try again,” when trying to turn on Developer Mode.
This usually means your headset firmware is outdated. Update it to the latest version, then try again.

There are two ways to update the firmware.
- You can reset the headset and let it update to the latest firmware automatically during the setup process.
- Or you can update it manually from the headset settings.
Below are the steps to check and update it manually.
Step 1: Open the software update menu
From the headset’s system menu, select Settings.
Go to General → Software Update.

Step 2: Update the firmware
If you see a new firmware version listed here, update to the latest version.
If the headset is already up to date, you’ll see a message saying “Your software is up to date.”
If it isn’t up to date, start the update from this screen.

That covers everything you need to enable Developer Mode and deal with the common issues along the way.
Once Developer Mode is turned on, the next step is installing SideQuest. In the next article, I’ll walk you through that process step by step.

FAQ – Common Questions
Why don’t I see “Developer Mode” in my Meta account?
First, make sure you’ve joined or created a developer organization. On top of that, organization verification and two-factor authentication must be completed. Until both are done, Meta won’t show the Developer Mode toggle.
I paired my Quest with the mobile app, but I still can’t find Developer Mode.
In the Meta Horizon app, go to Device Settings, select your Quest headset, then open the Hardware Settings page and turn on Developer Mode there.
What if two-factor authentication just won’t work?
Try using an authenticator app like Google Authenticator, or switch to WhatsApp or SMS verification. If you use SMS, make sure the phone number can reliably receive messages. If it still fails, try changing your network connection or using a different phone number and try again.
What can I do once Developer Mode is enabled?
Once it’s on, you can connect to the headset via USB or Wi-Fi using ADB. Combined with tools like SideQuest or Unity, this lets you sideload apps, run tests, and develop VR applications.