Overwhelmed by the endless menus in DEO VR? While this online-only player is incredible for streaming immersive Meta Quest content, its settings panel can sometimes feel like flying a fighter jet. In this complete guide, we break down every single playback and system option so you do not have to guess. Learn exactly how to optimize your video resolution, dial in the perfect UI distance, and unlock experimental features like 6DOF and Autofocus. Stop tweaking menus and start enjoying the ultimate VR viewing experience.
This article is part two of the DEO VR how-to series. This time, I’m going to focus on two areas: system settings and playback settings.
If you want to learn what this app can do overall, how the controls work, How to Upload VR Videos to DEO VR, or how to connect it with SLR, check these three articles first:
DEO VR Complete Guide
AI Passthrough, 8K Videos & Mixed Reality Setup
How to Upload VR Videos to DEO VR
11-Step Creator Guide
SexLikeReal Ultimate Guide
Hidden Discounts, Japanese VR & Passthrough Review
System Settings
DEO VR’s system settings control how the app works as a whole. You’ll find this area at the bottom of the main screen, but honestly, it’s not the most exciting part. In most cases, you don’t really need to touch anything here. If you mainly watch SLR, changing the URL is usually enough. Everything else works just fine with the default settings.
To open the settings screen, just press the ⚙️ icon.
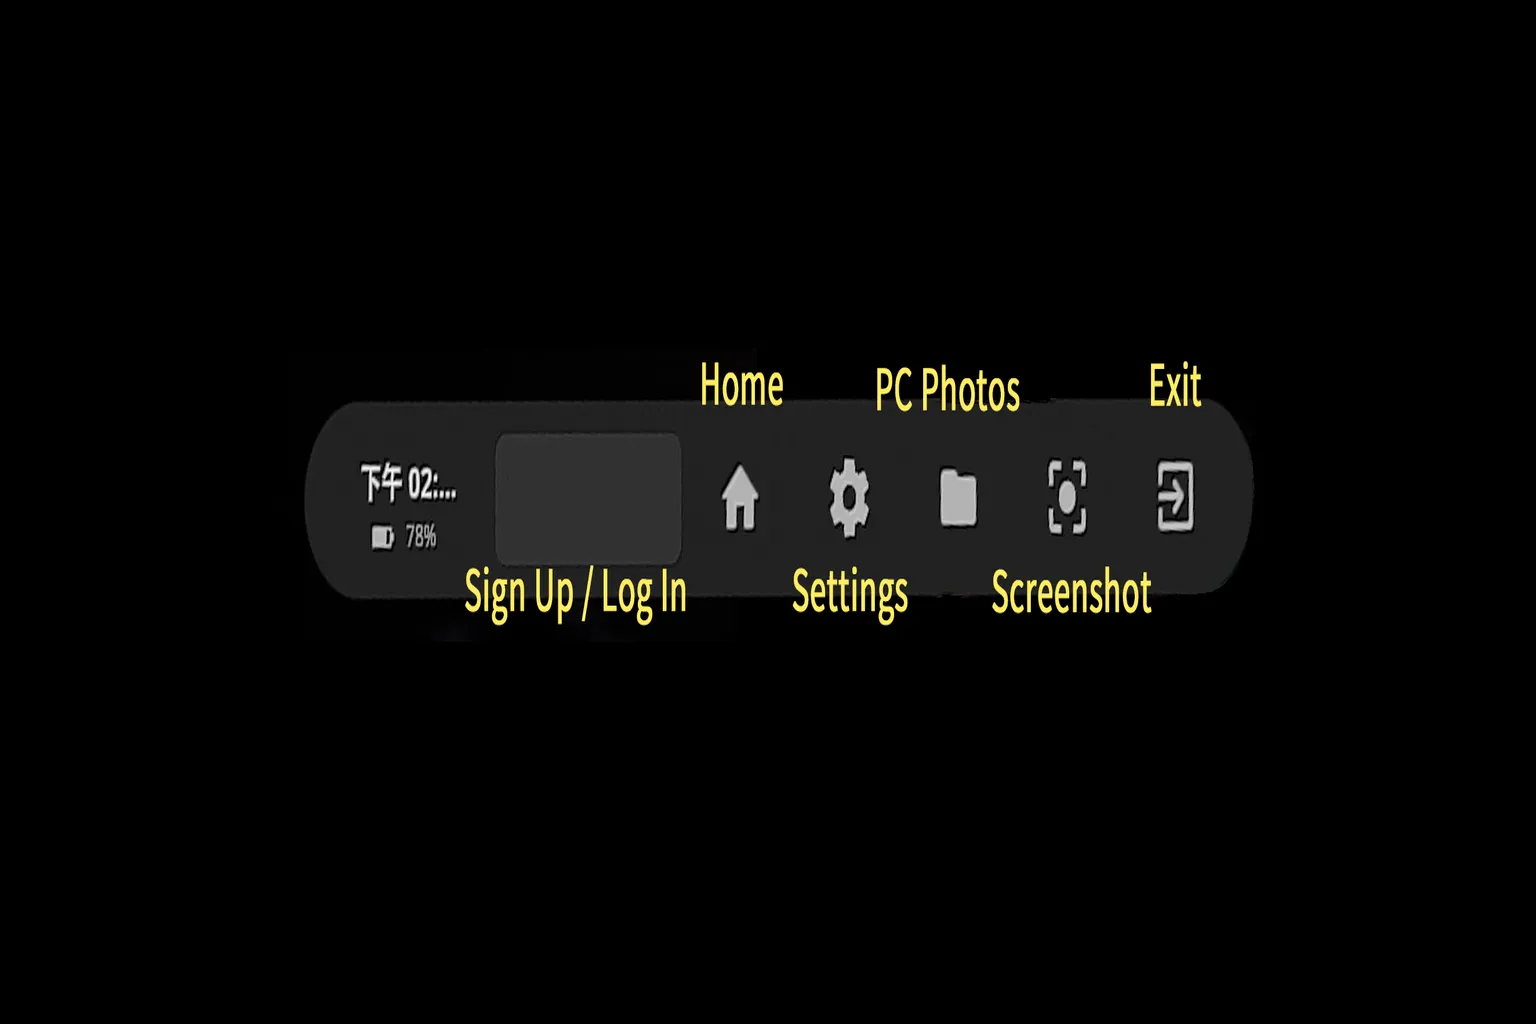
The settings menu is roughly divided into the following sections:
- Player: Player settings. This is where you manage things like video playback behavior, vibration on or off, and the default URL. These are the options you’re most likely to use.
- Controller: Controller settings. This section explains what each button does, and every control can be customized.
- Privacy: Privacy settings. You can clear cache data and enable a password lock here.
- Developer: Developer features. This includes options for remote control and channel locking.
- Personalize: Personalization settings. You can view a watch-time distribution graph, which makes it easy to see which parts of a video get the most attention.
- Bug report: Bug reporting. This lets you send playback or feature issues directly to the developers.
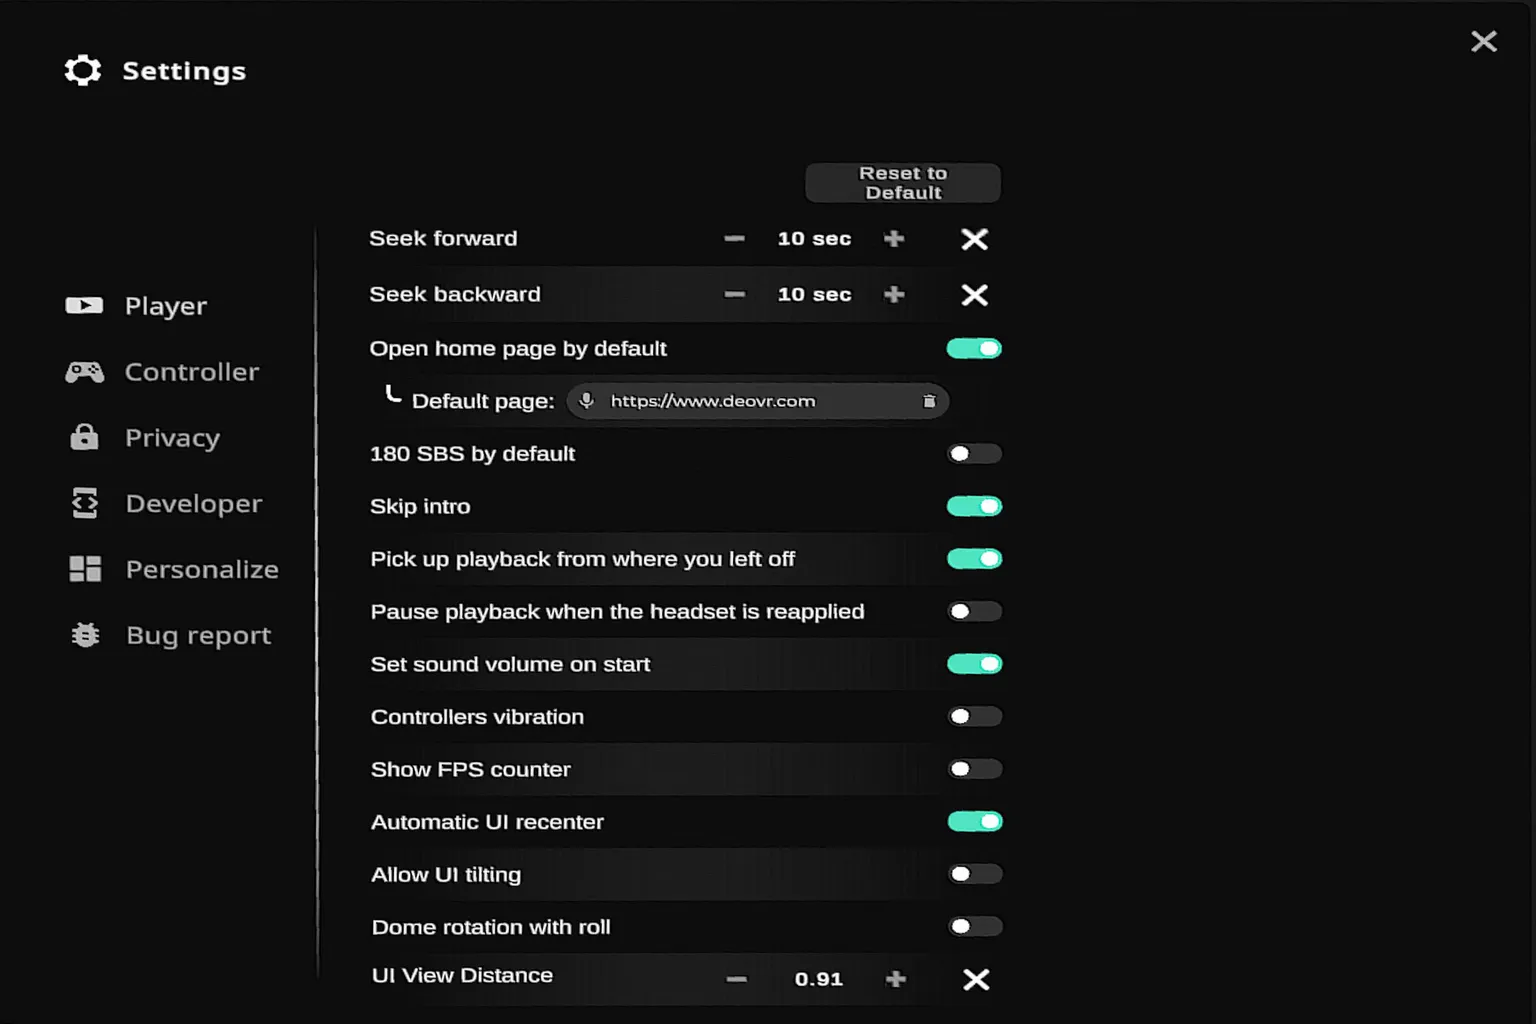
Player
Most of the core player options are grouped here. I’ll go through the commonly used items and the recommended settings.
- Seek forward / backward: Fast forward and rewind. This sets how many seconds you skip when you press the left or right button once. The default is 10 seconds.
- Open home page by default: Sets the home page when DEO VR launches. If you only use SLR, setting it like the image above is enough.
- 180 SBS by default: Sets the default video format to 180° side-by-side (SBS). Most VR videos use this format. Since DEO VR currently does not support local video playback from the headset or PC, there’s no real difference whether this is on or off when watching content on DEO VR or SLR.
- Skip intro: Automatically skips the opening part of videos. This saves time, so turning it on is recommended.
- Pick up playback from where you left off: Automatically resumes playback from the last position. This lets you continue right where you stopped, so it’s recommended to keep it on.
- Pause playback when the headset is reapplied: Controls whether playback pauses when you put the headset back on. When enabled, the video pauses when you take the headset off and resumes when you put it back on. Recommended to turn on.
- Set sound volume on start: Fixes the volume level when a video starts. This helps prevent sudden volume changes, so turning it on is recommended.
- Controllers vibration: Enables controller vibration. The controllers vibrate during supported interactive playback, so it’s recommended to keep this on.
- Show FPS counter: Displays the on-screen FPS (frame rate). This is useful for checking playback smoothness, but for everyday use it’s better left off.
- Automatic UI recenter: Automatically recenters the UI. This keeps menus from tilting or drifting, so it’s recommended to turn on.
- Allow UI tilting: Allows the UI to tilt. This is useful when watching videos while lying down.
- Dome rotation with roll: When you tilt your head left or right, the video dome rotates with it. This gives a planetarium-like sense of space.
- UI View Distance: Adjusts the distance between the UI and your eyes. Lower values bring it closer, higher values push it farther away.
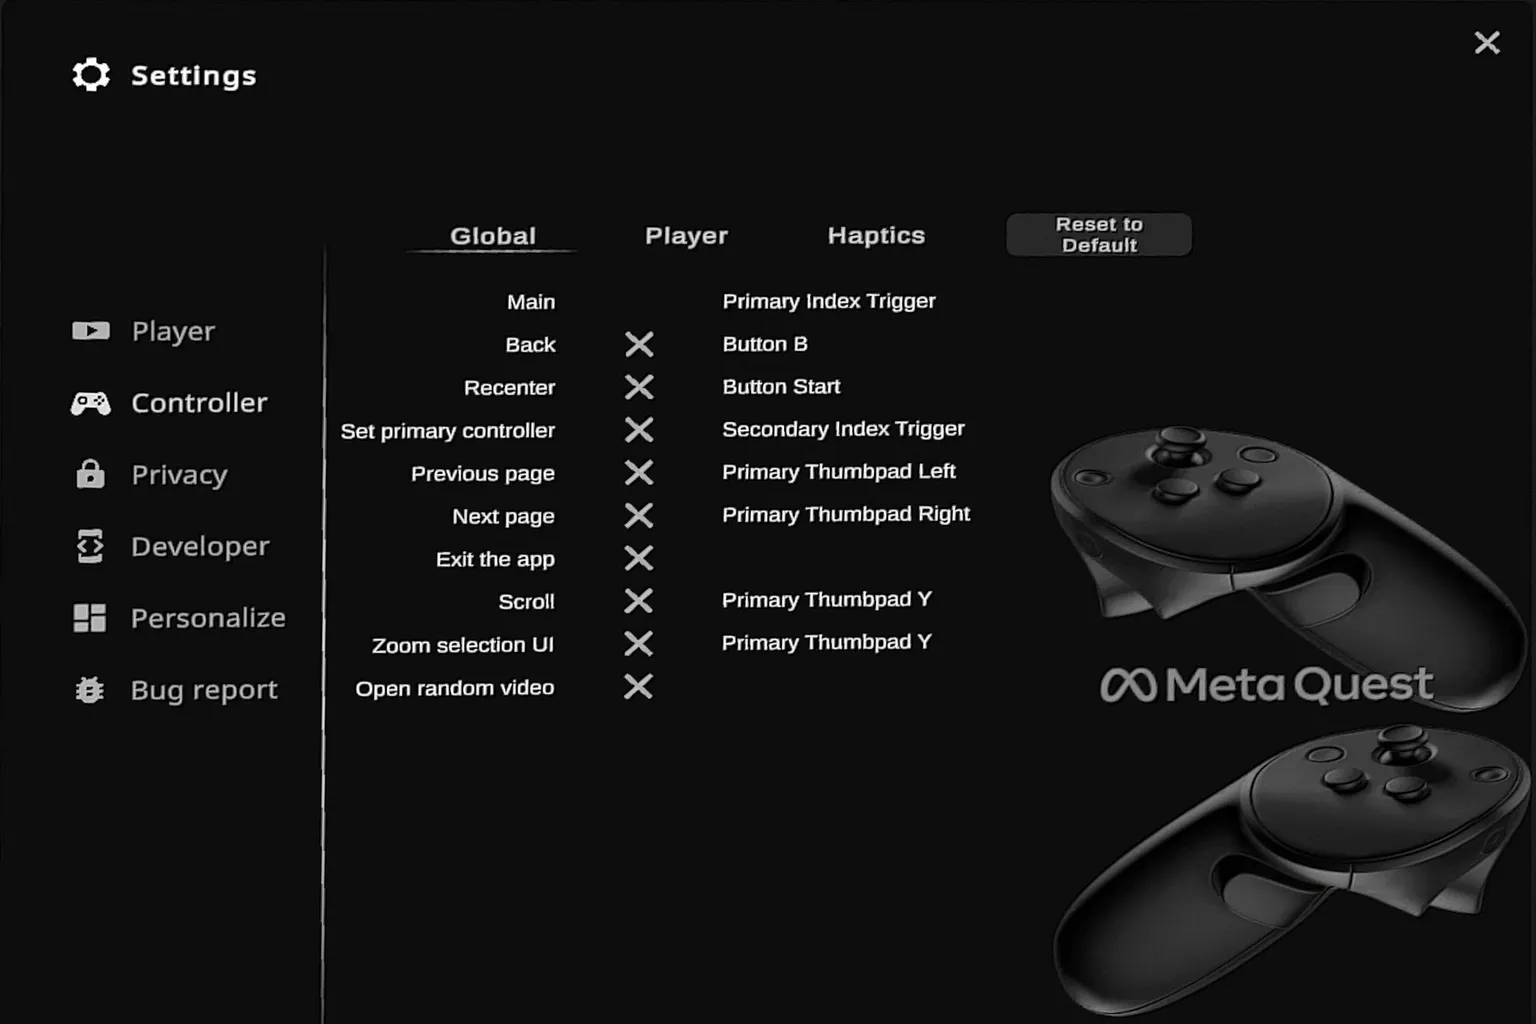
Controller
This section is split into three main categories. The controller shortcuts look pretty complex at first, but in practice, you can handle most actions just by using the trigger. The Haptics options are not used very often when watching videos directly in DEO VR. They are mainly there for SLR-related content.
- Global: Global actions for overall UI and menu navigation.
- Player: Controls specifically for video playback.
- Haptics: Vibration feedback features.
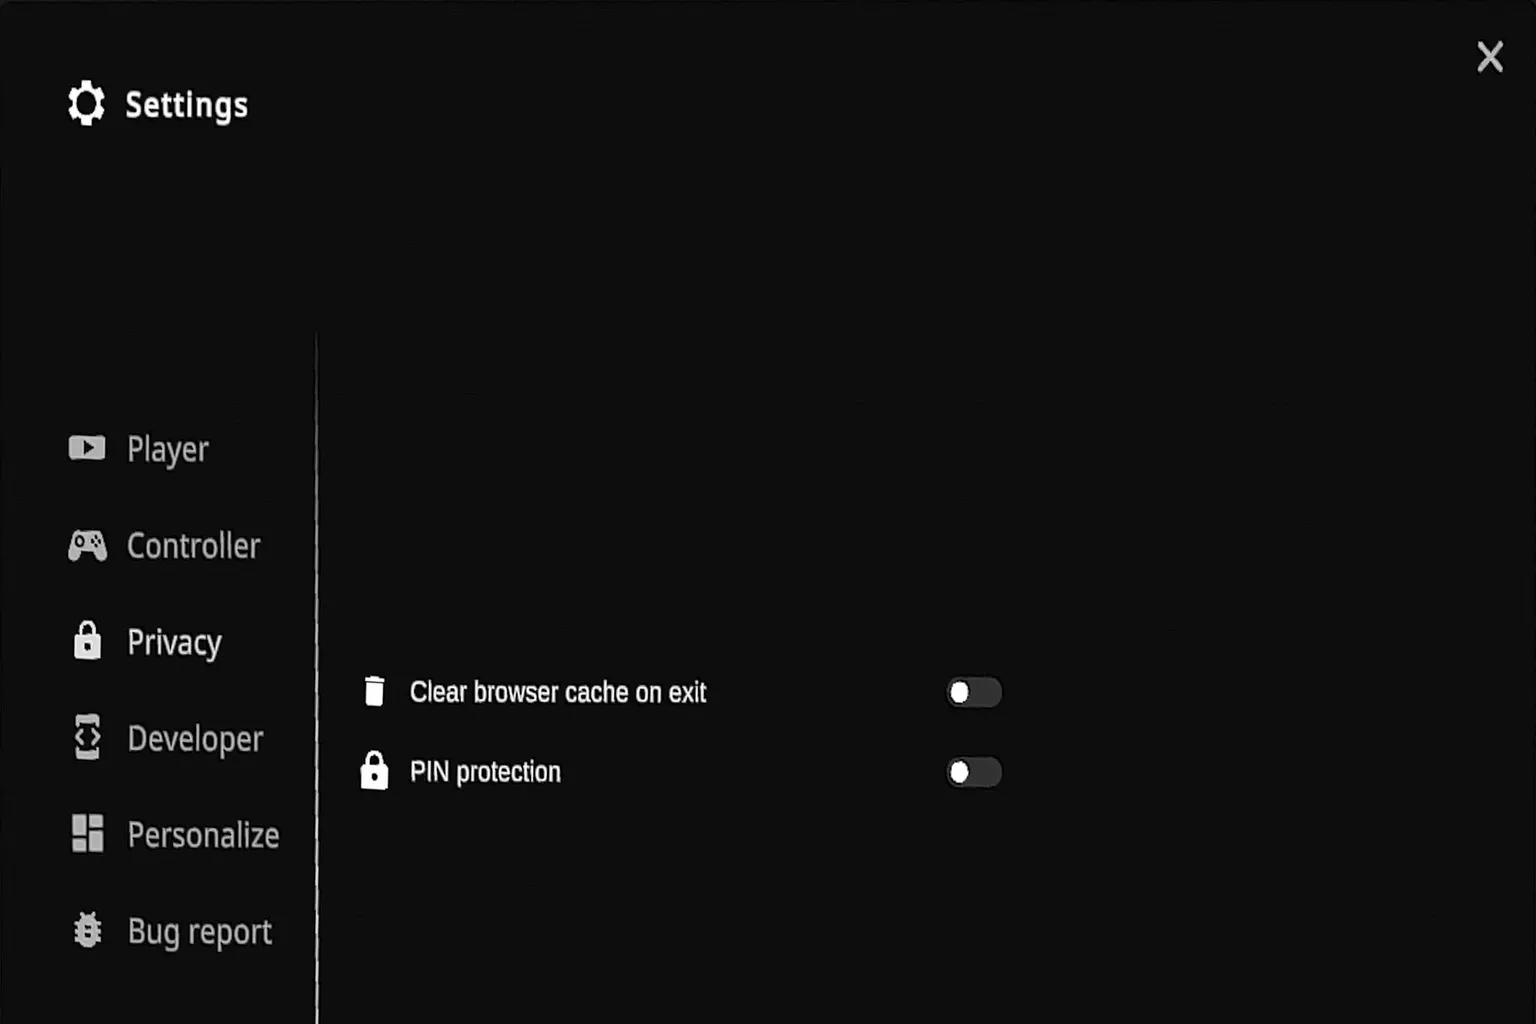
Privacy
The privacy section has two options.
- Clear browser cache on exit: Automatically clears the built-in browser cache, including temporary image and video data, every time you close DEO VR. This helps avoid wasting storage space and keeps your viewing history from being saved.
- PIN protection: When enabled, you need to enter a PIN to access certain features, such as adult content or privacy settings. This is useful if you don’t want kids accessing those areas.
Personalize
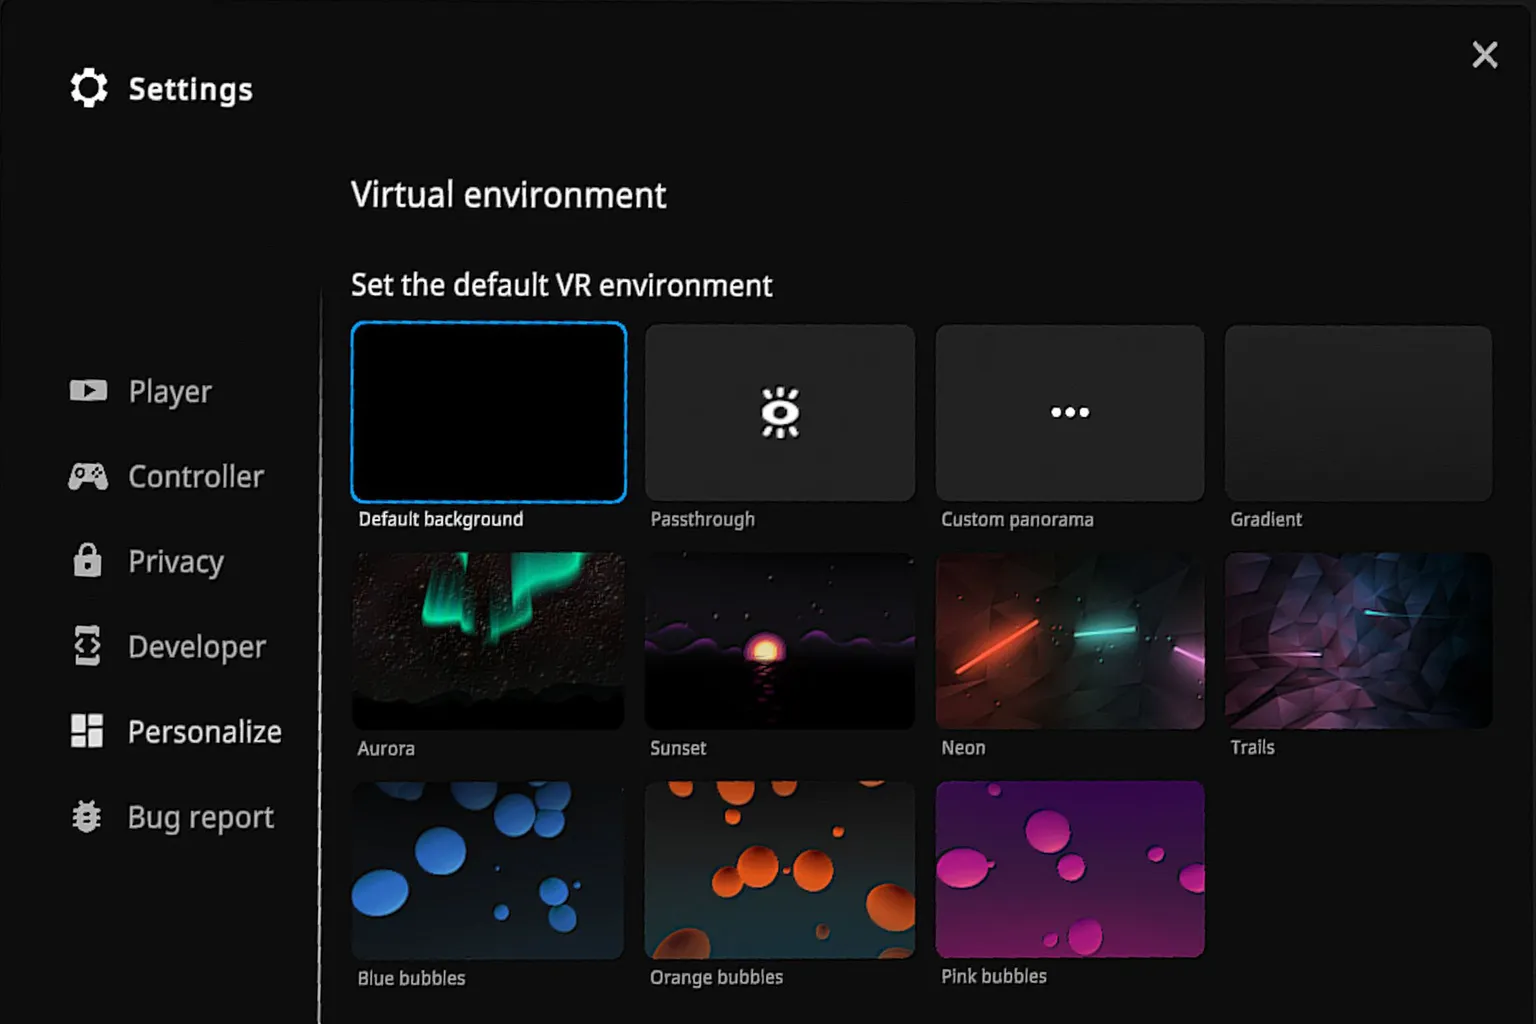
This is where you choose the background environment used while watching content in DEO VR. You can freely switch backgrounds based on your preference.
- Default background: A simple black background. Best when you want to focus entirely on the video.
- Passthrough: Passthrough mode. Uses the headset cameras to show your real room, which is useful if you want to stay aware of your surroundings while watching.
- Custom panorama: Custom panorama. Lets you set a 360° image of your choice as the background.
- Gradient: Gradient background. Clean colors that stay out of the way while watching.
- Aurora: Aurora background. A night sky with animated aurora lights, creating a dreamy atmosphere.
- Sunset: Sunset background. A calm scene with the sun setting over the ocean and soft lighting.
- Neon: Neon background. A light tunnel style look with a cool, cyber vibe.
- Trails: Trails background. Deep purple geometric patterns with flowing light trails.
- Blue bubbles: Blue bubbles background. A fresh, pop-style look.
- Orange bubbles: Orange bubbles background. Energetic and lively.
- Pink bubbles: Pink bubbles background. Soft and cute, with a dreamy, girly feel.
Aurora
This background fills the sky with soft, shimmering aurora lights moving slowly across the night sky. The animation is calm and subtle, which works well when you want to watch videos quietly or create a slightly special, atmospheric mood.

Sunset
This scene uses a sunset sinking into the ocean as the background. Gentle light and shadows spread across the view, creating a calm and relaxed atmosphere that makes it easy to settle in and enjoy the video.

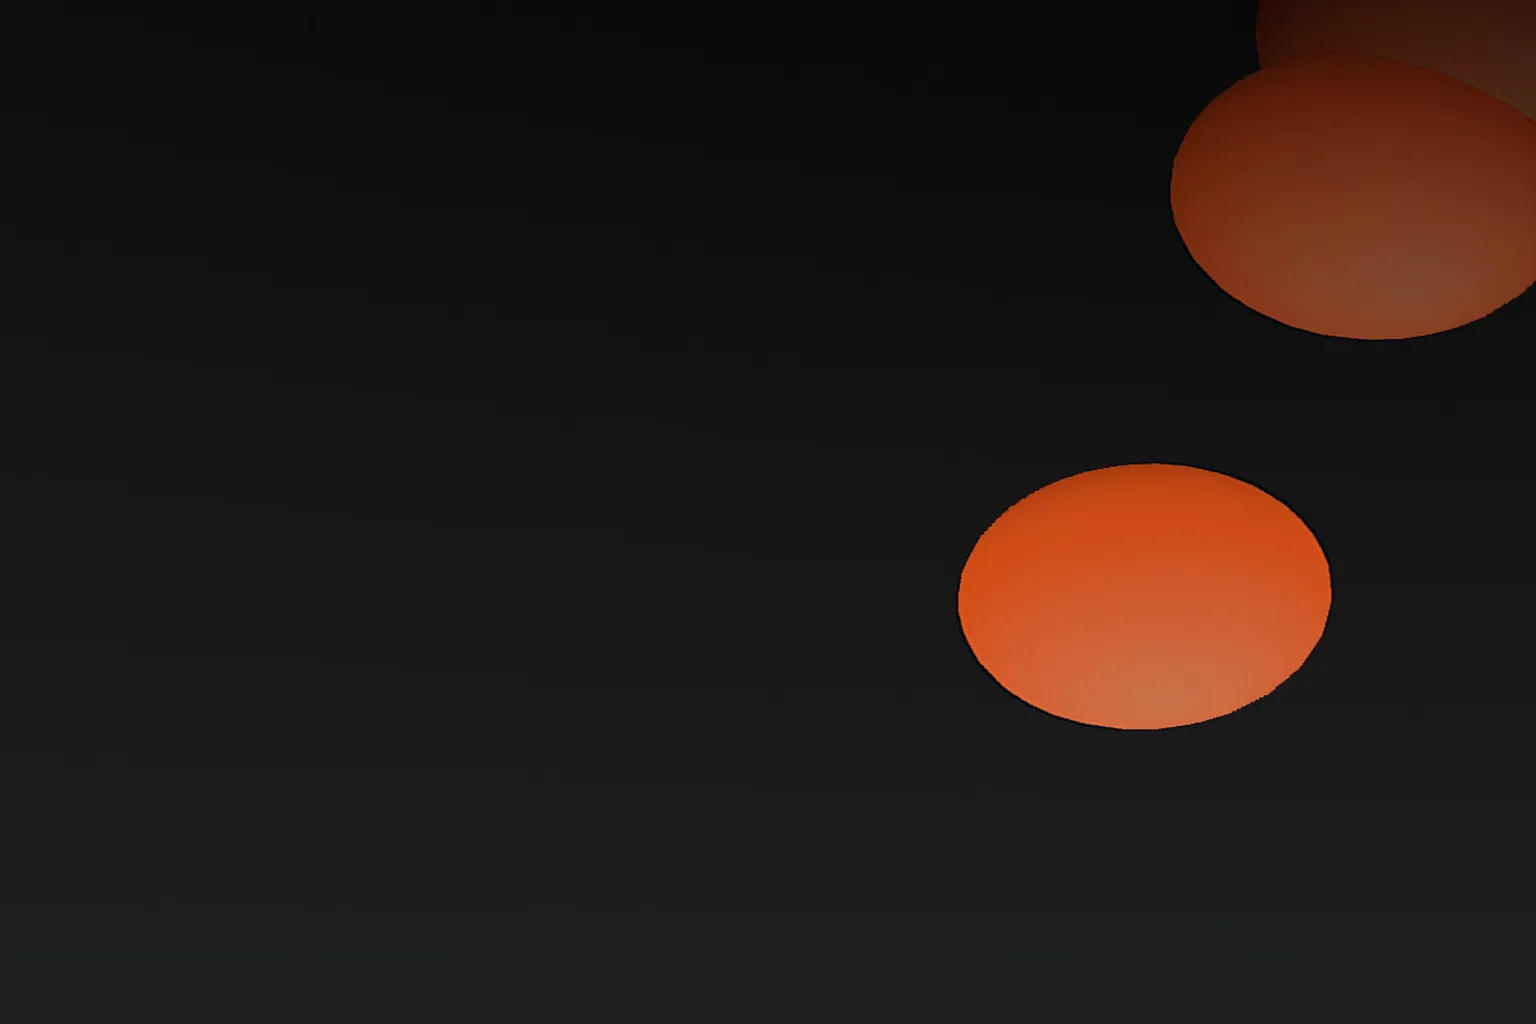
Orange bubbles
This background features orange bubbles floating softly around you. It feels bright and energetic, making it a good match for pop-style videos or when you want a more upbeat viewing mood.
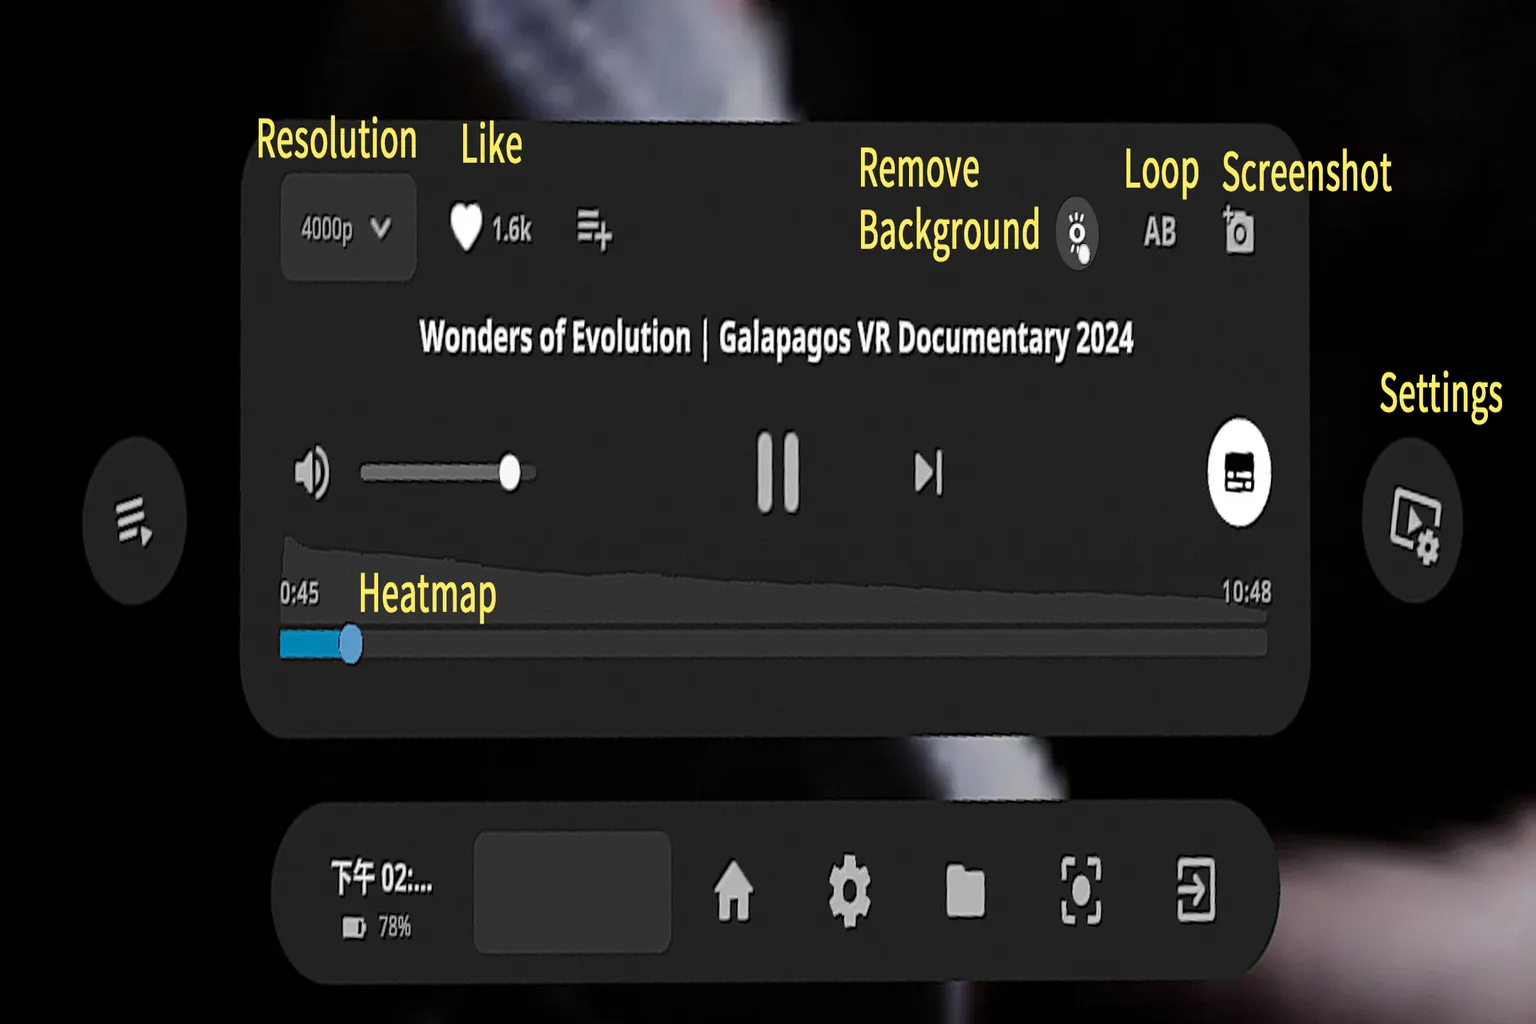
Playback Settings
This section includes some of the most practical features in the DEO VR player. If you want to change settings while a video is playing, just press the Settings icon on the right side of the screen to open this menu.
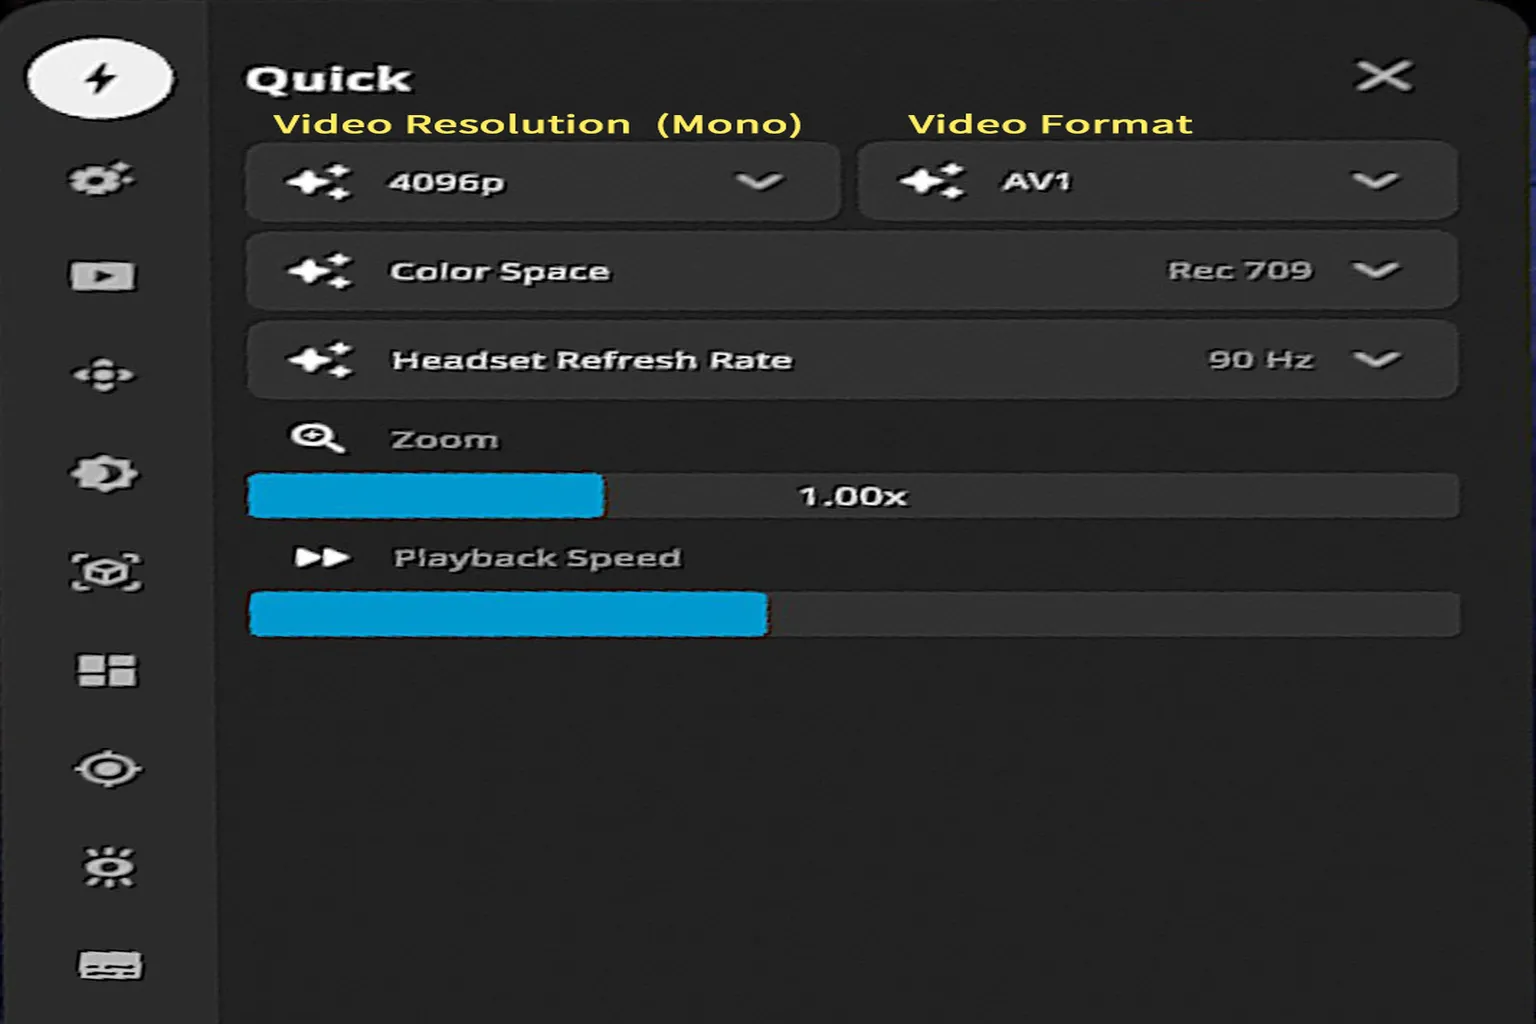
Quick
On the left side of the playback settings menu, there are ten different categories. The first one is Quick Settings. It groups together commonly used options, which makes it convenient, but aside from the headset refresh rate, you generally don’t need to touch much here.
Here’s what you can adjust in this section:
- Resolution: 4320p refers to 8K resolution (7680 × 4320).
- Video codec: Plays videos using AV1 or H.265 (HEVC). These codecs have better compression efficiency and image quality than H.264, making them more suitable for 4K and 8K playback.
- Color space: The default is Unmanaged, which means the video plays using its original color settings without applying a specific color space. Depending on the video, options like BT.709 or BT.2020 may also be available.
- Headset refresh rate: Higher values make motion look smoother and help reduce VR sickness. Setting this to the highest available value is recommended.
- Zoom (scale up / down): Adjusts the display size of the video so you can scale it to a more comfortable viewing size.
- Playback speed: The default is 1.0x. You can speed things up to 1.5x or slow it down to 0.5x if needed.
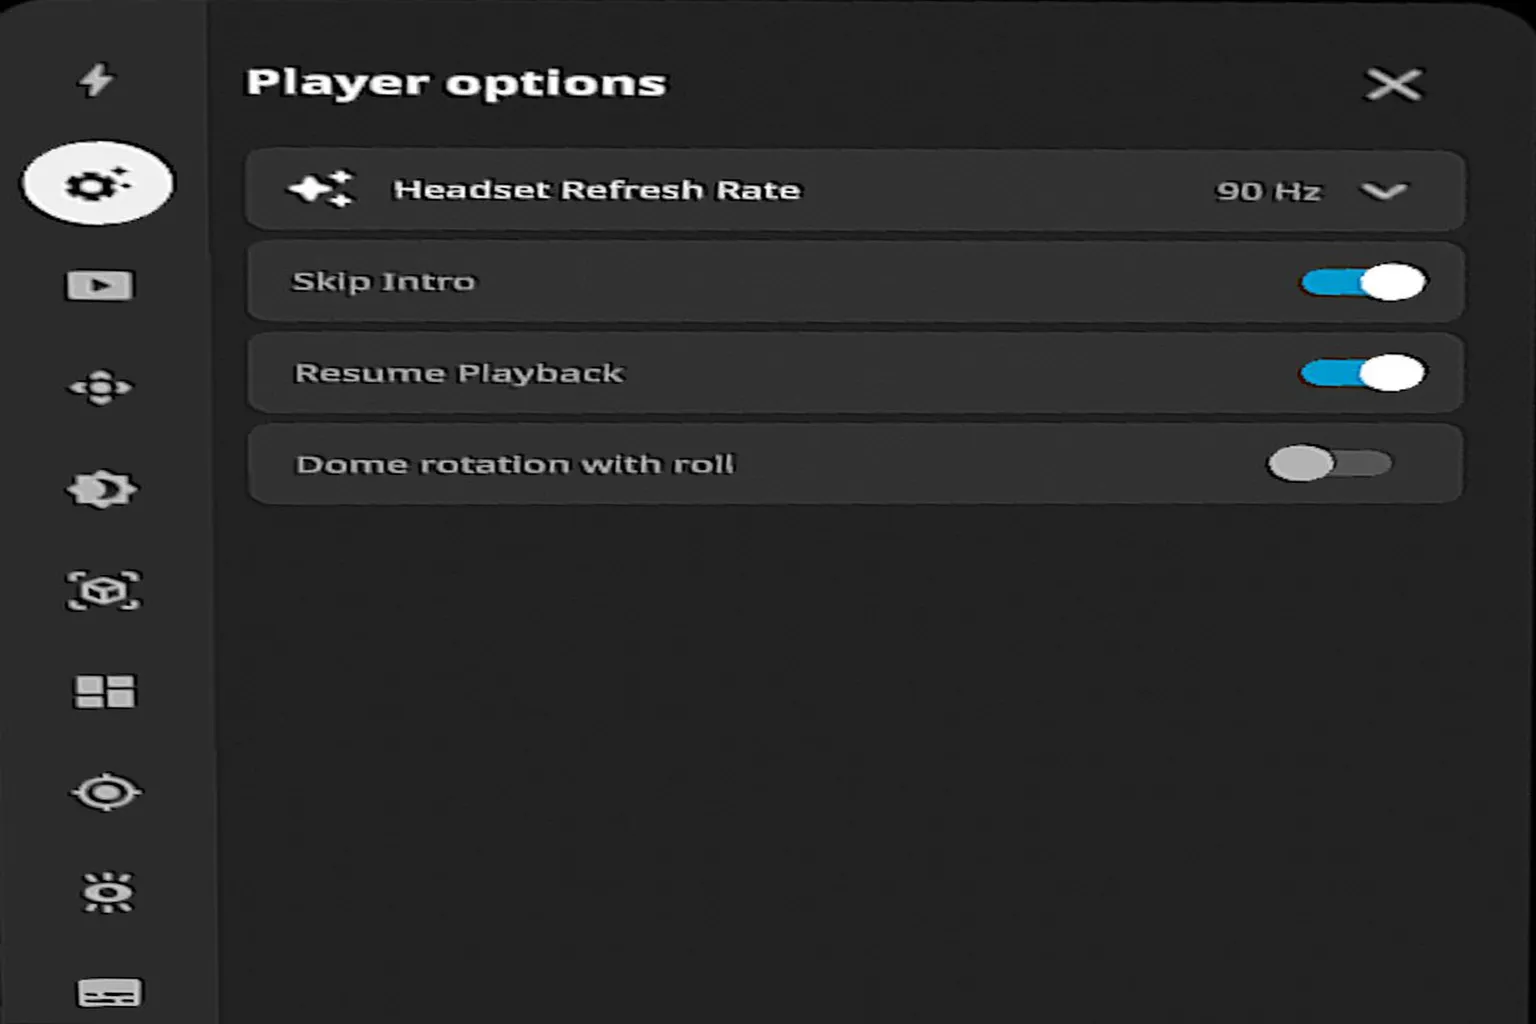
Player options
This area controls the basic behavior of video playback. In most cases, leaving everything at the default settings works just fine.
- Headset Refresh Rate: Higher values make the image smoother and help reduce VR motion sickness.
- Skip Intro: Automatically skips the opening part of videos, such as logos or intro animations. This cuts down on waiting time and is convenient.
- Resume Playback: Automatically resumes a video from where you last stopped watching it.
- Dome rotation with roll: When you tilt your head, the video and environment rotate with it. This can enhance the 360° feeling, but it can also make motion sickness worse, so it’s recommended to keep this off.
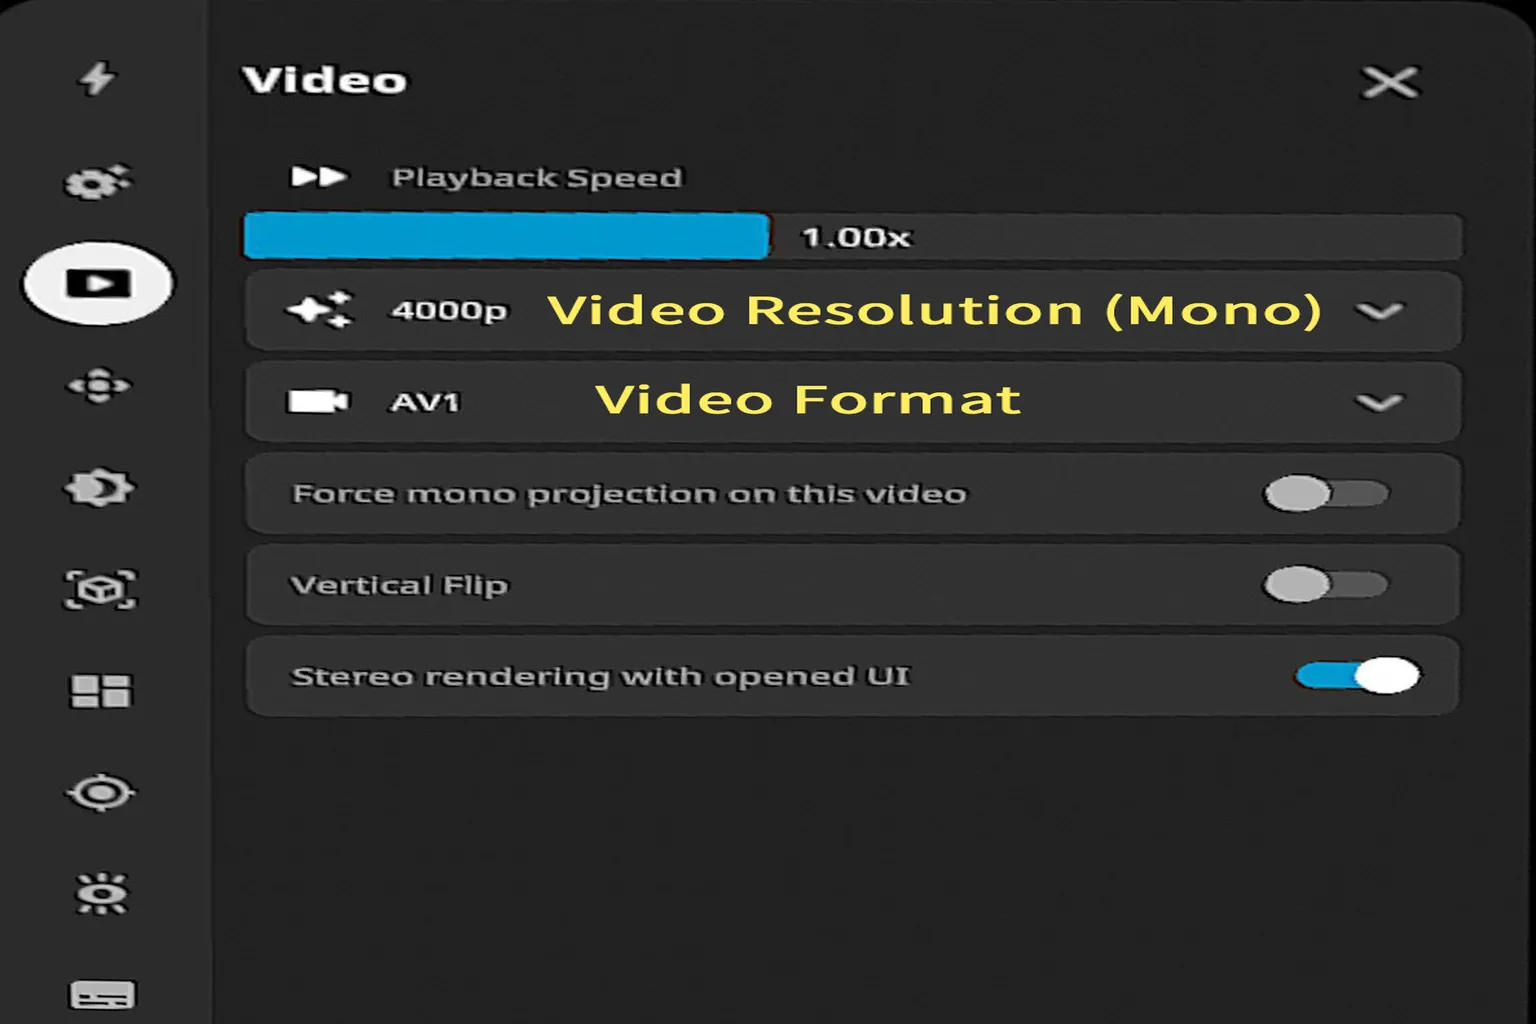
Video
Here you can adjust things like video resolution, format, and playback speed, but for most users, there’s no need to change anything.
The available options include:
- Playback Speed: Changes how fast the video plays. The default is 1.00x.
- Resolution: 1920p refers to 4K resolution (3840 × 2160).
- Video codec: Shows the encoding format used by the video. Options may include AV1, H.264, and H.265.
- Force mono projection on this video: Switches the video to single-eye display mode. This is useful if you want to disable VR-style stereo viewing.
- Vertical Flip: Flips the image upside down. Helpful for fixing videos that were recorded in the wrong orientation.
- Stereo rendering with opened UI: Controls whether stereo rendering stays active even when the UI is visible.
If you turn on Vertical Flip, the image flips upside down and looks like this.
Honestly, there’s almost no reason to use this during normal viewing. It’s really only useful when a video was recorded or encoded upside down and you need to fix it.
Transform
This section lets you fine-tune image distortion and positioning, but honestly, leaving everything at the default is recommended. We’re here to watch videos, not fly fighter jets. Settings like pitch, yaw, and roll are more like what you’d touch in something like Ace Combat 7 on PlayStation 4, and even then, only if you really know what you’re doing. You can try adjusting things out of curiosity, but for everyday video viewing, you’ll almost never need this.
- Zoom: Adjusts the display size of the video, letting you bring it closer or push it farther away.
- FOV (Field of View): Sets the horizontal field of view. Higher values let you see a wider area.
- Pitch: Tilts the image up or down. Useful for correcting the viewing angle when you need to look slightly up or down.
- Yaw: Rotates the image left or right. Used to fix horizontal misalignment.
- Roll: Tilts the image sideways. Helps correct situations where the horizon is not level.
- Height: Adjusts the vertical position of the image. Useful for matching the video to your eye level.
- Slide: Moves the image horizontally from left to right.
- Coax Distance (Interpupillary distance): Adjusts the distance between the left and right eyes in stereo video. On Quest, this is usually optimized automatically, and changing it can cause the image to separate and reduce the VR effect.

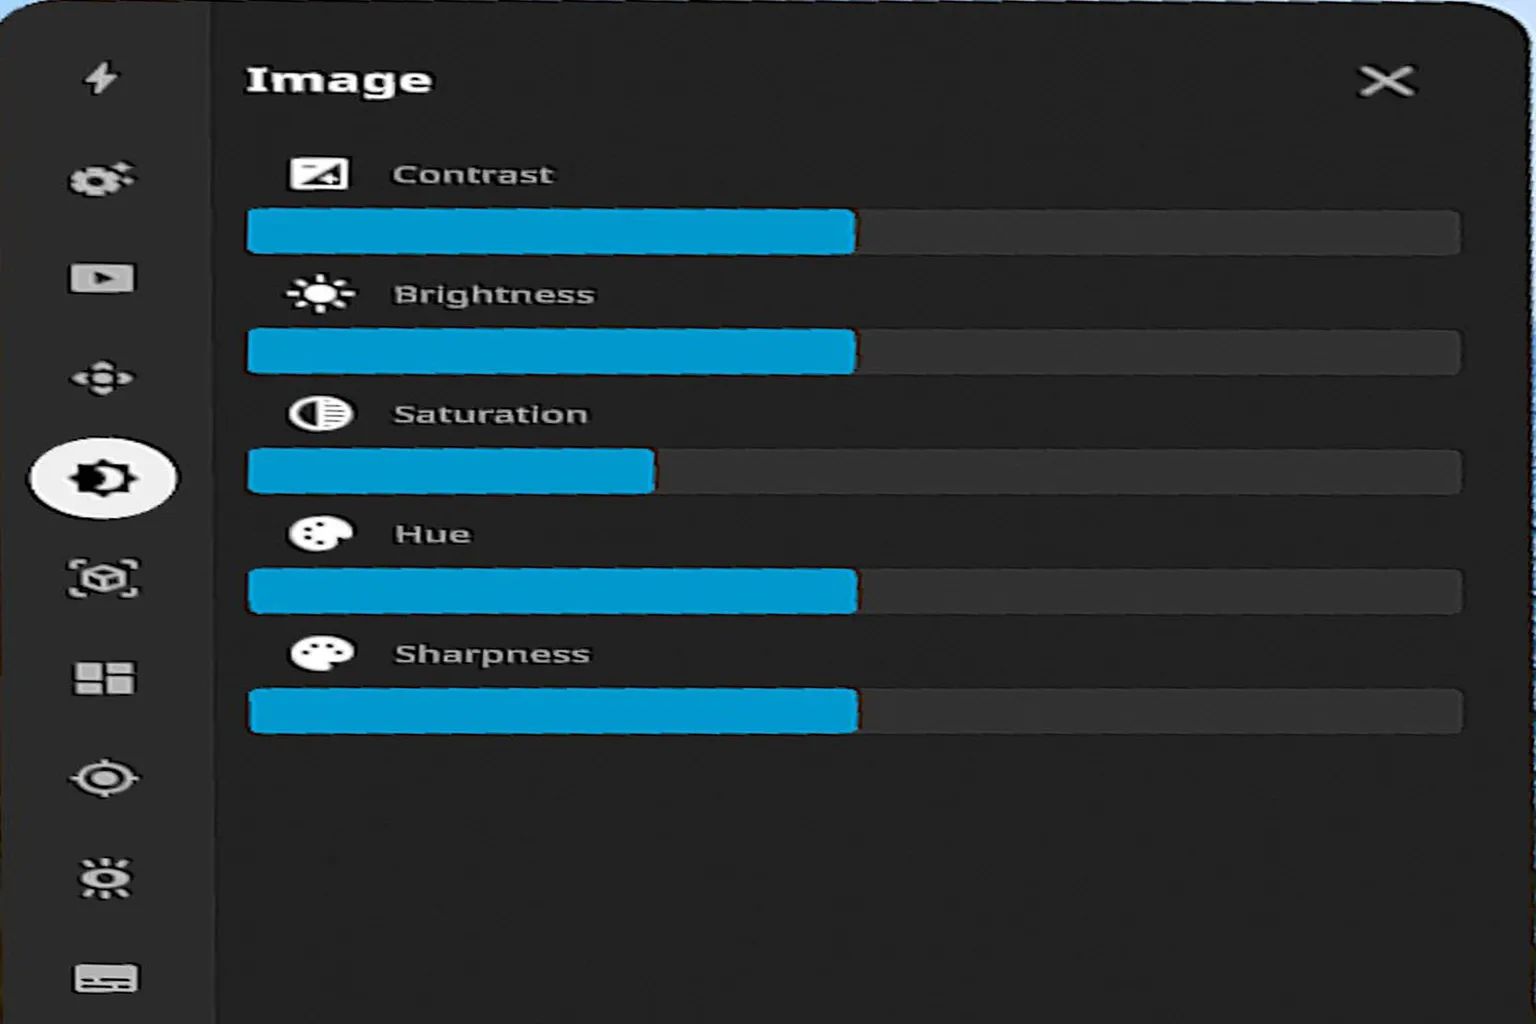
Image
This section controls the color and look of the video. The two most useful controls here are Brightness and Saturation. If a video looks too dark, you can raise the brightness. If the colors look washed out, increasing saturation helps bring them closer to how they should look. This is especially useful for videos that benefit from color correction, like JVR-Porn content on SLR.
- Contrast: Adjusts the difference between light and dark areas. Increasing it makes blacks and whites stand out more, while lowering it makes the image look flatter and more gray.
- Brightness: Adjusts the overall brightness of the image. Useful for fixing videos that are too dark or for reducing overexposed highlights.
- Saturation: Adjusts color intensity. Higher values make colors more vivid, while lower values push the image closer to grayscale.
- Hue: Shifts the overall color tone, such as making the image lean more red or more blue.
- Sharpness: Enhances edge definition in the image. Pushing this too high can make the video look unnatural, almost like an oil painting.
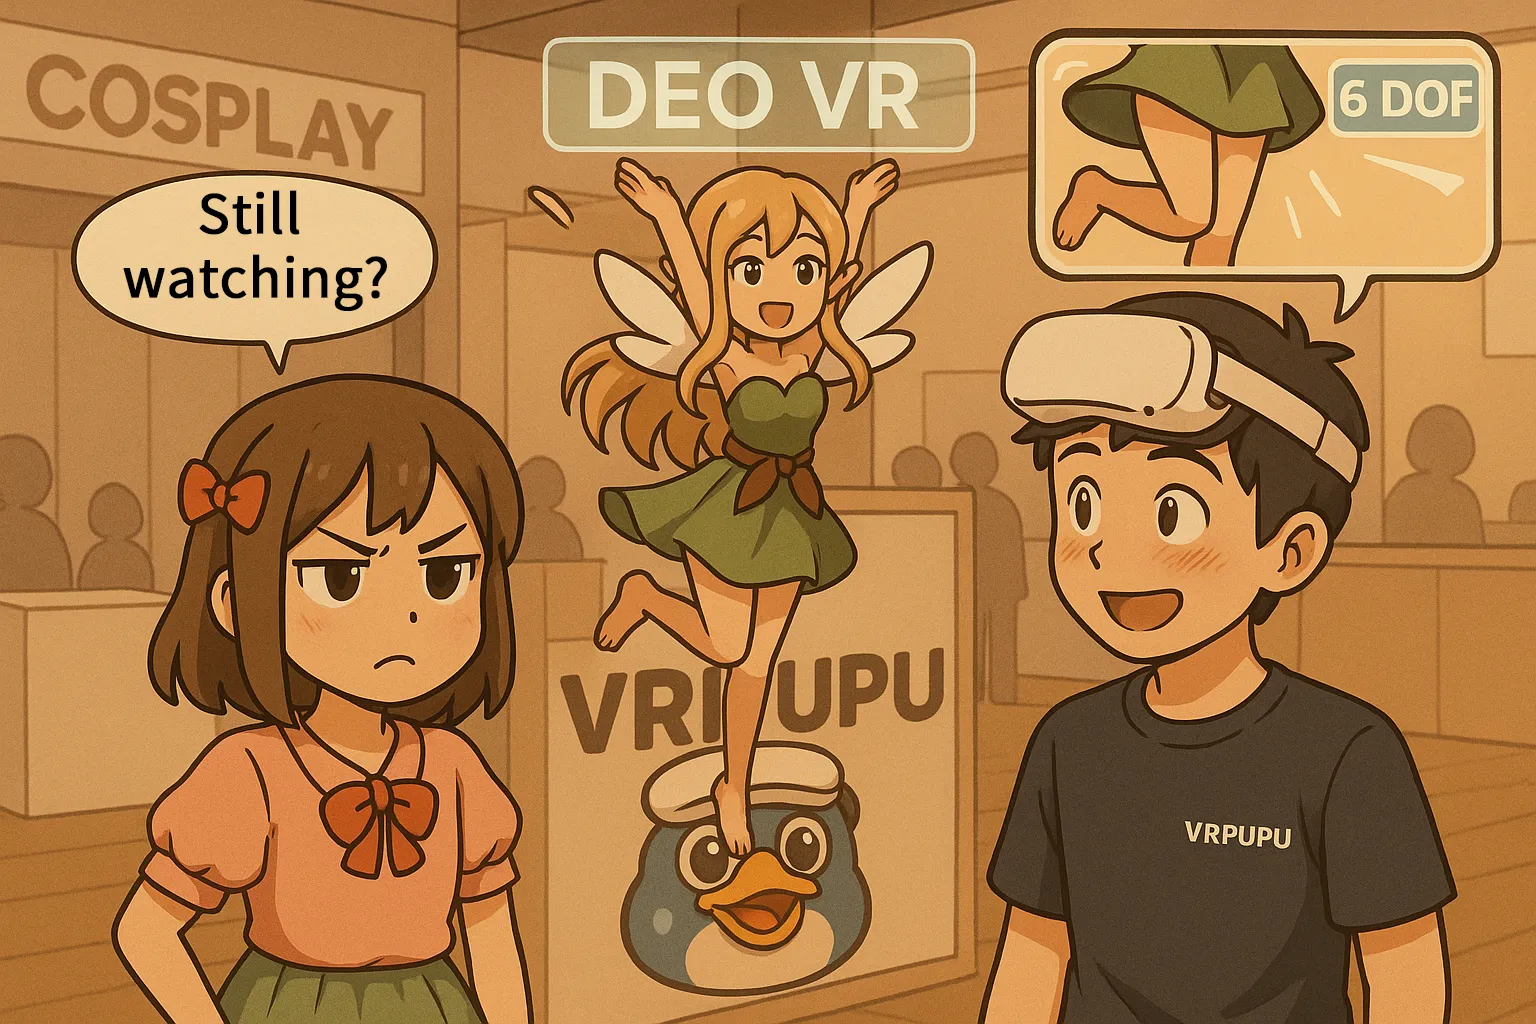
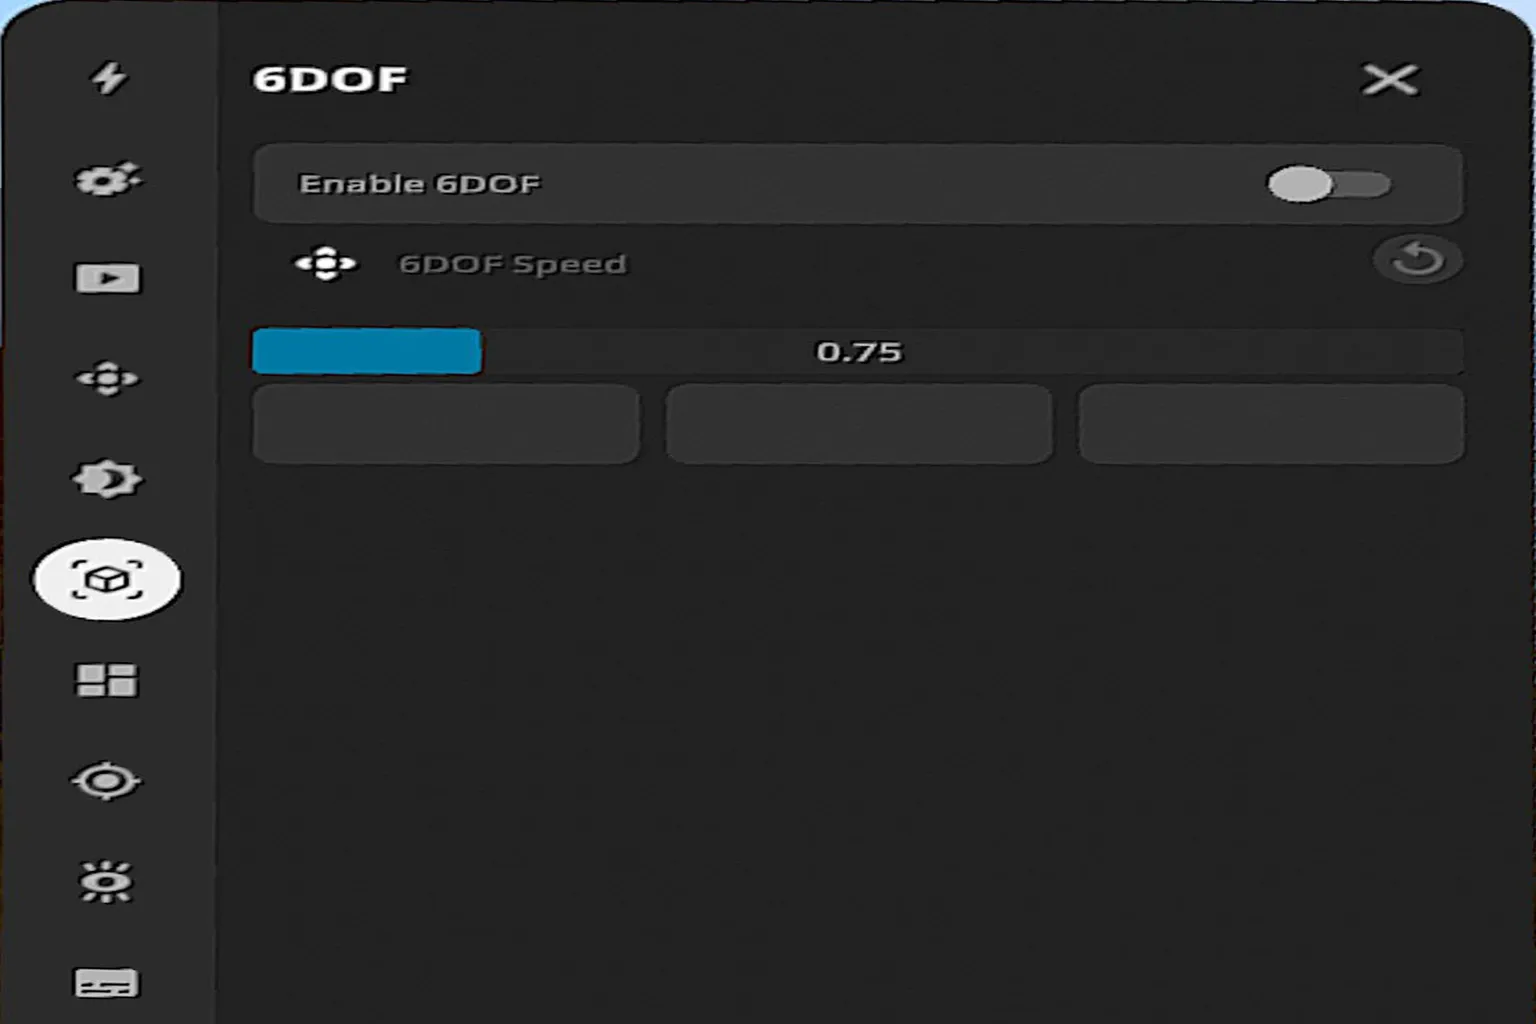
6DOF (Six Degrees of Freedom)
This is a feature you don’t see very often, even in VR headsets. When you move your head, the image slightly zooms in toward the direction you’re looking. It feels like the system is focusing on your line of sight, creating a kind of visual focus or concentration effect.
The 6DOF here does not mean six-degrees-of-freedom movement in the usual VR sense. It refers to this special mode that automatically magnifies the image in the direction you’re facing.
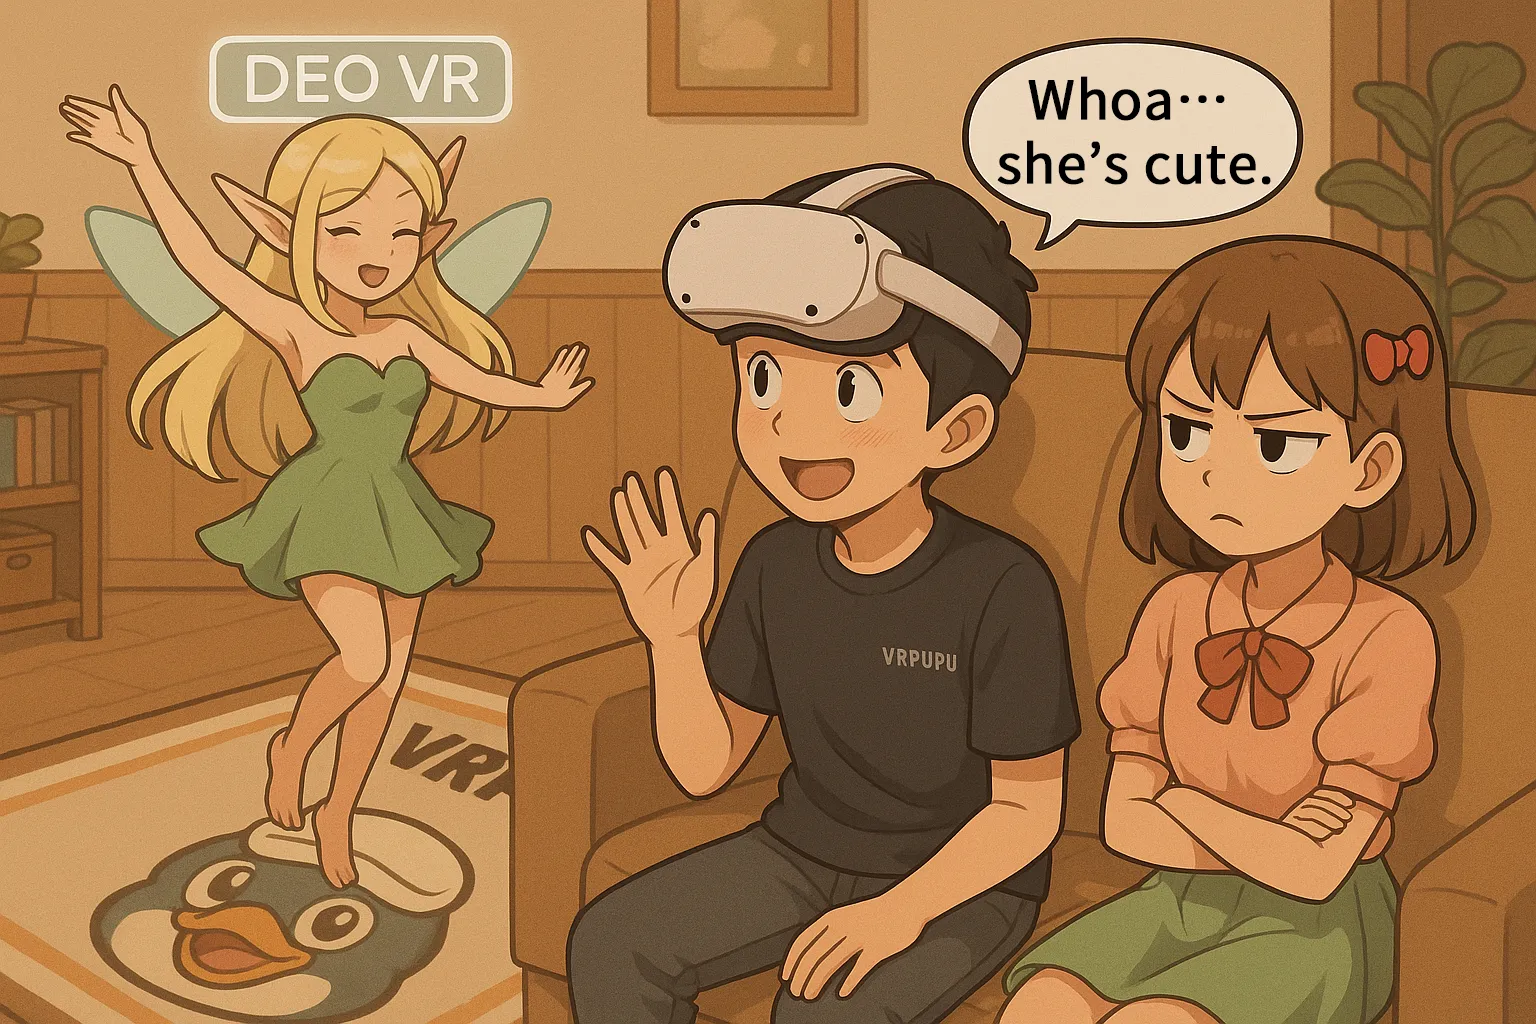
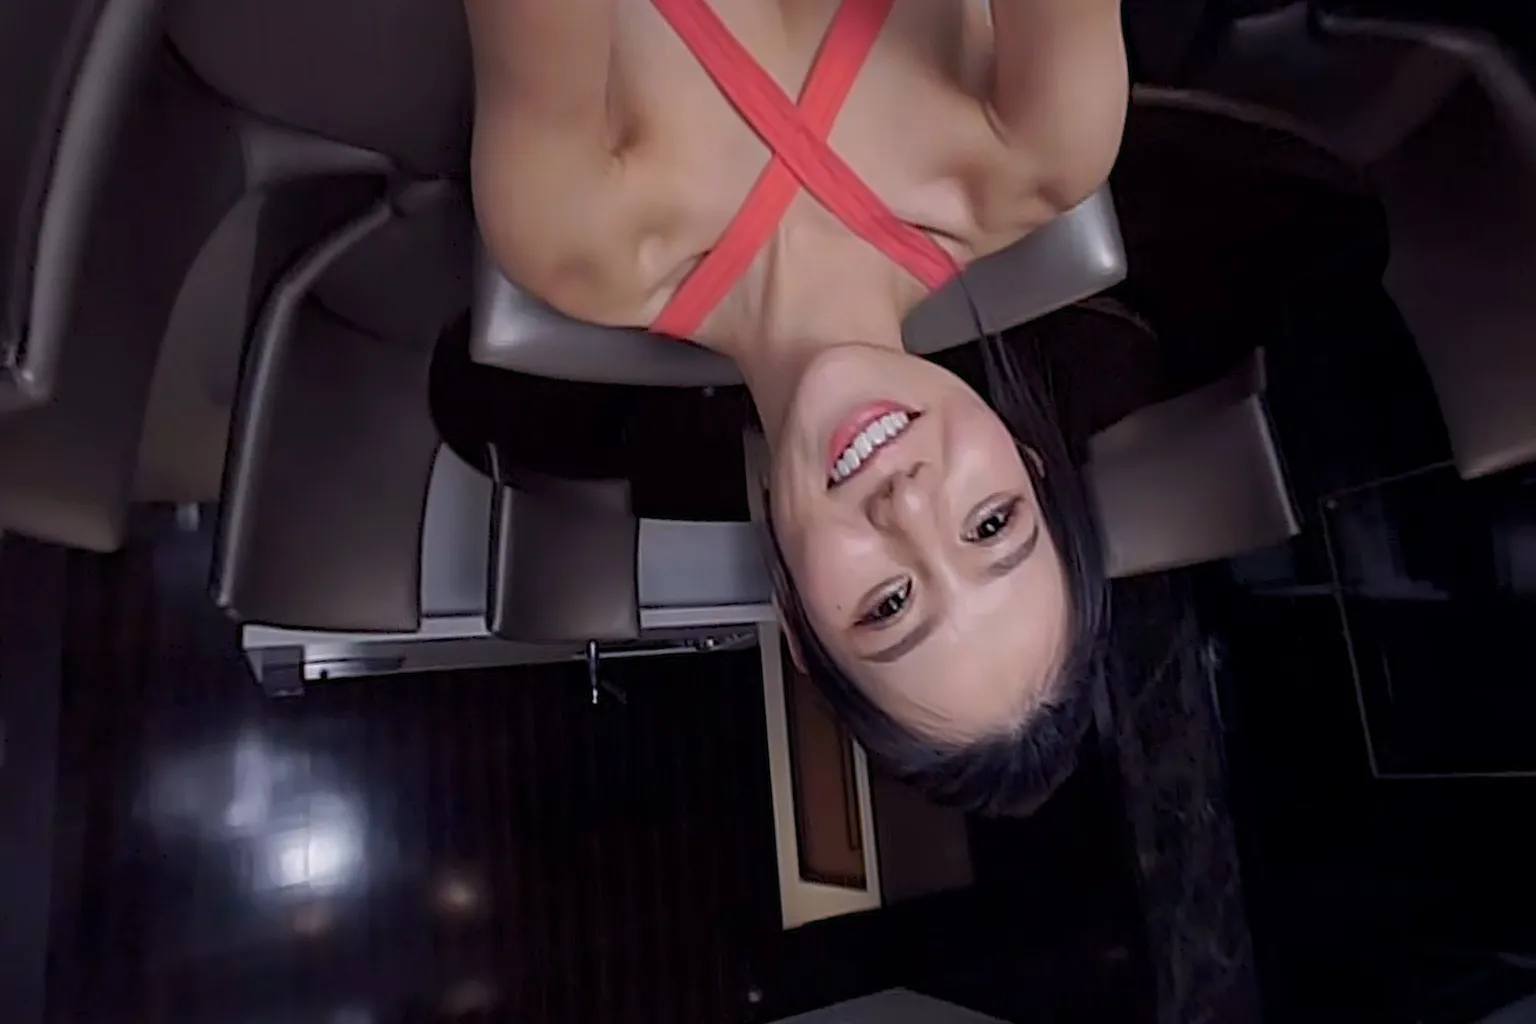
If it’s hard to picture this from words alone, take a look at the sample images below first. When your head is in a neutral position, the view looks almost the same whether 6DOF is turned on or off.

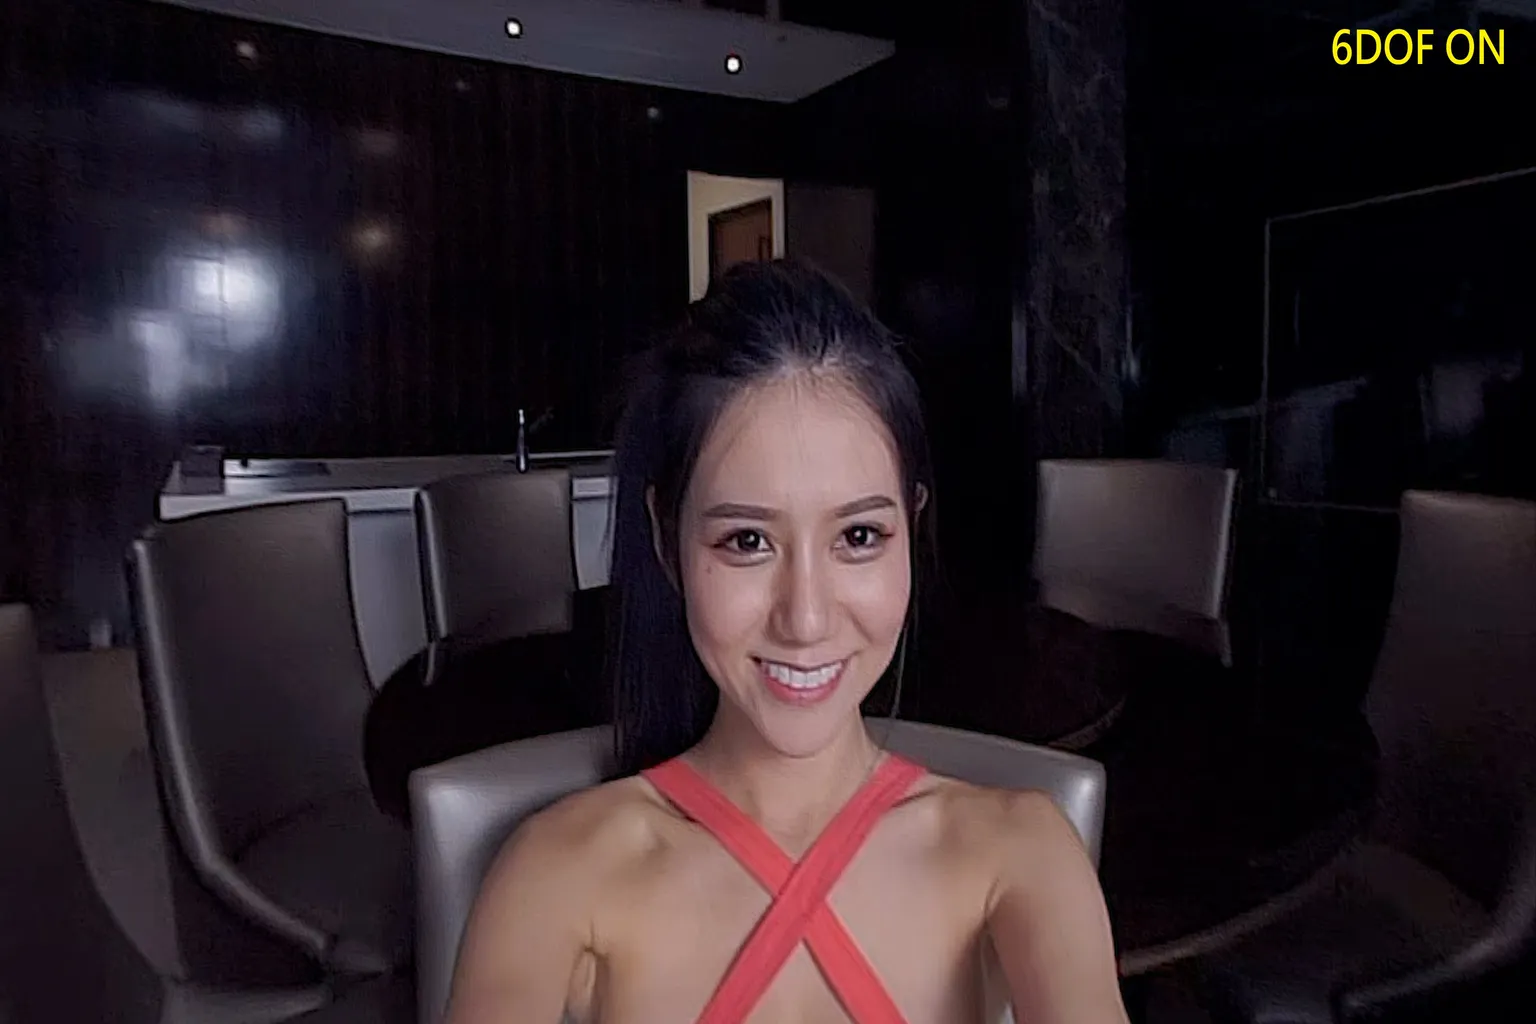
Now, for example, when you tilt your head downward to look at a girl’s body, with 6DOF turned off, the video stays at a normal viewing scale. It simply follows your head movement without changing how large anything looks.

When you turn 6DOF on, it feels like putting a magnifying glass over your eyes. The area you’re looking at gets noticeably enlarged, pulling your focus straight to that spot. Once you see this difference side by side, it becomes clear what this feature is meant for.
If I had to put it in simple terms, it’s like one of those classic Dragon Ball gags—Master Roshi glances at Bulma’s chest, and the camera instantly zooms in right where his eyes are locked.
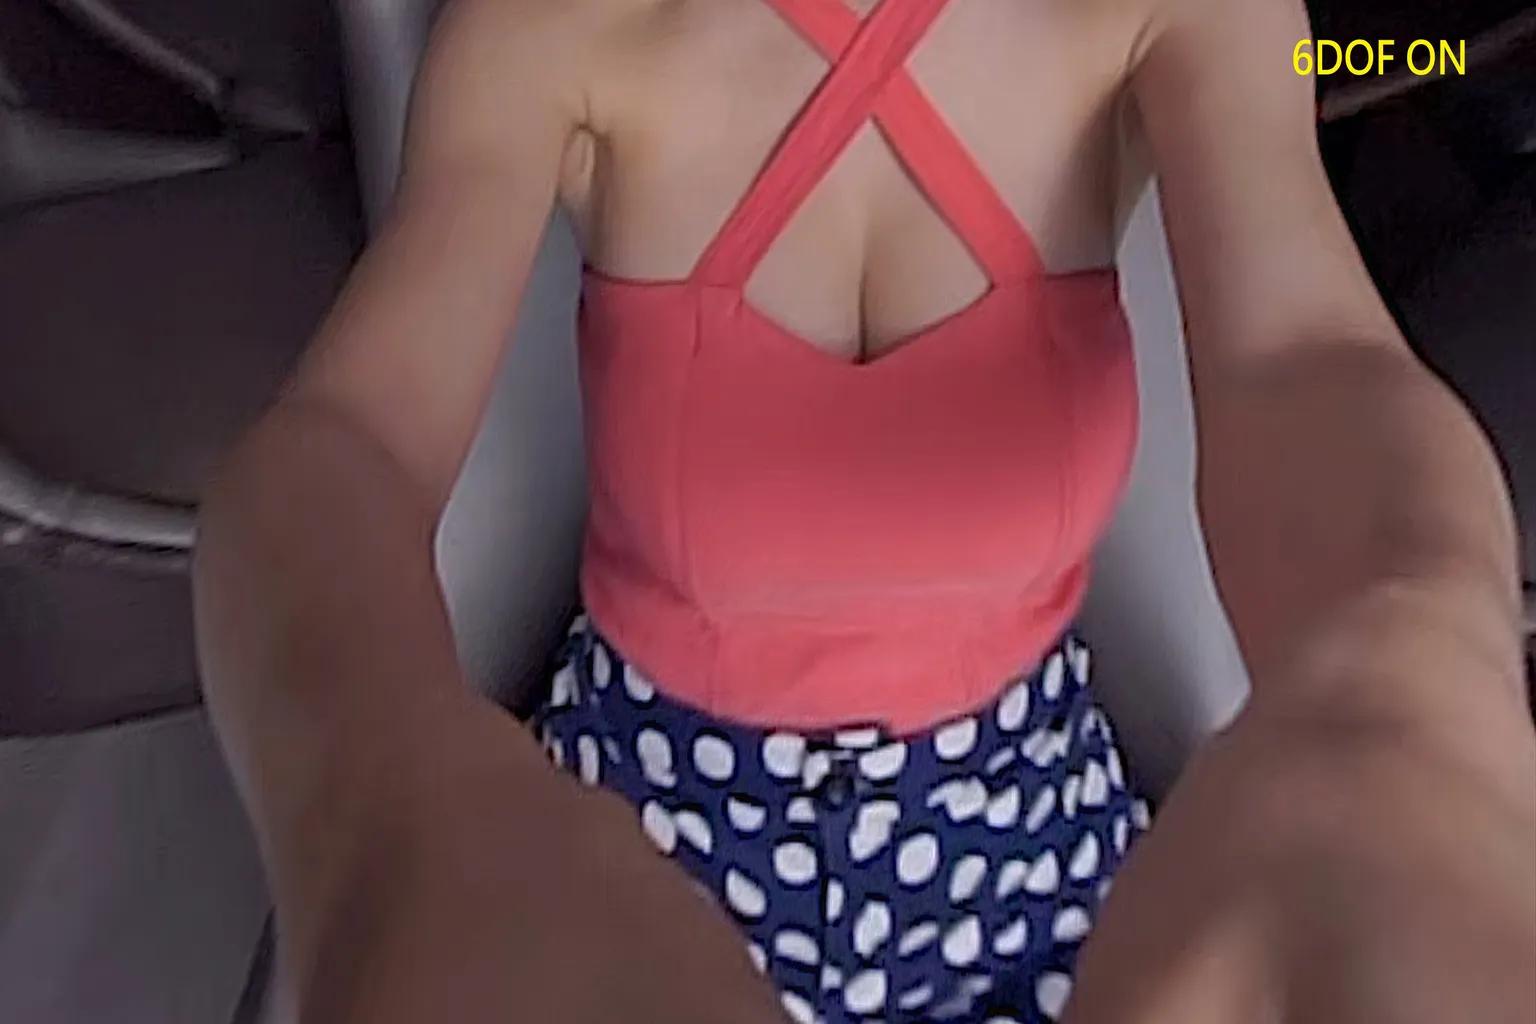
If you tilt your head even farther downward, the zoom level increases more, making what you’re looking at appear even larger.
This feature looks flashy and fun, but it doesn’t really match how human vision works naturally. It’s fine to try once just to see how it feels, but for everyday viewing, it’s more comfortable to leave it turned off.
Personalize
There’s only one option here: the viewing time graph (waveform chart). When you turn this on, you can see at a glance which parts of a video have the most plays or watch time, and jump straight to the scenes that everyone tends to watch the most.
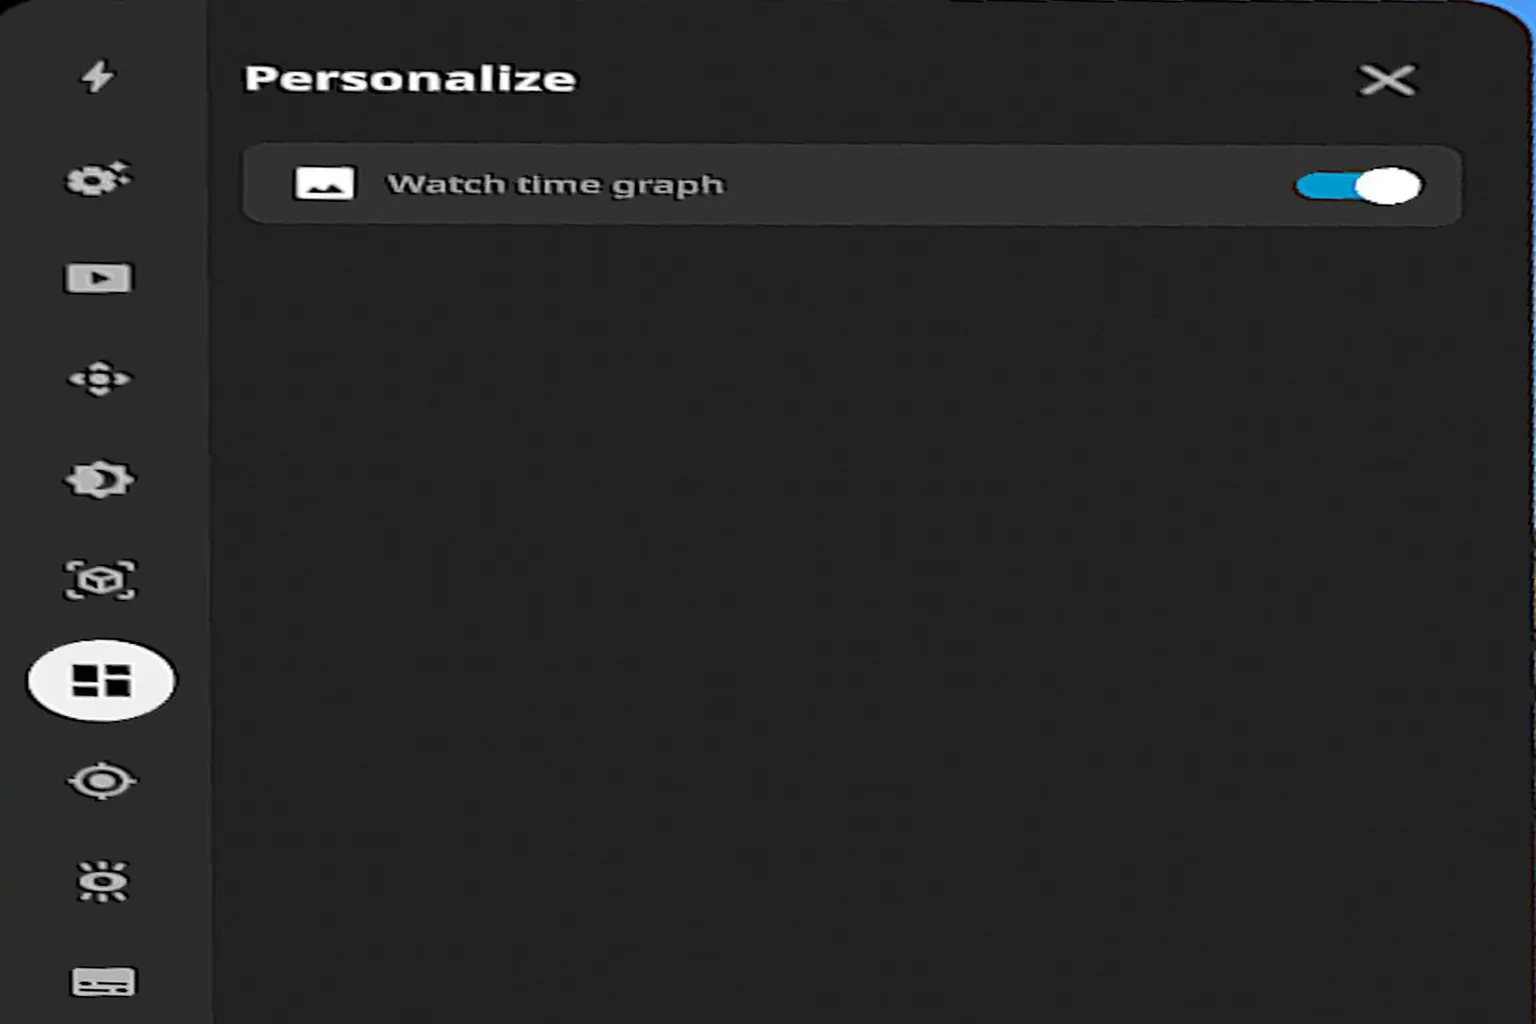
The image below shows an example of viewing data when this feature is turned on. The taller the peaks in the graph, the more people are focusing on and repeatedly watching those scenes.
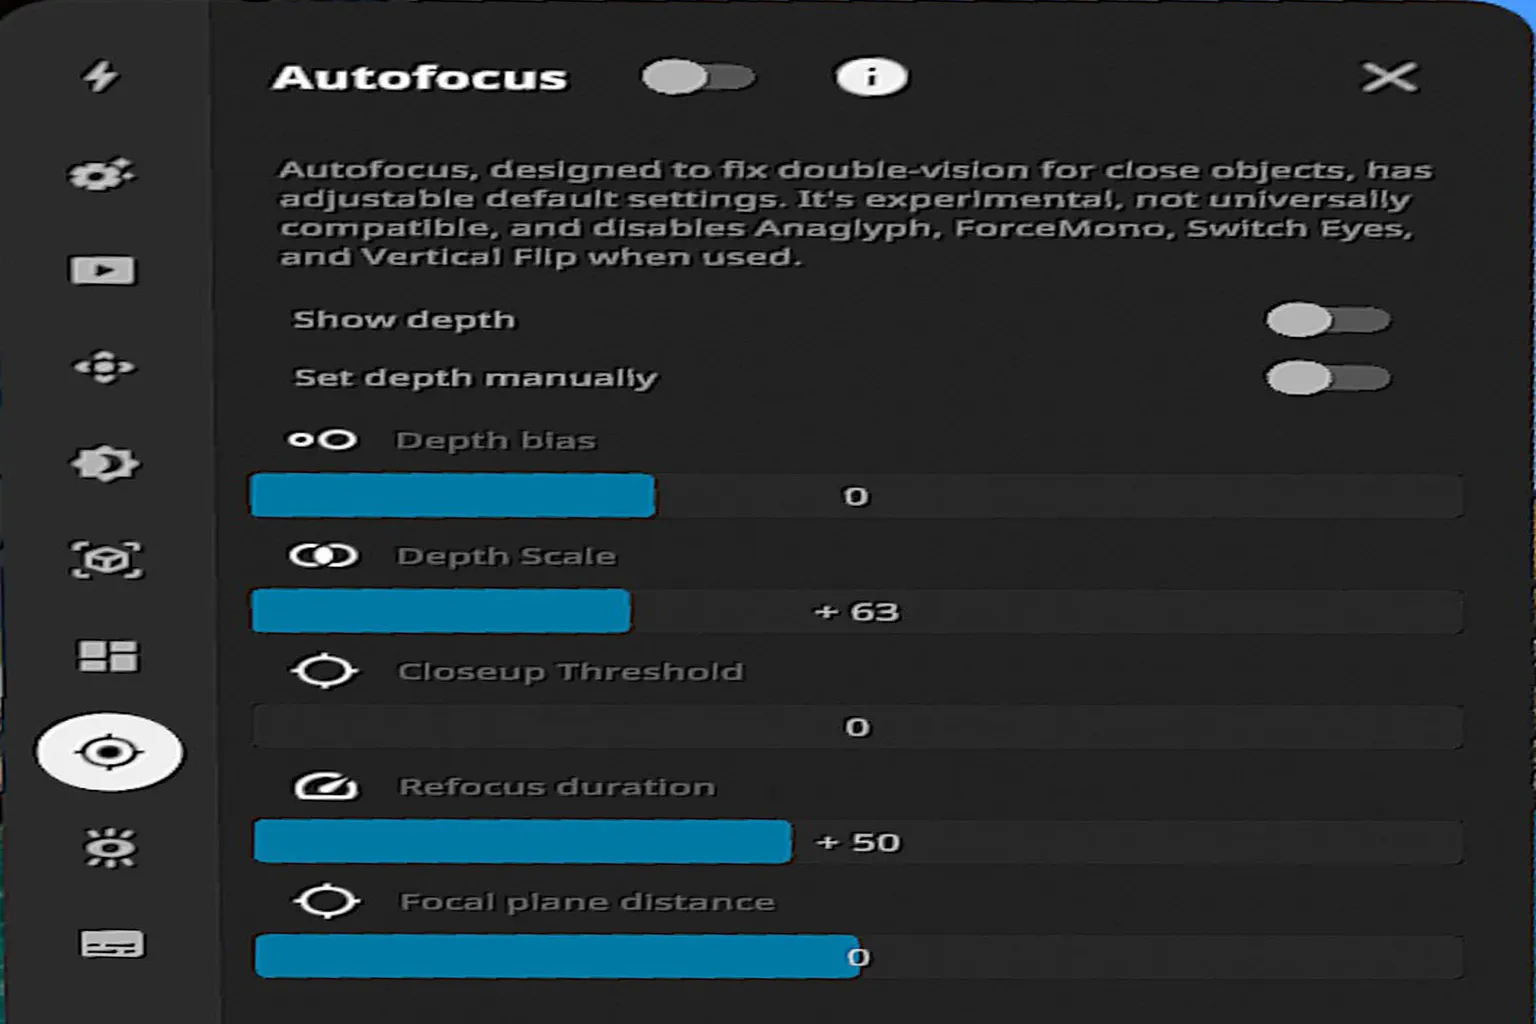
AutoFocus
This is another flashy and interesting feature. It automatically sharpens the area at the center of your view, making whatever you’re looking at appear the clearest. Autofocus itself is recommended to keep on, but you don’t really need to touch the fine-tuning options.
Here’s what each setting does:
- Autofocus: The main switch for the autofocus feature. When enabled, it corrects double images on close-up subjects. However, it cannot be used at the same time as Anaglyph (red-blue 3D), Force Mono (single-eye view), Switch Eyes (left/right swap), or Vertical Flip.
- Show depth: Displays the distance to the subject (depth of field), which helps as a reference when adjusting settings.
- Set depth manually: Manually sets the depth of field. When this is on, you choose the focus point yourself and autofocus is disabled.
- Depth bias: Offsets the depth of field. This lets you slightly shift the overall focus position.
- Depth scale: Controls the strength of the depth effect. Higher values make the difference between in-focus and out-of-focus areas more pronounced.
- Closeup threshold: Sets how close an object needs to be before refocusing is triggered.
- Refocus duration: Controls how long refocusing takes. Higher values make the transition slower and smoother.
- Focal plane distance: Sets a specific focus distance manually, keeping that range sharply in focus.
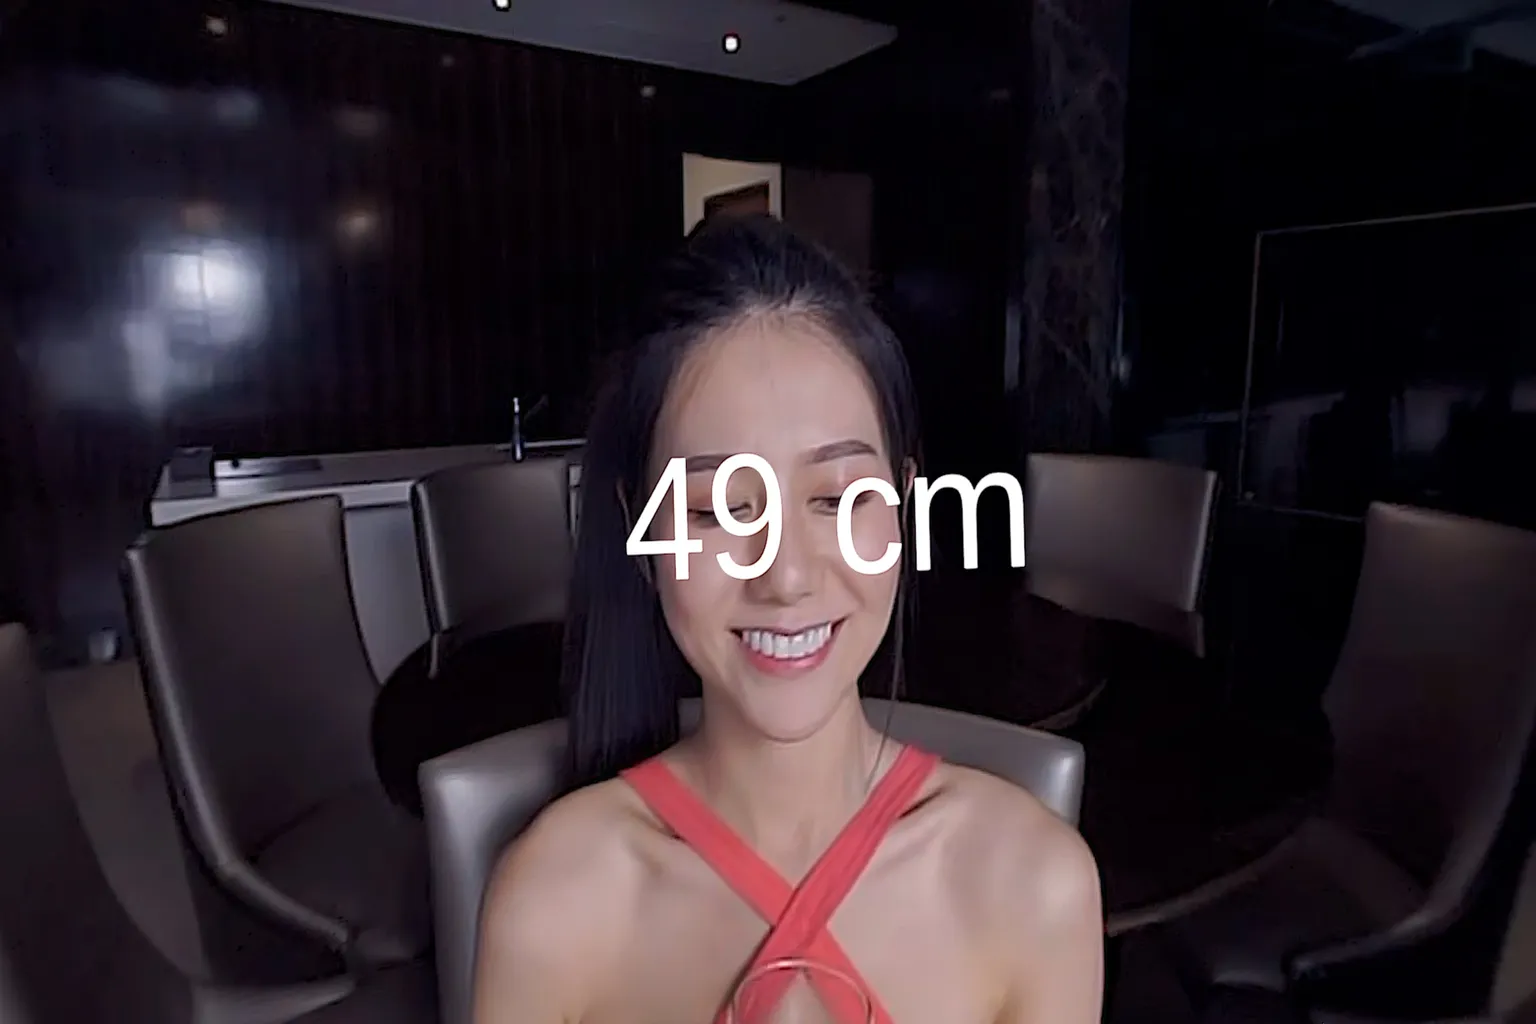
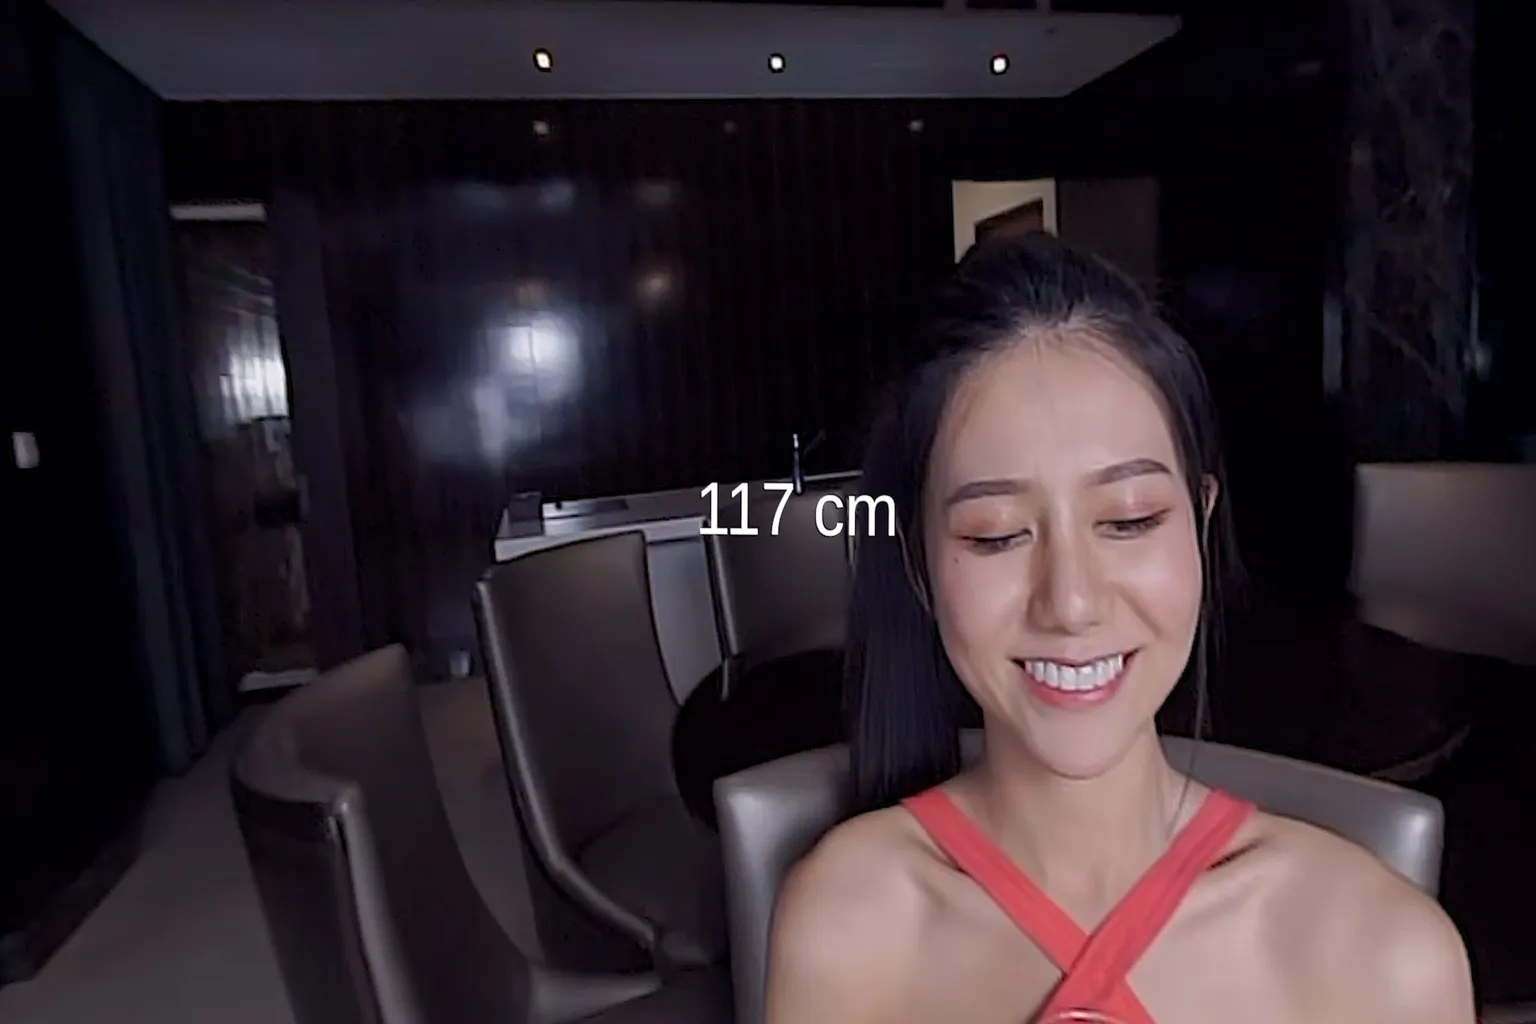
When you turn Autofocus on and look at a girl’s face at close range, around 49 cm away, her face appears noticeably sharper.
If you then shift your gaze to a chair about 117 cm behind her, the chair becomes slightly clearer instead. That said, even with this feature enabled, the difference in image quality isn’t that dramatic. It’s worth trying once to see how it feels, but that’s usually enough.
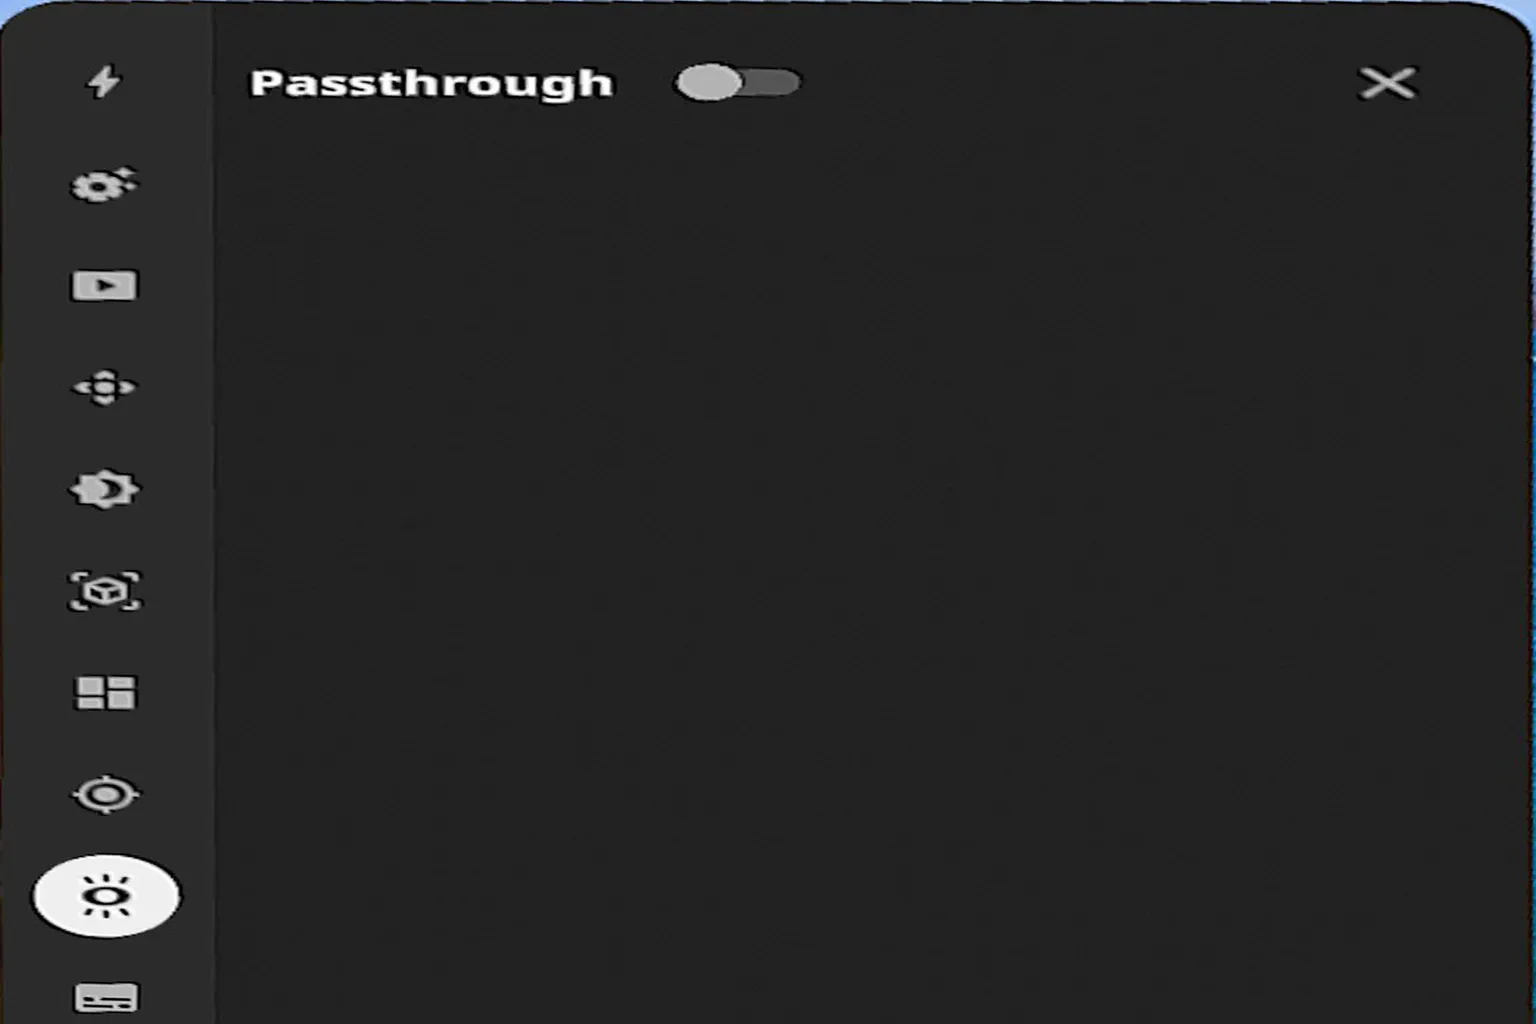
Passthrough
When you turn passthrough mode on, the headset’s cameras show the real world around you. This lets you keep an eye on your surroundings while watching VR content, which helps avoid bumping into things if you move around.
That said, having the real-world view layered over the video can make the image feel a bit unnatural. For regular viewing, it’s more comfortable to leave this turned off.
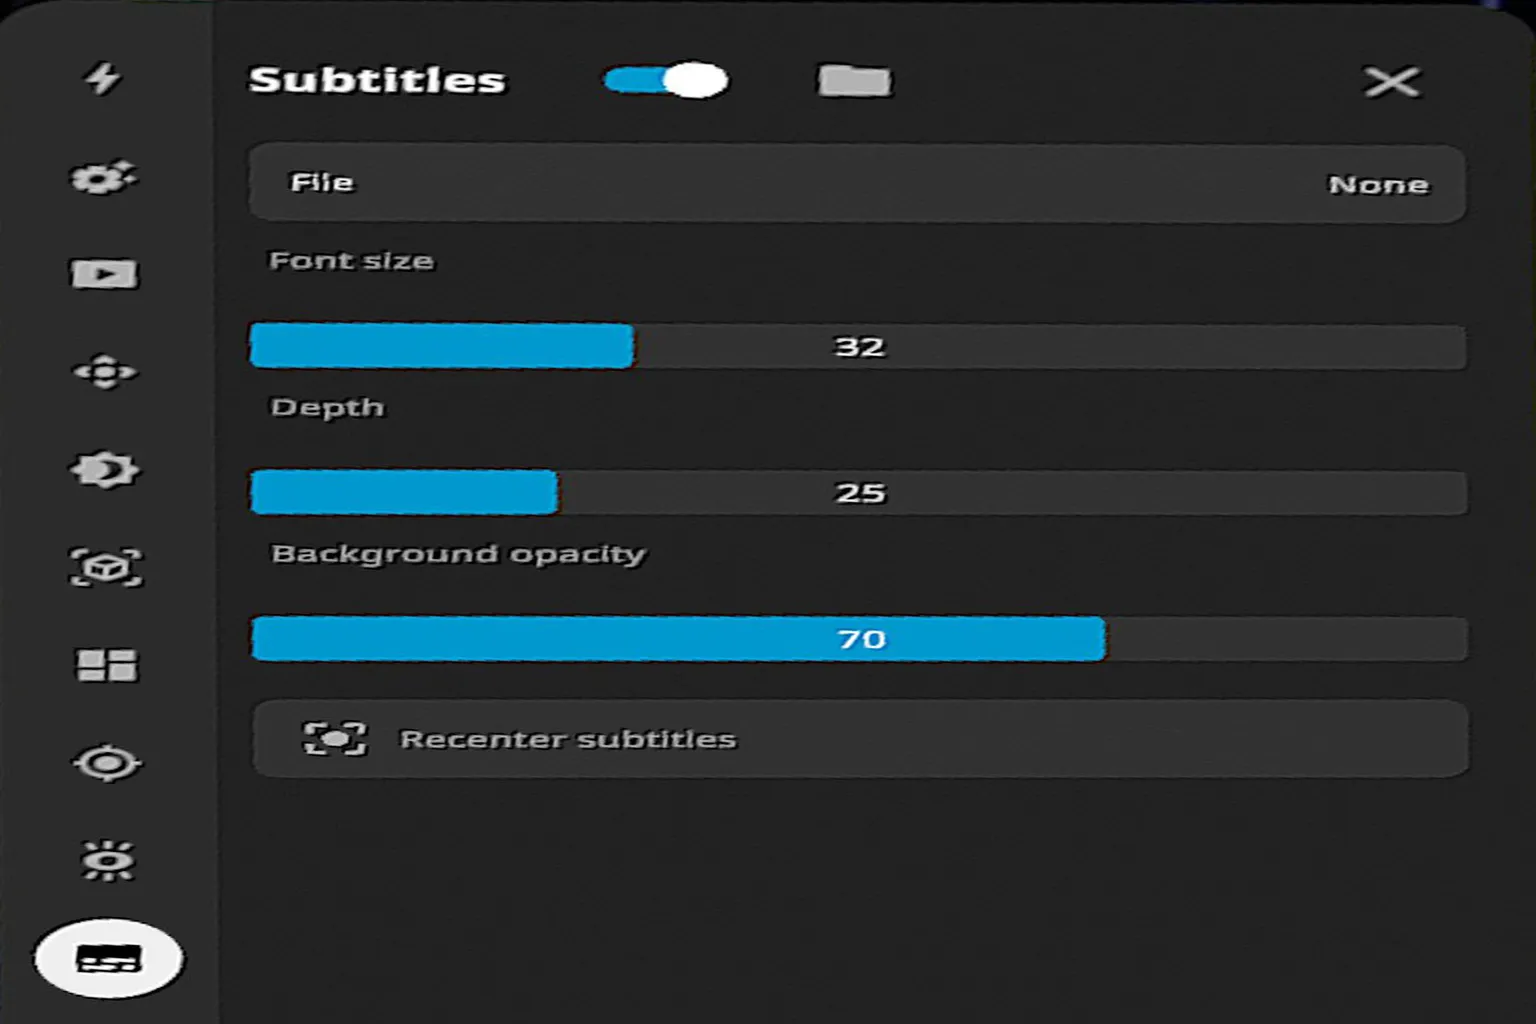
Subtitles
This feature lets you load and display subtitle files. However, since DEO VR can’t play local videos, there are very few situations where you’ll actually use subtitles here.
- Subtitles: Turns subtitles on or off. When enabled, the subtitle file is displayed.
- File: Selects the subtitle file. Supports .srt format.
- Font size: Adjusts the subtitle text size.
- Depth: Adjusts the distance of the subtitles from your eyes. Higher values bring the subtitles closer.
- Background opacity: Adjusts the transparency of the subtitle background mask.
- Recenter subtitles: Recenters the subtitles and moves them back to the middle of the screen.
That wraps up the overview of DEO VR’s settings. Honestly, there aren’t that many features you’ll actively use, so there’s no need to dig deep into the settings menu every time you watch something. The default setup is more than enough to enjoy videos comfortably.
Also, the current version of DEO VR does not support local videos or playback from your own PC or cloud storage. If those features are important to you, check the articles below and pick a player that better fits what you want to do.
Skybox VR Player Complete Guide
Setup AirScreen, Network Streams & YouTube VR

Moon VR Player Ultimate Guide
PC Streaming, WebDAV & Web Theater DLC
4XVR Video Player Premium Guide
PC Streaming, WebDAV & USB Setup
FAQ – Common Questions
Can DEO VR play local videos or content from USB devices?
No. At the moment, DEO VR only supports online streaming videos. It does not support local file playback or external storage devices.
Which settings should I change to use DEO VR normally?
Most settings work perfectly fine at their default values. The only ones worth changing are basic things like the home page URL and Skip Intro.
What is the 6DOF feature in DEO VR?
6DOF is a feature that simulates depth of field changes based on your head movement and enlarges the area you’re looking at. Since it feels a bit different from natural human vision, it’s best to try it once and turn it off if it doesn’t feel right.
Can I use my own subtitle files with the subtitle feature?
Yes, you can. However, since DEO VR currently only supports online videos, there are very few situations where subtitles are actually useful, so the practicality is limited.
Why should I enable Autofocus?
When you turn it on, it automatically adjusts the depth of field based on the center of your gaze and helps correct double images. The effect is limited, but in some videos, it can make the image look slightly sharper.