There are several ways to connect your Meta Quest to a PC for VR gaming, but Virtual Desktop (VD) stands out for its balance of stability, image quality, and features.
This guide covers the full setup—from how to purchase and install it, to configuring key PC-side settings like codecs and OpenXR for better performance. It also walks through how to deal with stuttering and get a smoother overall PCVR experience.
Feature Overview
There are three main ways to connect your Meta Quest to a PC.
Meta Air Link (Free)
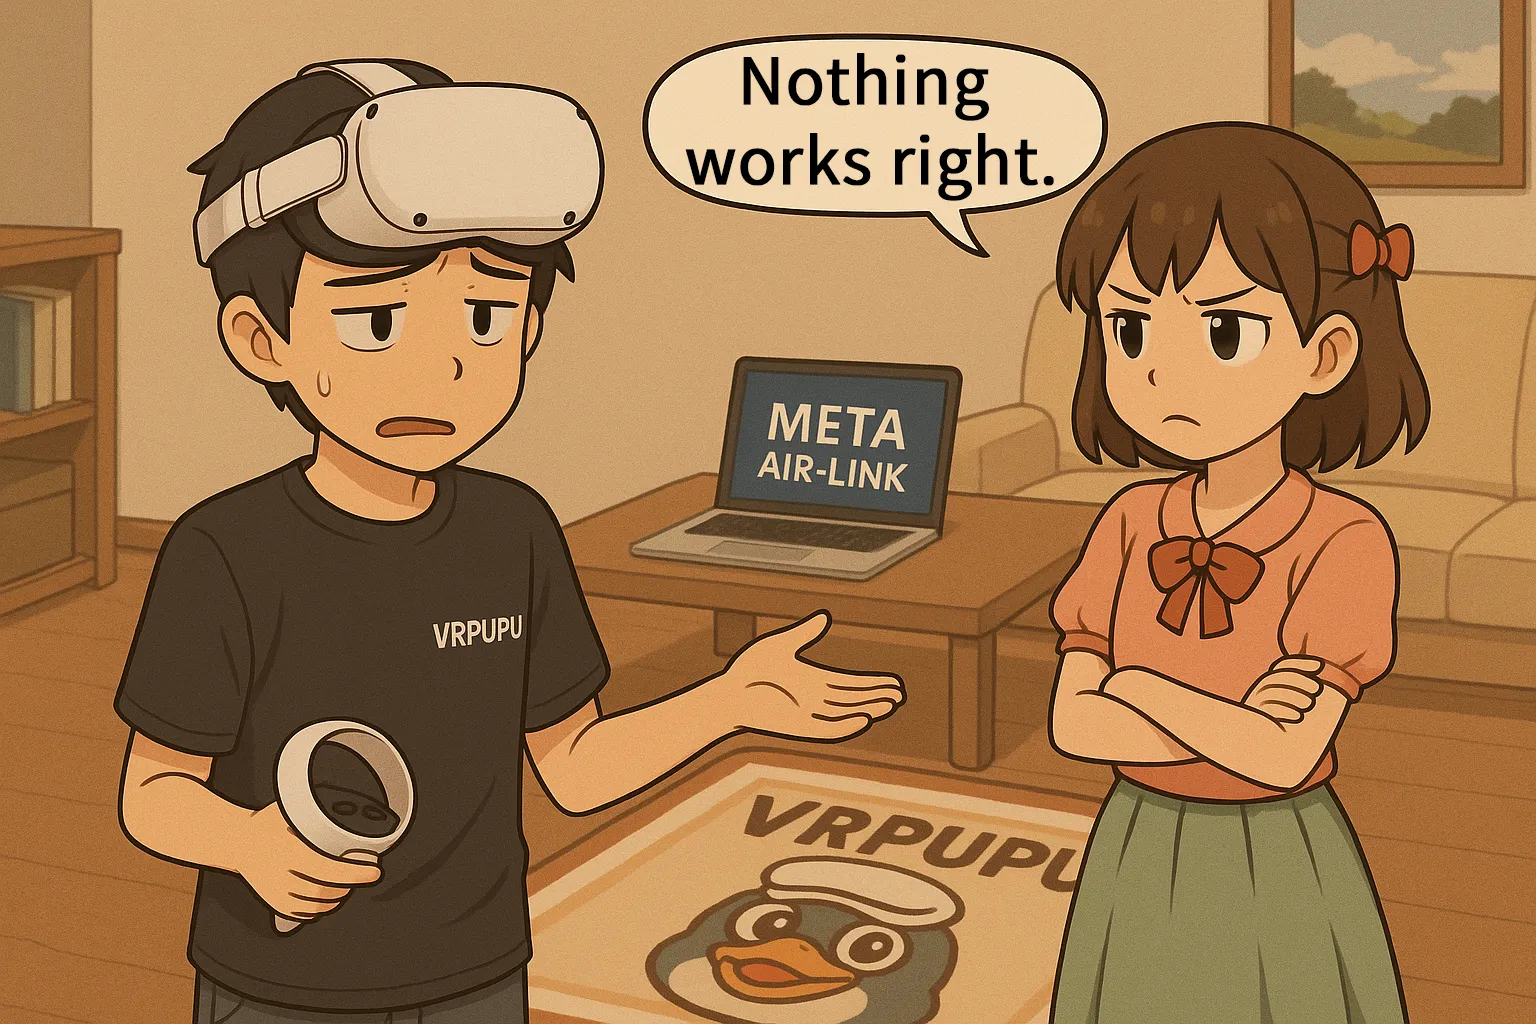
This is the simplest option and comes built into the Quest by default. The connection is fairly stable, but during long sessions or high-load gameplay, it can become unstable. It’s fine for occasional use.
Steam Link (Free)
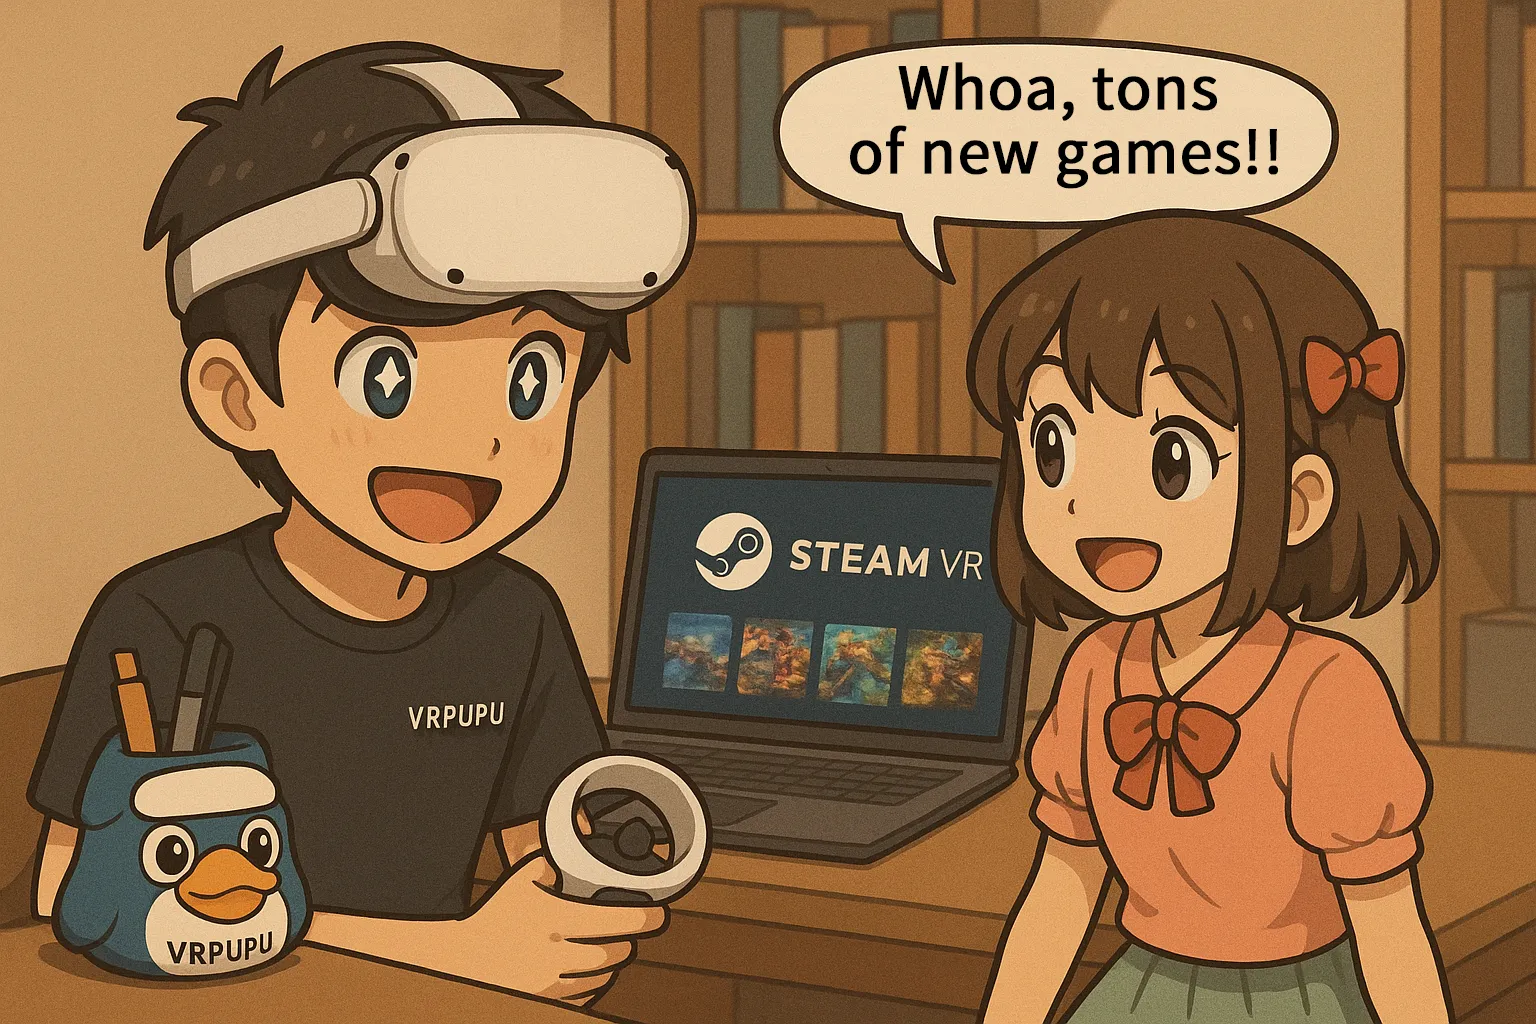
This method is designed specifically for SteamVR games. Stability is decent, but it only works with Steam titles, and there aren’t many advanced settings or extra features.
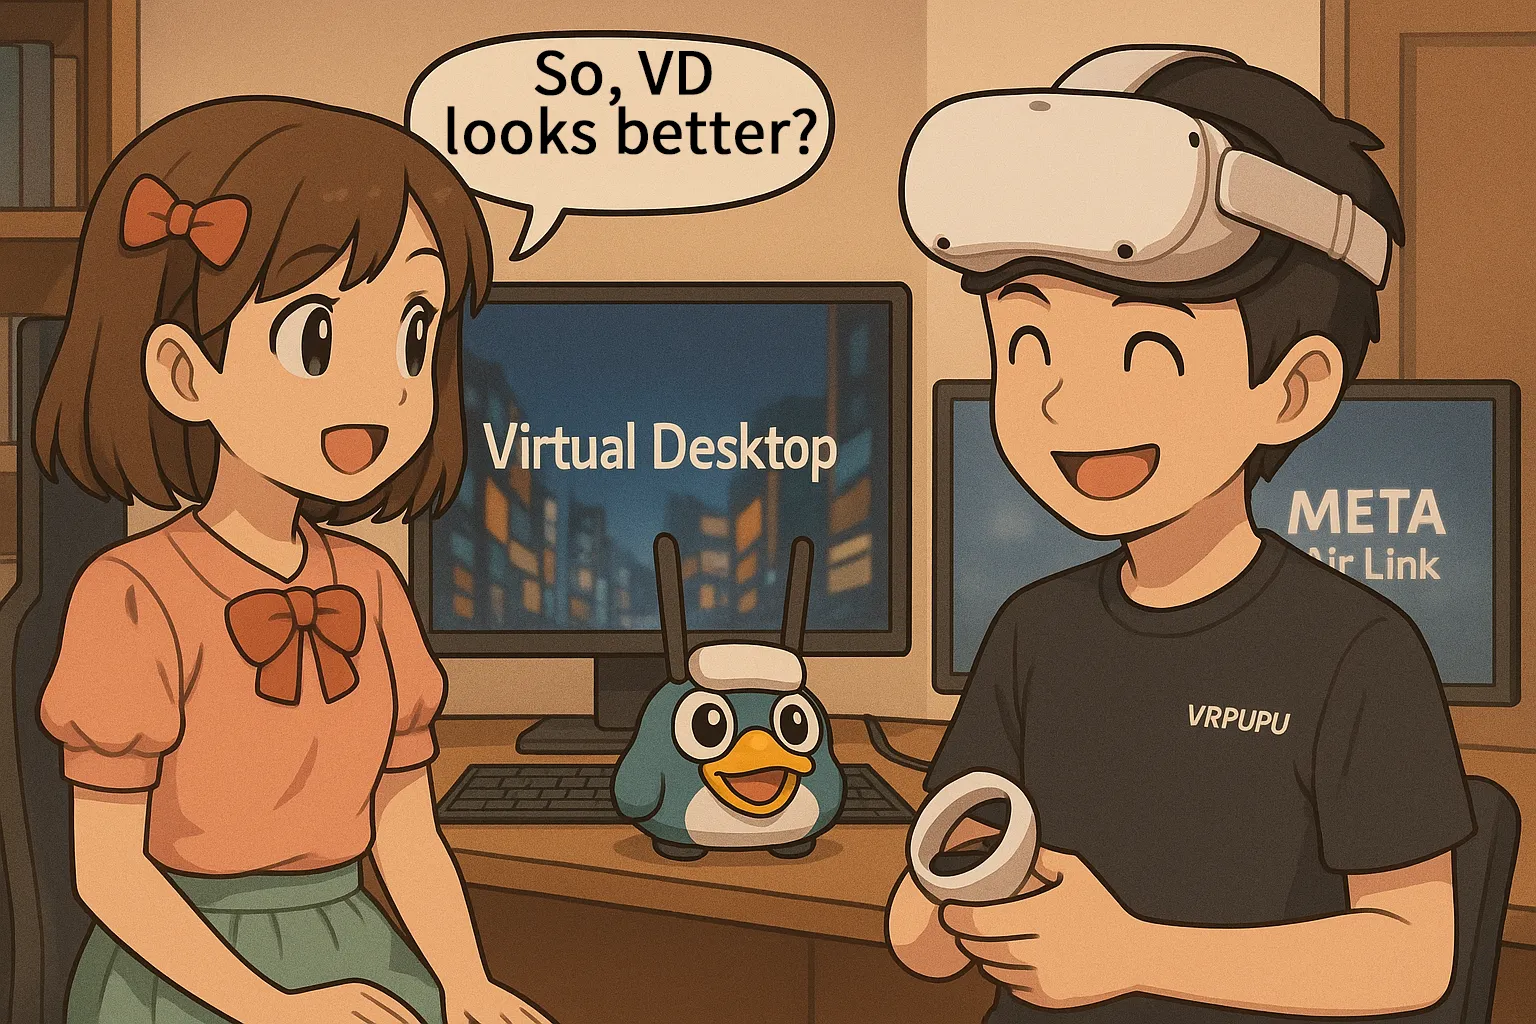
Virtual Desktop ($24.99)
This offers the most features and the best stability. You can stream VR games, mirror your entire PC as a virtual desktop, and even use it for watching videos. If you plan to use PC streaming regularly, this is the one to go with.
One more thing—if you’re buying a game or app on the Meta Store that isn’t on sale, you can enter “VRPUPU” at checkout to get 10% off. It also works on some DLC and bundle purchases.
Also, just so you know, Meta Air Link has had issues since V85, where it can’t properly launch games from platforms outside of Meta. On top of that, Steam Link only works with games from the Steam Store.
So if you want to play PCVR games that aren’t on Steam or Meta, your only real option right now is to rely on Virtual Desktop.
Meta Quest Air Link Setup
Play SteamVR Games Wirelessly for Free
How to Play SteamVR on Meta Quest
Setup & Best Settings Guide
When you use Air Link during gameplay, the connection often becomes unstable or drops mid-session. On top of that, even when you’re playing SteamVR games, Air Link and Steam Link can end up running at the same time, which can hurt performance.
Virtual Desktop costs money, but once your PC is on, it’s ready to go right away, and everything runs much more smoothly. Honestly, it’s highly recommended. One important thing to note: if you’re a Meta Quest user, make sure you buy Virtual Desktop from the Meta Horizon App Store. Buying it elsewhere can make installation more complicated or cause it not to work properly.
Virtual Desktop is a third-party streaming app, but it’s also one of the best-selling and most popular apps on Meta Horizon. Its main features include:
- PC streaming: Play both regular PC games and VR games
- Virtual desktop: Use your headset as a PC monitor
- Video playback: Works with both standard videos and VR videos
Purchase and Installation
You can buy Virtual Desktop from the Meta Horizon Store. The regular price is $24.99, but with a creator discount, it sometimes drops to around $22.49. After you buy it, the app downloads automatically to your headset, but you’ll need to install the PC-side app yourself.
Here’s how to download and install the PC software:
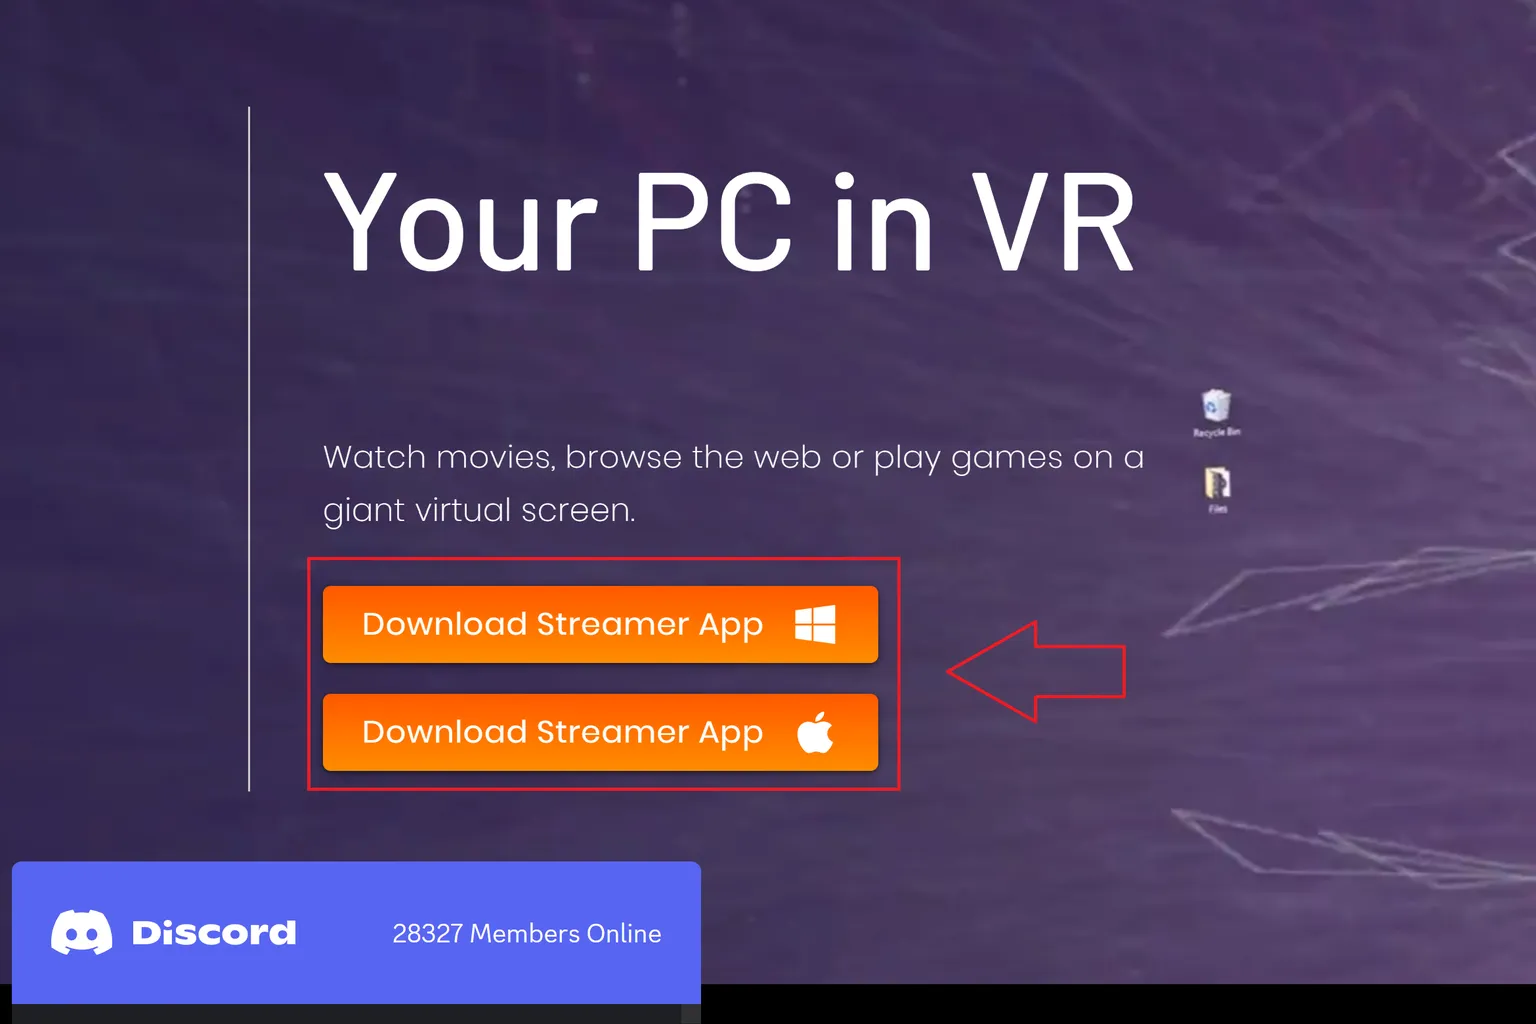
Step 1: Download the app from the official website
Go to the Virtual Desktop official site and download the connection app that matches your setup. There are versions for Windows and macOS, so choose the one that fits your PC.
Step 2: Install the software
Open the downloaded file and follow the on-screen instructions to install it. Once the installation is finished, it’s ready to use right away.
PC-side setup
Before you start, make sure you have the following ready.
- A PC with Virtual Desktop installed (with a dedicated GPU)
- The PC and your Meta Quest headset connected to the same Wi-Fi router
- A router that supports at least Wi-Fi 5, with Wi-Fi 6 or newer recommended
If all of these are in place, you’ll have a stable streaming environment.
The settings screen is organized into these main sections.
- ACCOUNTS: A page where you can check and manage the account of the connected VR device.
- BINDINGS: A page to set up keyboard shortcuts for quickly switching between desktop mode and VR mode.
- OPTIONS: A page to adjust things like the video codec, VR audio output, and which OpenXR runtime to use.
- ADVANCED: Advanced settings. Unless you have a specific reason, it’s safer not to touch these.
- MEDIA: A page to set where video files and screenshots are saved.
- ABOUT: A page to check system details and version information.
Here is a quick rundown of each one:
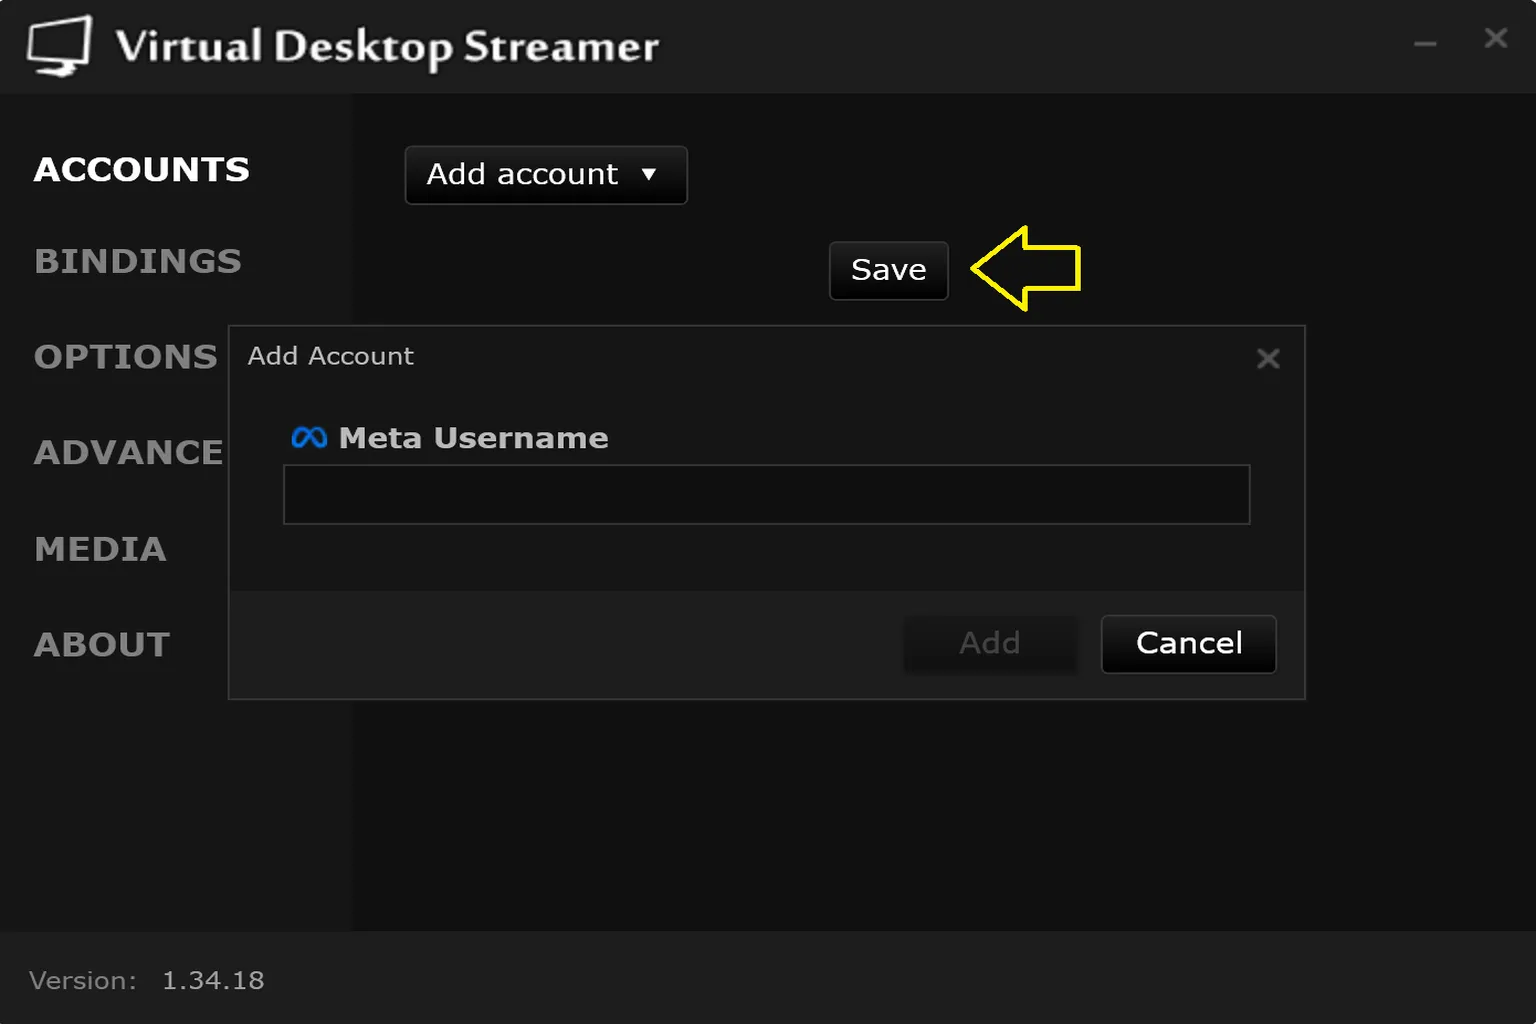
Accounts
This section is used to pair your headset with the PC. Because of that, the account on the headset side and the account on the PC side need to match.
Step 1: Set the connection account
Tap Add account on the screen, then select Meta.
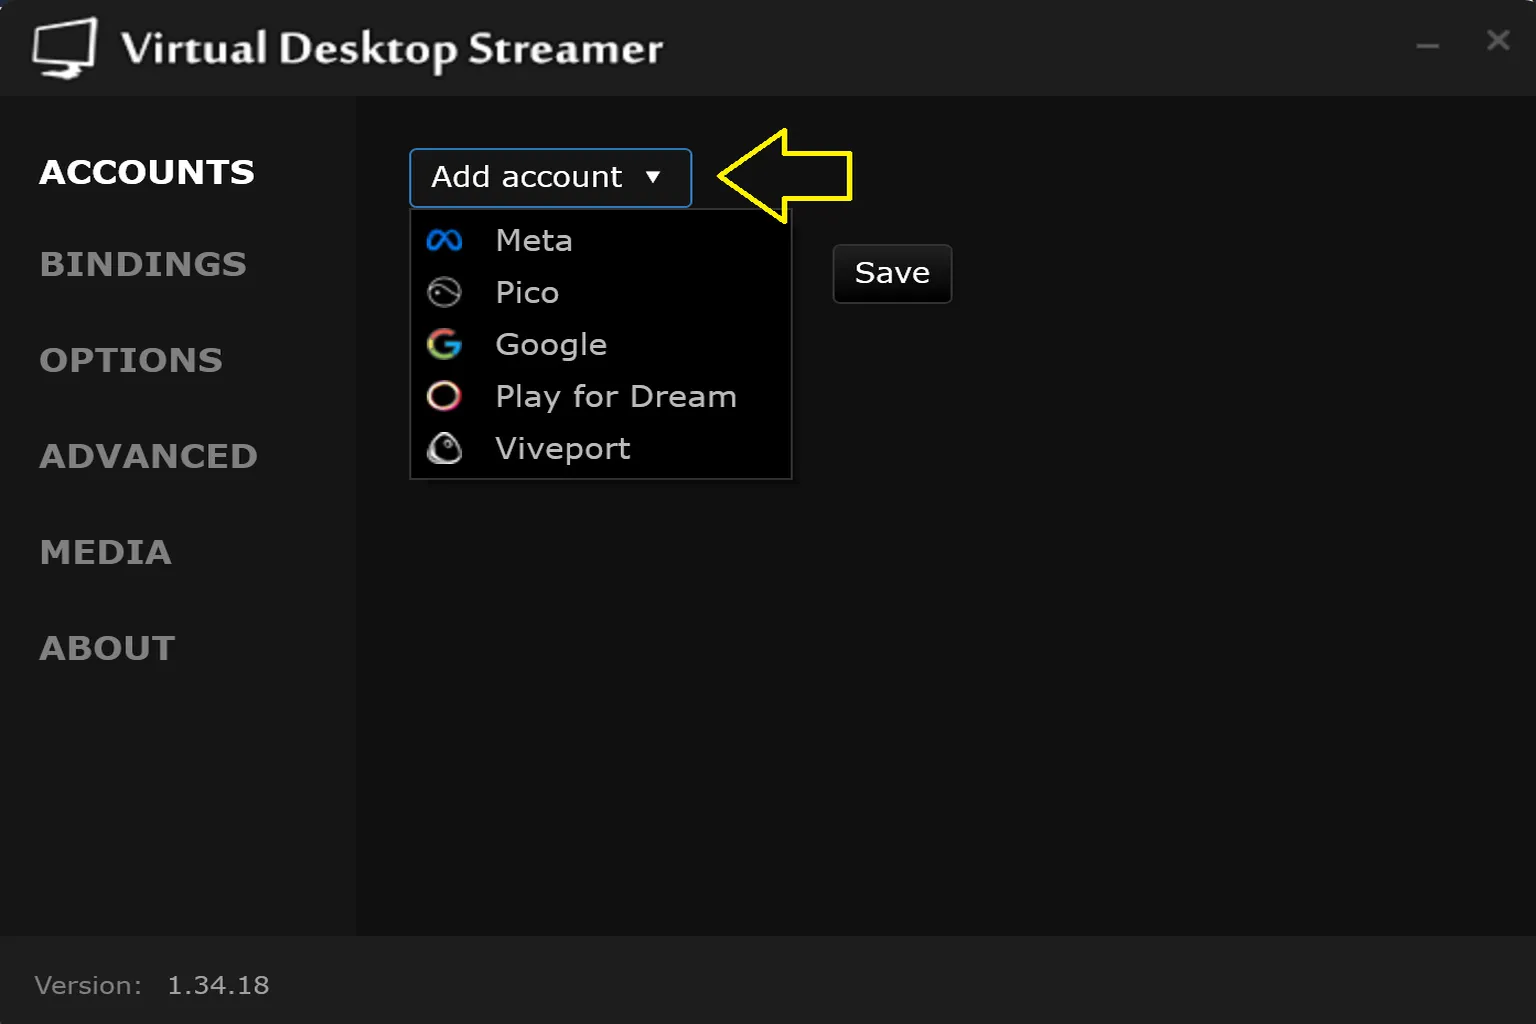
Step 2: Enter your account
Enter the connection account that matches the device you’re using (your Meta account). You can register up to four accounts on a single PC. Once you’re done, click Save. After that, your headset will be able to find the PC and connect to it.
Bindings
This is where you set keyboard shortcuts on the PC side. To be honest, most regular users don’t really need to touch this section.
- Switch Monitor: Switch between connected monitors
- Toggle VR Mode: Switch between VR mode and normal desktop mode
- Toggle VR Passthrough: Quickly toggle passthrough mode
- Enable VR Passthrough: Force passthrough mode on
- Disable VR Passthrough: Force passthrough mode off
- Toggle Hand Passthrough: Toggles hand passthrough. Only your hands are shown using the real-world camera feed.
- Toggle Desk Passthrough: Toggles passthrough around your desk area. Makes it easier to see where your real desk and keyboard are.
- Toggle Performance Overlay: Turns the performance overlay on or off. You can check latency, frame rate, and overall streaming status.
- Toggle Foveated Streaming: Toggles gaze-based optimized streaming. Keeps the center of the screen in high quality while reducing load in the peripheral areas to improve overall performance.

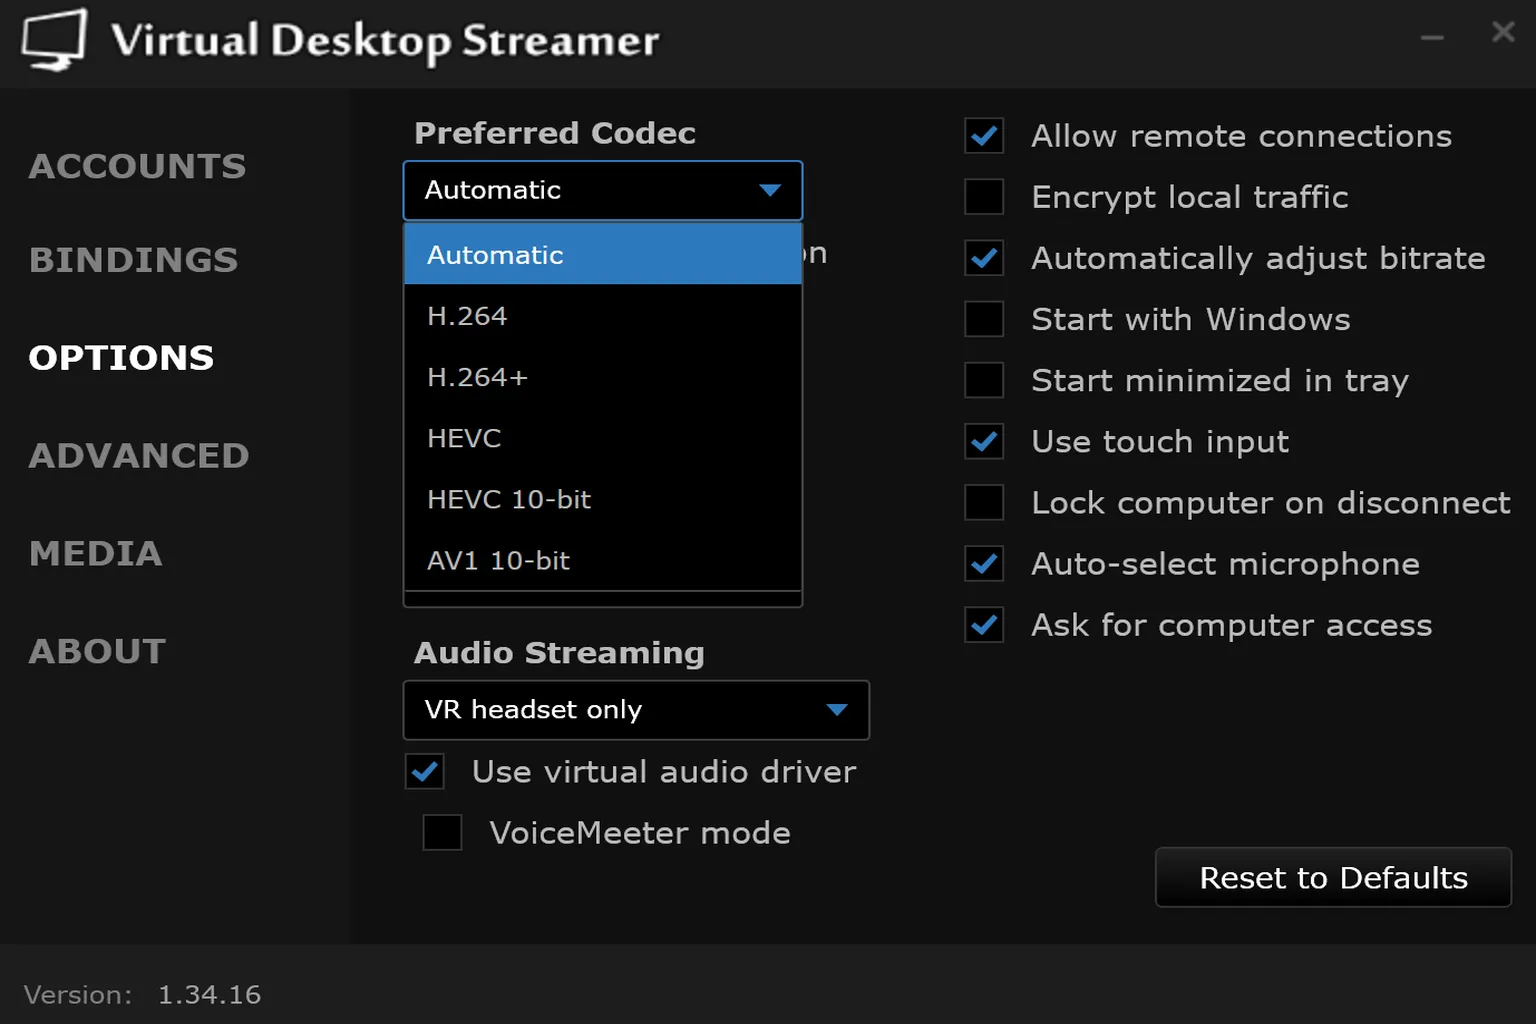
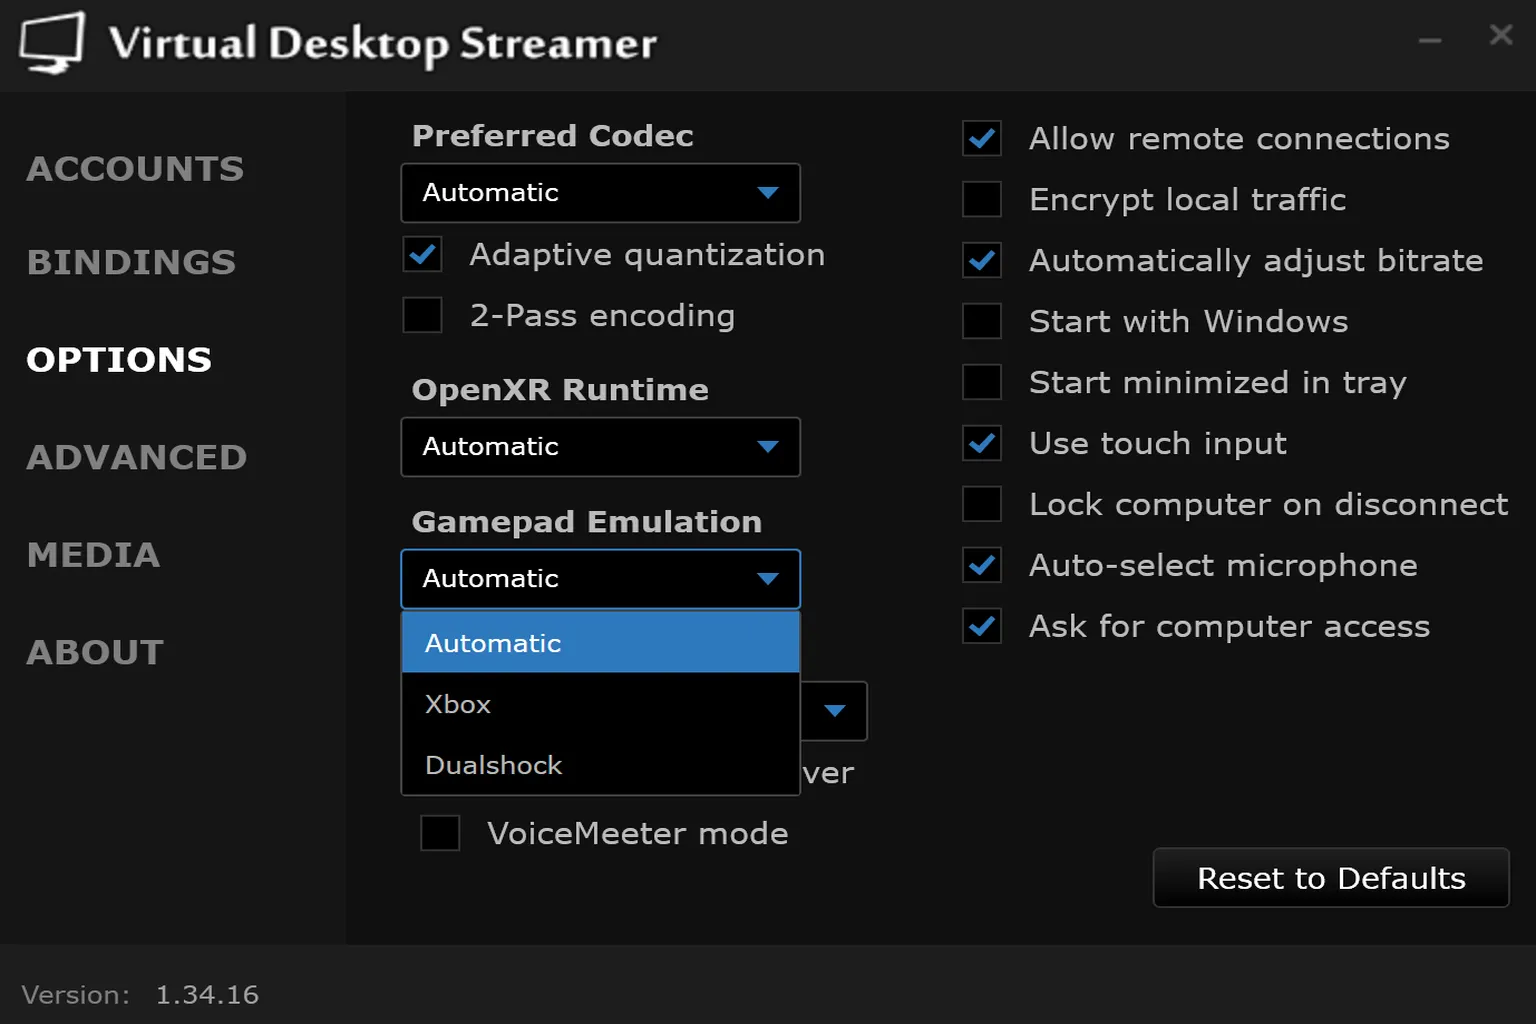
Options
This is the most important settings area on the PC side. Streaming quality settings, the OpenXR runtime, audio output, controller behavior, and network handling are all here. How comfortable Virtual Desktop feels overall depends largely on this section.
Next, I’ll go through each option in detail.
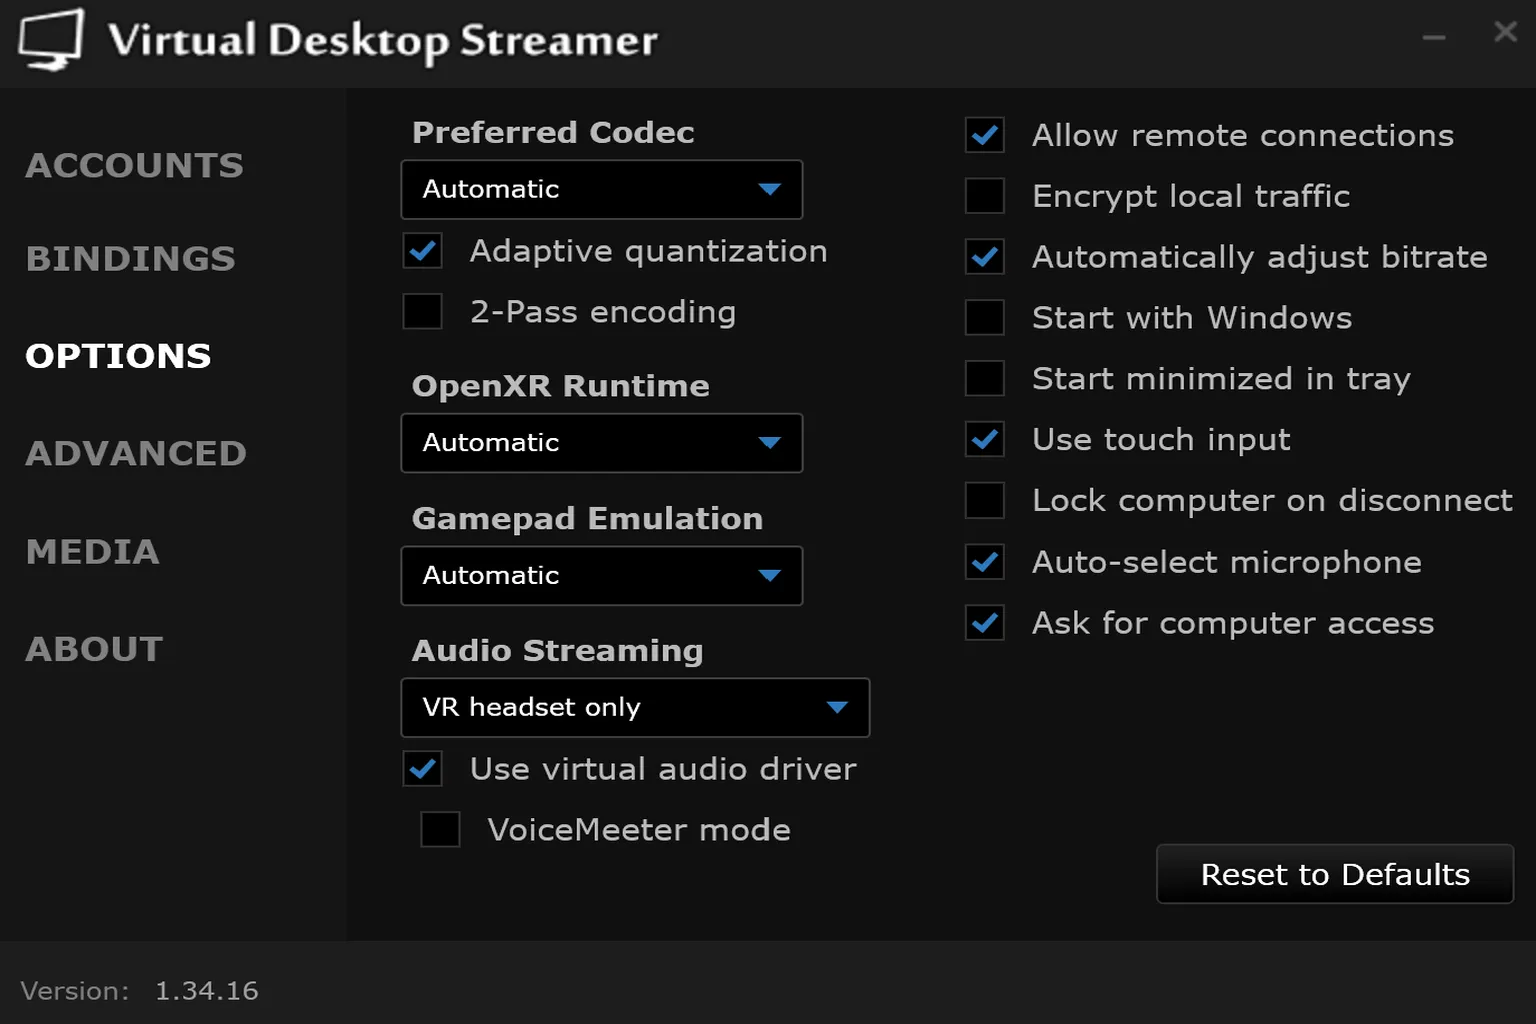
Preferred Codec
The codec is a key factor that affects both smoothness and image quality. The available options range from the lightweight H.264 all the way up to the highest-quality AV1 10-bit.
That said, the best choice really depends on the combination of your GPU and headset, so here I’ll go over the recommended settings instead.
| PC GPU | Headset | Recommended Setting |
| Integrated GPU, NVIDIA GTX 10xx, AMD Vega | Quest 2, Quest 3S, Quest 3 | Automatic |
| NVIDIA RTX 20xx / 30xx series, AMD RX 6000–8000 series | Quest 2, Quest 3S, Quest 3 | HEVC-10Bit |
| NVIDIA RTX 40xx / 50xx series, AMD RX 9000 series | Quest 2, Quest 3S | HEVC-10Bit |
| NVIDIA RTX40xx / 50xx series, AMD RX90xx series | Quest 3 | AV1 10-bit (Quest 3) |
- Adaptive Quantization: This feature prioritizes GPU encoding resources for the parts of the image that stand out the most. Important areas like character or object edges, and the center of the screen, stay clearer. Less noticeable areas, like the outer edges, are compressed a bit more to improve overall efficiency.
- 2-Pass Encoding: This method has the encoder do a rough analysis of the image first, then handle the actual compression. It helps keep image quality more consistent in fast-moving scenes or areas with a lot of visual detail, so blur and compression noise are less likely to show up. The tradeoff is slightly higher GPU load and a bit more latency. Since it’s pretty heavy, I think it’s best to leave it off in most cases.
OpenXR Runtime
OpenXR is a core part of how VR works. It takes VR commands sent from games and translates them so they run correctly on the headset you’re using. The exact implementation can vary slightly depending on the platform and environment.
- Automatic: Uses automatic selection. Virtual Desktop will choose the best OpenXR runtime for your current setup on its own. In most cases, you can just leave it on this and not touch it.
- SteamVR: Uses the SteamVR OpenXR runtime. It has broad compatibility, and VR games or tools that were originally built around SteamVR tend to run more reliably with this. If a game won’t launch, the controllers act weird, or VDXR causes odd behavior, switch back to this and try again.
- VDXR: Virtual Desktop’s own OpenXR runtime. Since it doesn’t go through SteamVR, the processing path is simpler, which can improve latency and performance in some games. That said, compatibility depends on the title, so if something doesn’t run properly, SteamVR may still be the more stable option.
Put simply, SteamVR is the stable, compatibility-first route, while VDXR is Virtual Desktop’s direct path designed to squeeze out better performance.
For normal use, just leave it on Automatic. If you run into compatibility issues or something feels off, that’s when it’s worth switching manually and testing the other options.

Gamepad Emulation
This lets you use VR controllers as a standard gamepad when playing non-VR games. You can choose between Microsoft Xbox and PS4 DualShock. In general, Xbox offers better compatibility, so it’s the safer choice.
Audio Steaming
This setting controls where audio is sent. You can switch it depending on whether you’re watching videos, playing games, or streaming. There are three modes:
- Computer only: Sound plays only through the PC speakers.
- VR headset only: Sound plays only through the headset’s headphones or speakers. This is the most recommended option.
- VR headset & computer: Sound plays through both the PC speakers and the headset at the same time.

Other Settings
Right-side checkboxes
- Allow remote connections: Keep this on. If it’s off, you won’t be able to connect.
- Encrypt local traffic: Turning this on adds a bit of overhead and slightly increases latency. Unless you’re on a network where security is a concern, like public Wi-Fi or a corporate network, it’s fine to leave it off.
- Automatically adjust bitrate: When your connection is unstable, this will automatically lower image quality to prevent stuttering. The downside is that image quality can fluctuate. If you’re on stable Wi-Fi 6 or a wired setup, turning this off and using a fixed bitrate will give you more consistent visuals.
- Start with Windows: If you use this PC mainly for VR, you can turn this on. If it’s your everyday PC, it’ll just run in the background and use resources, so it’s better to leave it off.
- Start minimized in tray: This is usually used together with auto-start. On its own, you probably won’t notice much difference.
- Use touch input: Can be useful for gesture-based mouse control even without a touchscreen, but most people won’t use it very often.
- Lock computer on disconnect: Locks your PC automatically after you disconnect from Virtual Desktop. This is especially useful in shared spaces like a living room, since it prevents others from seeing your screen the moment you take off the headset. For example, even if you had adult content open, it won’t just stay visible.
- Auto-select microphone: Helpful if you have multiple input devices like a USB mic, headset, or virtual devices. Without this, it’s easy to end up using the wrong input.
- Ask for computer access: Prompts for permission every time you connect. If you’re the only one using the headset, you can turn this off. In a shared environment, it’s safer to leave it on.
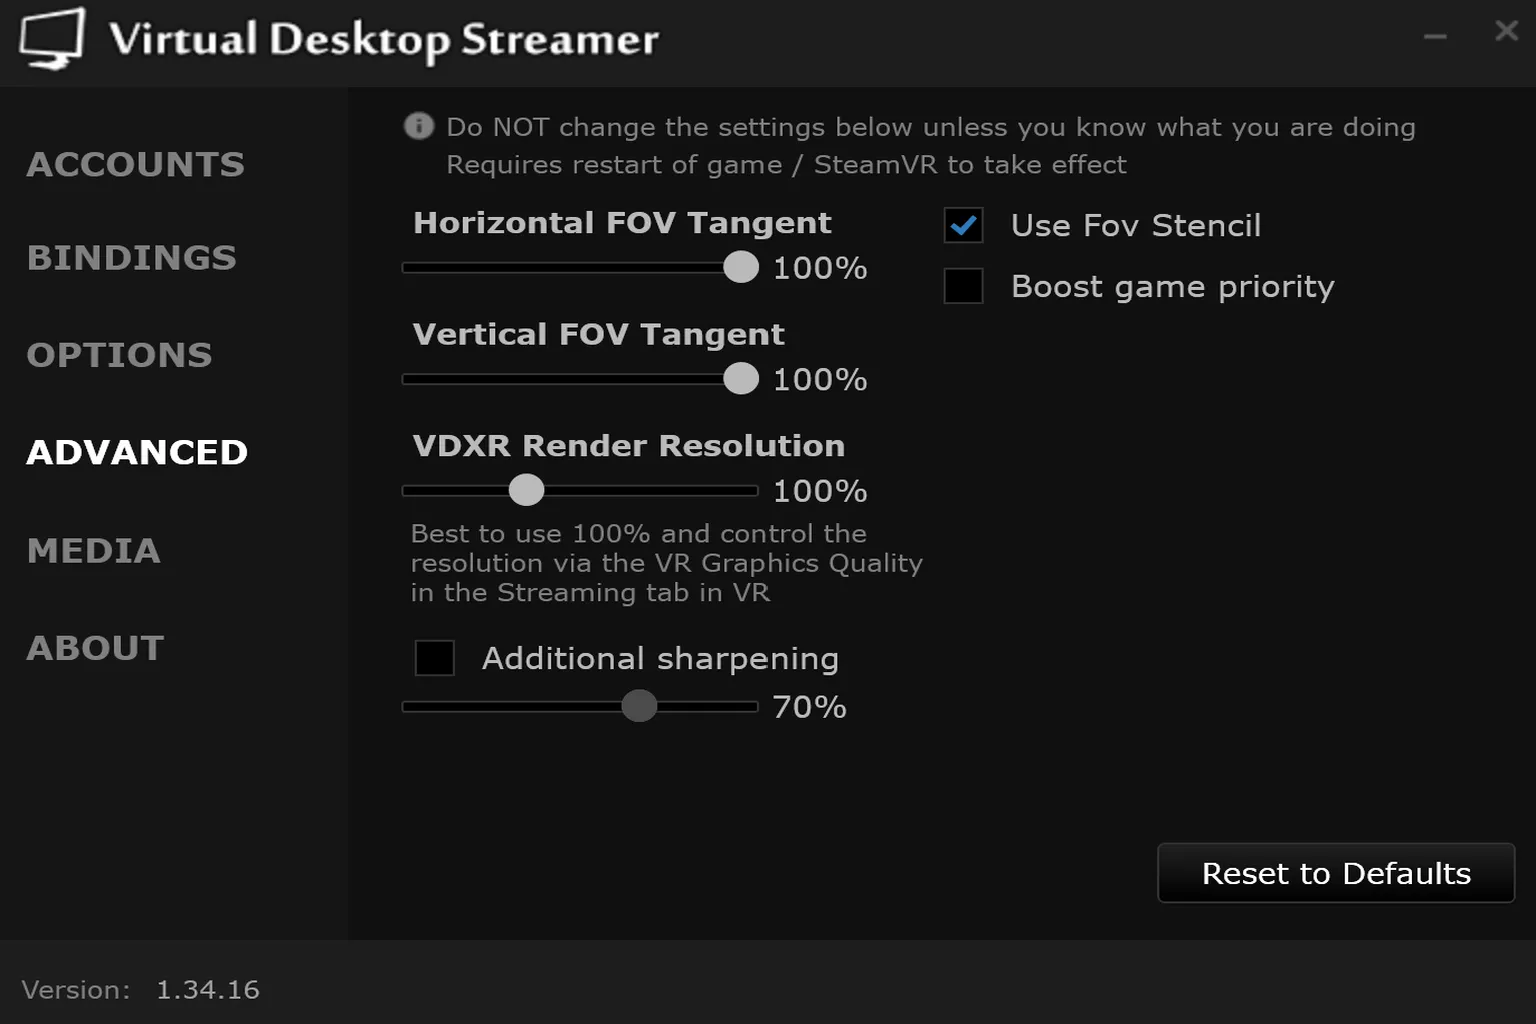
Advanced
This page is for advanced users and contains fine-grained parameters. Honestly, most users should avoid touching these. Changing them can easily affect rendering and performance.
- Horizontal FOV Tangent: Controls the horizontal field of view. Lowering this reduces how much is rendered on the left and right, which lightens GPU load. If you lower it too much, you might start seeing black edges or feel like the image is being cut off.
- Vertical FOV Tangent: Controls the vertical field of view. Works the same way as horizontal—lowering it reduces load slightly. But if you go too low, the top and bottom of your view can feel clipped.
- VDXR Render Resolution: Adjusts the render resolution scale for VDXR. Increasing it improves image quality, while lowering it reduces GPU load. That said, as noted in Virtual Desktop, it’s generally better to leave this at 100% and adjust resolution through the Streaming settings instead. With something like an RTX 4070 or 5070-class GPU or higher, that’s when it makes sense to consider increasing it.
- Additional sharpening: Adds extra sharpening to the image. It can make text and edges look clearer, especially if things appear slightly blurry. But if you push it too far, edges can look overly bright or noisy and start to feel unnatural. It’s basically like a TV sharpness setting, so you usually don’t need to touch it.
- Use FOV Stencil: Renders only the area you can actually see, and skips processing parts outside the lens where nothing is visible. There’s basically no downside, and it can slightly reduce GPU load, so it’s recommended to keep this on.
- Boost game priority: Raises the game’s priority in Windows so it gets resources first. If you’re running things like recording software, monitoring tools, or voice apps in the background, it can help a bit. But it’s not the kind of setting that significantly boosts FPS on its own—it’s more about preventing other apps from getting in the way.
Media
This is where you set the screenshot save location and choose which video folders on your PC can be played directly from Virtual Desktop. You can change it by clicking Change Location….
I wouldn’t recommend putting your Screenshots folder on the desktop like I did. It gets cluttered really fast after just a few captures. It’s better to set up a dedicated folder from the start so everything stays organized later on.

About
This section shows your PC’s hardware configuration. Everyone’s setup is different. The two options at the bottom do the following:
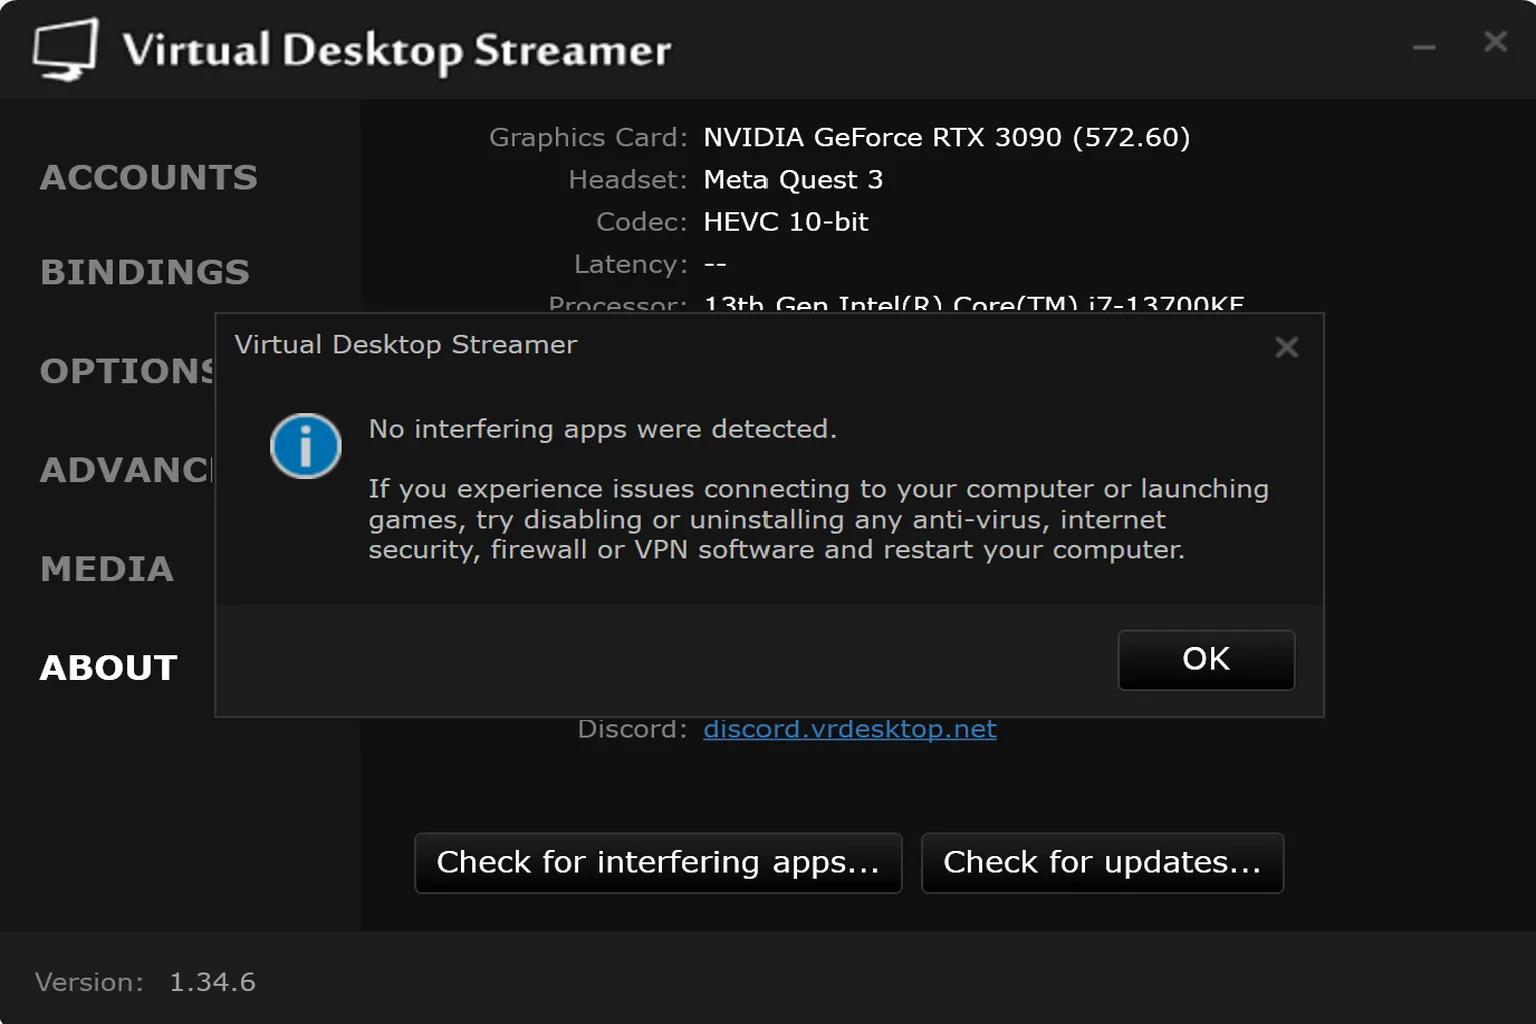
- Check for interfering apps…: Checks for errors or potential issues.
- Check for updates: Checks for updates to the PC version of Virtual Desktop and lets you update to the latest version.
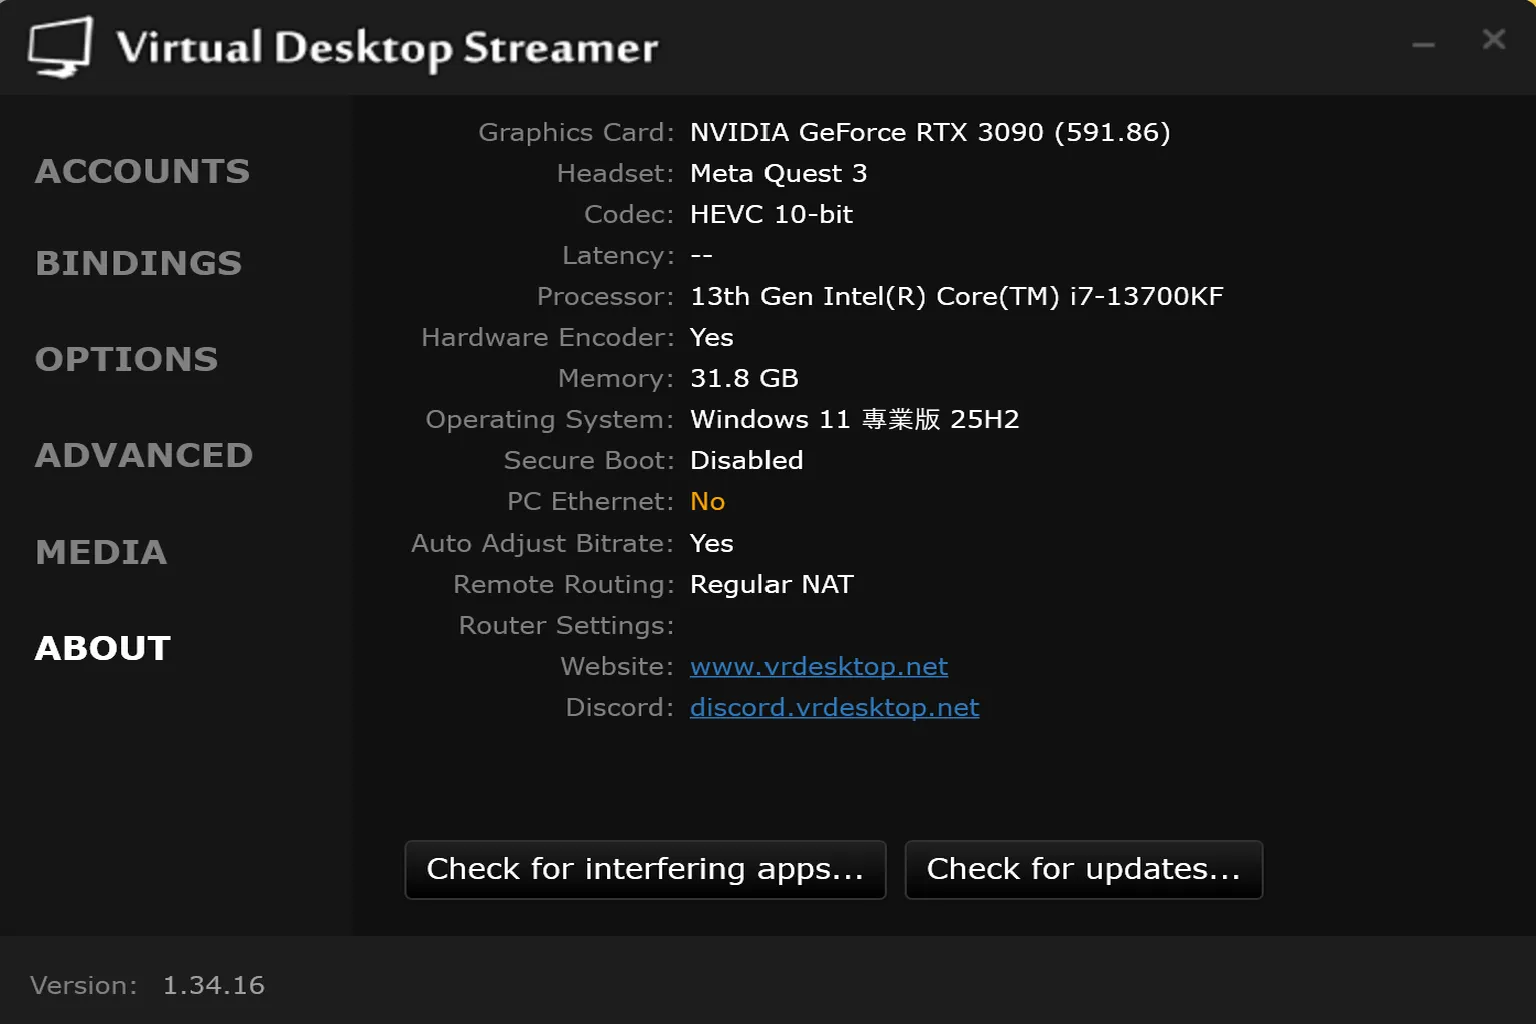
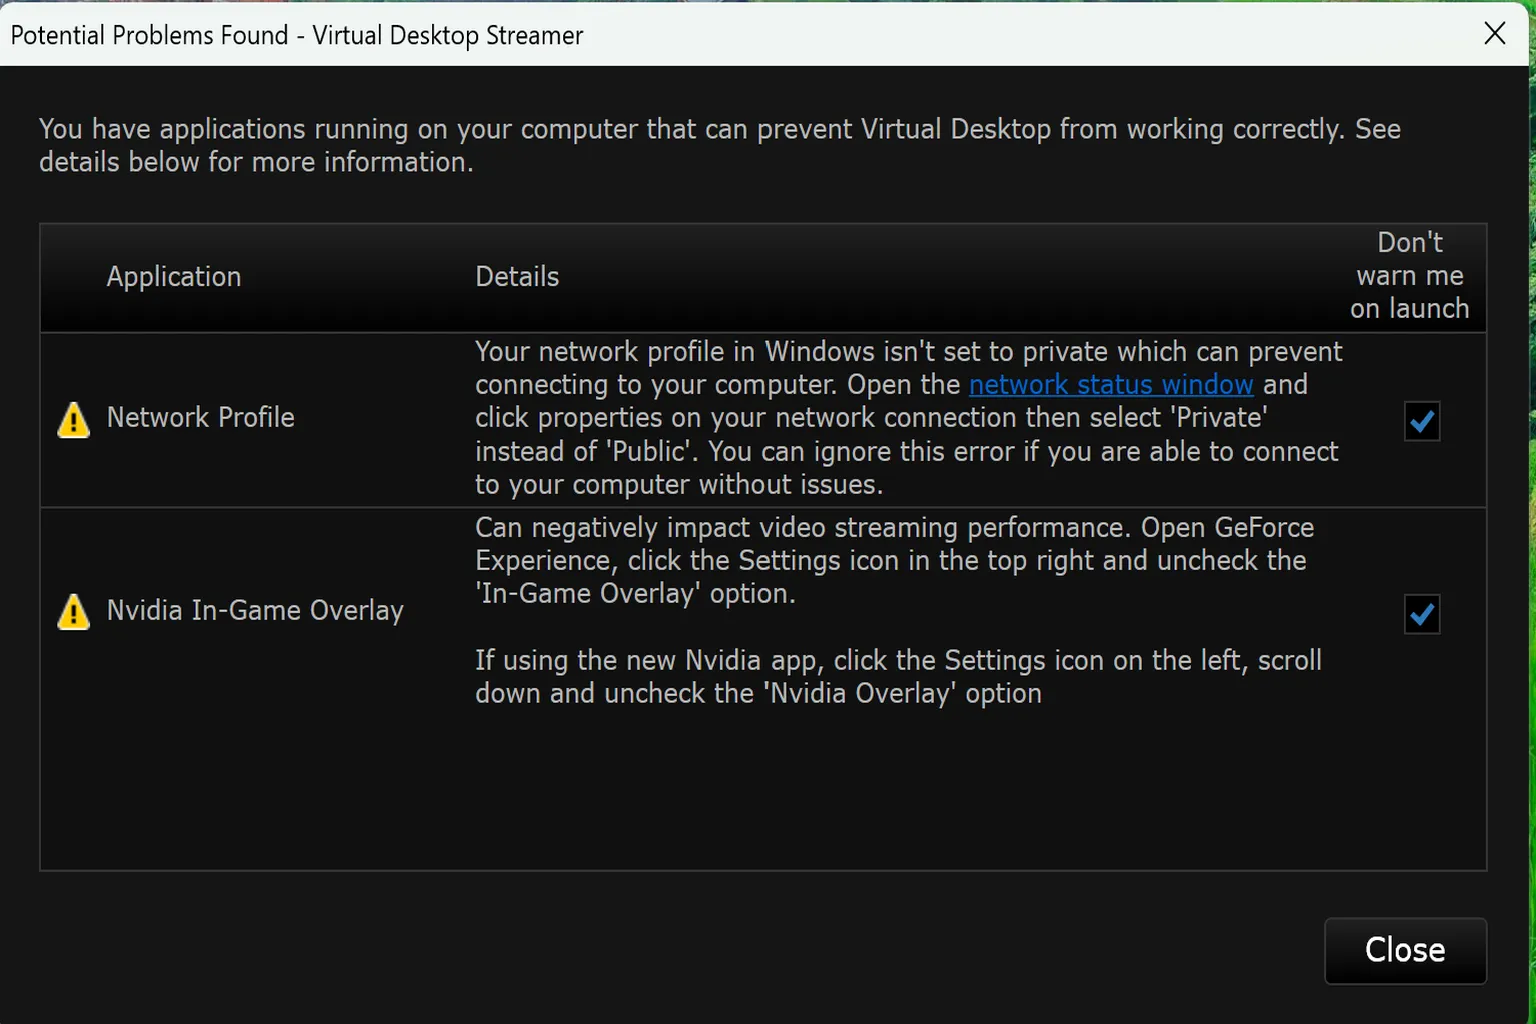
The error and warning check is something you’ll often use right after installation. At first, it’s common to see one or two warnings. For example, on my PC, I saw these:
- Network Profile: It advised that avoiding a public network would improve stability.
- Nvidia In-Game Overlay: It suggested turning this off to prevent performance drops.
A yellow “!” icon is just a warning or suggestion, and in most cases, you can keep using the app without issues. A red “!” icon, however, can lead to problems if ignored, so it’s best to deal with those as soon as possible.
If you don’t want to see these warnings every time, check “Don’t warn me on launch” on the right, and they won’t show up when the app starts.
If you want to clear these two warnings, just follow the steps below.
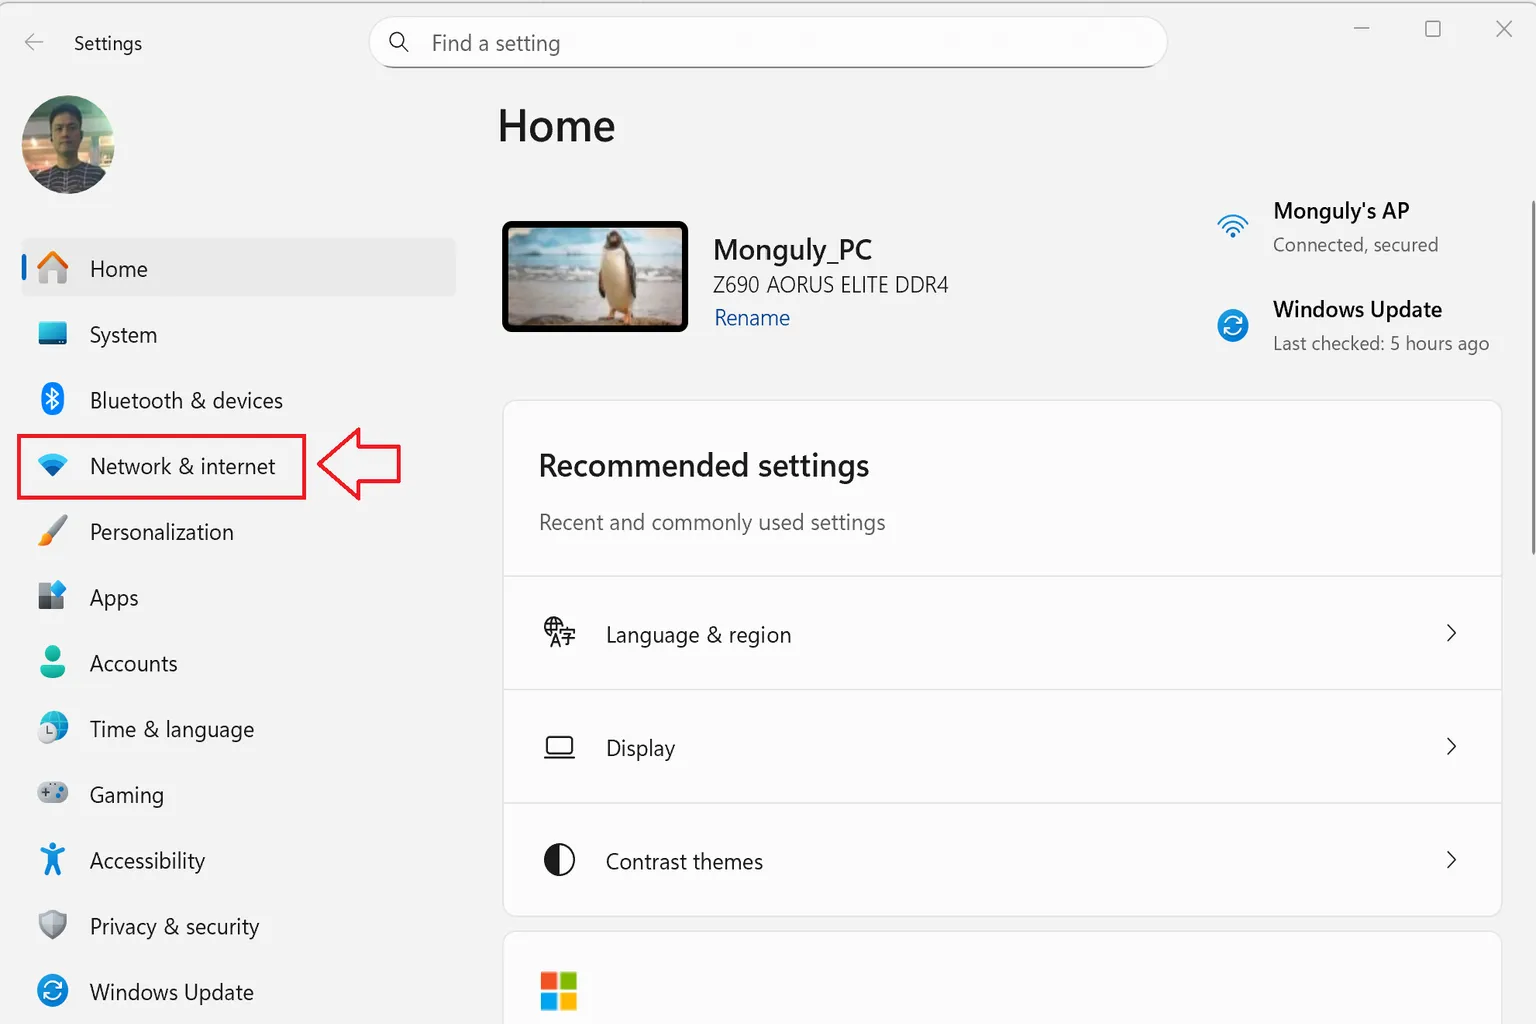
Network Profile
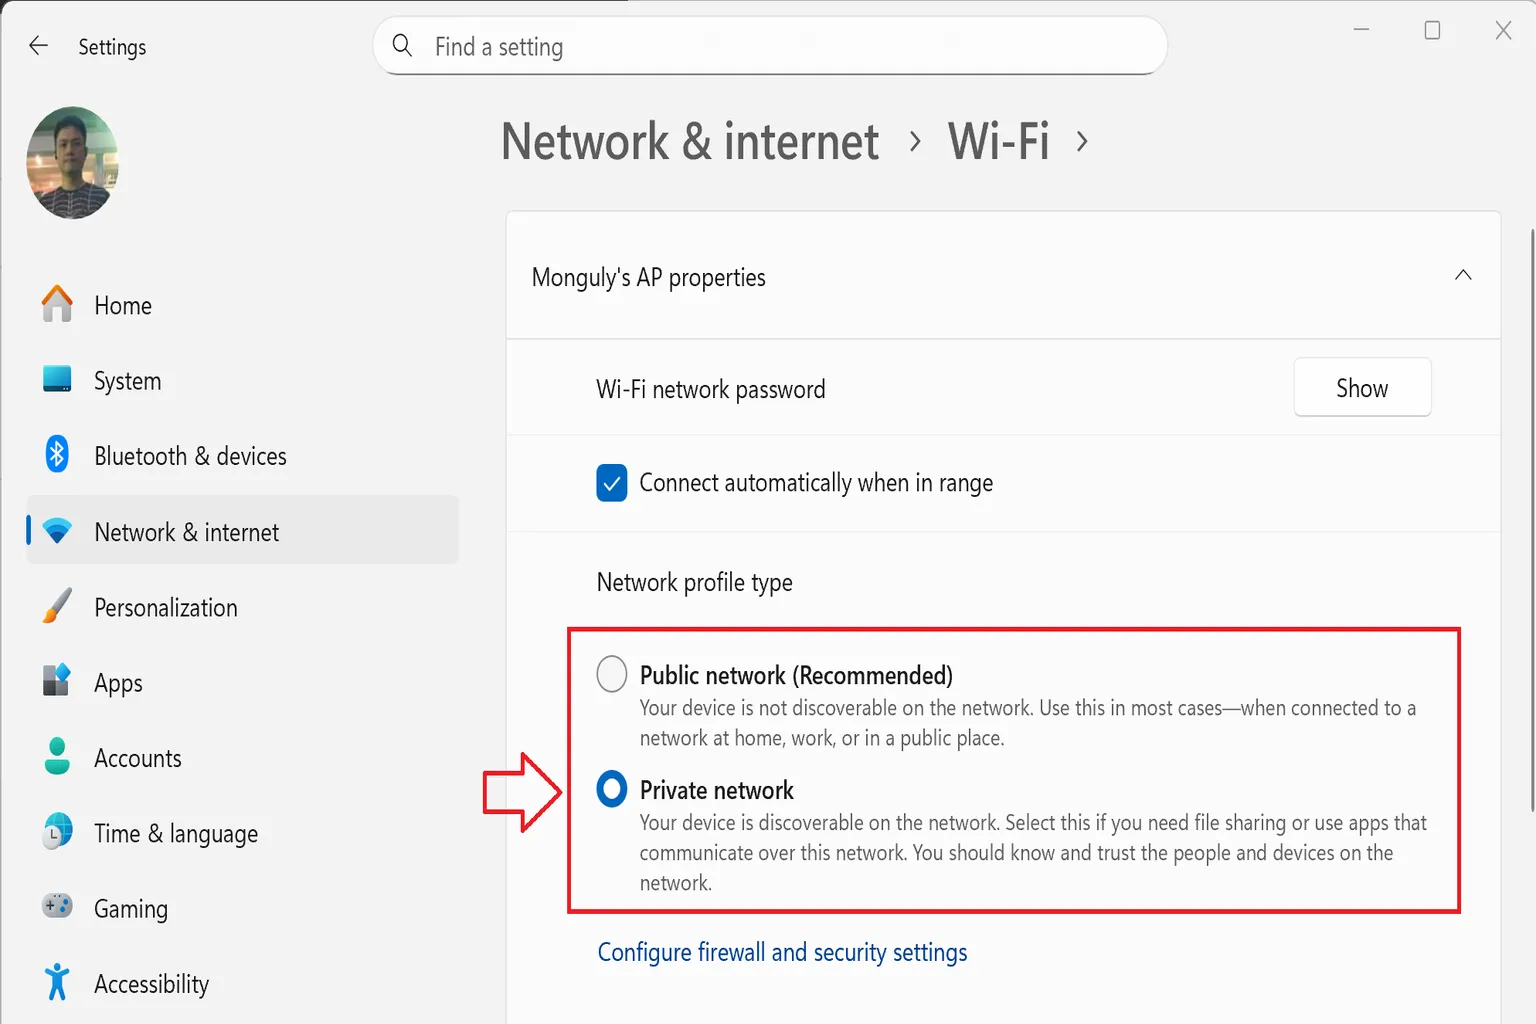
Step 1: Open your PC’s settings and go to Network & Internet.
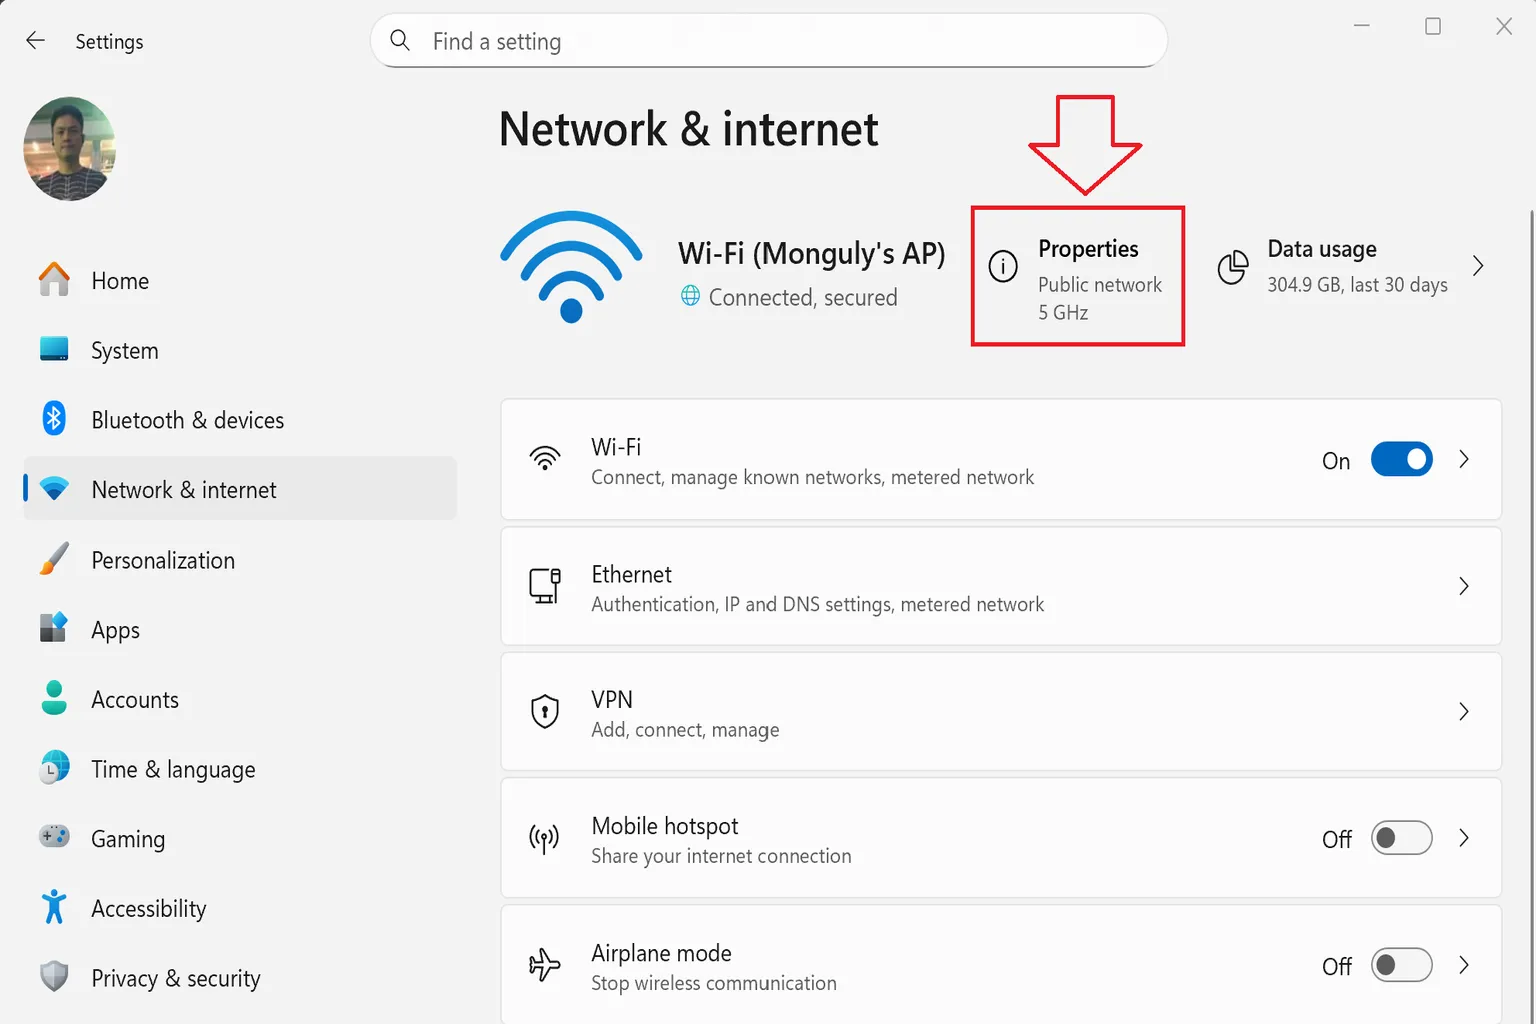
Step 2: Click Properties
Find Properties near the top of the screen and click it.
Step 3: Switch the network mode
You’ll see options for Public network and Private network.
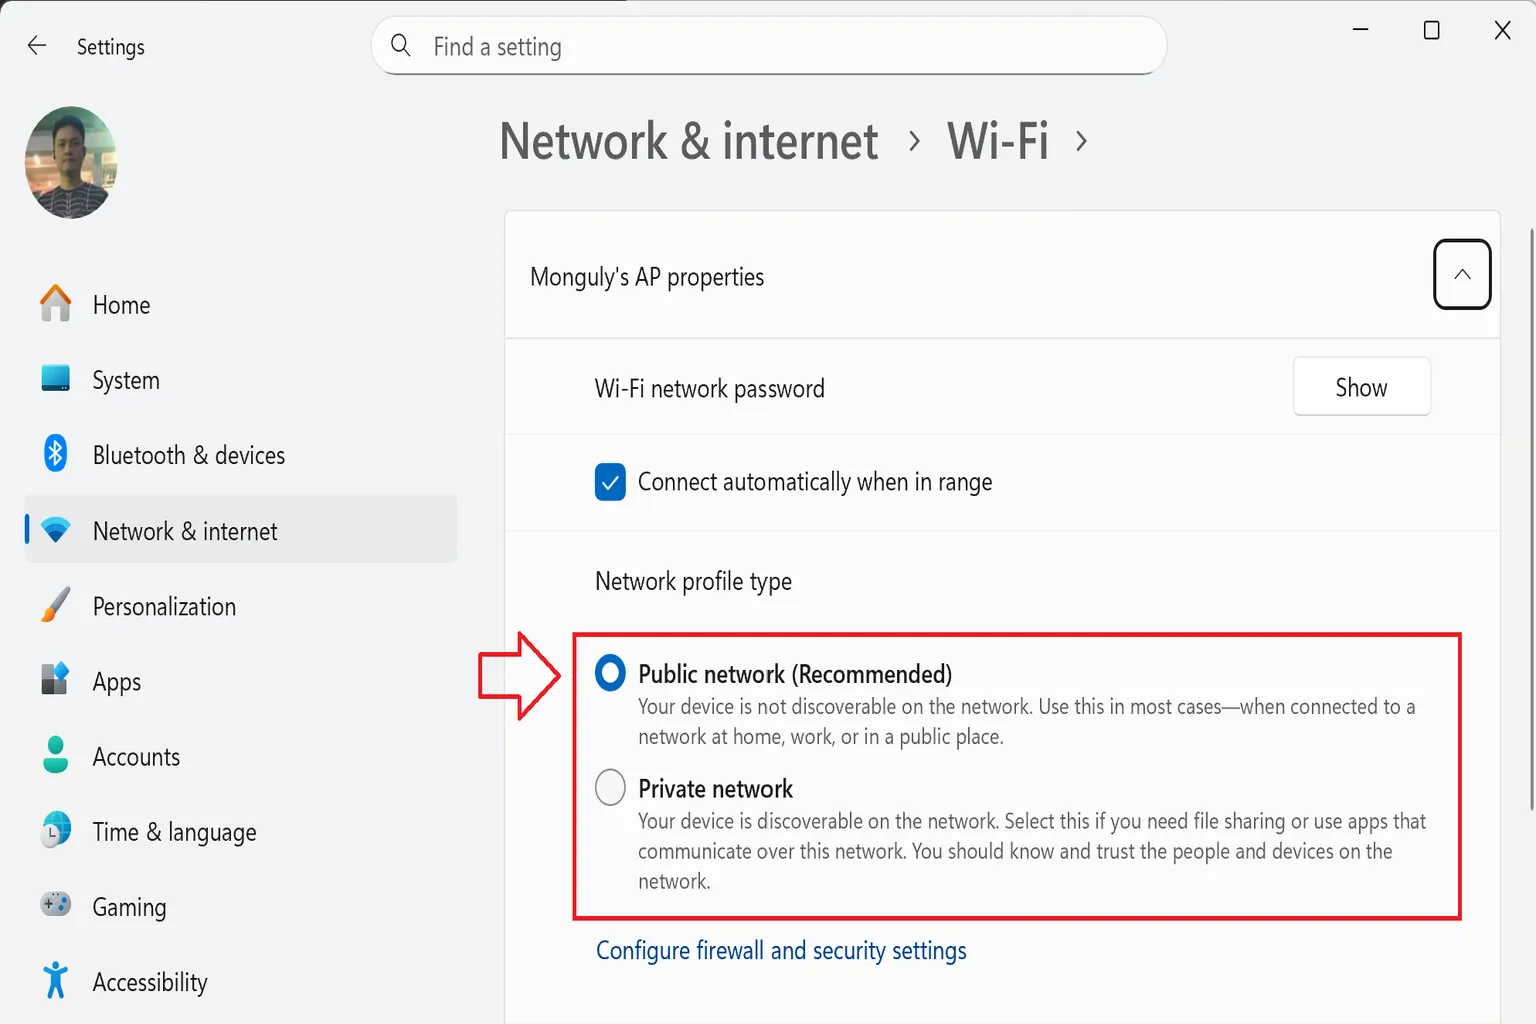
Switch it to Private network, and you’re done.
Nvidia In-Game Overlap
Open the latest NVIDIA driver and click Settings. A small NVIDIA window will appear on the right side.
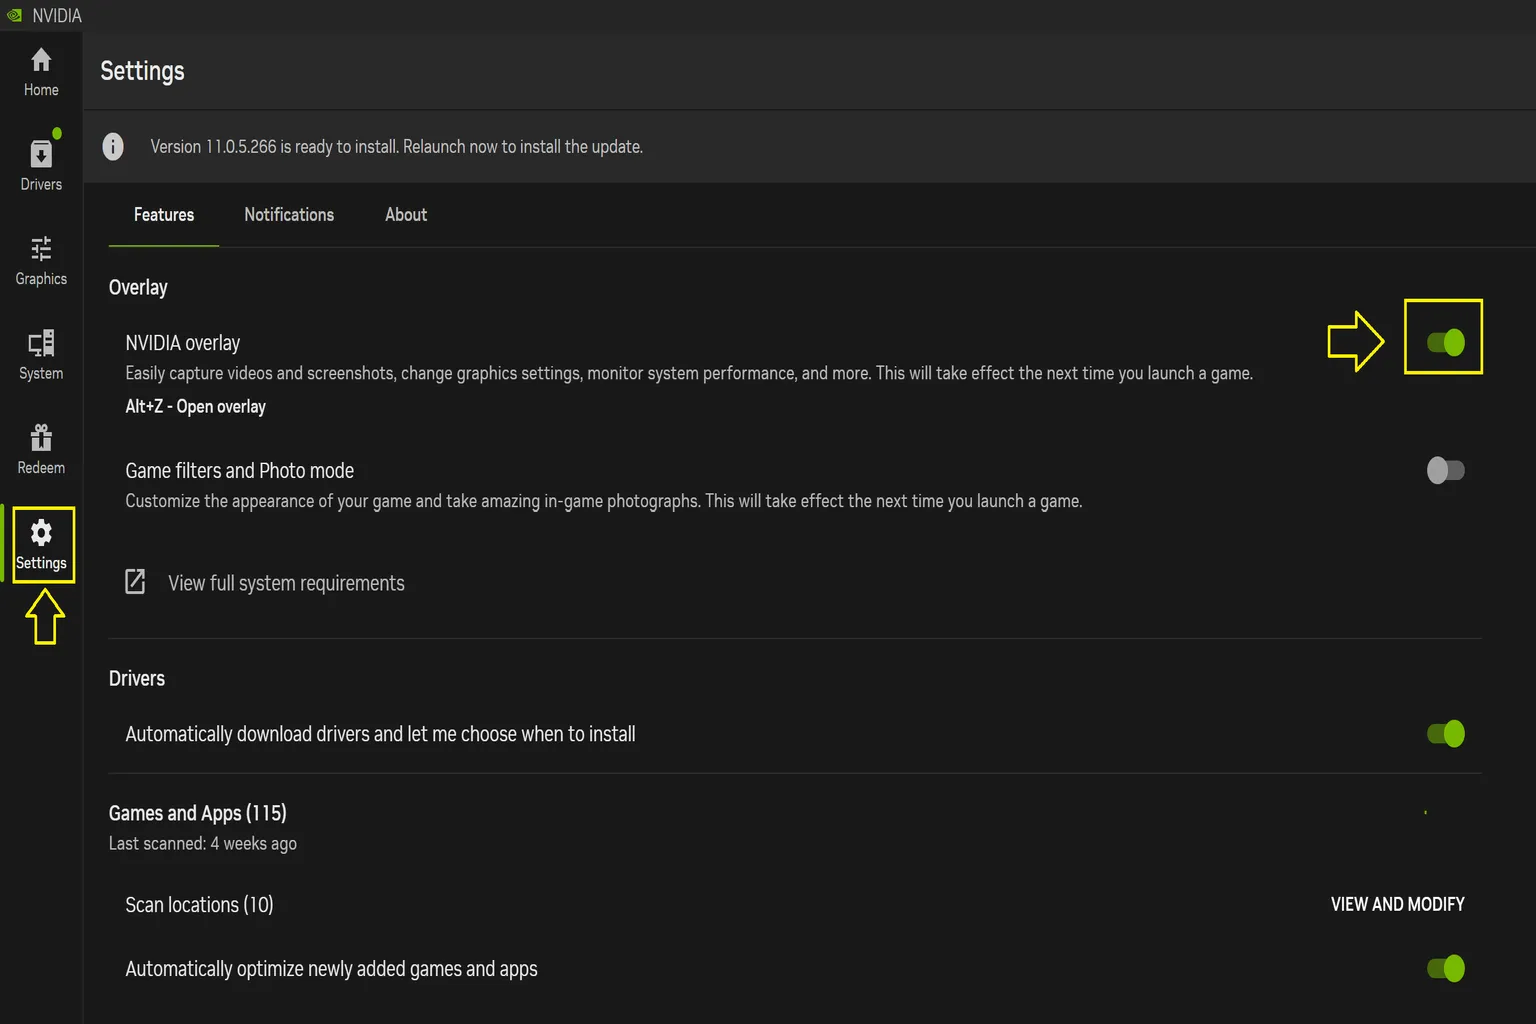
Turn off the overlay option in that window, and that’s it.
Once you finish these two adjustments, the Virtual Desktop warning messages will be cleared and won’t show up anymore.
Headset-Side Settings and How to Use Them
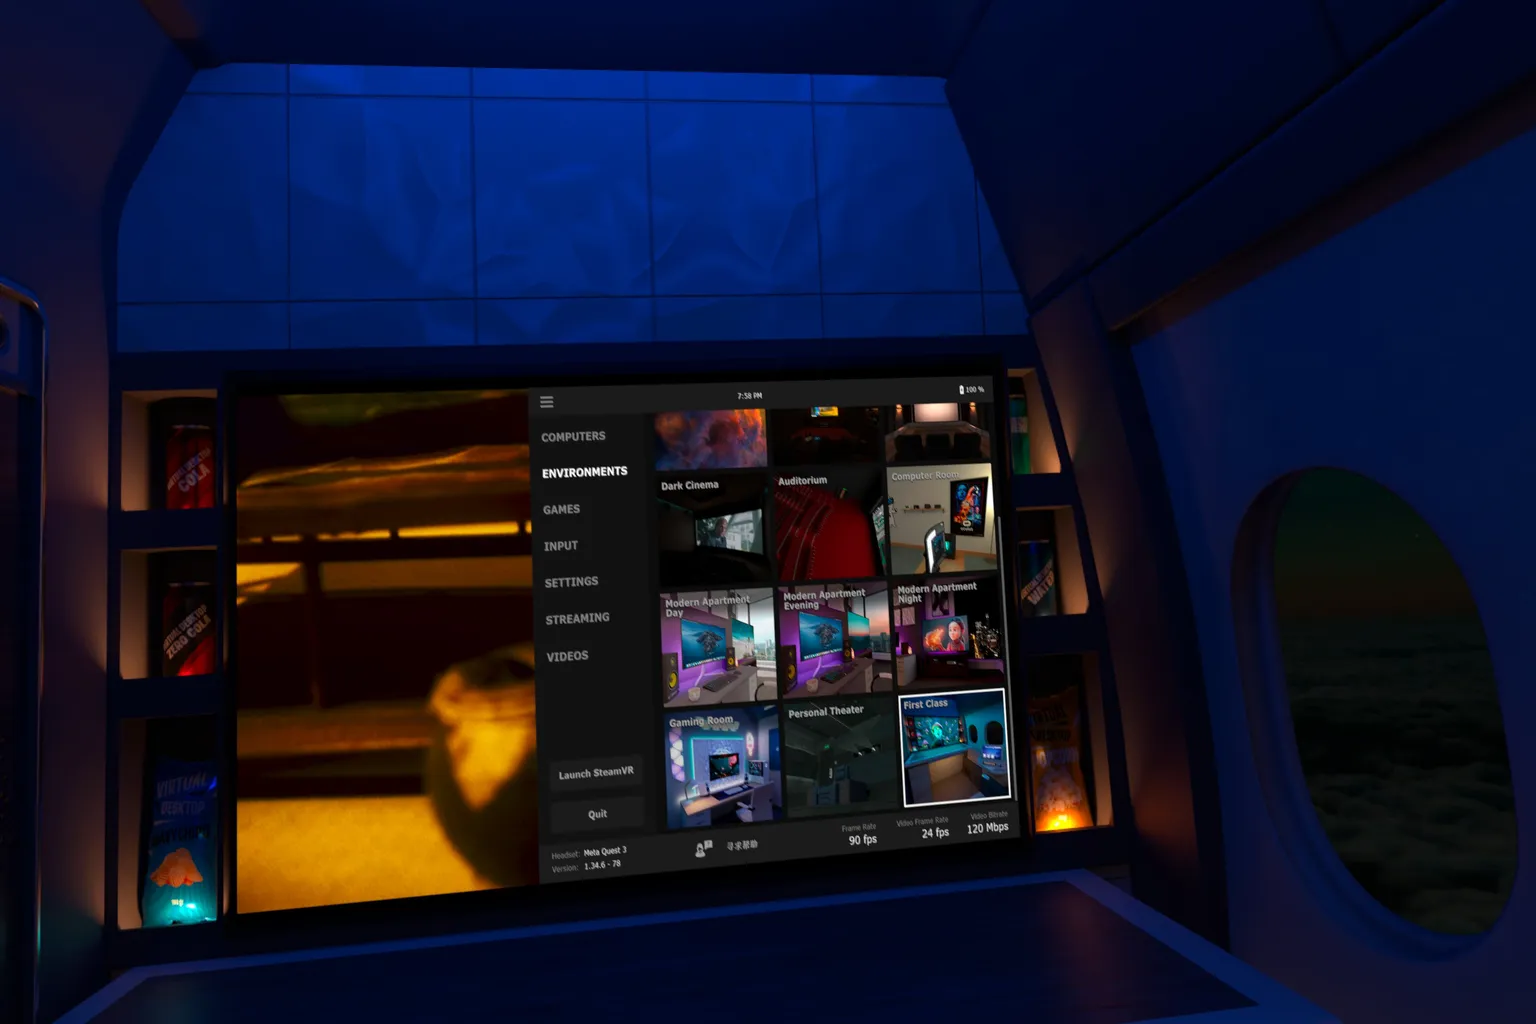
Once you’re done with the PC-side setup, put on your headset and launch Virtual Desktop. The first thing you’ll see is the main menu, which has the following seven sections.
- Computers: Shows a list of PCs you can currently connect to
- Environments: Switches the background environment
- Games: Displays SteamVR and Oculus VR games installed on your PC
- Input: Configures mouse, keyboard, and controller input
- Settings: General settings where you can adjust audio output and visual effects
- Streaming: Streaming-related settings, including image quality and codecs
- Videos: Video playback
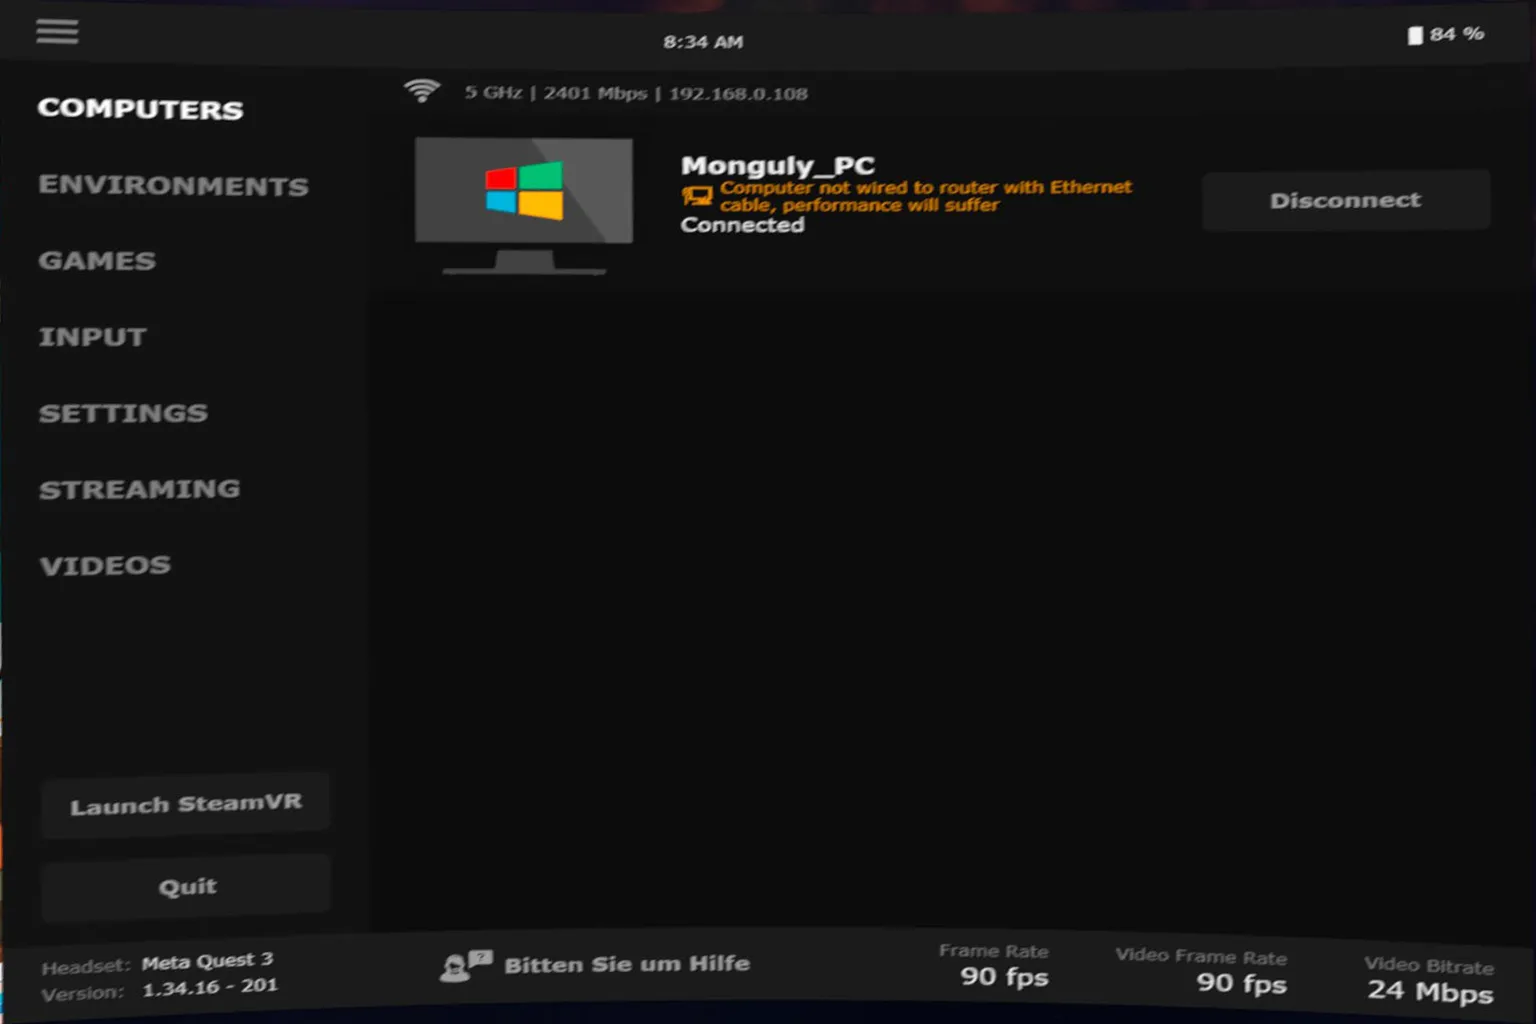
Computers
This screen shows the name of the PC you can connect to, along with Wi-Fi speed and IP address information. If you press Disconnect, the connection to that PC will be ended.
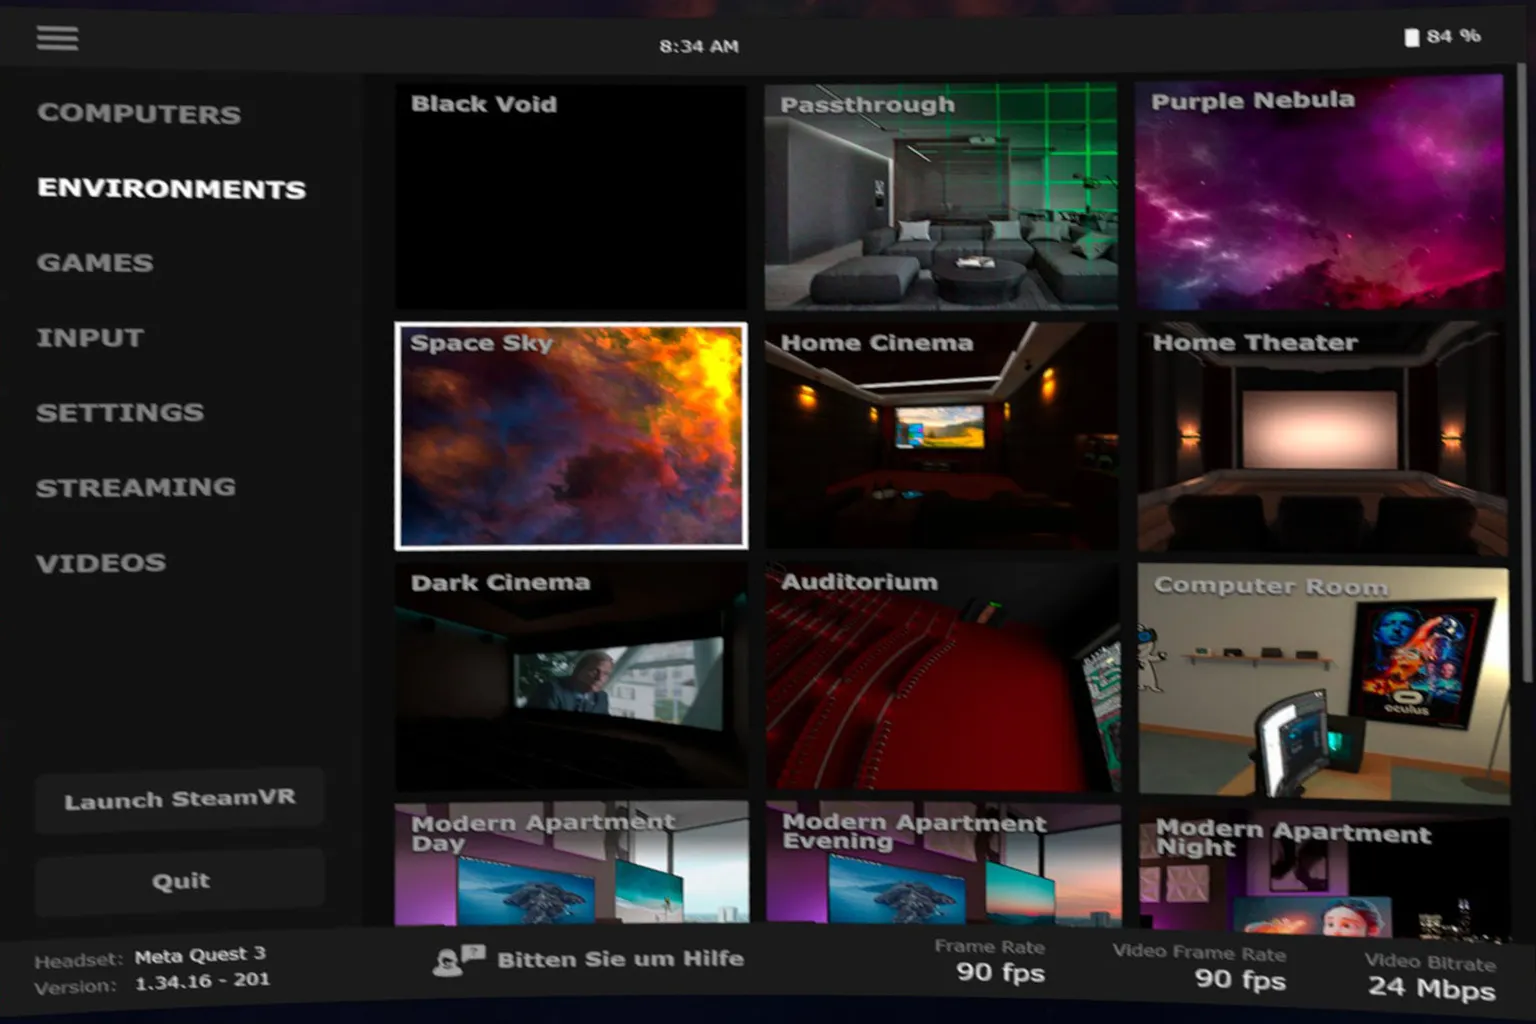
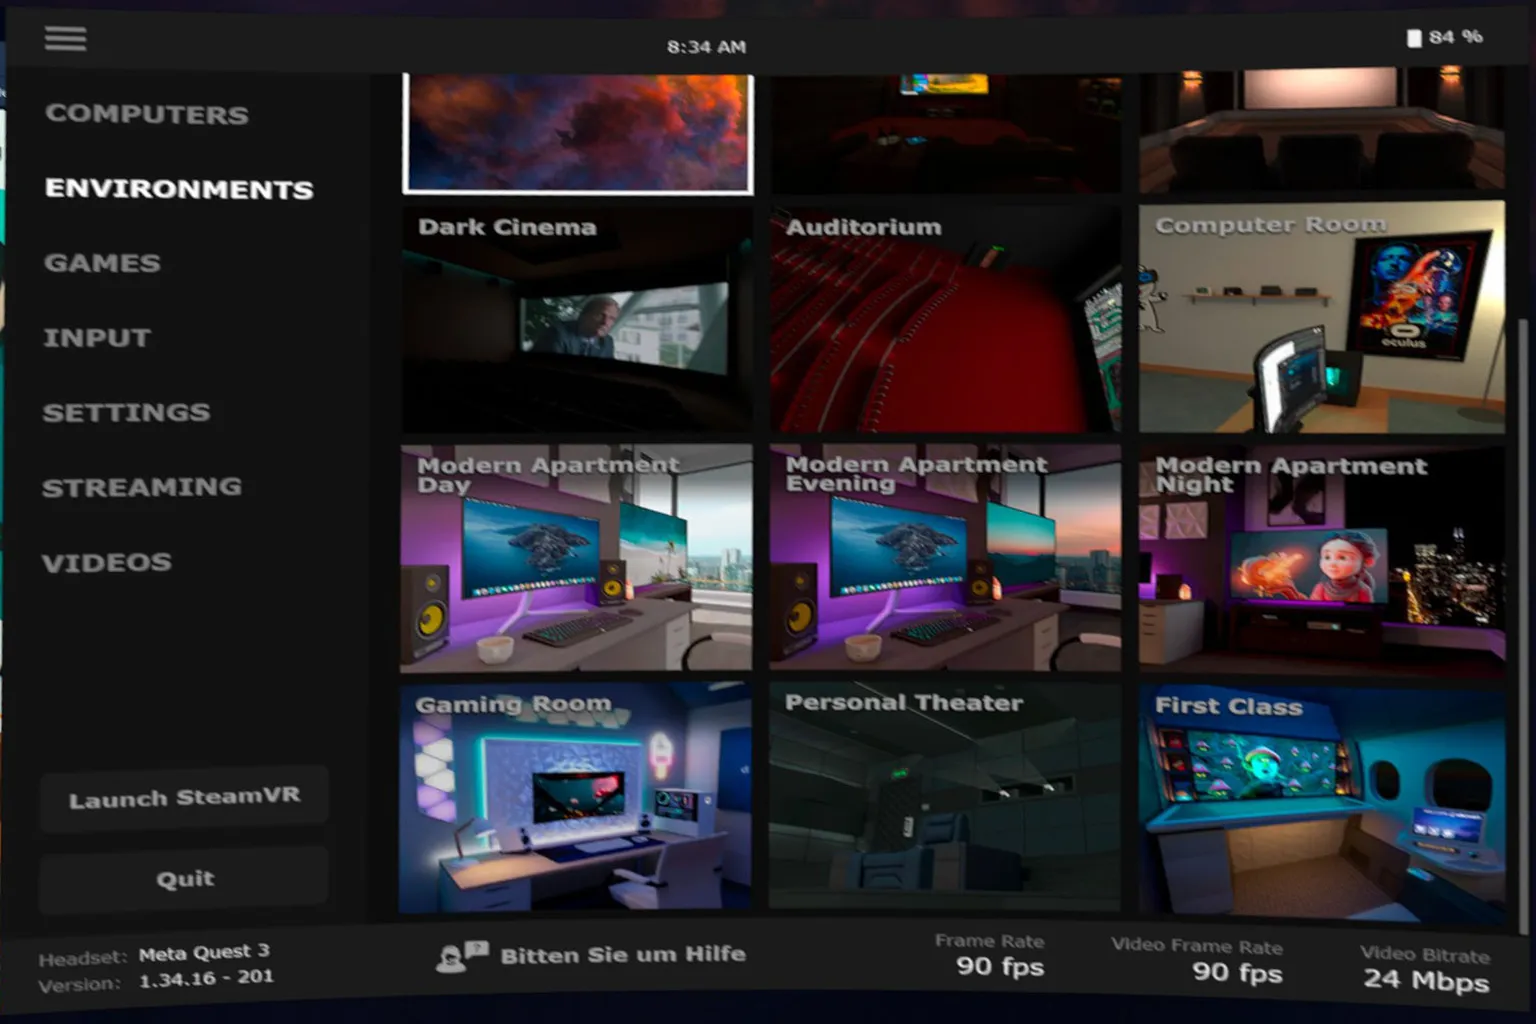
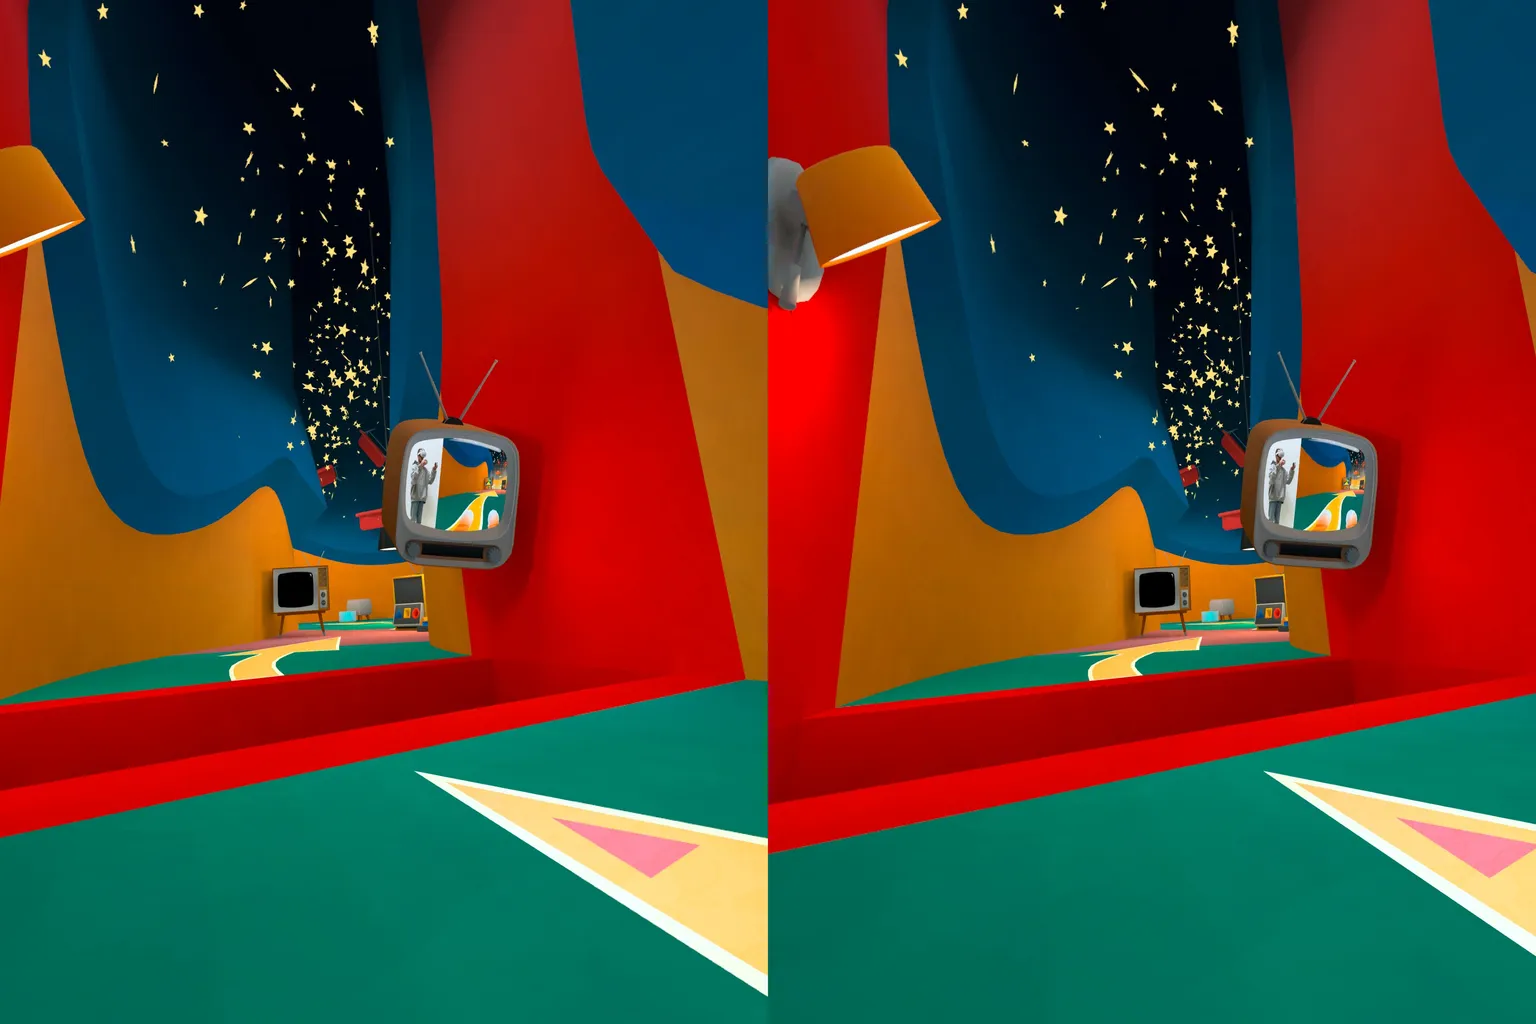
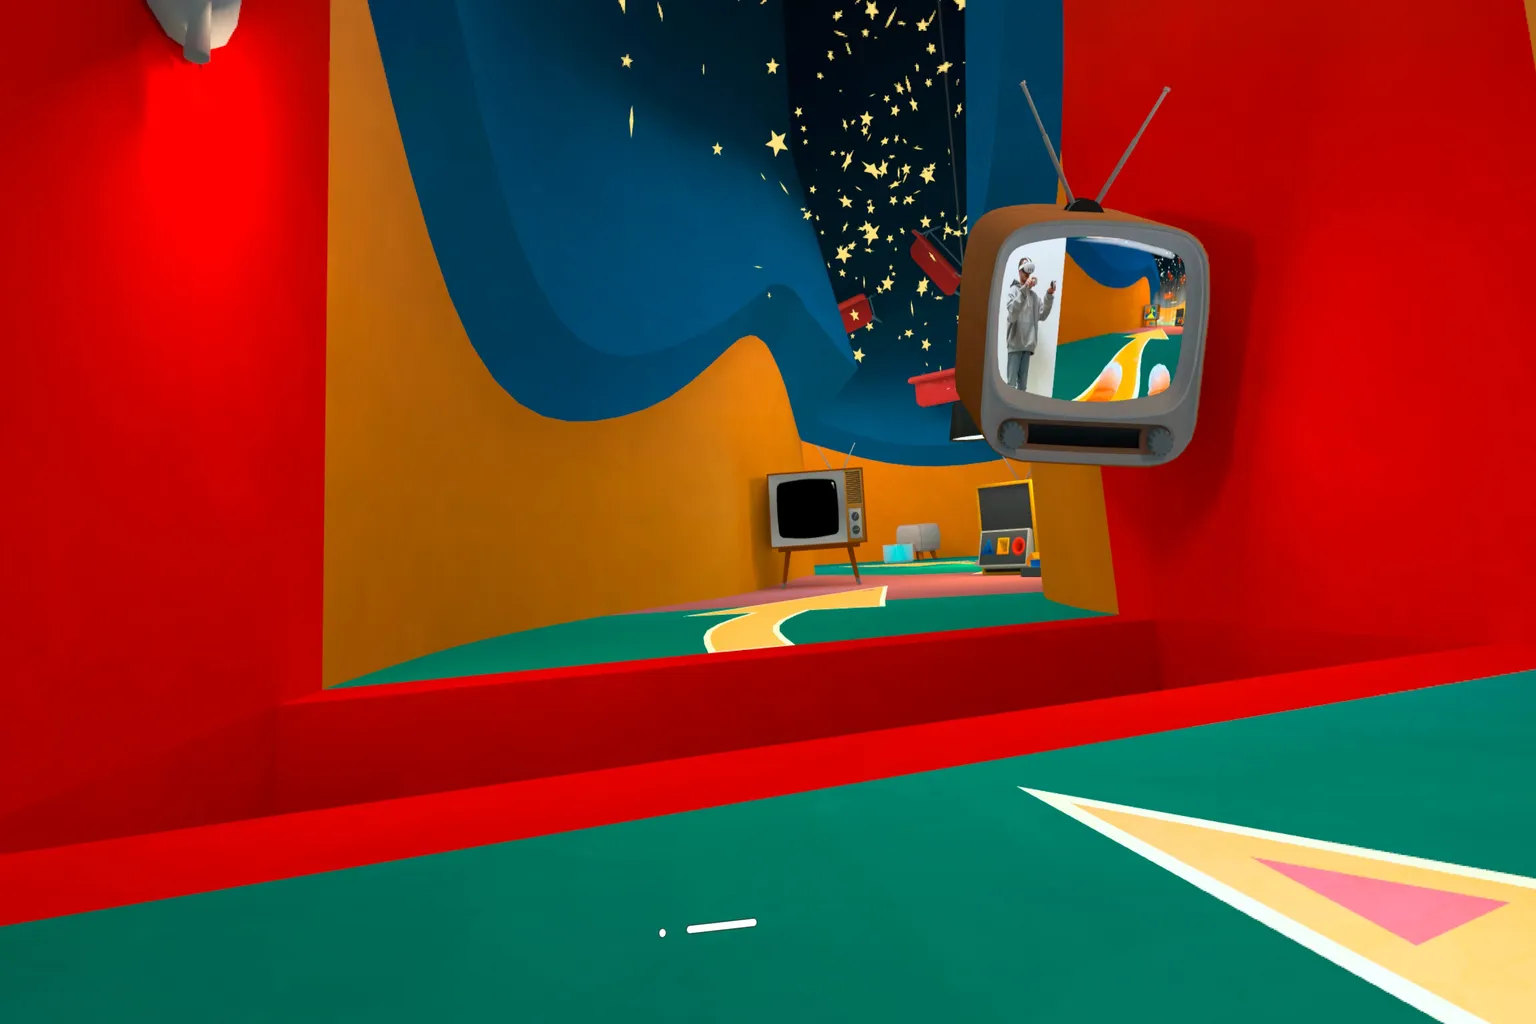
Environments
Here, you can switch the background scene you use. There are a total of 15 environments available, including above the clouds, a sea of clouds, a home theater, a gaming room, a living room, and a first-class airplane cabin. You can choose whichever scene you like depending on whether you’re playing games or watching videos.
This is the first page of the environment selection screen.
This is the second page of the environment selection screen.
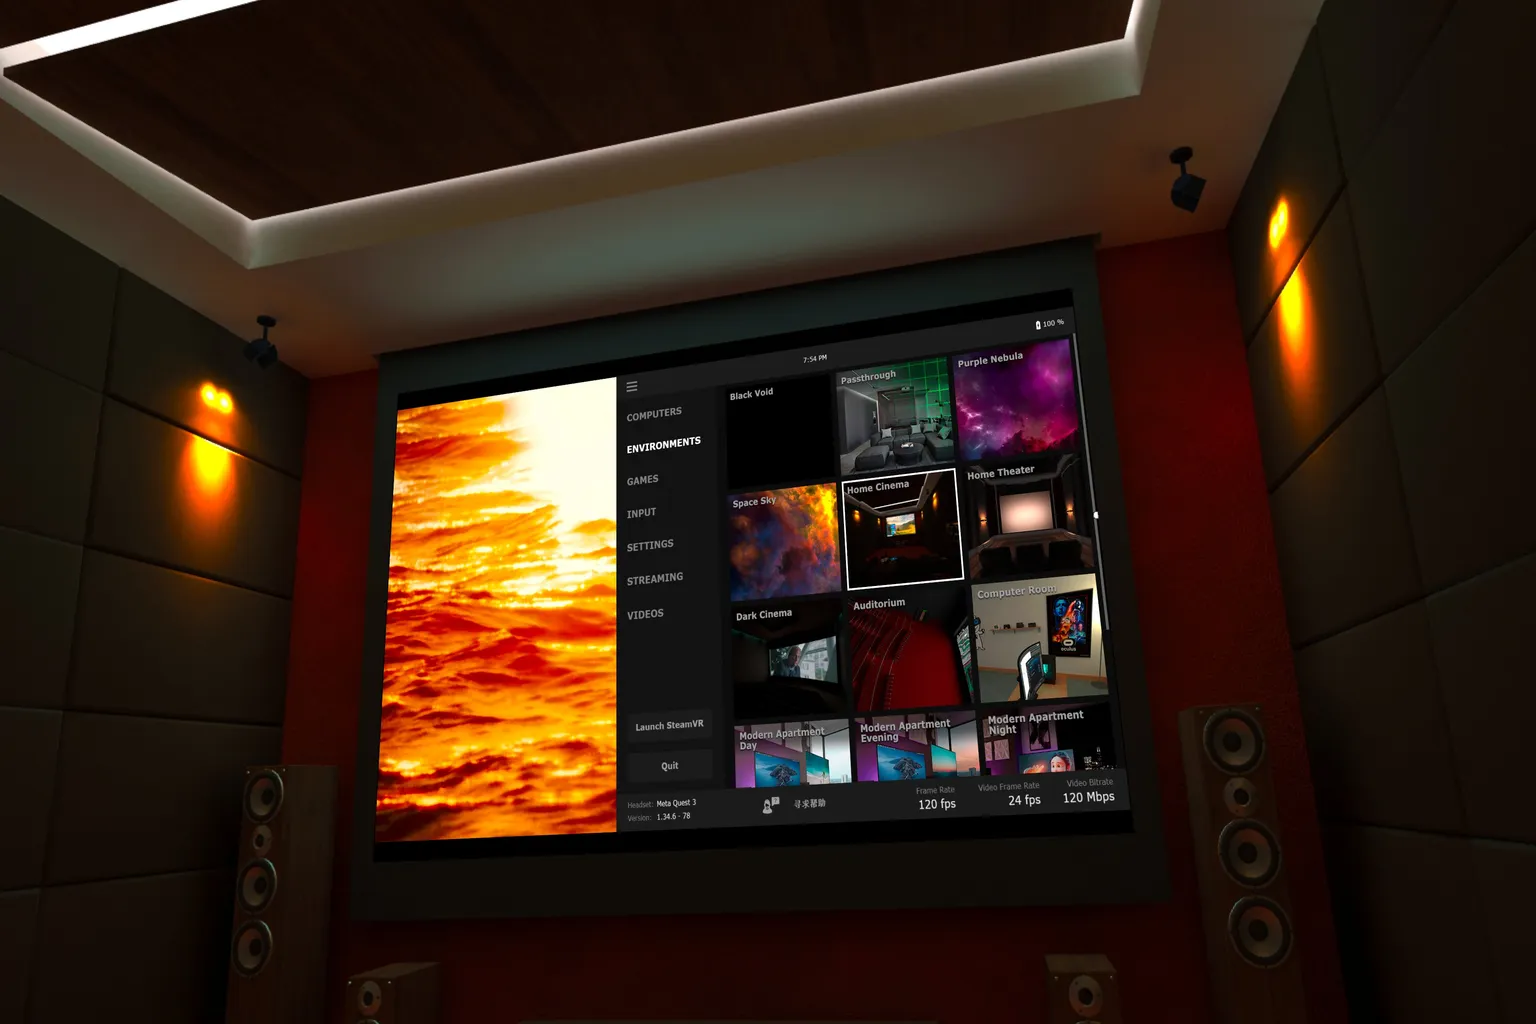
Now let me show you a few scenes I personally like.
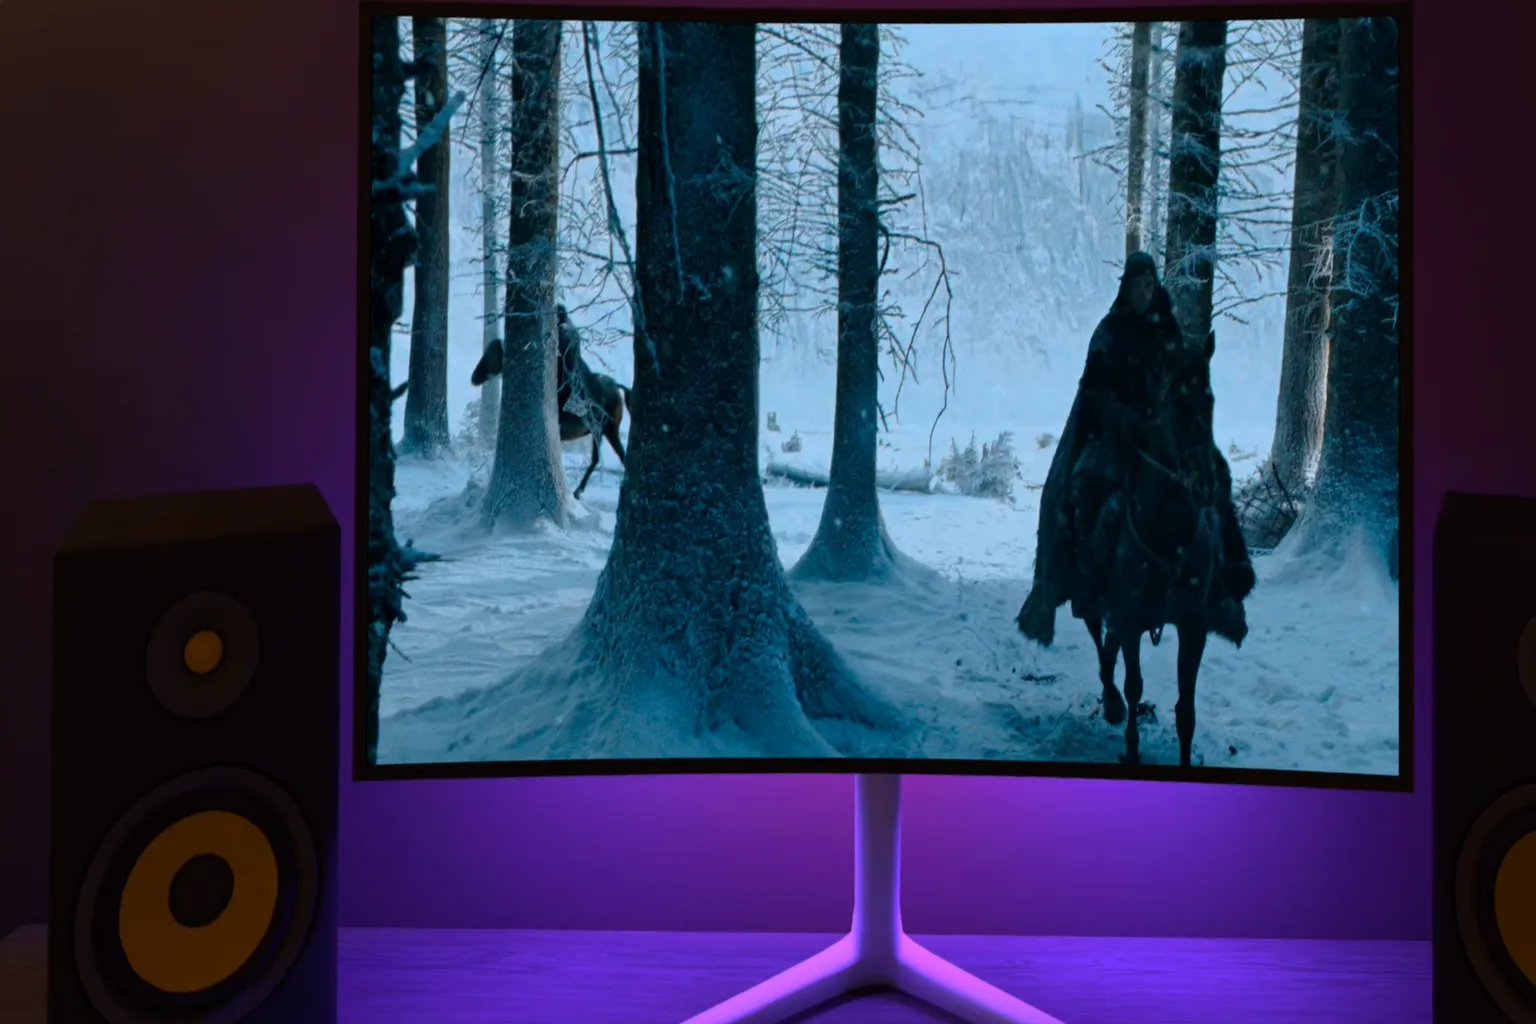
Home Cinema
This feels like sitting in front of a huge projector screen, relaxing on a soft leather sofa while watching a movie. The calm atmosphere makes it a really nice setup for watching videos.
First Class
It feels like having your own private space above the clouds. You’re sitting in a first-class airplane seat, enjoying games or videos at a relaxed pace while looking out at the view outside.
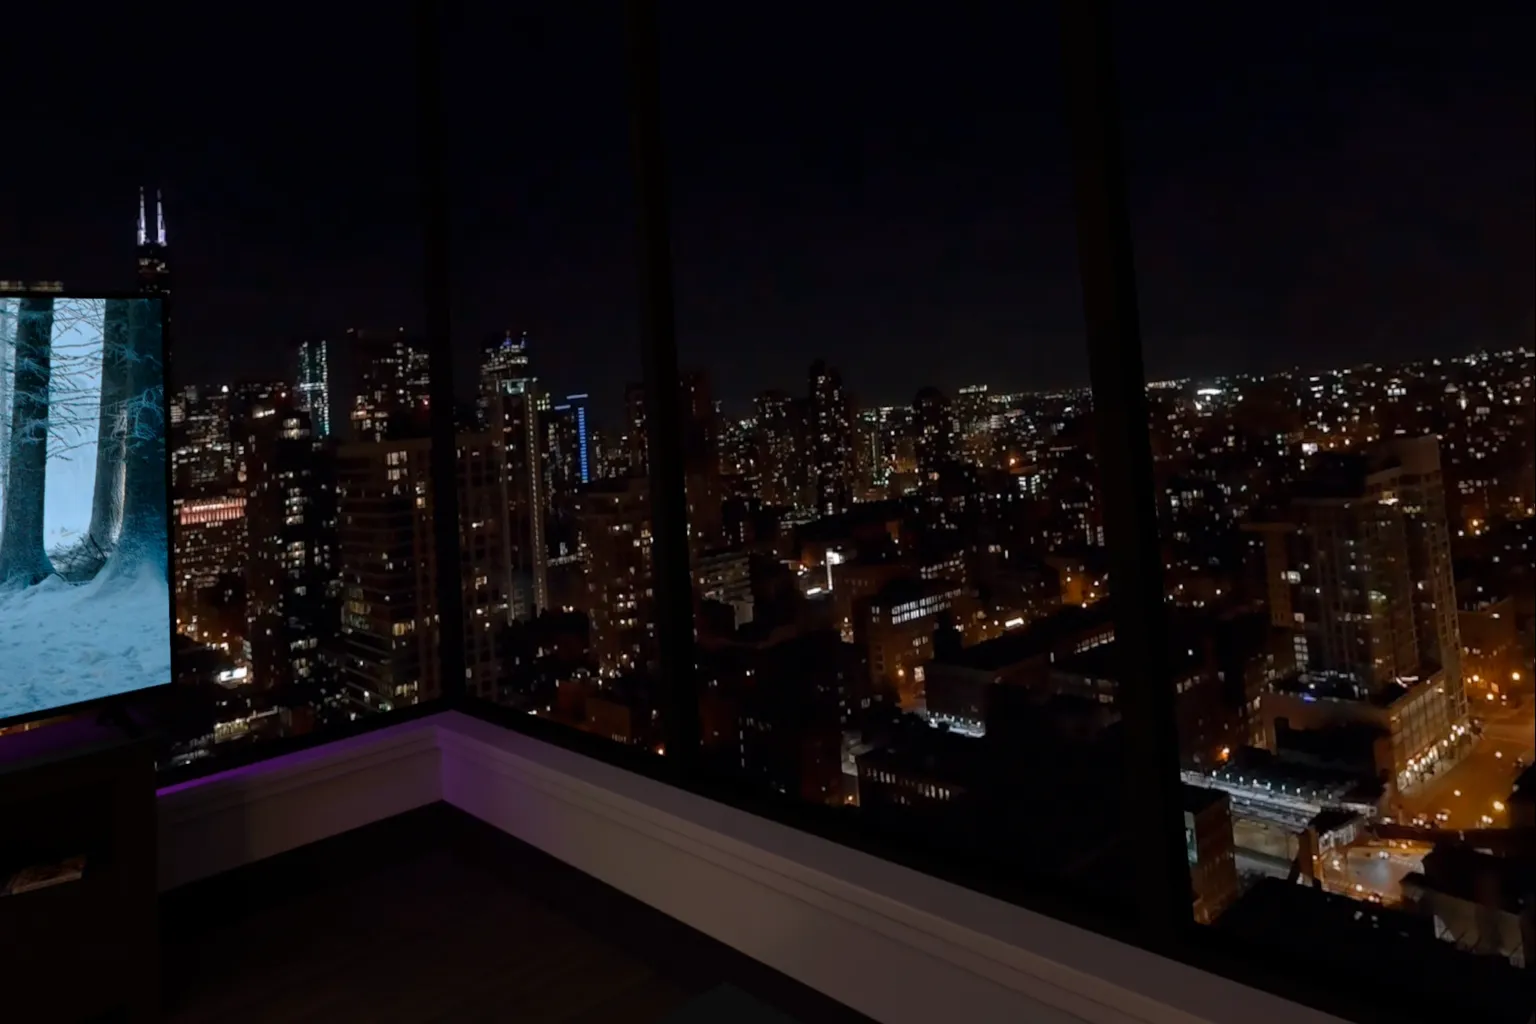
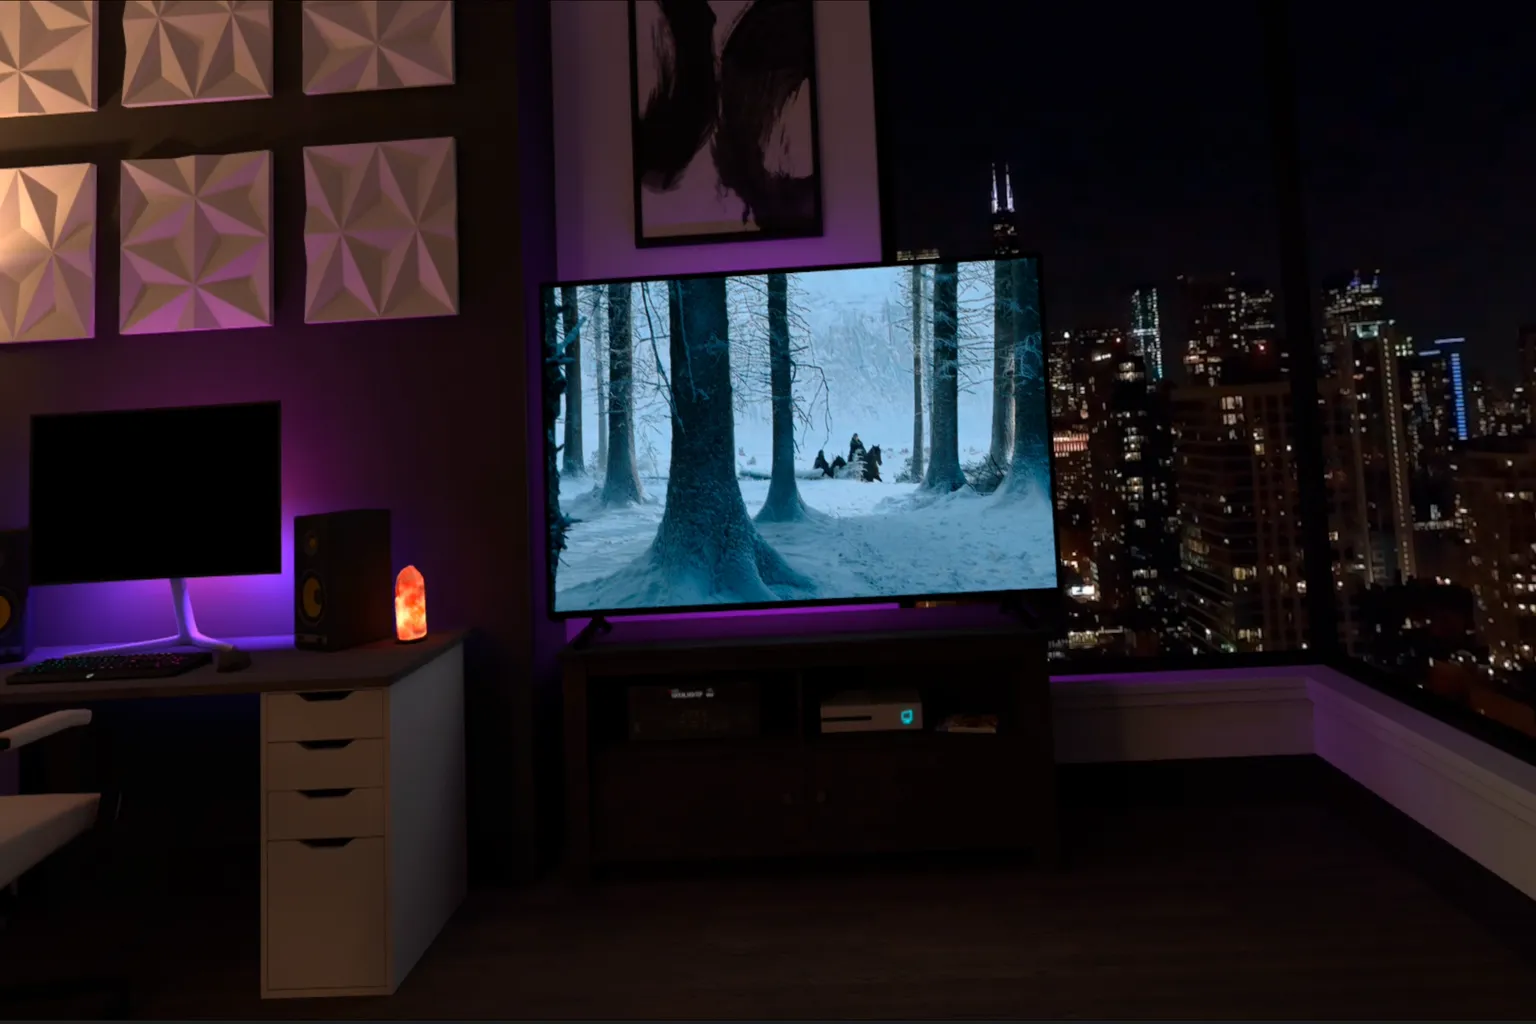
Modern Apartment Night
Watching a movie with a drink in hand—this one really has that high-end, business-class vibe. The large windows with a city night view and the refined interior create a mature, stylish atmosphere.
Games
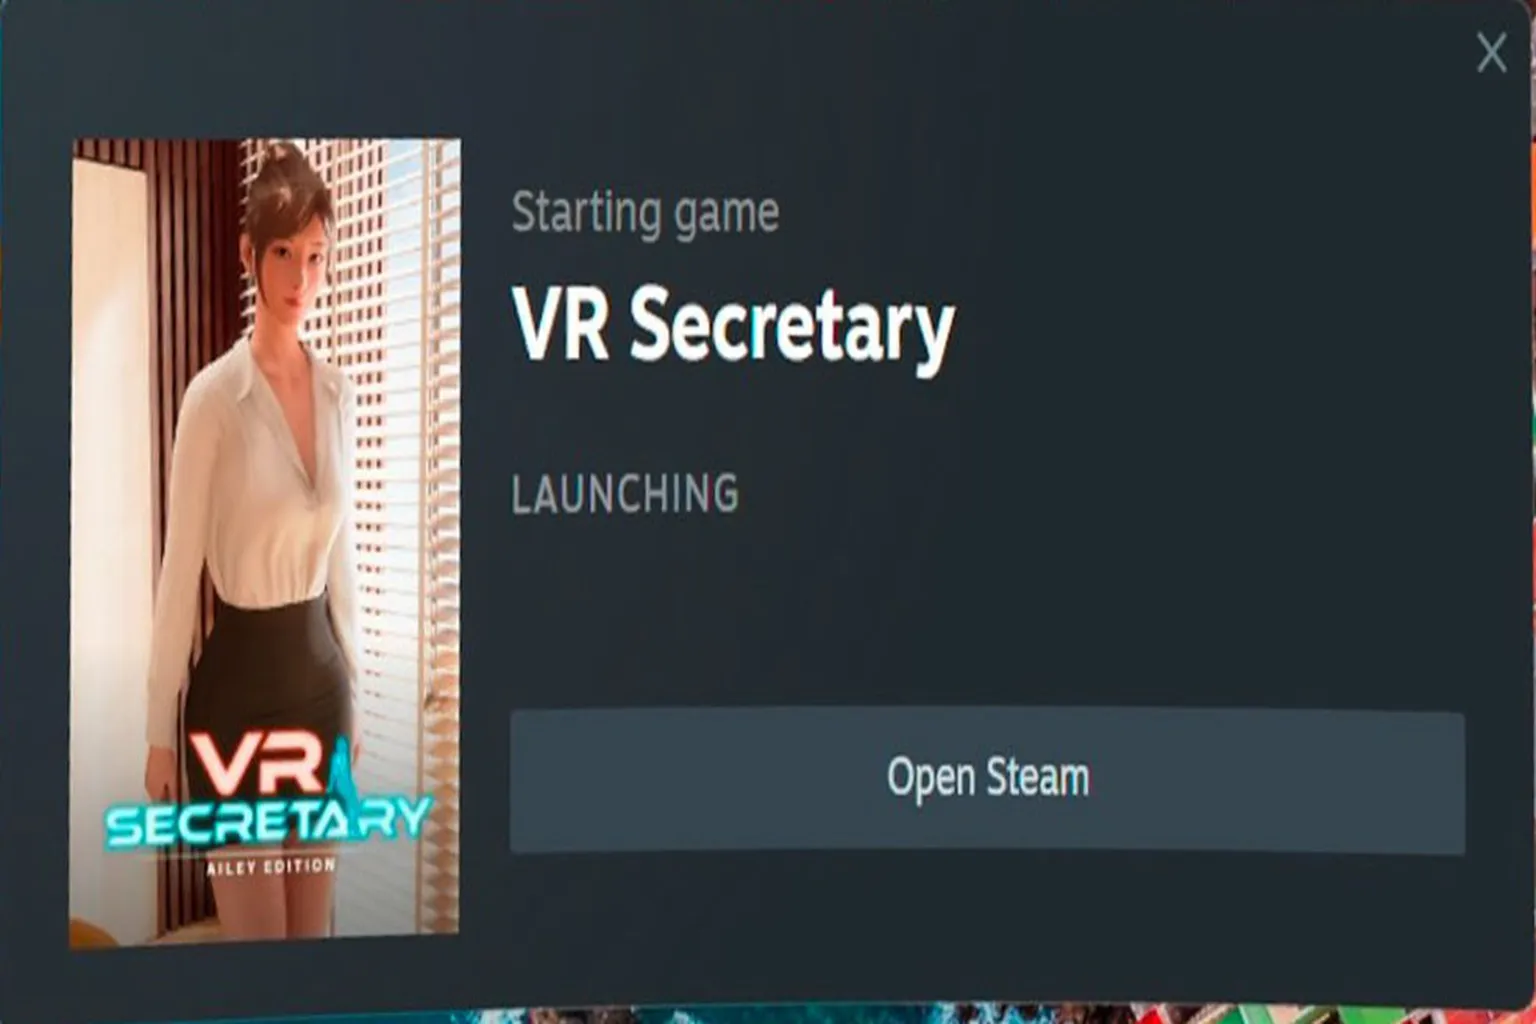
This section shows a list of Oculus and Steam games installed on your PC. You can launch them directly from here without opening the Steam or Oculus apps separately, and start playing right away.
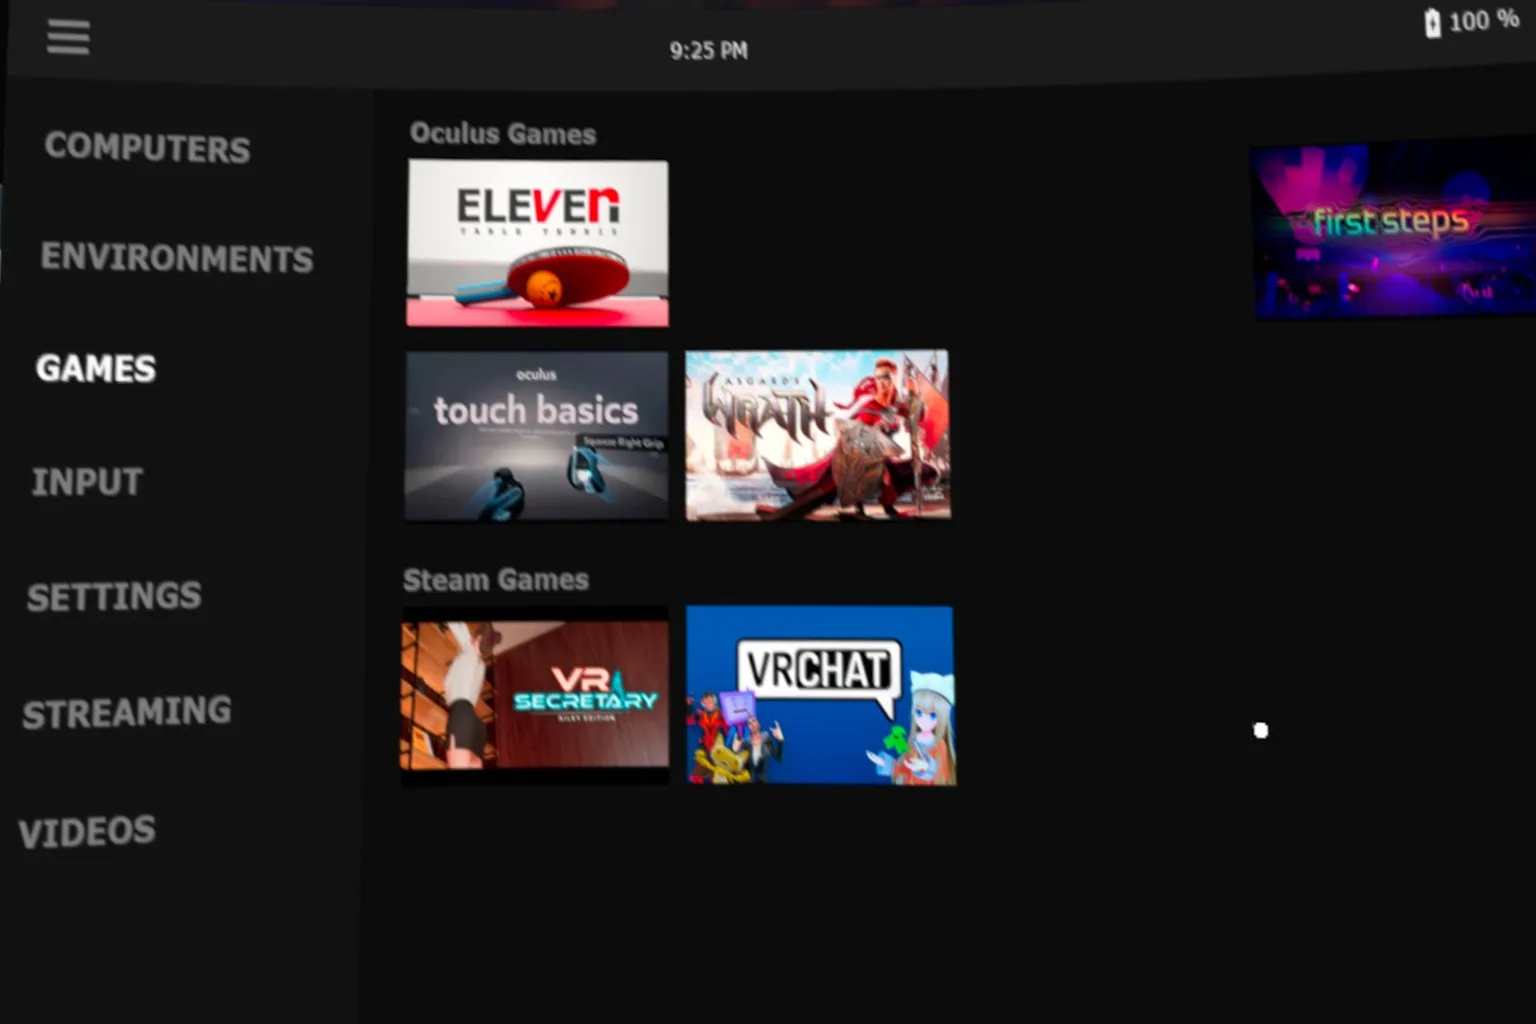
When you select a game, it launches right away, and if it’s a VR game, it automatically switches into VR mode. The whole flow feels really smooth.
Even if it’s not a Meta or Steam game, you can just click the desktop icon directly from within Virtual Desktop to launch it. It works the same way as opening a game from a shortcut on your PC.
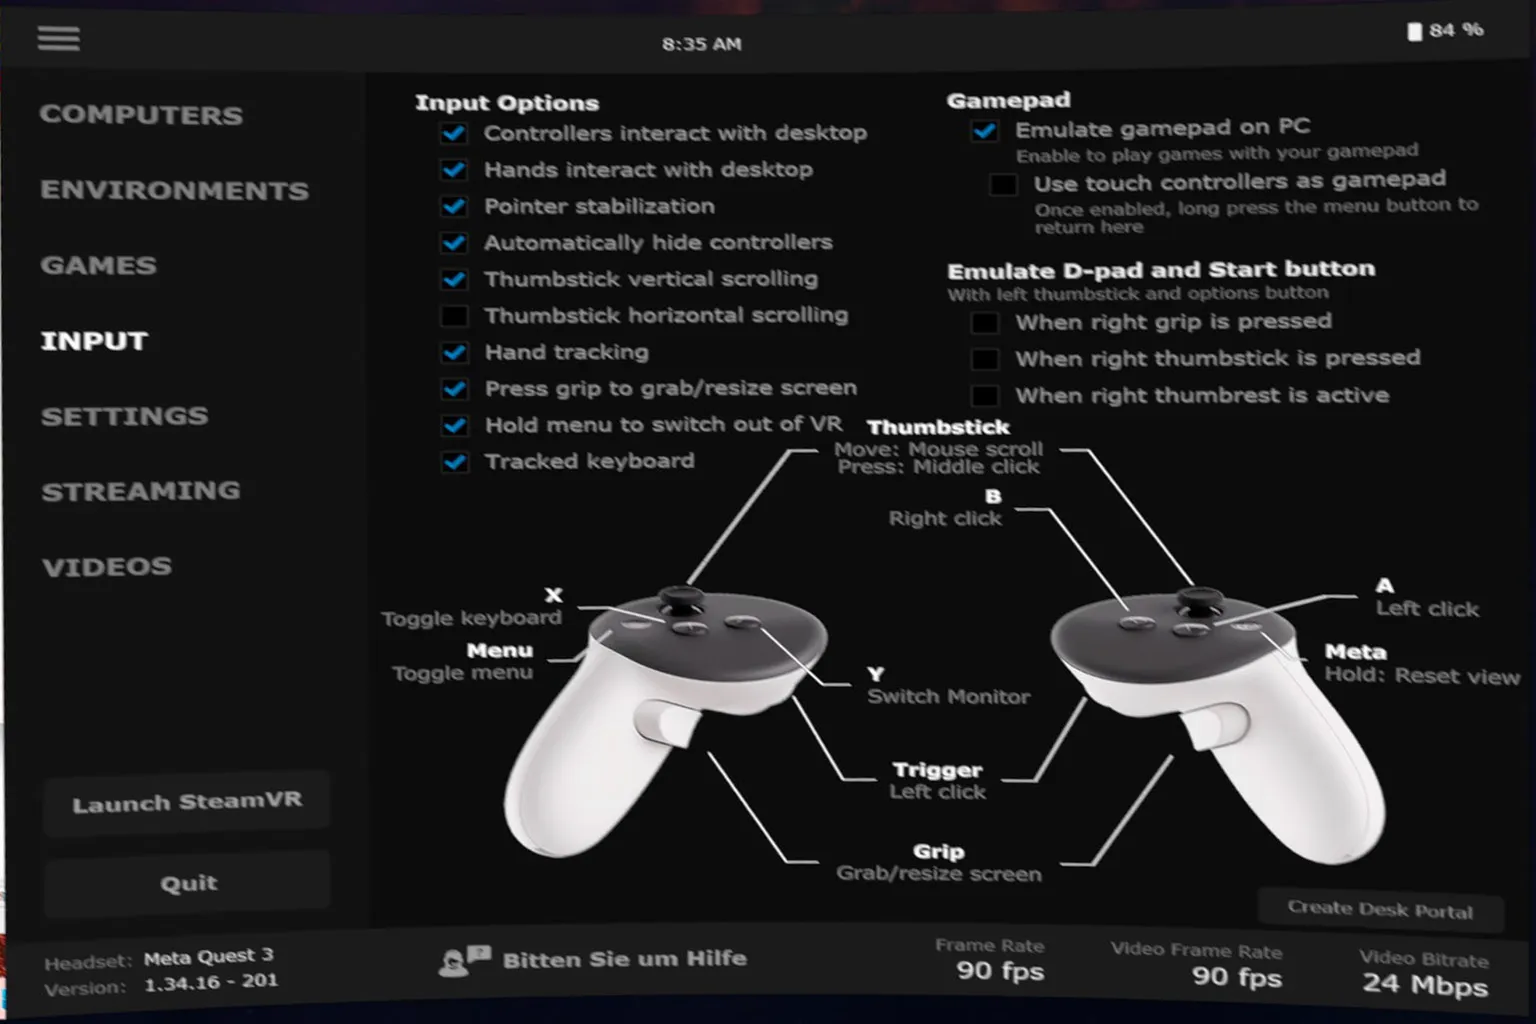
Input
This is the section for controller and input settings. There are a lot of options here, but honestly, most of them are fine left at their defaults. For normal use, you won’t need to touch much.
- Controllers interact with desktop: Lets you use the controllers like a mouse to control the desktop. You can click buttons and drag things around.
- Hands interact with desktop: Lets you control the desktop with hand tracking too. If hand tracking is enabled, you can use hand gestures without needing the controllers.
- Pointer stabilization: Reduces pointer shakiness. It makes the cursor more stable when using the controllers, which makes buttons easier to click.
- Automatically hide controllers: Automatically hides the controllers after a period of inactivity. This keeps the screen cleaner when you’re watching videos or just using the desktop.
- Thumbstick vertical scrolling: Lets you scroll up and down with the thumbstick. Useful for browsers and settings screens.
- Thumbstick horizontal scrolling: Lets you scroll sideways with the thumbstick. You won’t use it often since it only helps on certain screens.
- Hand tracking: Enables hand tracking. You can control things with just your hands, but controller input is still more reliable overall.
- Press grip to grab/resize screen: Lets you grab and resize the screen with the grip button. You can move it closer or farther away, and adjust its position and size more intuitively.
- Hold menu to switch out of VR: Lets you quickly exit VR mode by holding the Menu button. Handy when you want to switch modes.
- Tracked keyboard: Shows a supported keyboard inside VR. Since it lines up with the real keyboard’s position, it makes typing easier.
- Emulate gamepad on PC: Makes the Quest controllers behave like a Windows gamepad. That lets you control PC games that support gamepads. This one is important, so I recommend leaving it on.
- Use touch controllers as gamepad: Uses the Touch controllers as a gamepad. Instead of desktop controls, the buttons switch to a game-focused layout.
- Emulate D-pad and Start button: Adds virtual D-pad and Start button inputs. This is there to make up for inputs you’d normally have on a standard gamepad.
- When right grip is pressed: While you hold the right grip button, some buttons temporarily switch to D-pad and Start inputs.
- When right thumbstick is pressed: Pressing the right thumbstick enables D-pad and Start button emulation.
- When right thumbrest is active: Placing your right thumb on the specified sensor area enables D-pad and Start inputs.
On the Windows desktop, A works as left click and B works as right click. If you know just that part, you’ll be fine for now.
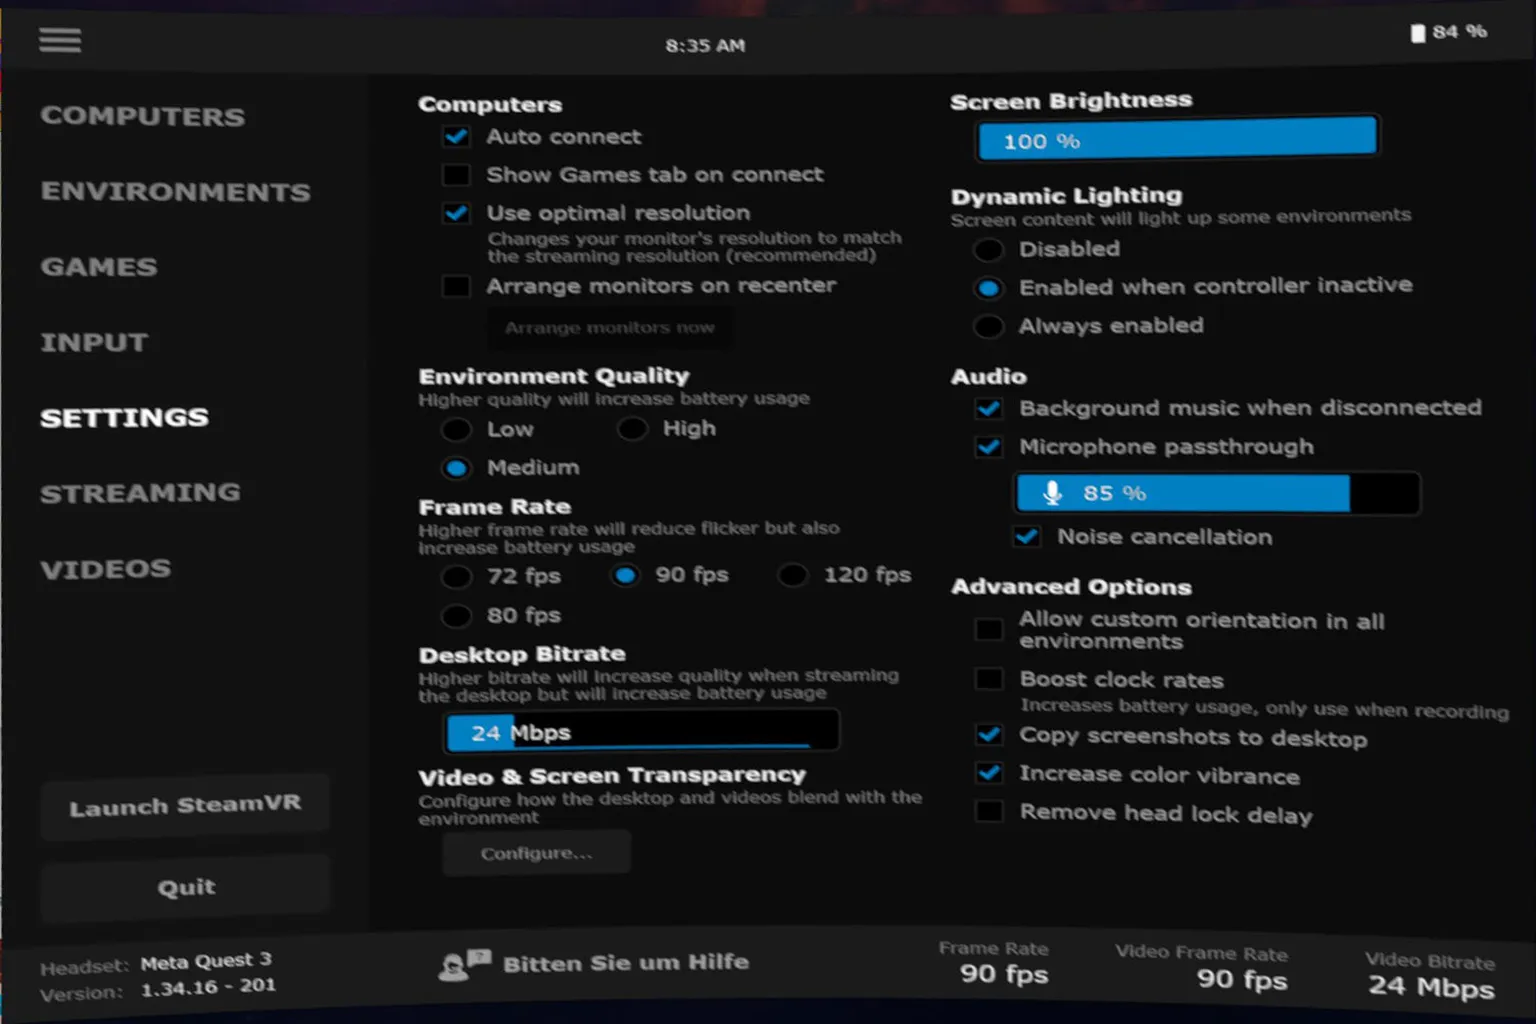
Settings
Here you can adjust items that directly affect streaming quality and performance, such as brightness, audio, frame rate, and image quality. In most cases, you only need to tune these three based on your PC’s performance: Frame Rate, Environment Quality, and Desktop Bitrate. Everything else can usually stay as-is.
- Computers
- Auto connect: Automatically connects to the last PC you used. You don’t have to select it manually every time you open Virtual Desktop, so it’s best to leave this on.
- Show Games tab on connect: Opens the Games tab right after connecting. If you usually jump straight into games, turning this on is more convenient. If you often interact with the Windows desktop first, you can leave it off.
- Use optimal resolution: Automatically sets the best resolution for streaming. It also adjusts the PC’s resolution, which helps prevent display issues. Recommended to keep this on.
- Arrange monitors on recenter: Reorganizes your monitor layout when you recenter your view. Useful if you’re using multiple monitors. If you’re on a single monitor, it won’t make much difference.
- Environment Quality:Adjusts the visual quality of the Virtual Desktop background environment. It doesn’t affect in-game graphics.
Medium (default) is already good enough, but if you’re using something like an RTX 3060 or higher, you can switch to High.
The background will look a bit nicer, but power usage will increase slightly. - Frame Rate:You can choose between 72 / 80 / 90 / 120 fps.
Higher values make motion smoother, but they also use more GPU, network bandwidth, and headset power.
90 fps is generally enough. If you have an RTX 3070 or better and a stable connection, you can aim for 120 fps. If it feels too heavy, just lower it. - Desktop Bitrate:Controls the image quality of the desktop stream. Higher values make text, windows, and videos clearer, but increase network load.
If you’re on stable Wi-Fi 6 / 6E, you can set it higher. If you notice stuttering, lower it a bit. - Video & Screen Transparency:Adjusts how transparent the screen and background look. This is purely visual and doesn’t really affect performance or usability. You can leave it as is.
- Screen Brightness:Controls brightness. The default 100% is fine. Only adjust it if it feels too bright or too dim.
- Dynamic Lighting:Changes the brightness of the environment based on what’s on your screen.
- Disabled: Off
- Enabled when controller inactive: Only active when you’re not using the controllers. Good balance between visuals and usability
- Always enabled: Always active, even during interaction
- Audio
- Background music when disconnected: Plays background music when disconnected. It’s just a notification-style feature, so turn it on or off based on preference.
- Microphone passthrough: Sends headset mic audio to your PC. Required if you’re using Discord or in-game voice chat.
- Noise cancellation: Adjusts the mic level sent to the PC. Too high can pick up noise, too low makes your voice hard to hear.
- Advanced Options (Advanced settings — you usually don’t need to touch these)
- Allow custom orientation in all environments: Saves orientation settings per environment. It’s more about personal preference and doesn’t have much impact.
- Boost clock rates: Increases the headset’s clock speeds. It can improve responsiveness, but also increases heat and power consumption. Best left off unless you specifically need it, like for recording.
- Copy screenshots to desktop: Also saves screenshots to your PC. Makes them easier to find later, so it’s convenient to keep this on.
- Increase color vibrance: Boosts color saturation. It can make visuals pop more, but too much can look unnatural. Up to preference.
- Remove head lock delay: Reduces delay in head tracking. Feels more responsive, but can slightly reduce smoothness. This one comes down to personal preference.
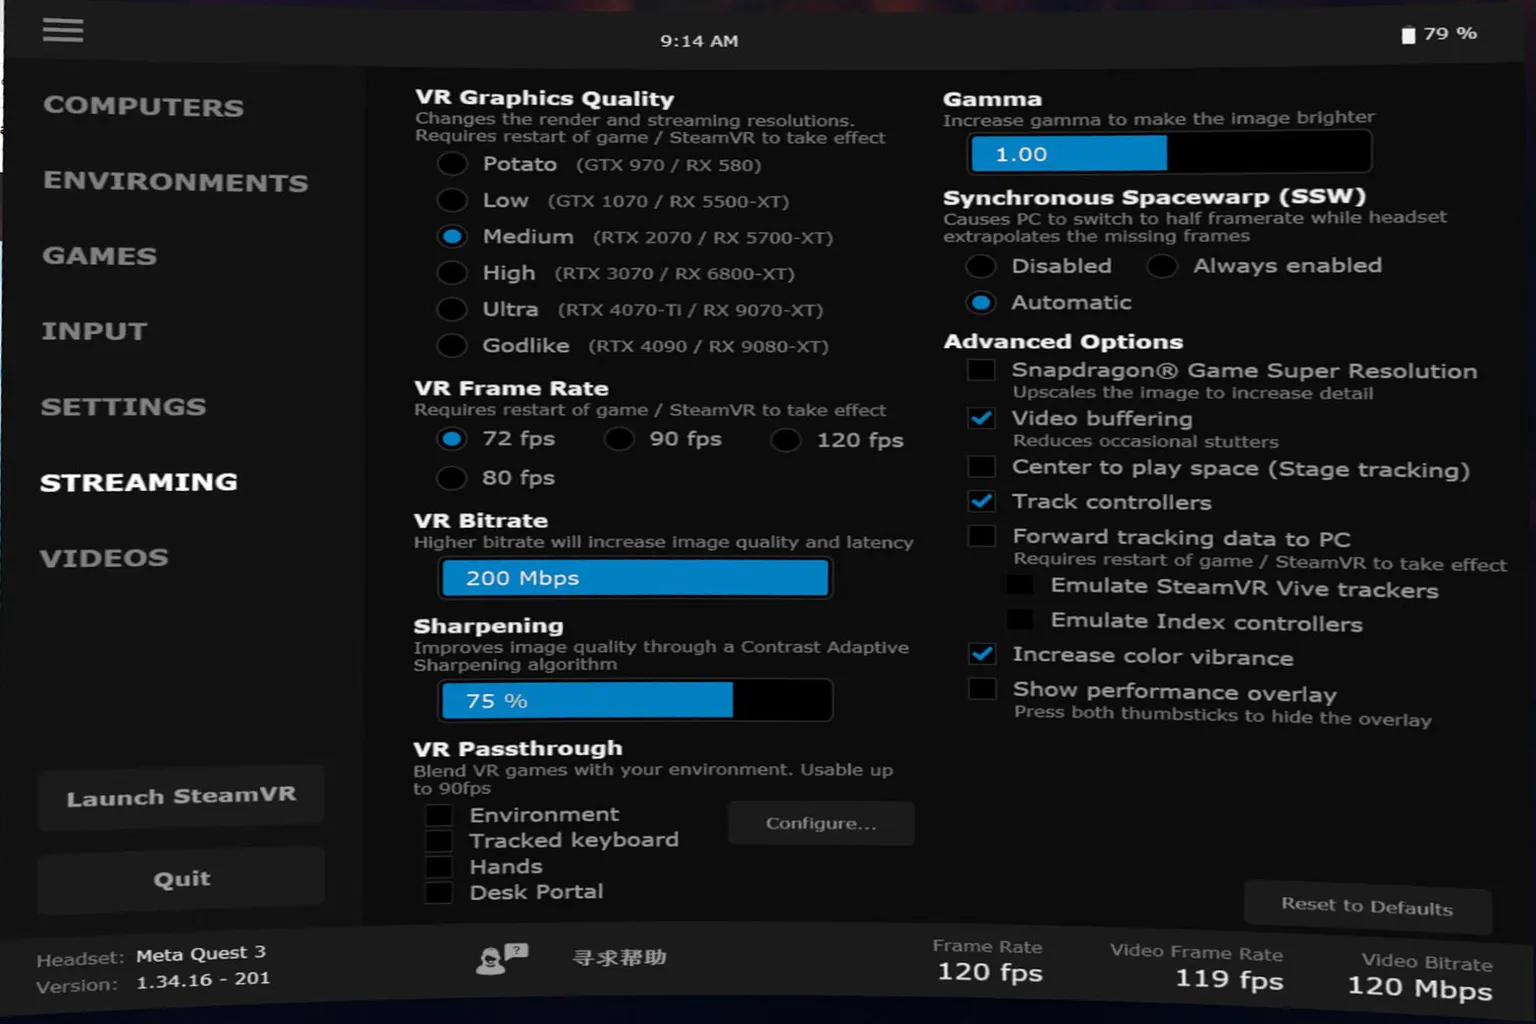
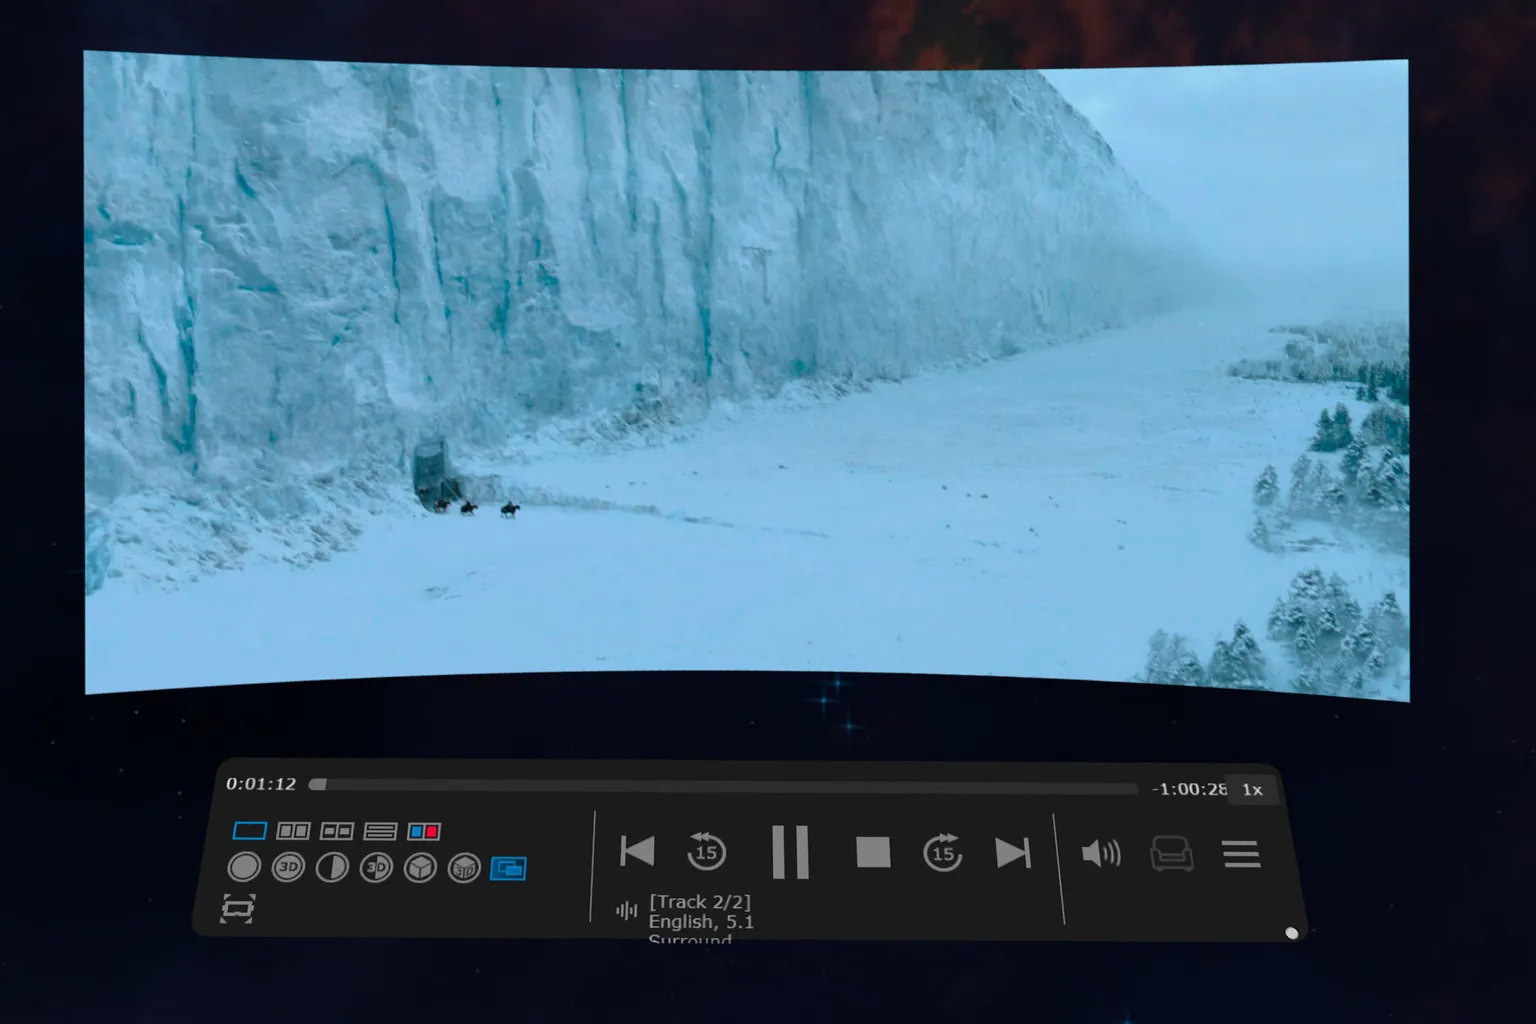
Streaming
This is the most important settings page on the headset side, since it directly affects VR game image quality, frame rate, latency, and overall stability.
- VR Graphics Quality: Choose the image quality based on your GPU performance. It ranges from Potato (GTX 970) up to Godlike (RTX 4090).
This setting affects both render resolution and streaming resolution, so increasing it makes the image look better, but it also raises GPU load a lot. - VR Frame Rate: This is the frame rate setting. Higher values make motion look smoother, but they also require more GPU power and a more stable connection.
Start by raising it based on your GPU, and if you notice stuttering, frame drops, or latency, lower it a bit.
With an RTX 3070-class GPU or better, 120 fps is often fine. - VR Bitrate: Higher bitrate reduces compression and improves image quality, but it also increases latency and network load.
With Wi-Fi 6 / 6E, you can often push it up to around 150 to 200 Mbps. If you start getting stutter or latency, lower it and adjust from there. - Sharpening: This adds sharpness to edges and fine details. The default setting is usually enough, and pushing it too high can make edges look overly bright and unnatural.
- VR Passthrough: This overlays the real-world camera feed with the VR image. It’s useful when you want to see your keyboard or check your surroundings. It’s more of a convenience and safety feature, and the performance impact is small, so leaving it as is is usually fine.
- Gamma: Adjusts overall brightness. Higher values make the image brighter. If nothing looks off, the default setting is fine.
- Synchronous Spacewarp (SSW): Meta’s frame interpolation feature. When your GPU can’t hit the target frame rate, it generates in-between frames to make motion look smoother.
- Automatic: Turns on automatically when needed. This is usually the best option.
- Always enabled: Always stays on. This can sometimes add latency or visual distortion.
- Disabled: Completely off. Your GPU has to maintain the frame rate on its own.
- Advanced Options (Advanced settings: usually best left alone)
- Snapdragon Game Super Resolution: Upscales the image on the headset side and adds detail. It can improve how lower resolutions look, but it also increases headset load and power use. How much it helps depends on the game.
- Video buffering: Increases the video buffer to reduce sudden stutter or image corruption. The tradeoff is slightly more latency. It can help if your connection is unstable, but if you care most about low latency, leaving it off is also an option.
- Center to play space: Aligns the center of the virtual space with your real play area. Useful for standing games, but it doesn’t matter much if you mostly play seated.
- Track controllers: Controller tracking. This is required, and if you turn it off, you won’t be able to control anything.
- Forward tracking data to PC: Sends headset and controller tracking data to the PC. Some apps, including SteamVR, may need this.
- Emulate SteamVR Vive trackers: Simulates Vive Trackers. This is mainly for full-body tracking use, like VRChat, and isn’t needed for normal play.
- Emulate Index controllers: Emulates Valve Index controllers. This is there for compatibility with supported games.
- Show performance overlay: Shows FPS, latency, encoder status, and other performance data in real time. Useful for tuning and troubleshooting, but you can leave it off during normal use.
Videos
Any videos you add to your PC—whether they’re standard 2D videos or VR videos—can be played directly from the Videos tab. You don’t need to open a separate app, which makes it really convenient.
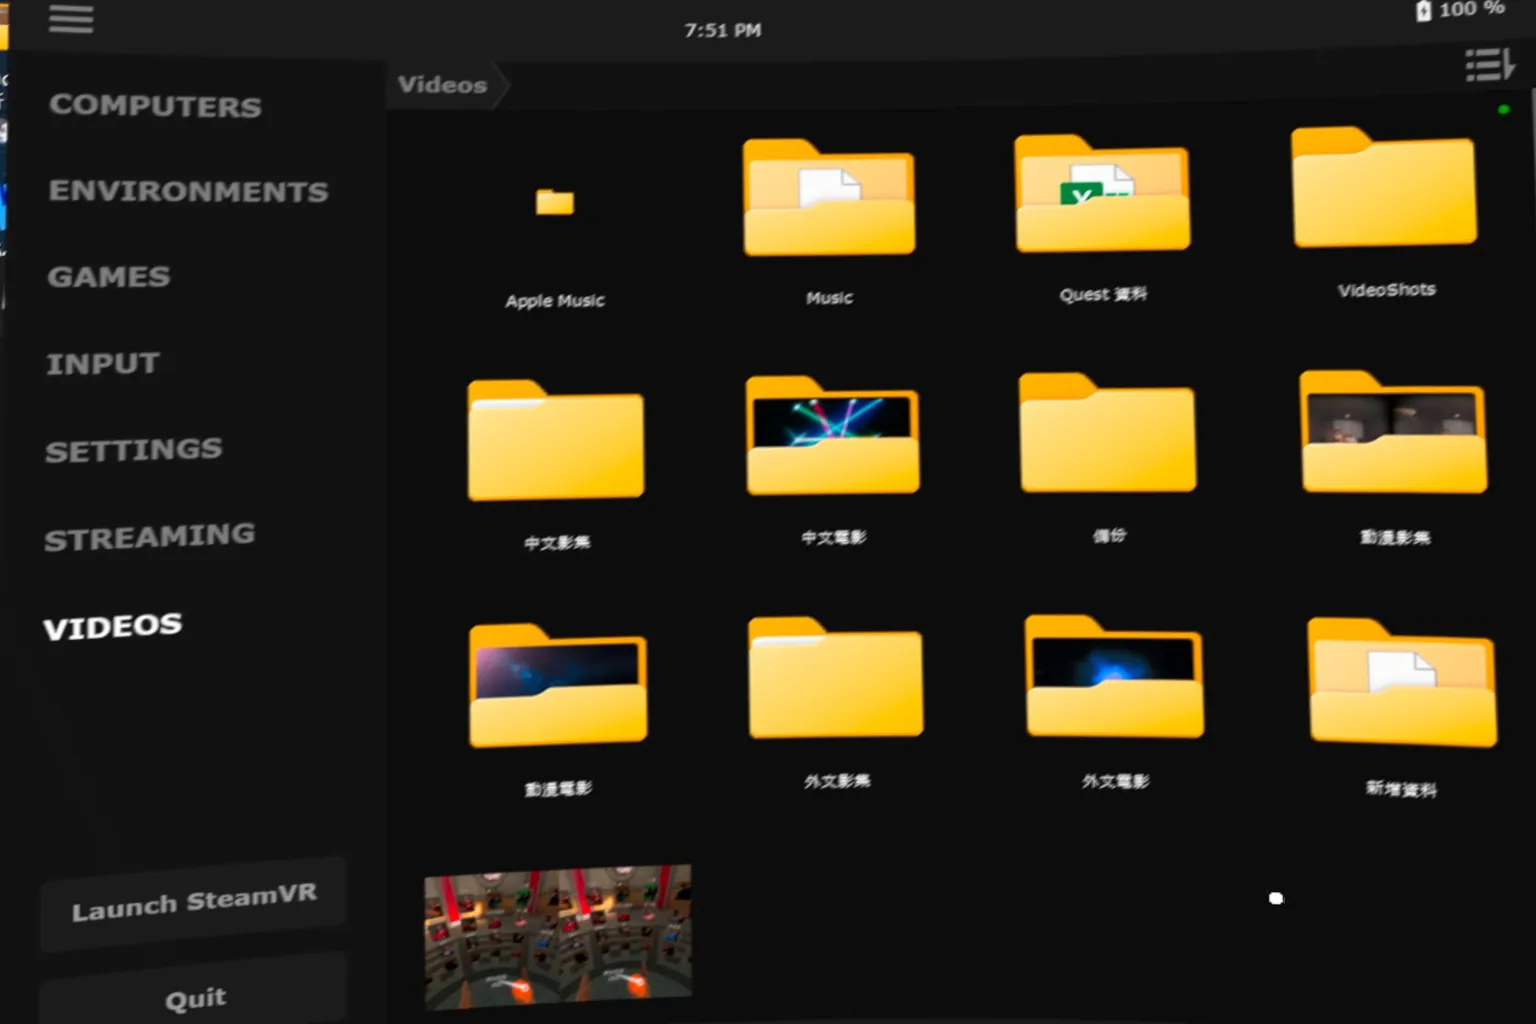
Regular videos play normally, and you can change the audio format from the menu. One thing to keep in mind is that subtitles and external subtitle files aren’t supported.
For VR videos, you can set the video format from the left side of the control panel, such as 180° or 360°, top-and-bottom, or side-by-side.
For example, this is a recorded VR video from I am Cat. When you play it, the footage recorded for each eye is shown side by side.
By setting it to side-by-side VR mode, the video plays back as true stereoscopic footage exactly as it was recorded in-game. It really feels like you’re back inside the game, seeing it through your own eyes.
Top Menu
While using Virtual Desktop, point your controller toward the top of the screen and seven menu options will appear. Each one works like this:

- Head Lock: The virtual screen follows your head movement and stays fixed in front of your view. This is useful when you’re walking around.
- Transparency: Adjusts the transparency of the desktop screen.
- Reset View: Resets your view position.
- Height: Adjusts the vertical position of the screen.
- Distance: Adjusts how far the screen is from you. Moving it closer makes it larger, moving it farther away makes it smaller.
- Curve: Adjusts how curved the screen is.
- Size: Changes the overall size of the screen.
Bottom Menu
Point your controller toward the bottom of the screen to access quick settings. On the left, options like Half SBS and Full SBS let you switch video formats when playing VR videos.

In the center, the viewing mode switch lets you change your seating position in certain environments. For example, in the Modern Apartment scene, you can switch from sitting on the sofa to sitting at the PC desk, which works better for immersive viewing or focused work.
You can also stay seated in front of the sofa. If you just want to relax and watch movies or videos, this position feels the most comfortable.
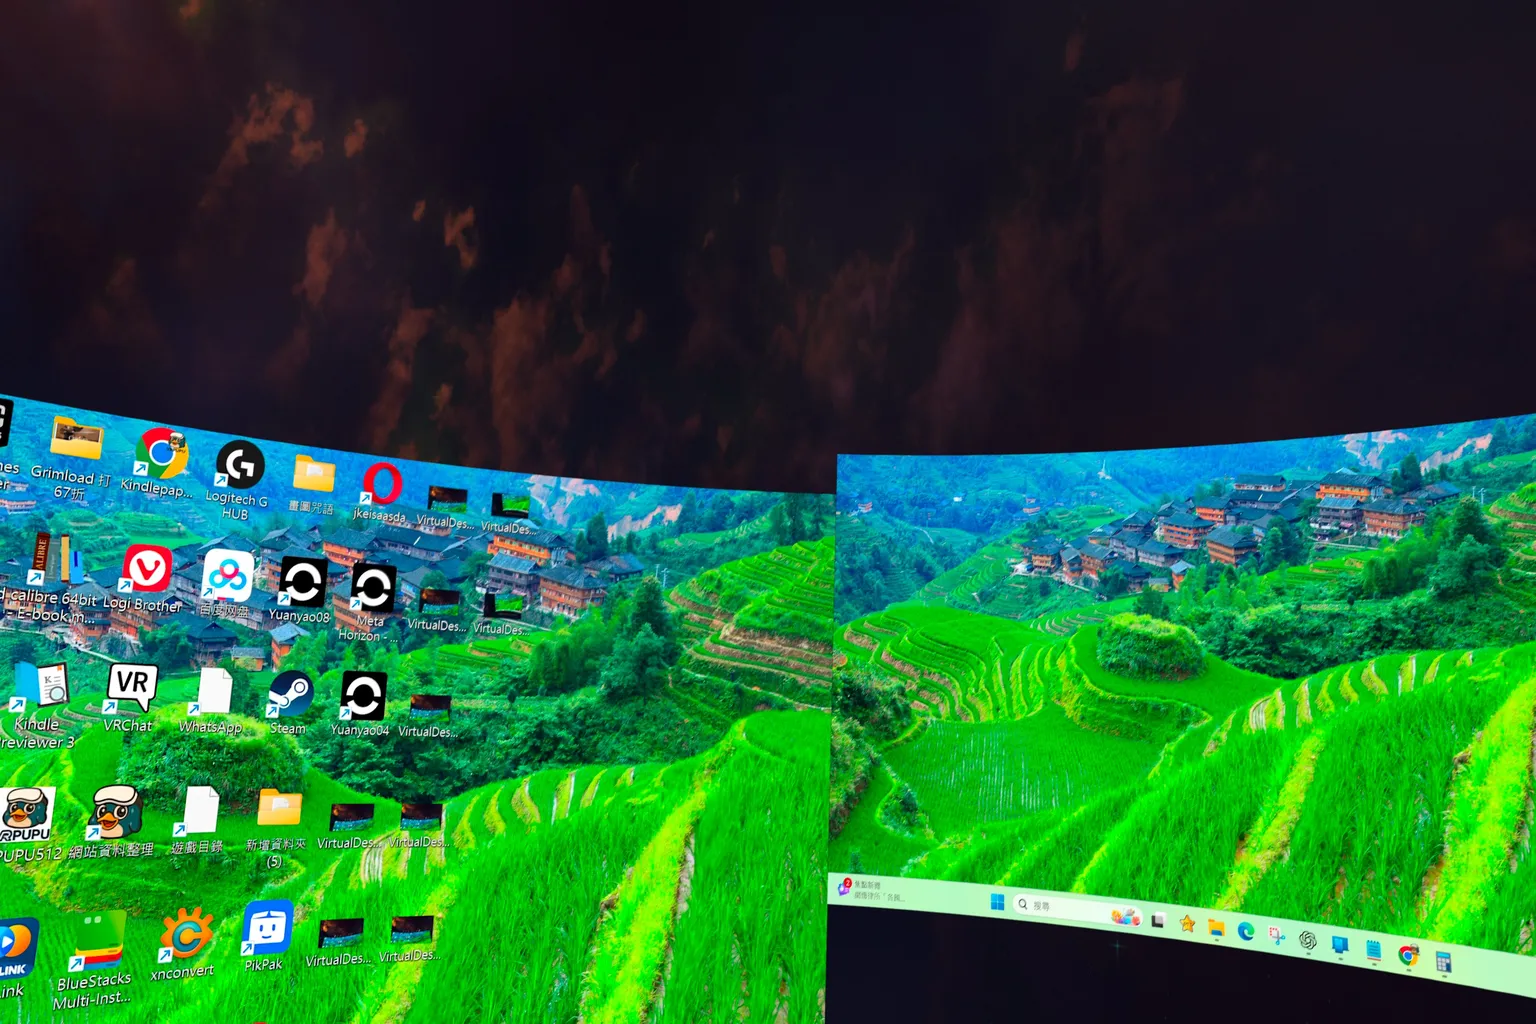
With the multi-screen feature, you can increase or decrease the number of screens displayed. You can place up to three screens at the same time, making it easy to separate them for work, videos, and games.
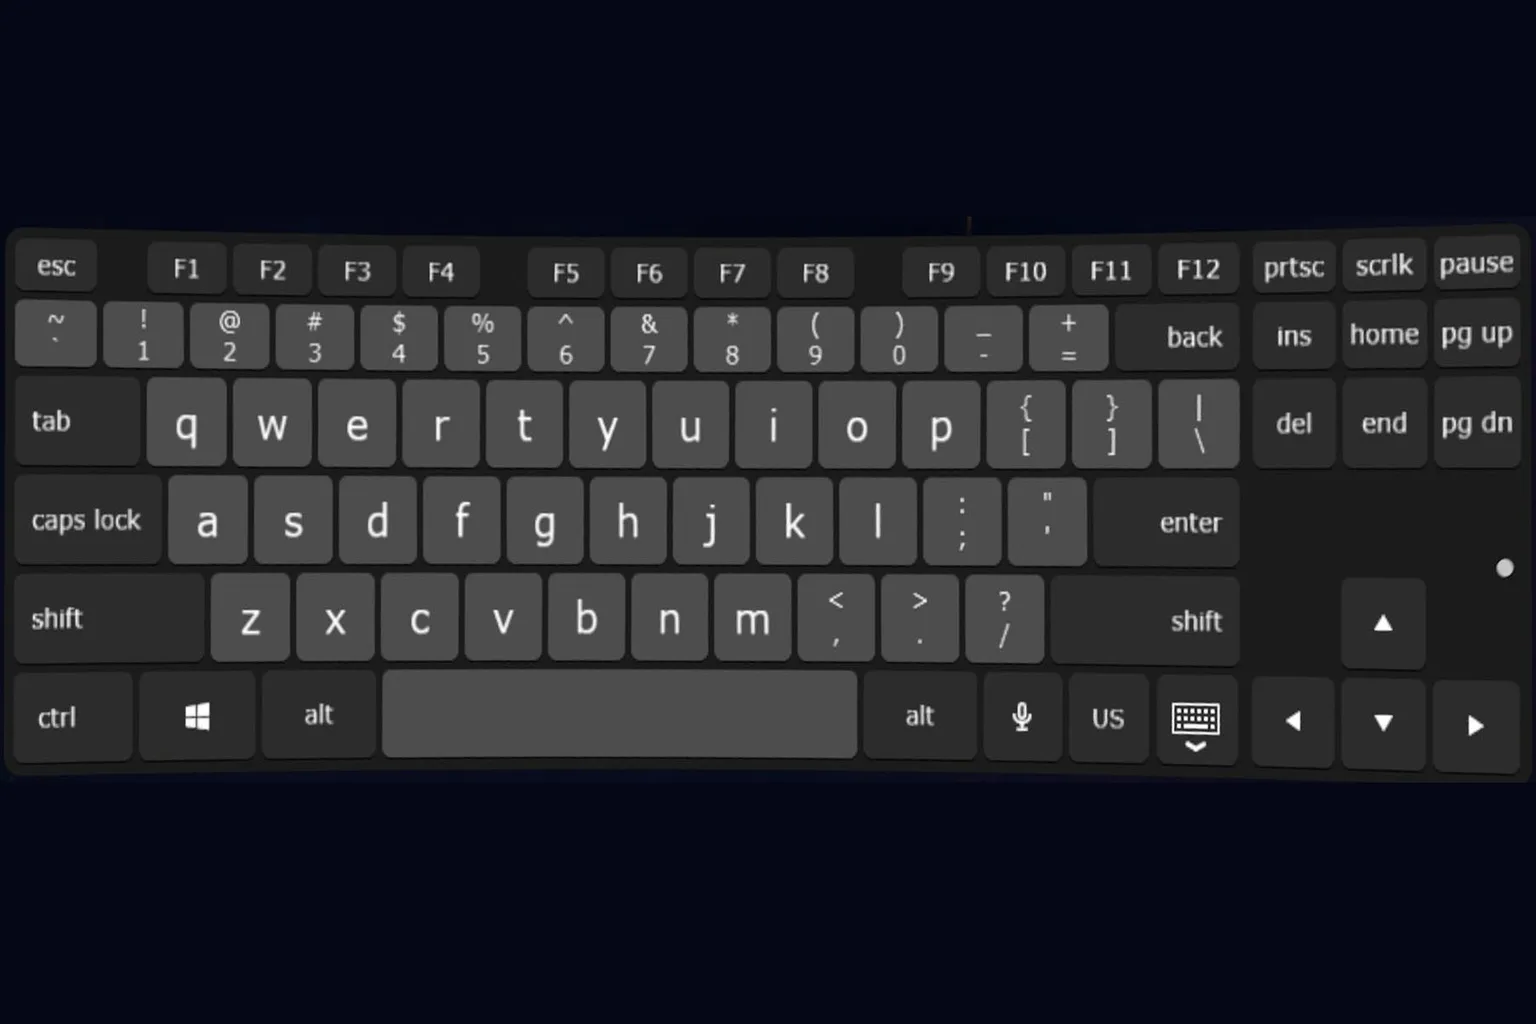
Once you enable the keyboard feature, you can use the built-in keyboard inside Virtual Desktop.
Starting from version 1.34.16 in 2026, it also supports Japanese and German keyboards, making browsing much easier.
That’s the full overview of Virtual Desktop. At first glance, it might look like there are a lot of features and complicated settings, but in reality, the default settings are already more than good enough for a smooth and stable experience.
Virtual Desktop does include video playback, but honestly, it’s pretty basic. If you really want to enjoy movies or videos properly, you’ll probably be happier using a dedicated video player app or subscribing to an online streaming service.

SexLikeReal Ultimate Guide
Hidden Discounts, Japanese VR & Passthrough Review
Best Meta Quest VR Video Players 2026
Skybox vs Moon vs 4XVR
DEO VR Complete Guide
AI Passthrough, 8K Videos & Mixed Reality Setup
FAQ – Common Questions
What’s the difference between Virtual Desktop and Air Link? Which one should I choose?
Air Link is a free, built-in feature from Meta. It’s simple and easy to use. Virtual Desktop, on the other hand, offers finer image quality tuning, better streaming stability, and more features like remote desktop access, video playback, and recording.
If you only play Steam games occasionally, Air Link is usually enough. If you care more about image quality and stability, Virtual Desktop is the better choice.
What should I do if the video stutters or latency feels high?
Make sure you’re using a 5GHz Wi-Fi band and staying close to the router
Check that VR Graphics Quality in Virtual Desktop isn’t set too high
Make sure the Bitrate isn’t exceeding what your network can handle (trying around 100–150 Mbps is recommended)
Controllers don’t respond in SteamVR
Go back to the INPUT settings page in Virtual Desktop and check the following.
Emulate gamepad on PC is enabled
Track controllers is turned on
These need to be enabled before launching SteamVR, otherwise controller emulation won’t work properly.
The image looks blurry. How can I make it sharper?
Go to the Streaming page and adjust these two settings.
- Increase Bitrate (100–200 Mbps is recommended)
- Set VR Graphics Quality to at least High. If your GPU has enough headroom, try Ultra
This usually makes the image much clearer.
The screen isn’t centered during gameplay
Press Reset View inside Virtual Desktop, or enable Center to play space in the settings. This resets the screen position to the center of your actual play space.
Virtual Desktop doesn’t detect my PC
Make sure Virtual Desktop Streamer is installed and running on the PC
Confirm your Meta account is entered correctly (including uppercase/lowercase letters)
Make sure the headset and PC are on the same local network
Check that your firewall isn’t blocking Virtual Desktop Streamer
⚠️ Critical Alert: NVIDIA Driver 591.44 Bug breaks Virtual Desktop video encoding
According to the Virtual Desktop developer, NVIDIA’s recently released 591.44 driver has a confirmed bug that completely breaks Virtual Desktop’s video encoding.
The development team is currently investigating the cause. Until a fixed version is released, do not update to driver 591.44. Make sure you stay on an earlier version.
If you’ve already updated to 591.44, there’s no need to reinstall Windows. You can downgrade by installing one of the older drivers below.
Recommended older drivers
RTX 30 / RTX 40 series: 566.36
Download: https://www.nvidia.com/en-us/geforce/drivers/results/237719/
Other NVIDIA GPUs: 581.80
Download: https://www.nvidia.com/en-us/geforce/drivers/results/237685/