This page walks you through everything you need to connect your Meta Quest to a PC.
It covers the differences between wired Link and wireless Air Link, USB cable speed testing, Horizon Link system and device settings, and fixes for wired connection issues that still show up in 2026.
It also goes over common problems with latency, Wi-Fi, OpenXR, video quality, and audio, so you can get your PCVR setup and connection sorted in one place.
How to Connect to a PC
The Meta Quest hardware isn’t that powerful, so if you only use it in standalone mode, it can feel a bit limiting.
Once you connect it to a PC, you get better visuals and access to a much wider range of games.
You don’t need to buy any extra apps either. Quest can connect to a PC in two ways:
- Wired connection: You’ll need a USB 3.0 high-speed cable. Since you stay plugged in while playing, it does limit your movement.
- Wireless connection: There’s a bit of latency, but it’s not an issue for normal gameplay. It’s easier to use overall, so this is the option most people go with.
Wireless Connection
Freedom feels better without cables
Latency: 30–60 ms
Cost: starts around $100
Wired Connection
Super low latency, but you are tethered
Price: $10–$40
How to Connect with a Wired Link
Before you start, you’ll need a cable that actually meets the required specs.
A lot of off-the-shelf charging cables claim things like 20W or 100W, but their data transfer speeds often aren’t good enough.
Below are the speed test results from cables I actually bought and tested. A 3-meter USB 3.0 cable is usually easy to work with, but once you go up to 5 meters, picking the right brand really starts to matter.
| Source | PC Port | Length | Measured Speed | Usable for VR |
| Amazon VR cable | USB-A | 3m | 2.3 Gbps | OK |
| Unbranded VR Cable | USB-C | 5m | Not measurable | NG |
| Quest 3 Included Cable | USB-C | 1m | 367 Mbps | NG |
Next, let’s go over how to test your cable speed. Before you start, make sure you have the following ready:
What you’ll need:
- A Windows 10 or 11 PC (as long as it has a USB 3.0 or USB-C port, you’re good—most PCs support this)
- The cable you want to test
- Download Horizon Link from the official Meta website and install it on your PC
Once the installation is done, follow the next steps on your PC to set things up.
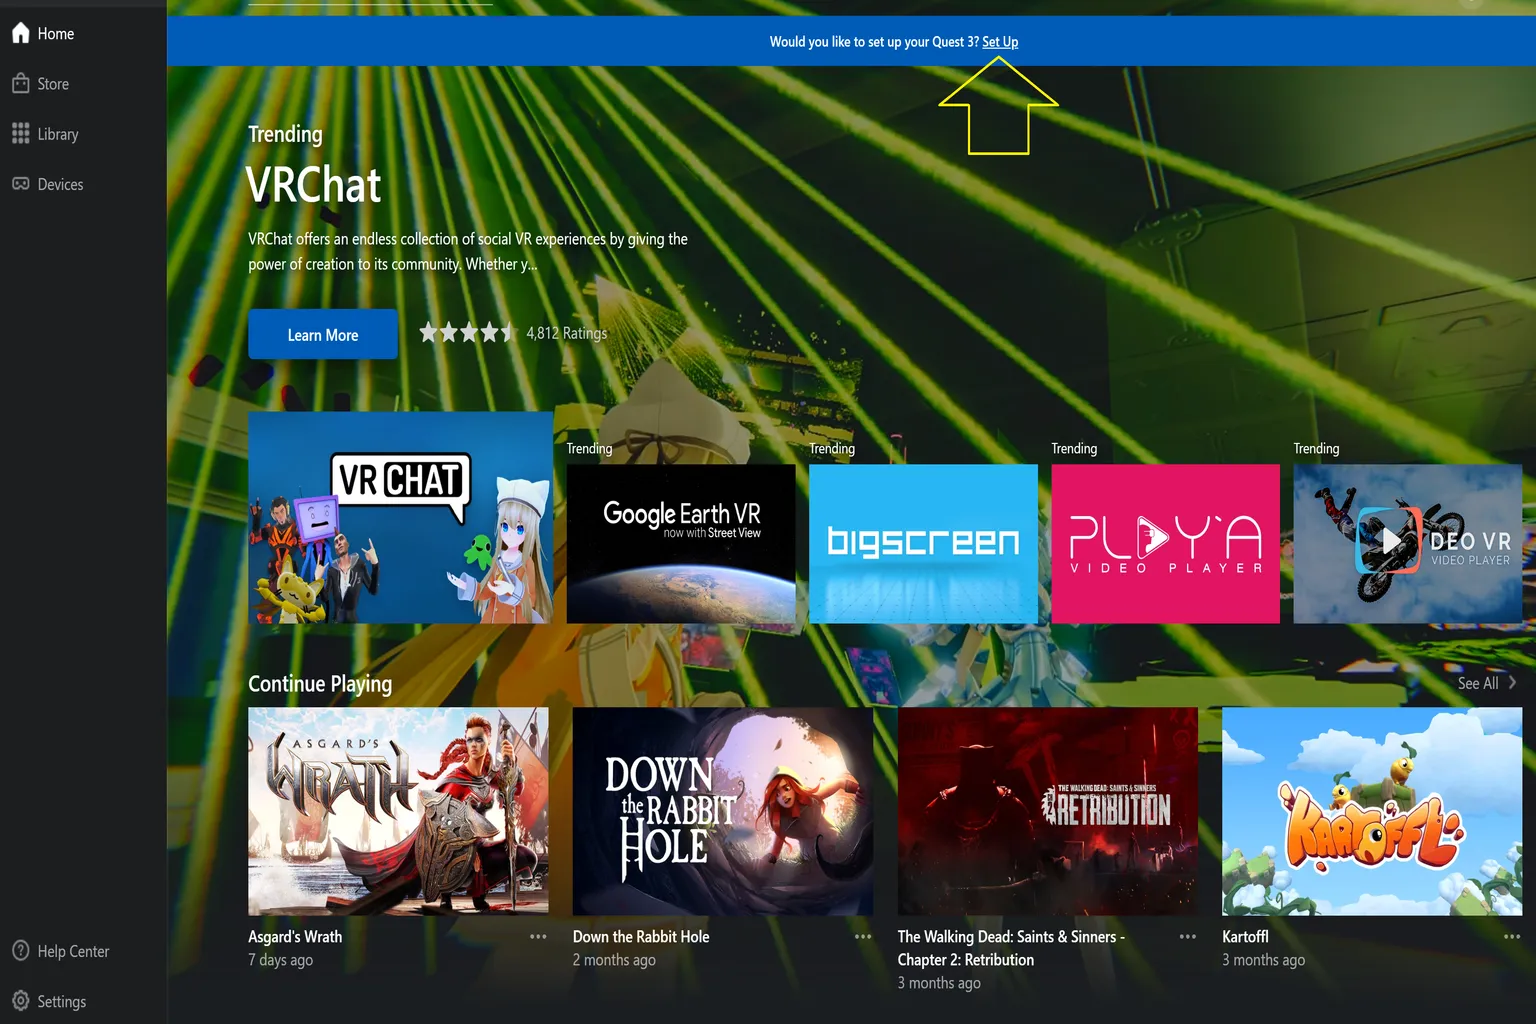
Step 1: Select Your Device in Horizon Link
Once you connect the headset with a USB cable, a setup prompt will appear on the screen. Just press Set Up and you’re good to go.
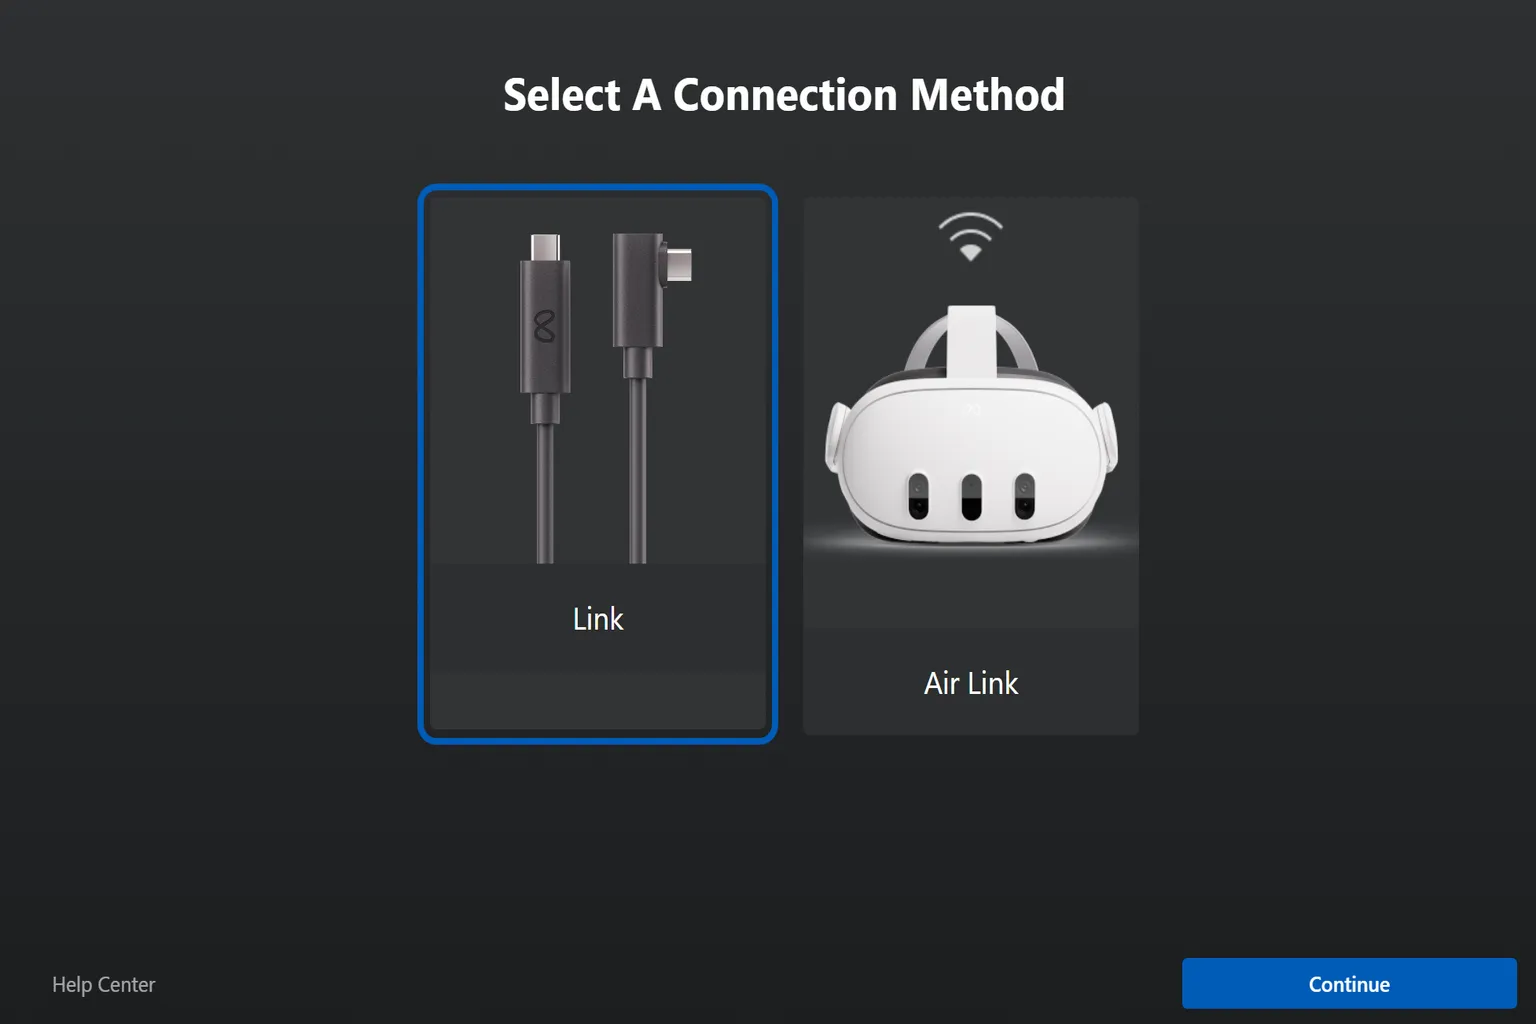
Step 2: Connect the Device
For a wired connection, just select Link.
When you connect your PC and Quest with a USB cable, you’ll see a green indicator on the screen showing that it’s ready to connect.
![USB-C cable connected from the Quest headset to a PC USB 3 port] [Alt Text: Meta Link cable test screen checking whether the cable supports high-speed connection](https://vrpupu.com/en/wp-content/uploads/sites/4/2025/07/7-quest-link-connect-usb-cable-step-2025.webp)
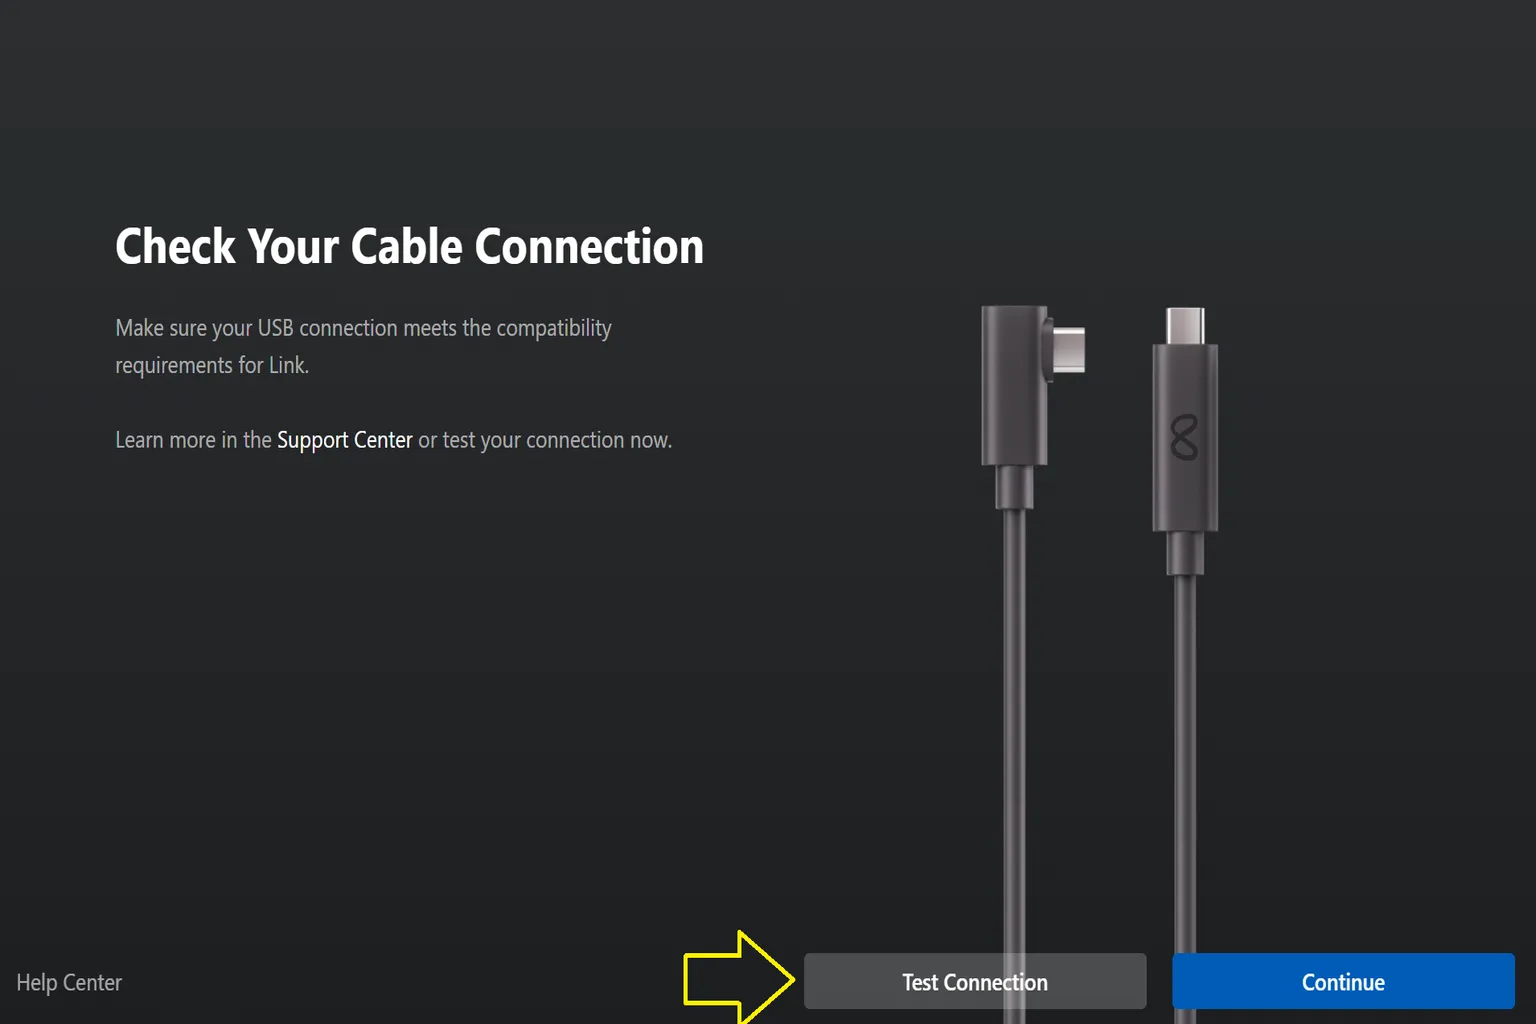
Step 3: Test the Cable Speed
Press Test Connection, and the speed test will start right away.
Step 4: Check the Test Results
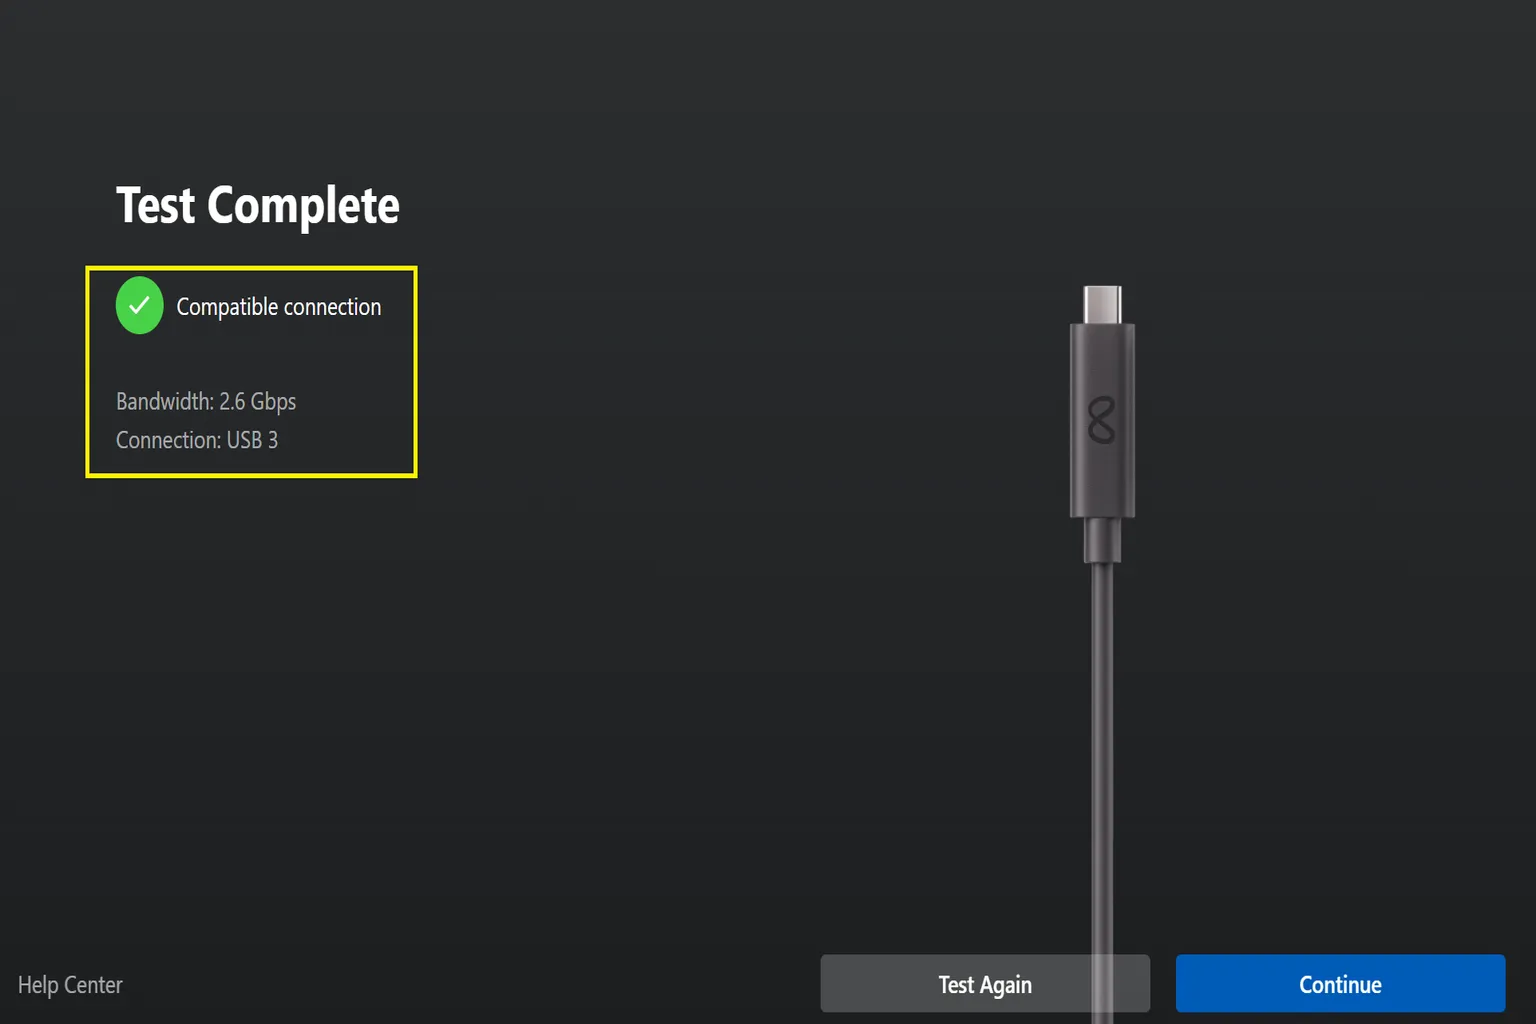
If you see Compatible connection, you can go ahead and use it as is.
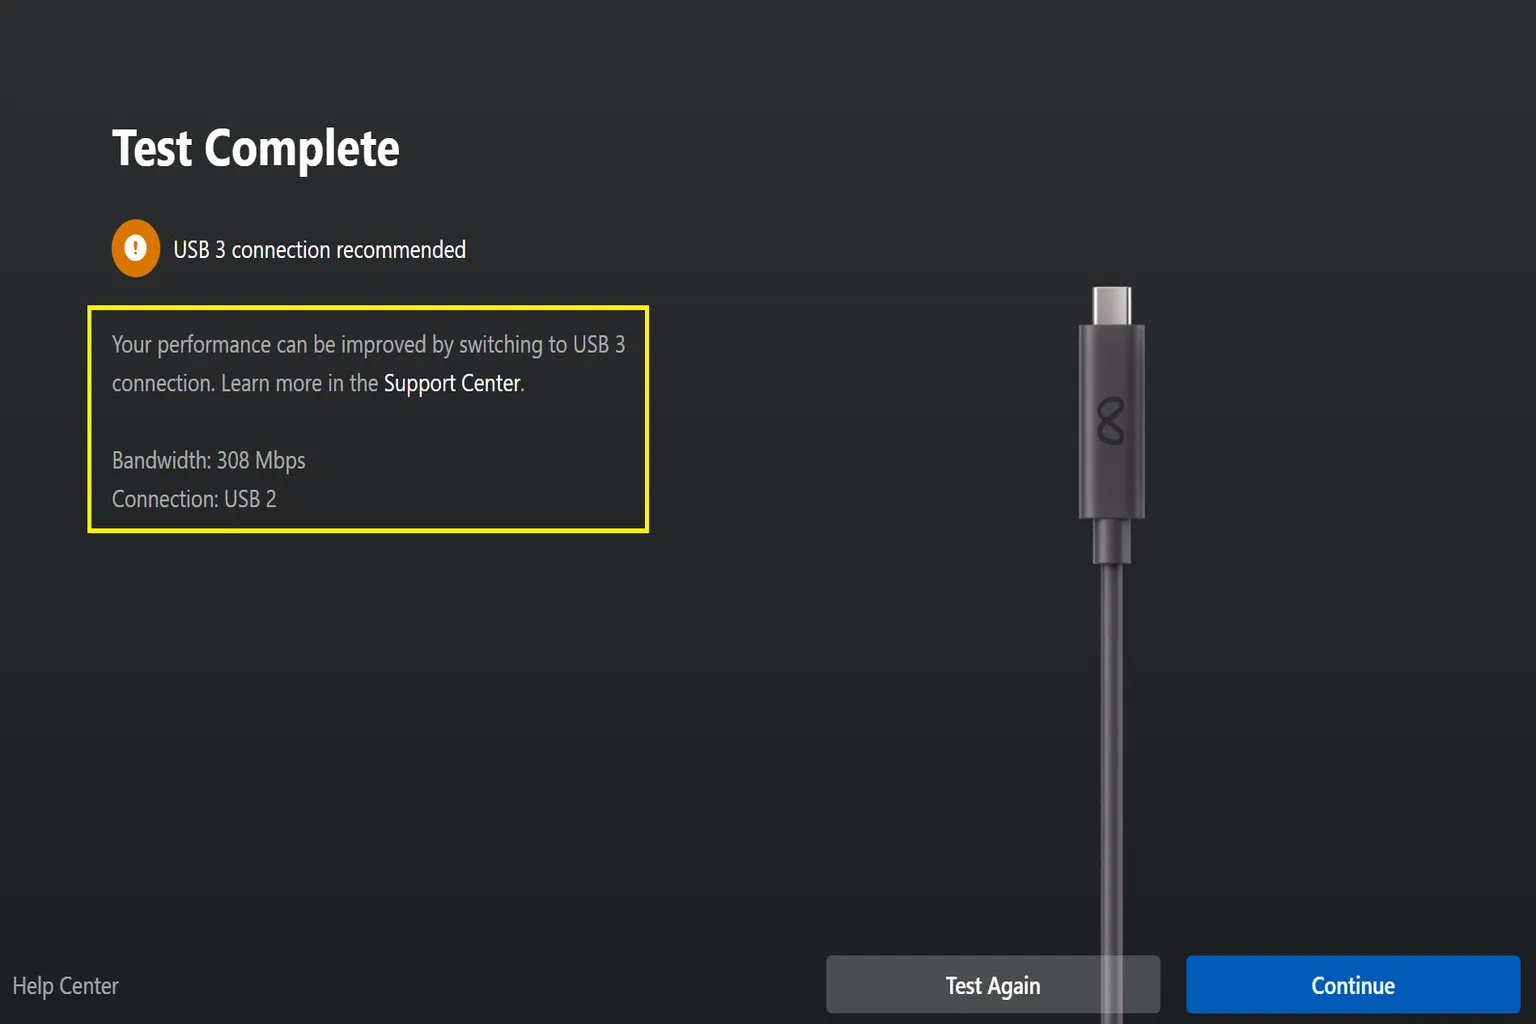
If you see USB 3 connection recommended, or if the test fails, that cable won’t work.
Once the PC-side test is done and everything looks good, you can move on to the headset settings.
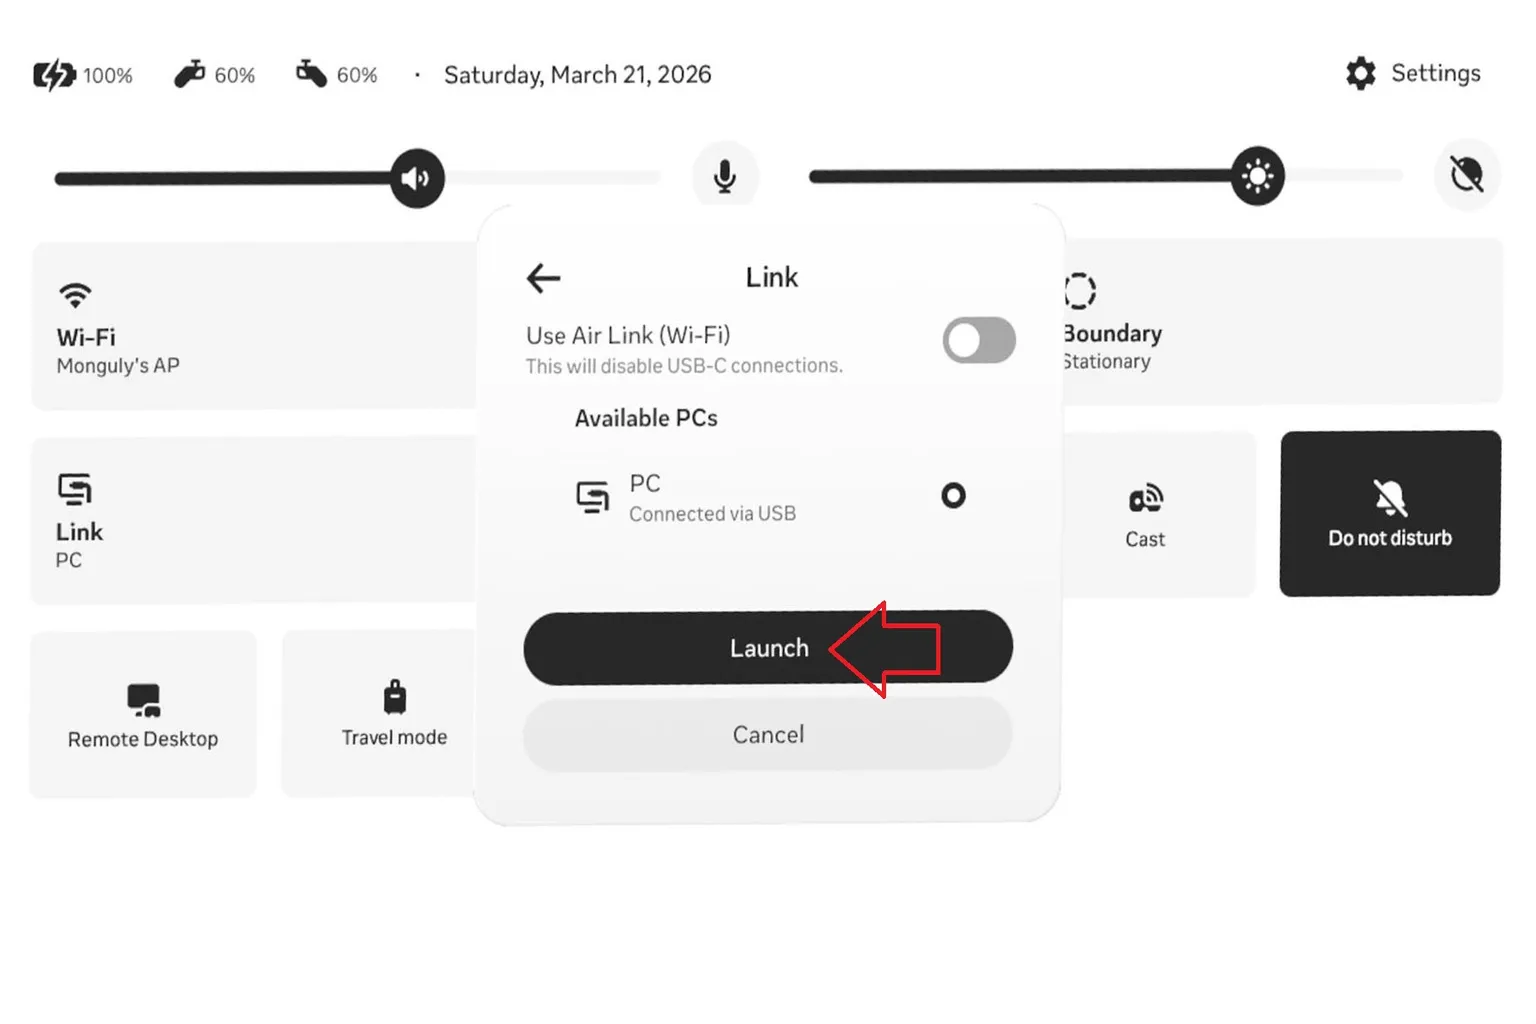
Step 1: Use Link
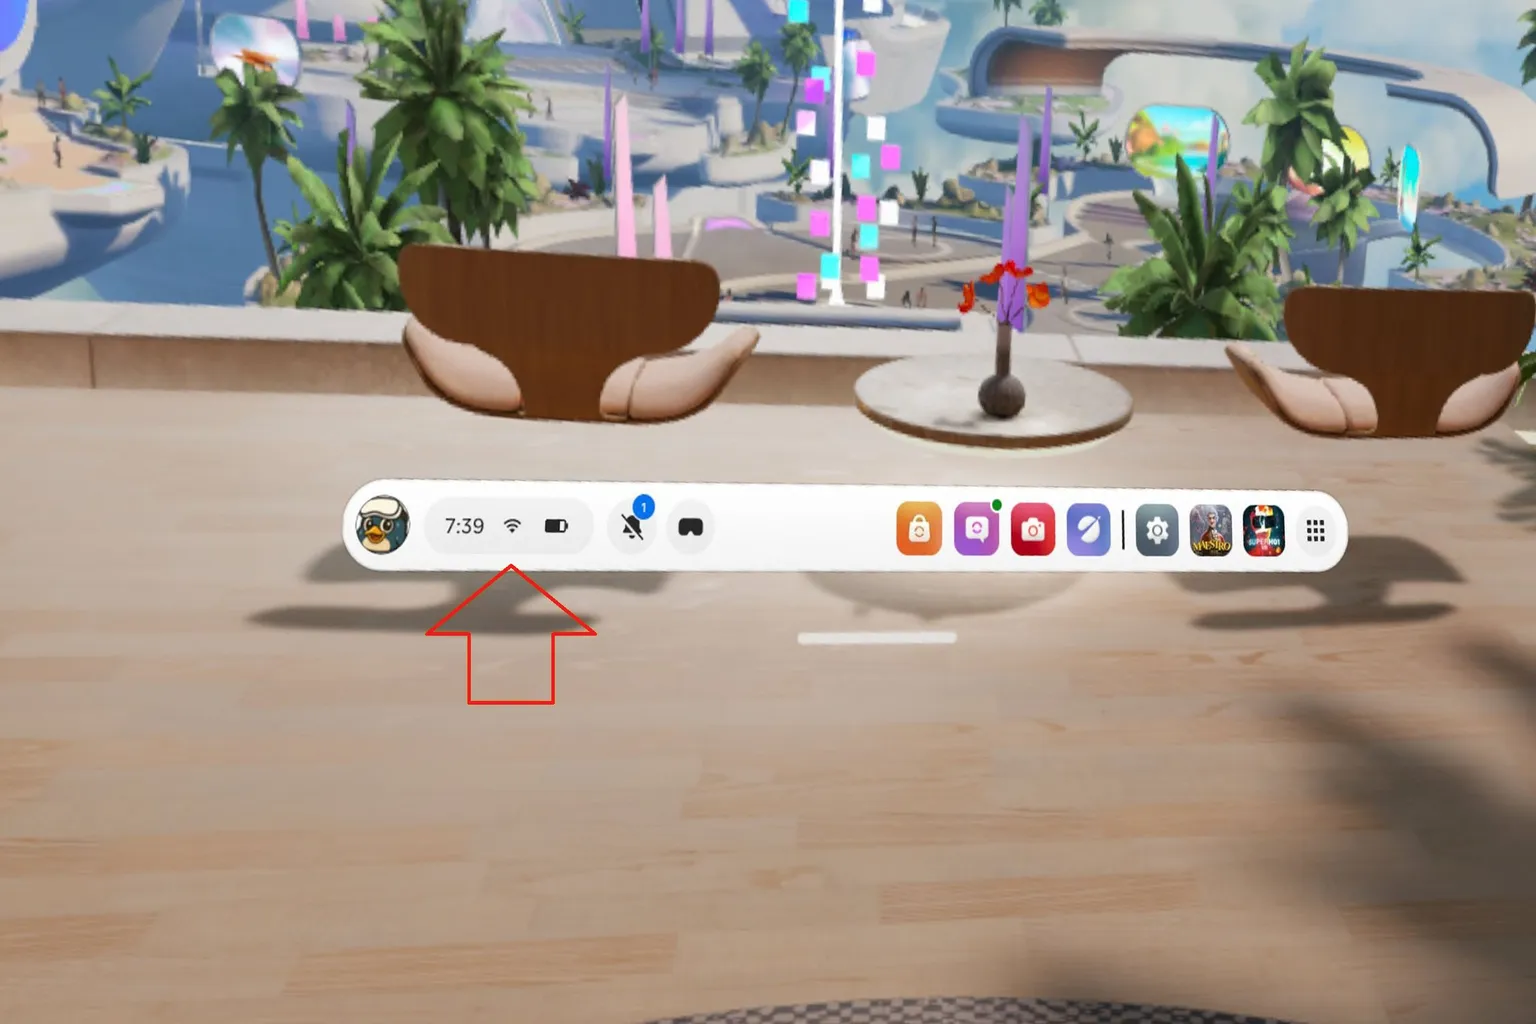
Open the settings screen on your headset.
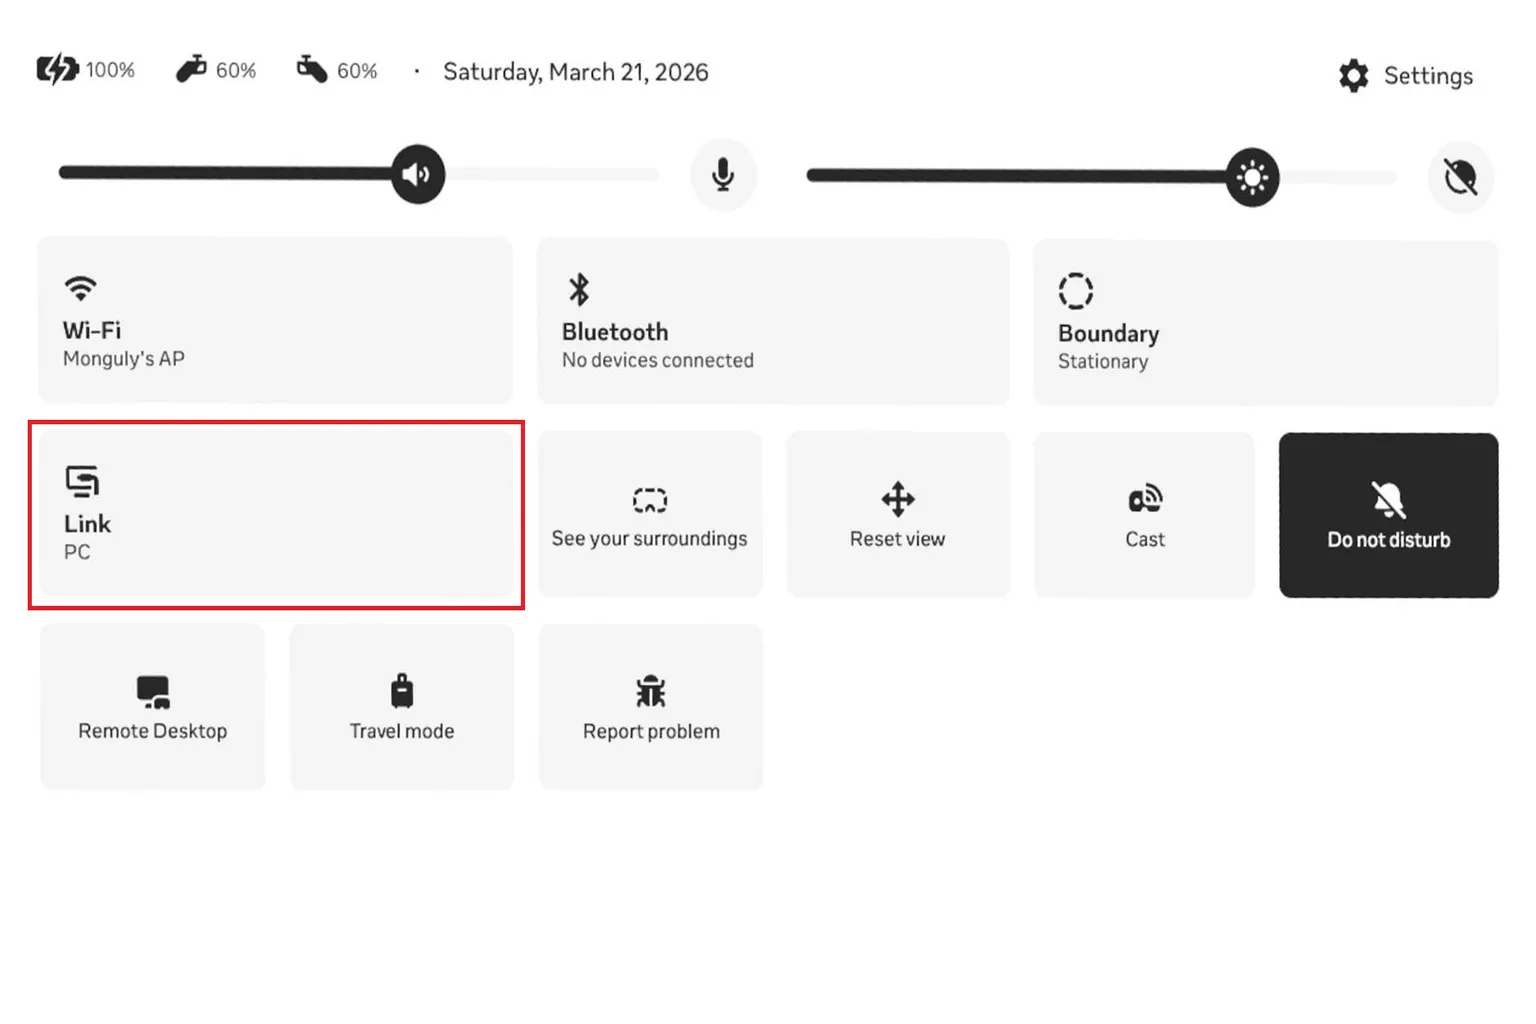
Select Link.
Step 2: Connect to Your PC
Here, you’ll see that your PC and headset are connected via USB. Press Launch, and the connection will complete.
One thing to watch out for—when using a wired connection, make sure Air Link is turned off.
How to Connect Wirelessly
Before you start, make sure you have the following ready:
- A Wi-Fi router (Wi-Fi 6 or higher is recommended)
- A Windows 10 or 11 PC (connected to the same Wi-Fi network as your Quest)
- Your Quest headset connected to the same Wi-Fi network as your PC
- Download Horizon Link from the official Meta website and install it on your PC
- Make sure you’re already logged into Horizon Link with your Meta Quest account
Step 1: Start the Wireless Connection
The process is almost the same as wired. After installing the software, just select Air Link on the right side.

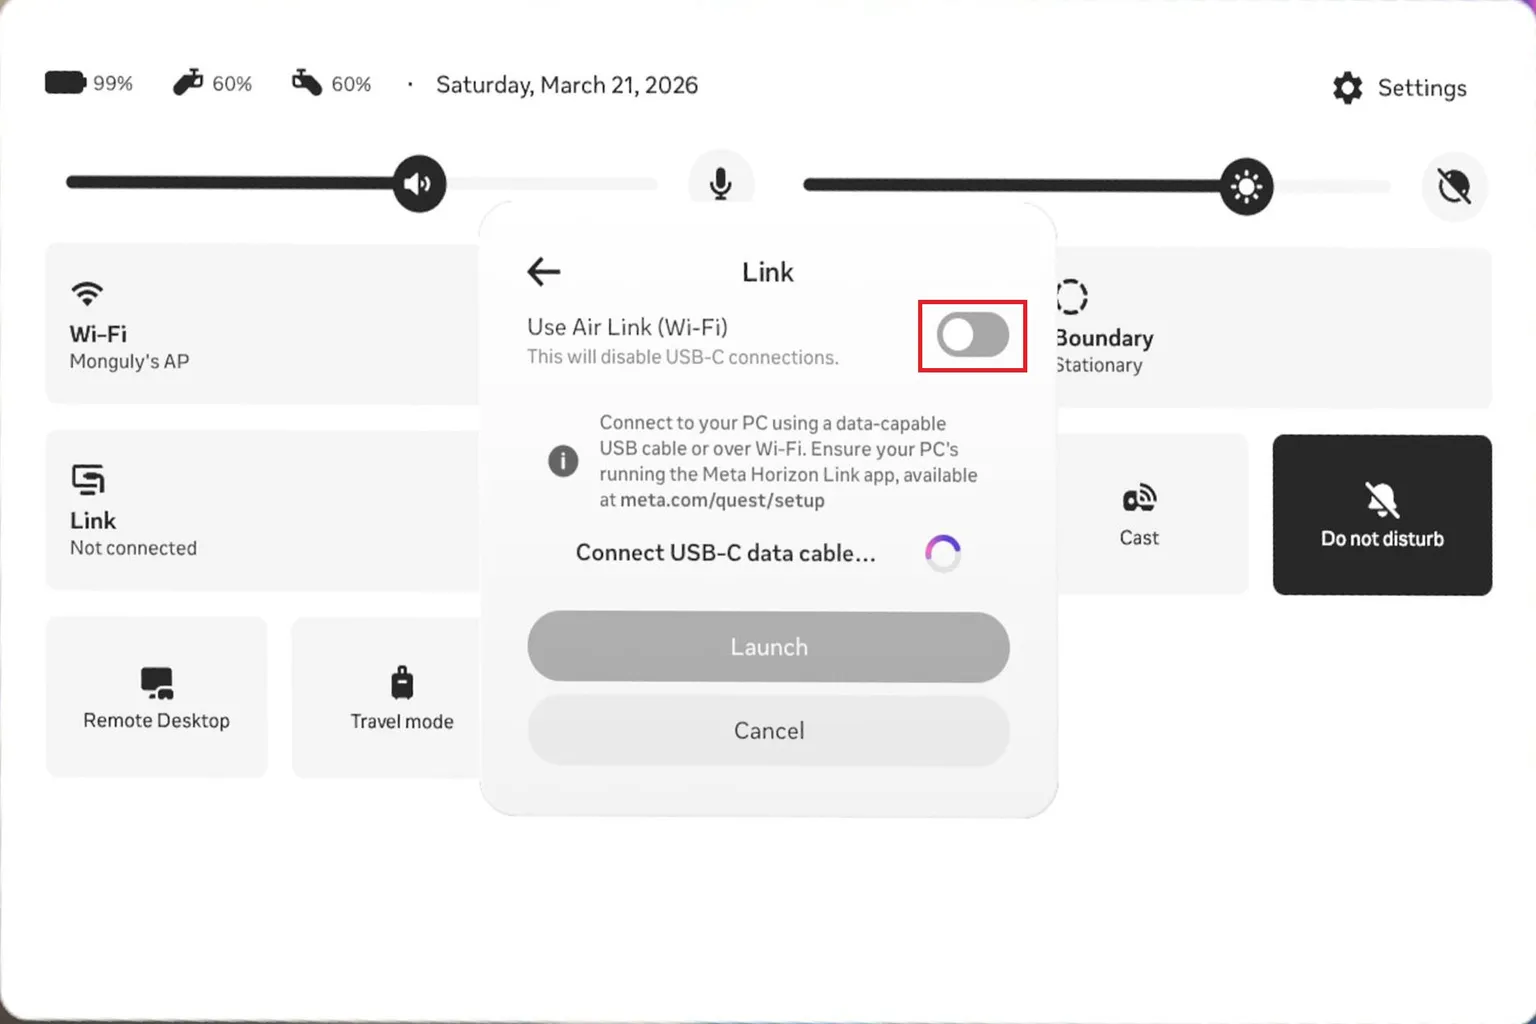
Step 2: Turn On Air Link
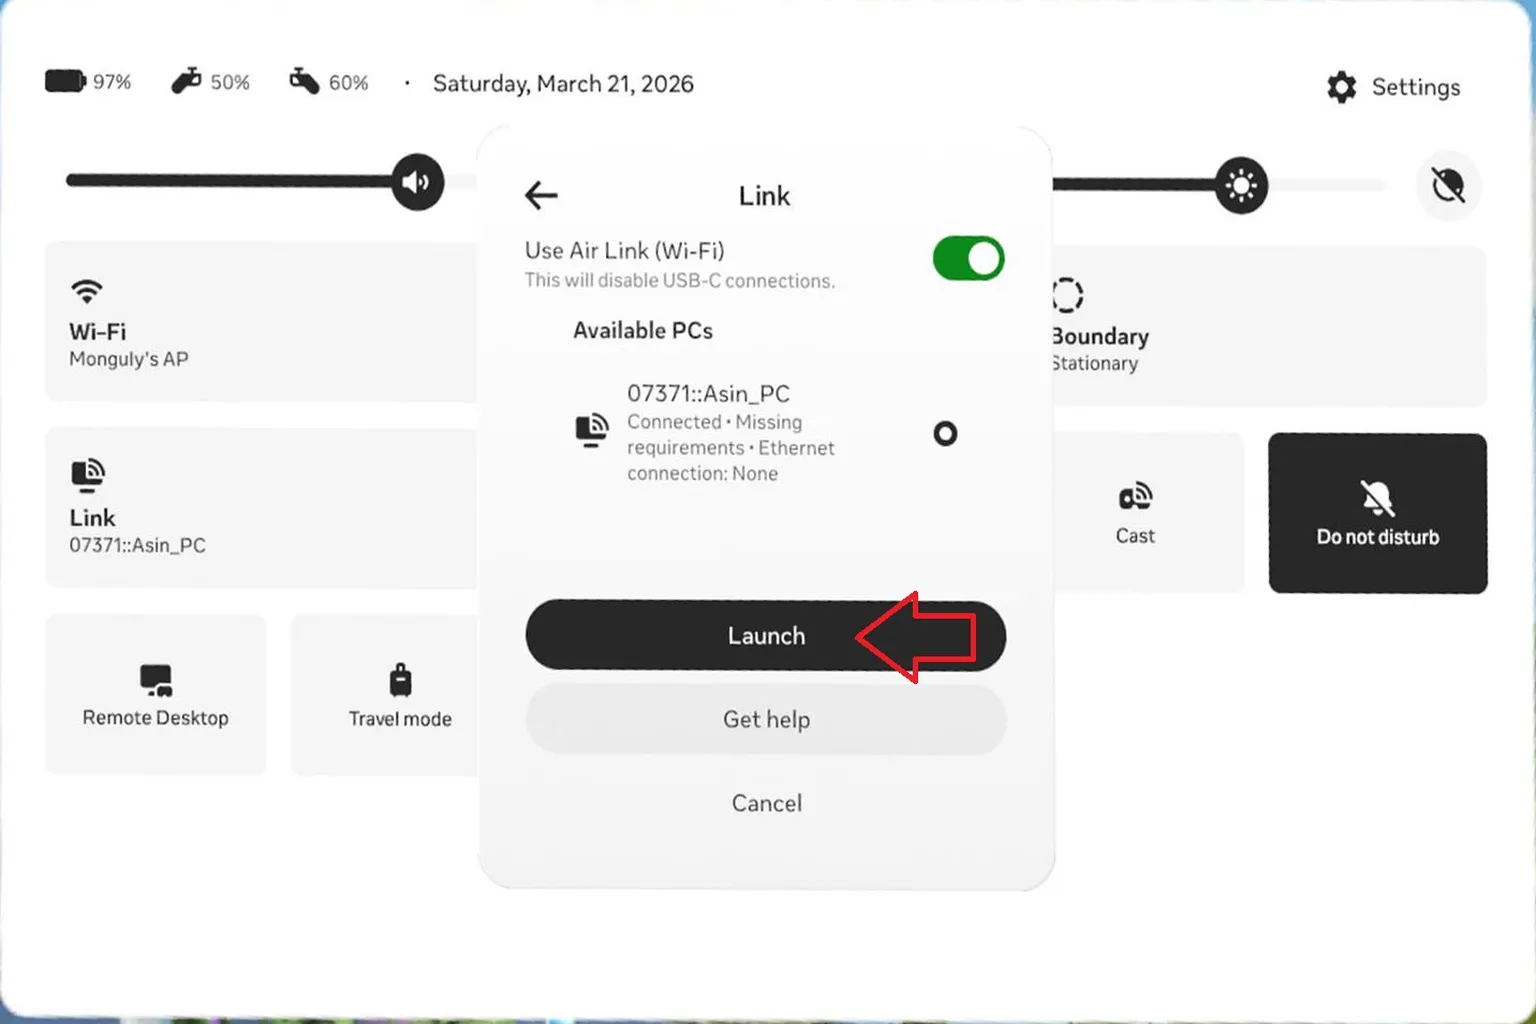
Open the settings screen on your headset, then select Link.
Press the button to turn on Air Link.
Step 3: Connect to Your PC
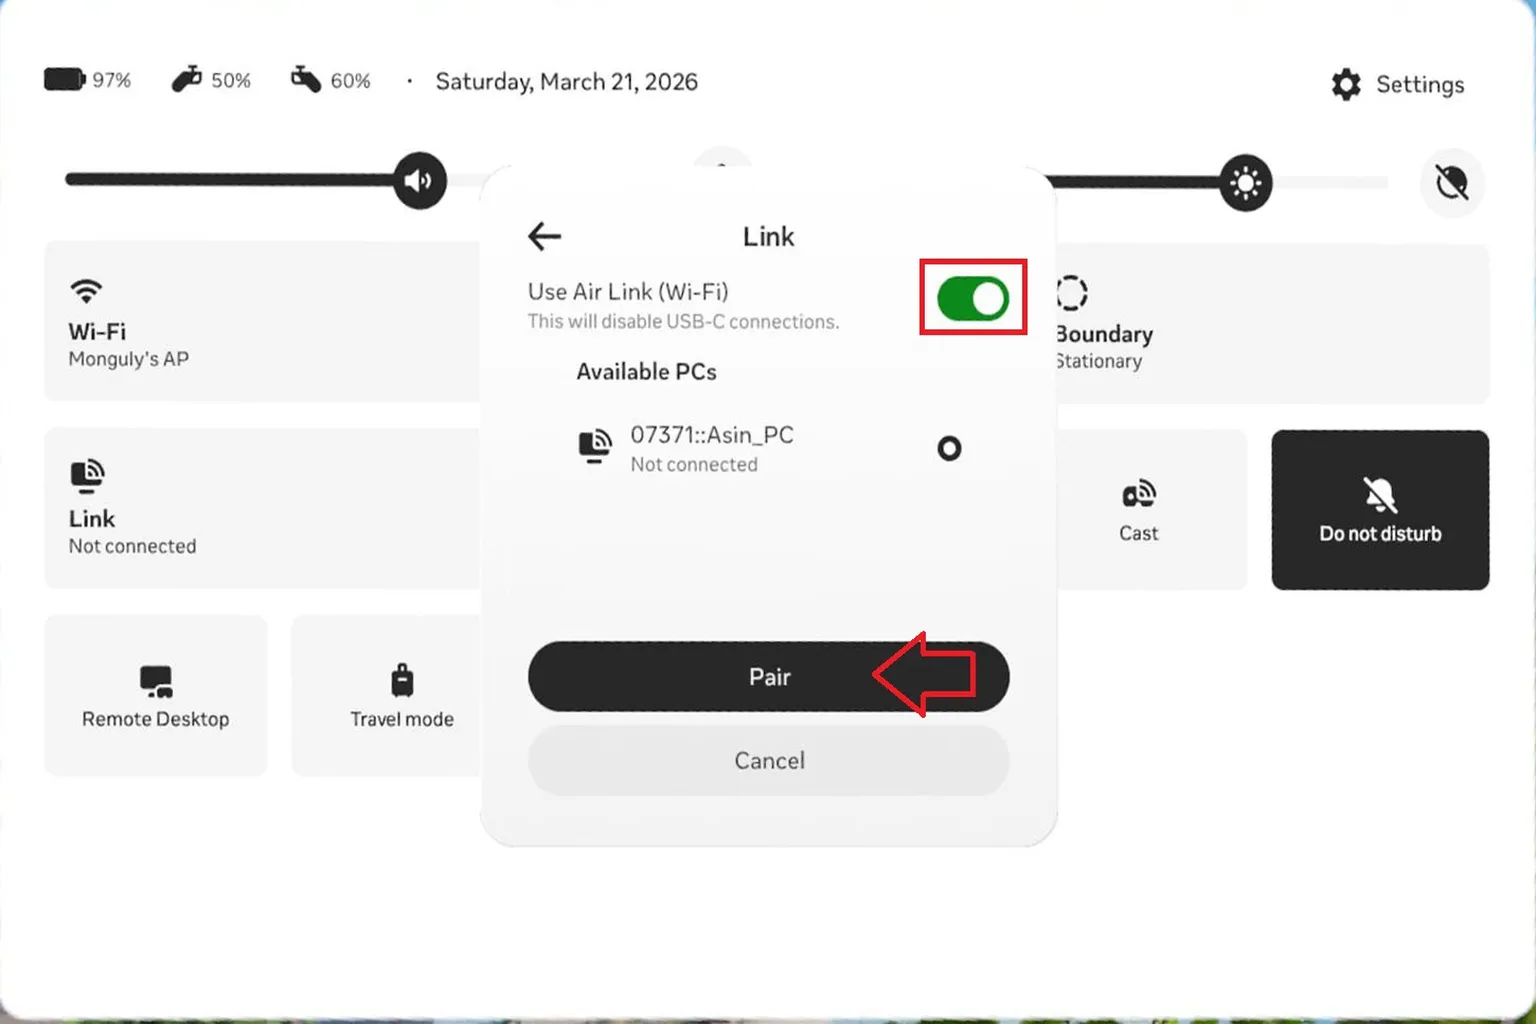
Once Air Link is turned on, your PC will appear. Select it and press Pair.
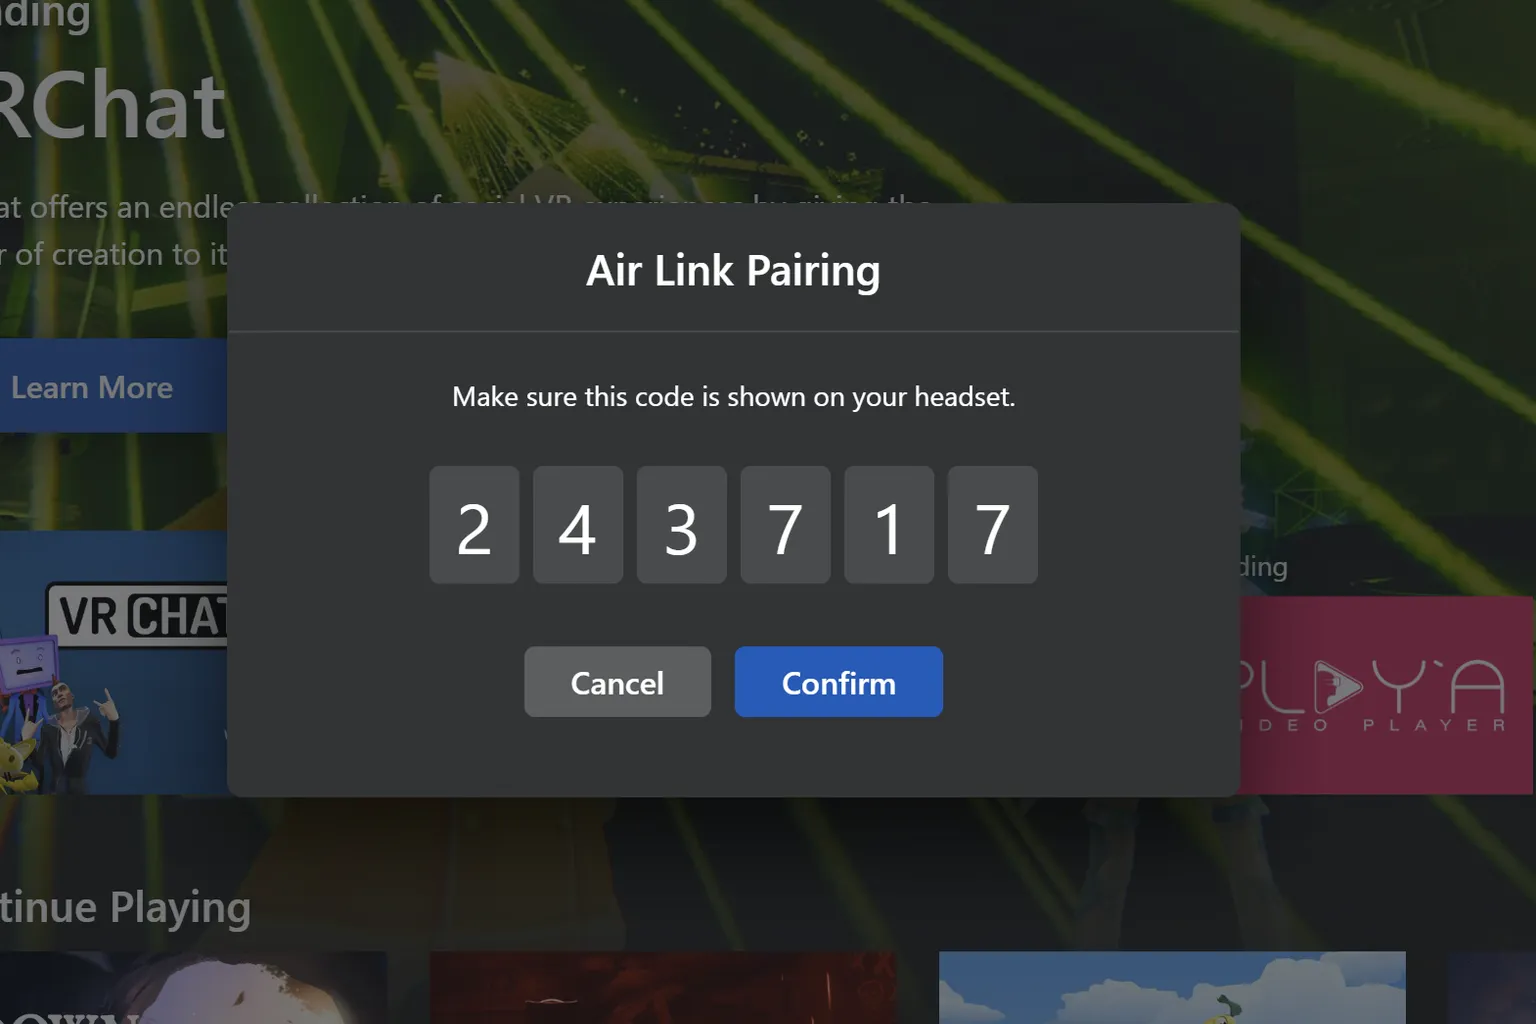
At this point, a pairing code will appear on the headset. Go back to your PC.
If the code shown on your PC matches, just press Confirm.
Go back to the headset again and press Continue.
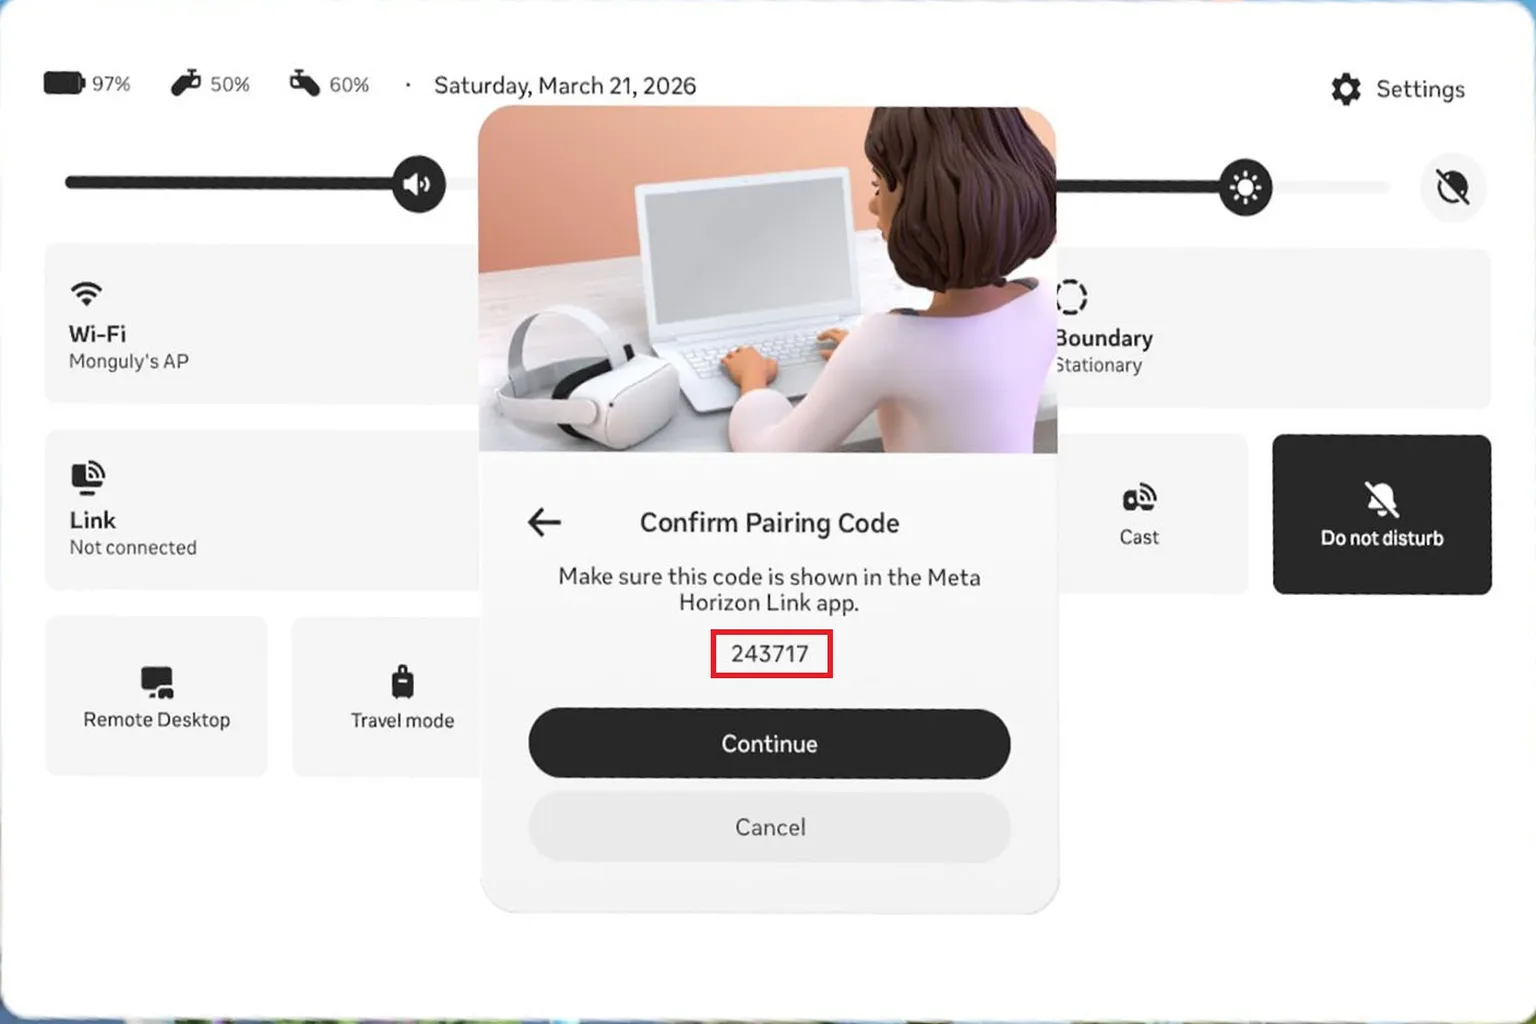
Now your PC and headset are connected wirelessly through Air Link.
Press Launch, and you’ll enter the Air Link home screen.
Troubleshooting: Wired Connection Not Working
There’s a weird bug where a wired connection won’t go through.
There’s a Devices button on the left side, and normally you’d start the connection from there. But in this version of Horizon Link, it doesn’t behave properly, and pressing it won’t take you into the setup.
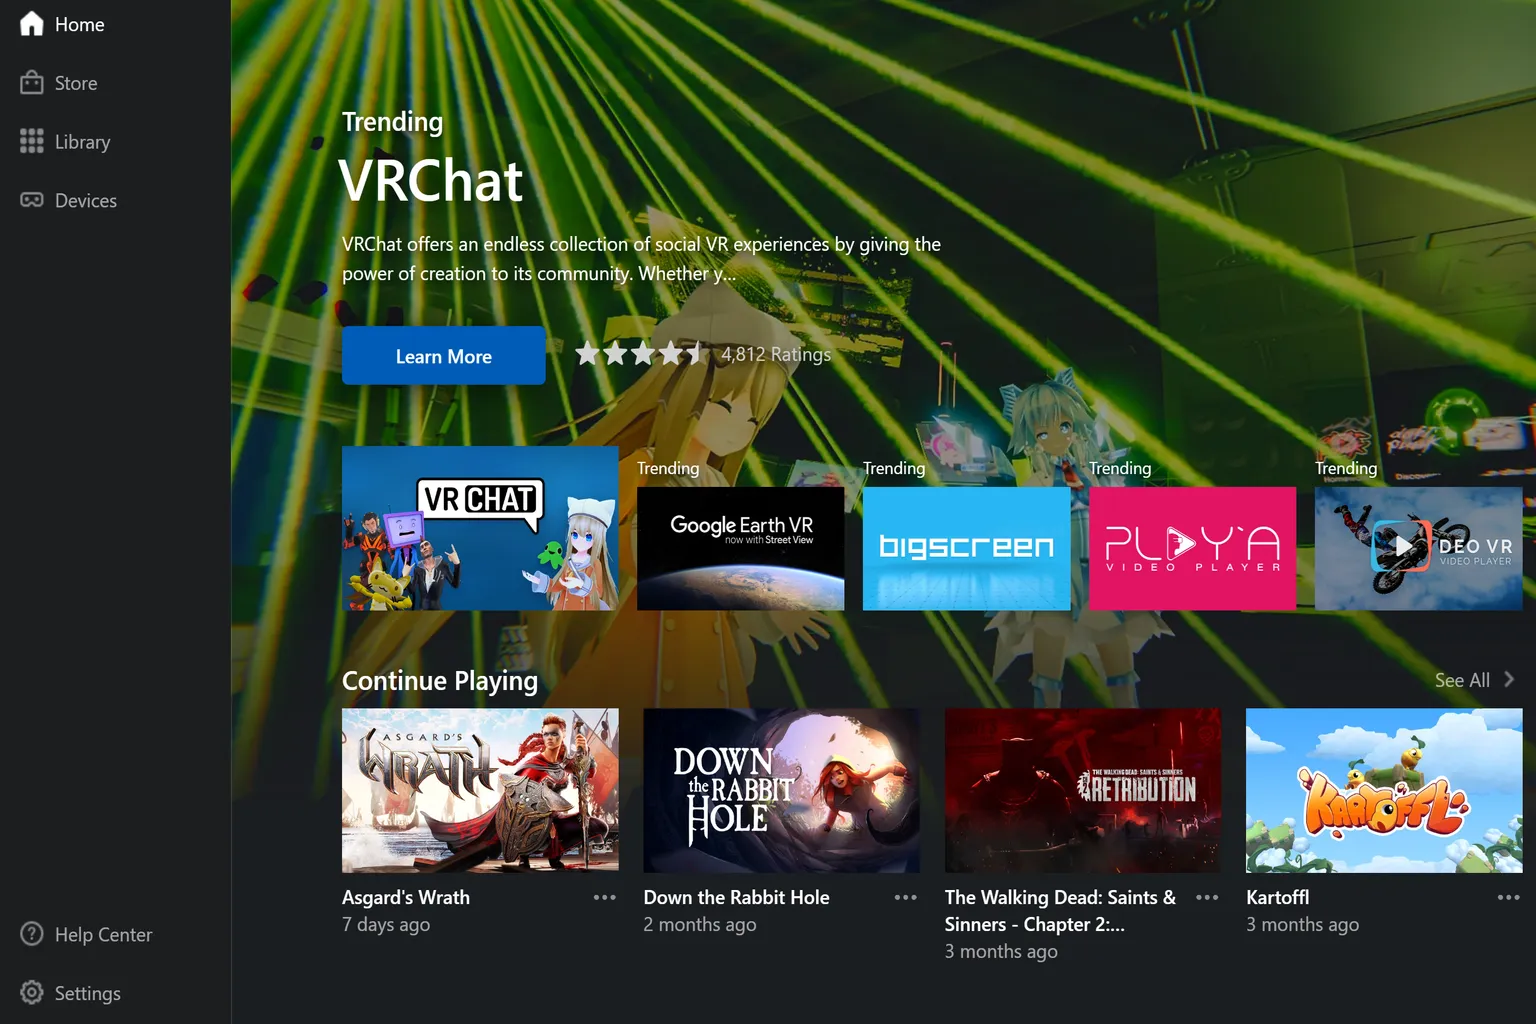
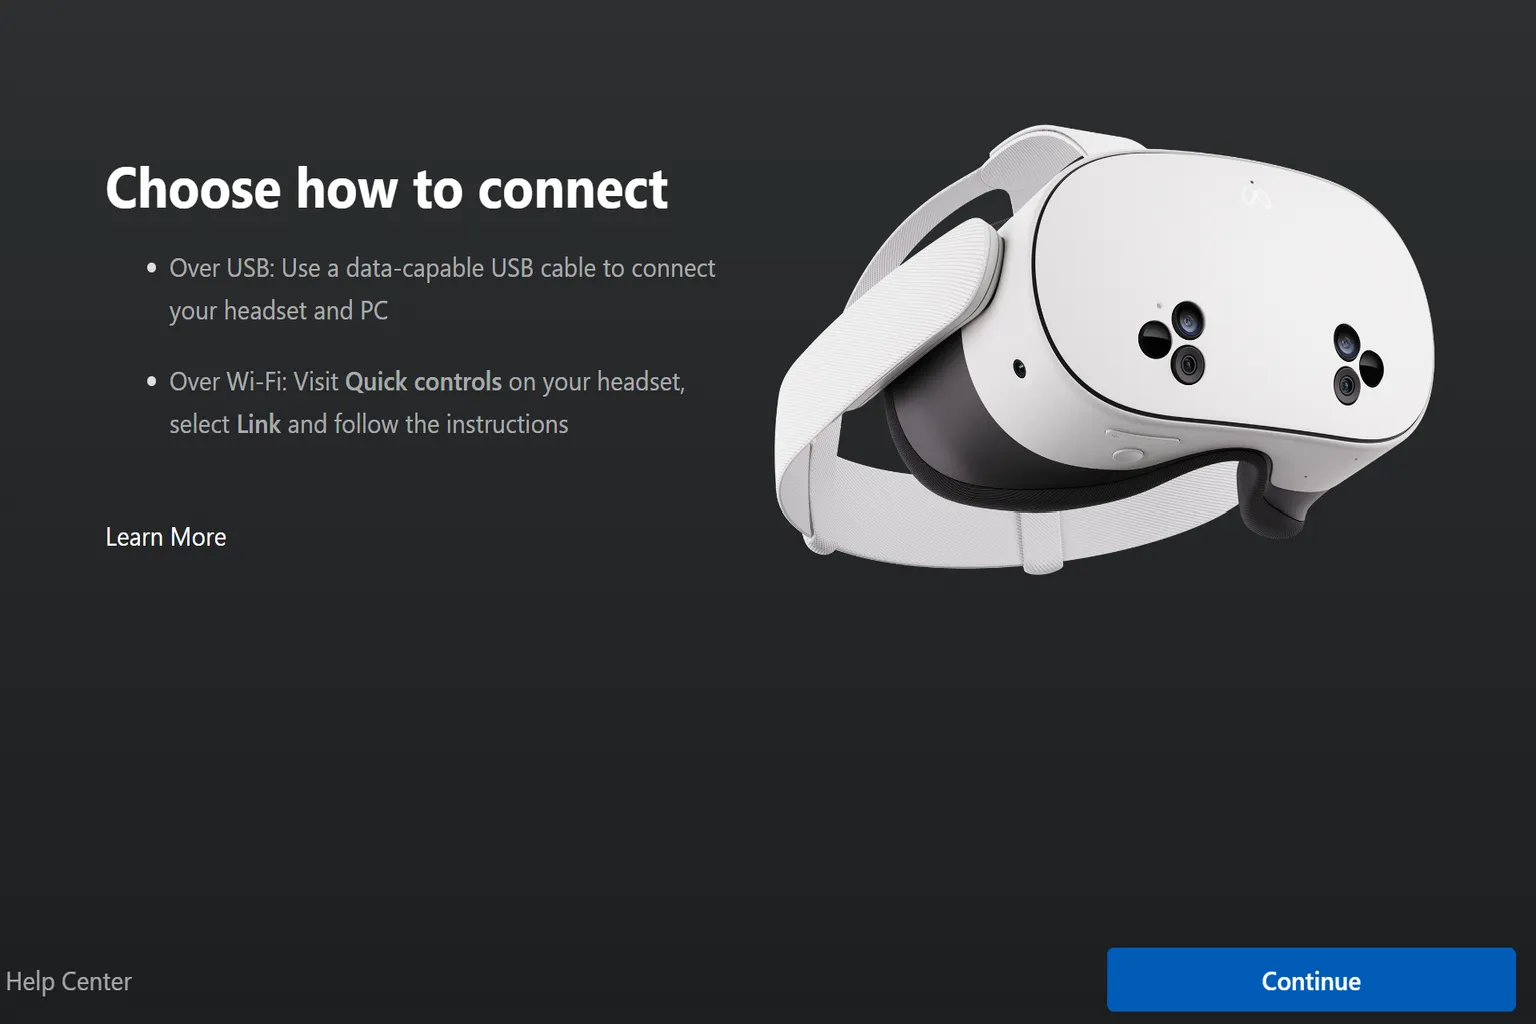
When you select a device, it takes you to this setup screen where you choose how to connect.
But when you press Continue, it just sends you back to the previous screen, so you can’t actually use it like that.
This issue started showing up around Horizon Link V83 in late 2025, and it’s still not fixed in V85 or even V201 in 2026.
In most cases, it’s caused by account data getting stuck in the system, and signing in again usually fixes it.
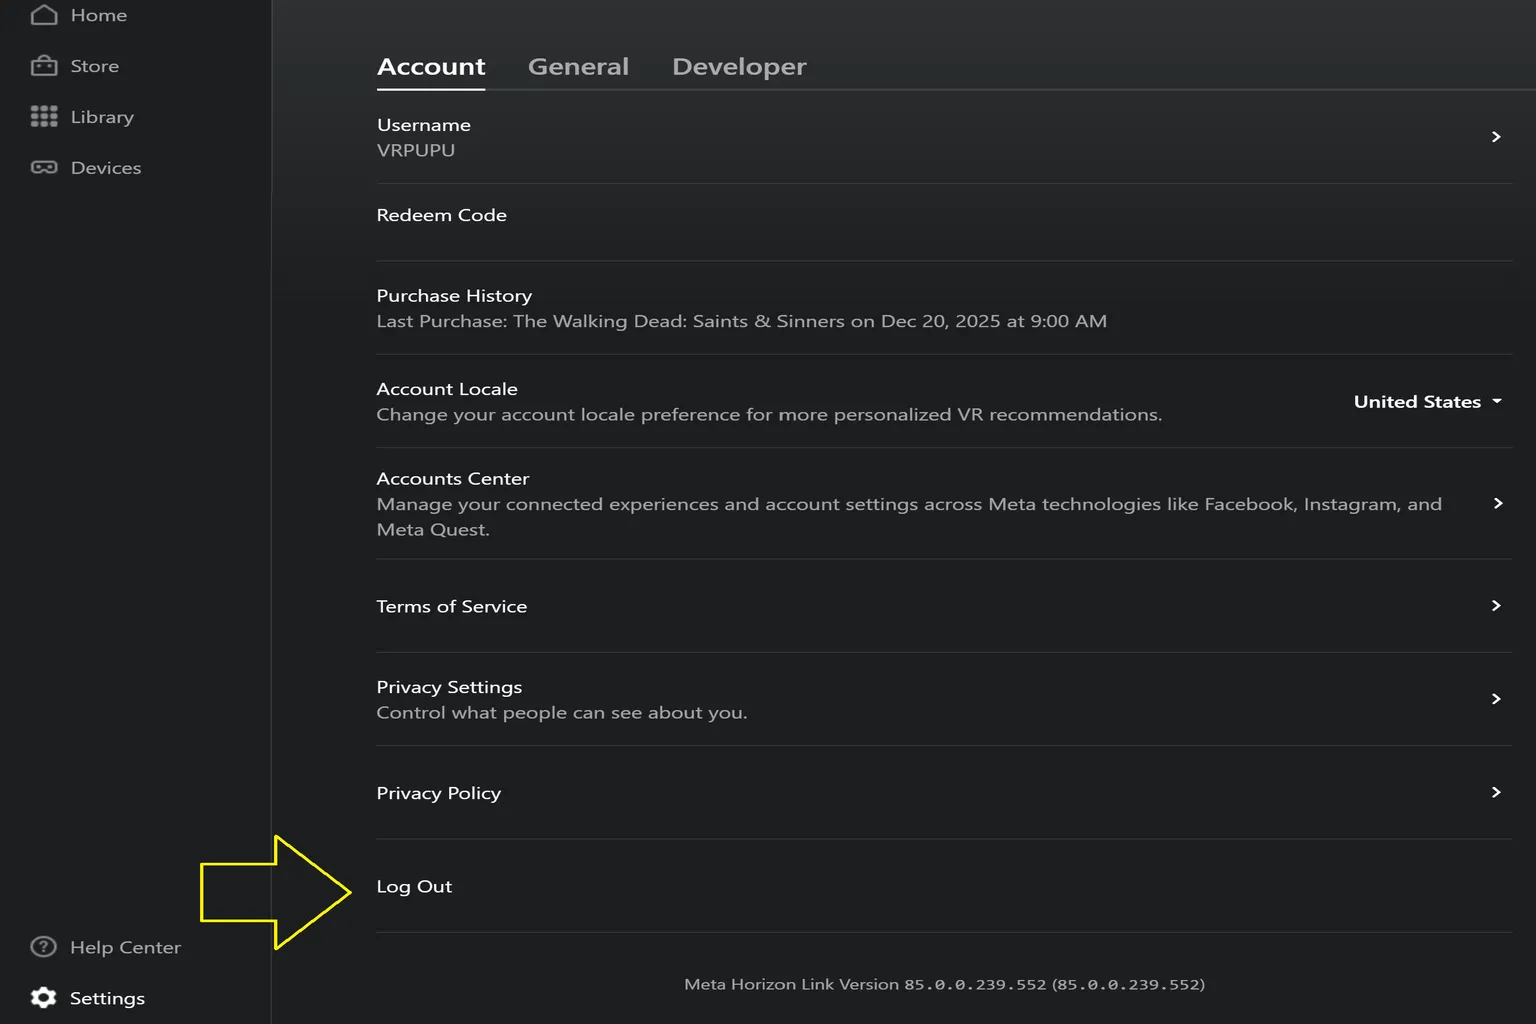
Open Settings, go to the account tab, and select Log out at the bottom to sign out once.
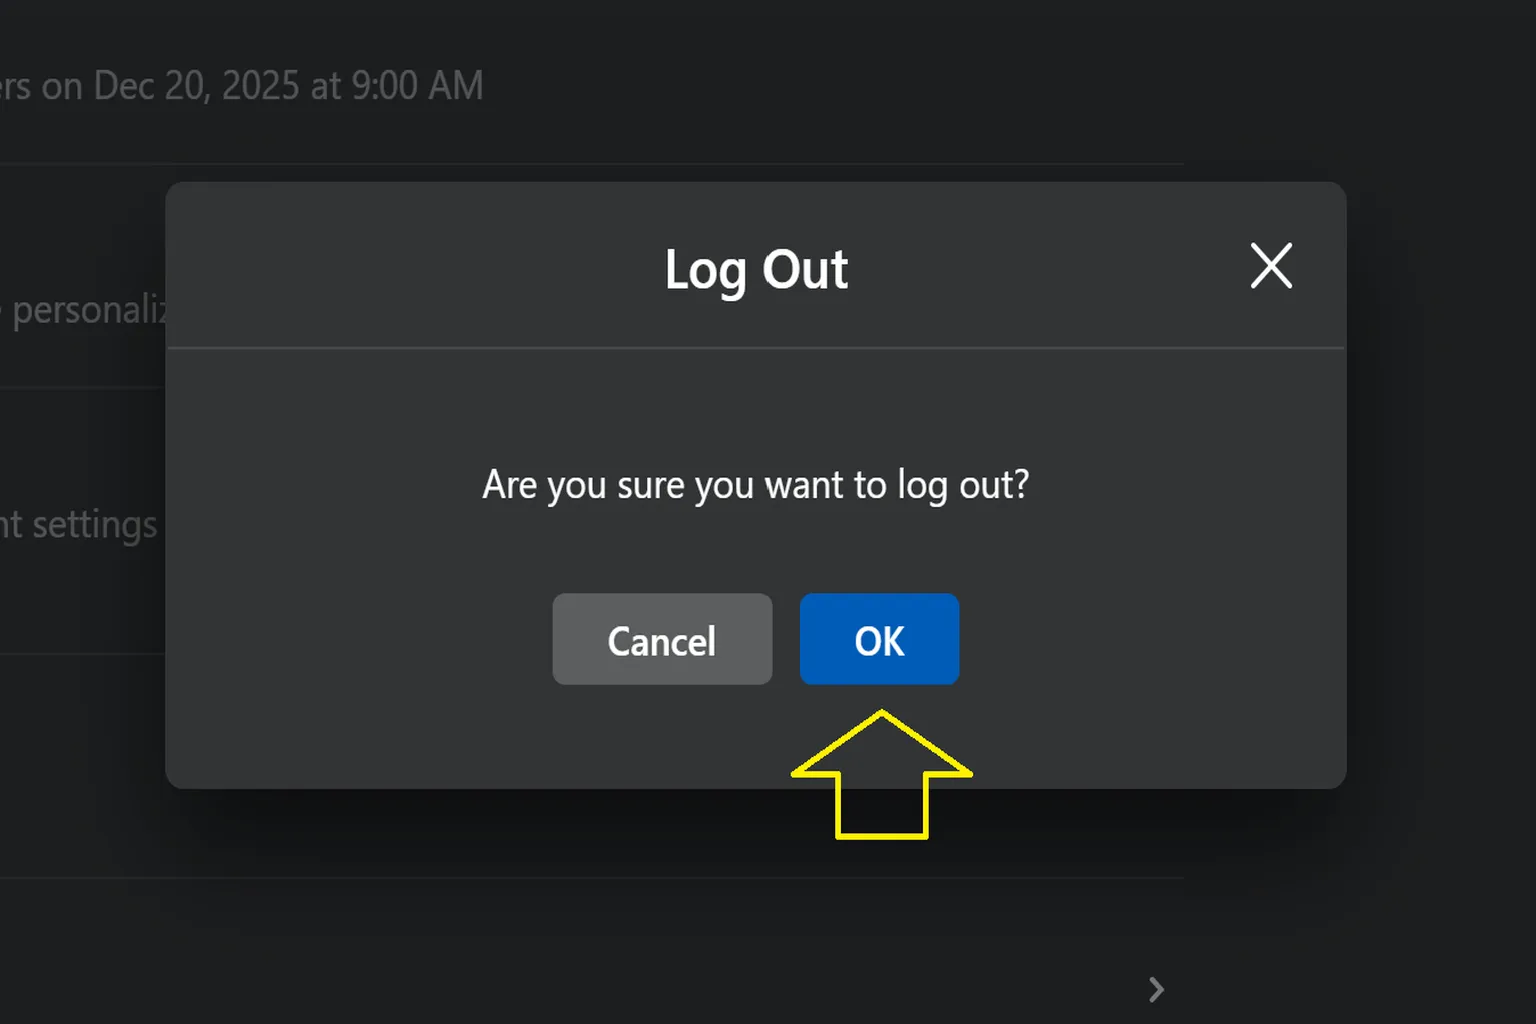
You’ll see a logout confirmation. Just press OK.
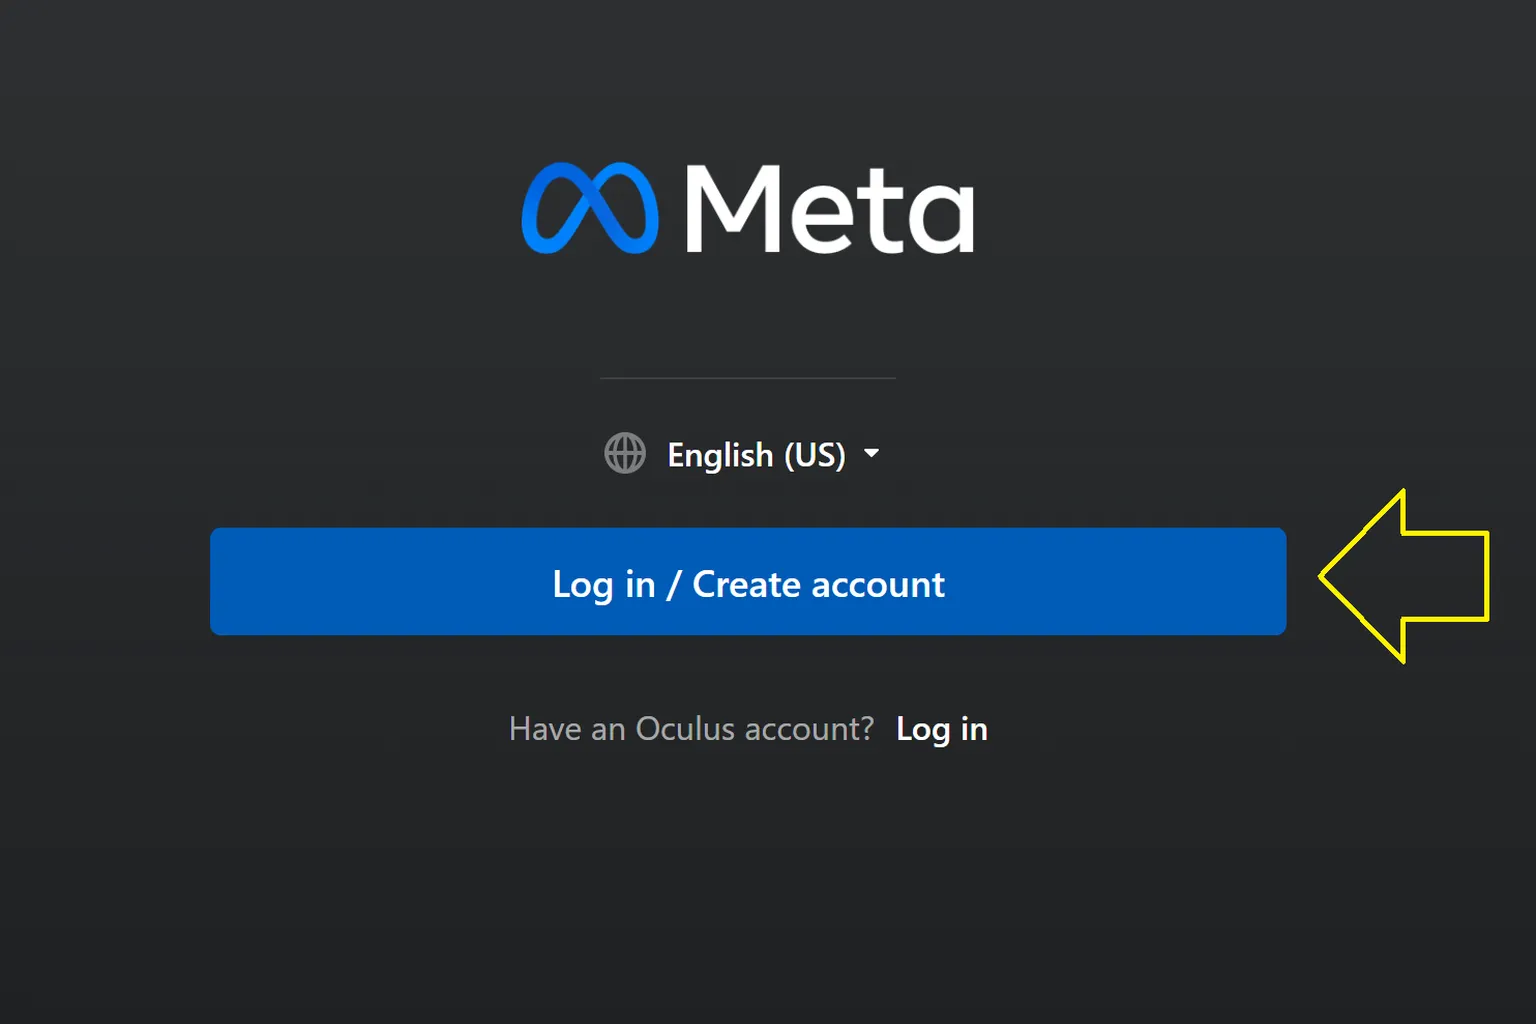
After that, sign in again with your Meta account.
Just press Log in / Create account.
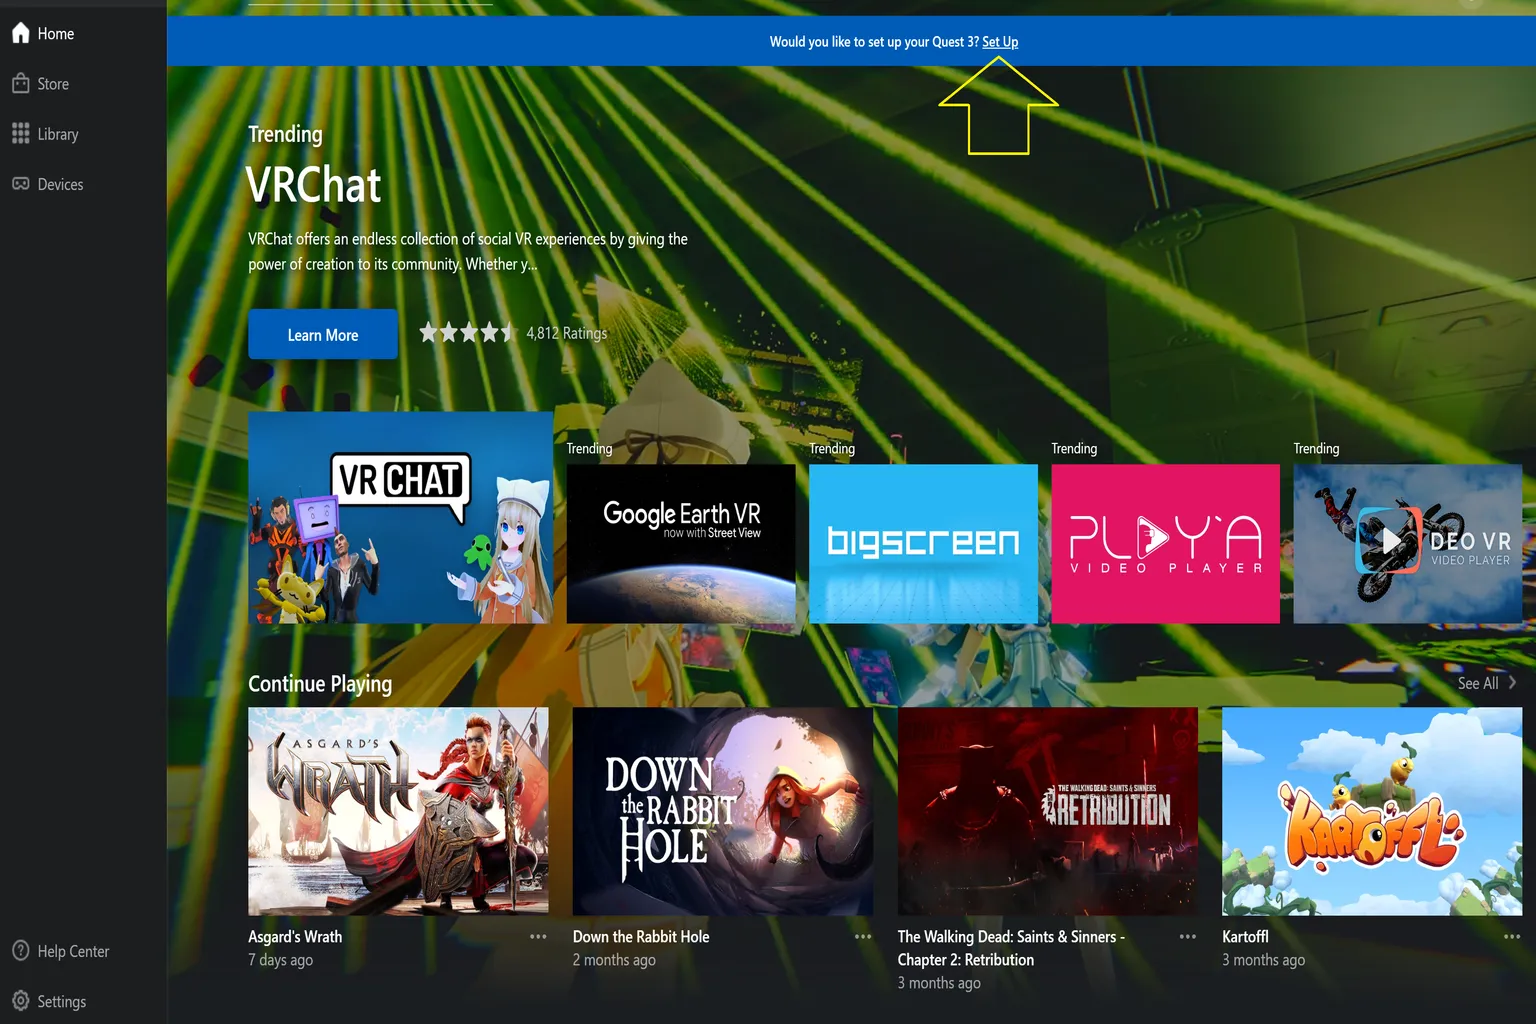
After signing back in, connect your headset to the PC with a USB cable. The PC will automatically recognize your headset model.
From there, press Set Up and continue with the connection.
After that, just follow the same steps as the wired connection you went through earlier.
Press Set Up and continue.

Overview of Settings
Meta Horizon has two separate settings screens: System Settings and Device Settings.
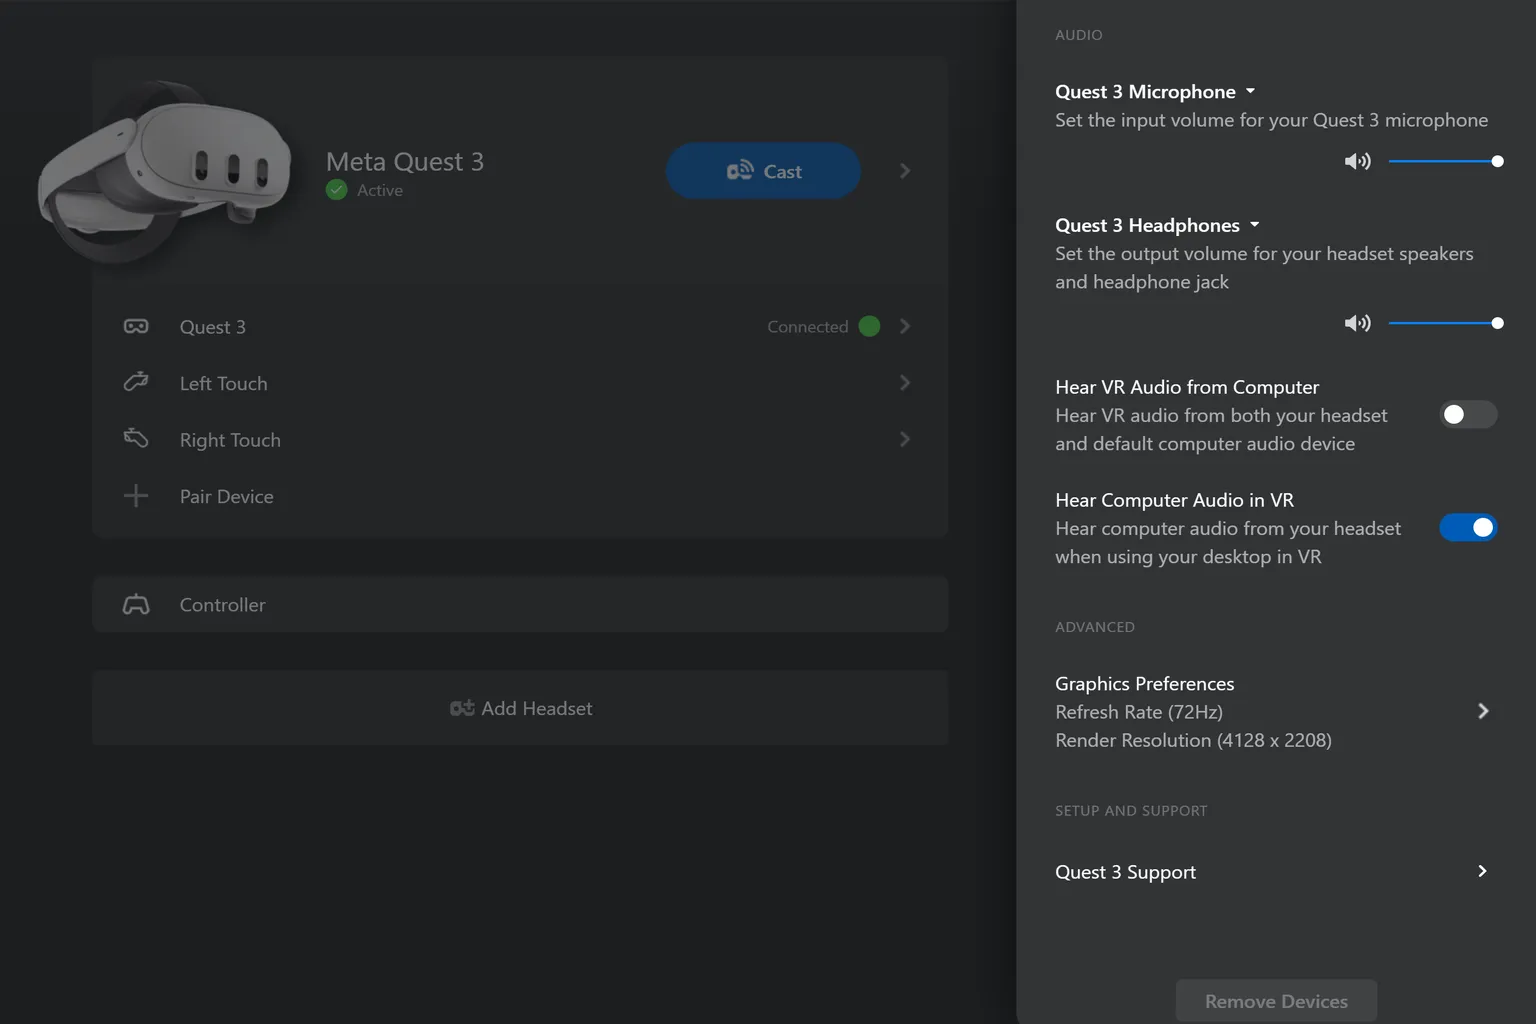
System Settings is where you manage your account, display options, and developer-related settings. Device Settings is where you adjust things like headset FPS, resolution, and audio.
Next, we’ll go through each of them step by step.
System Settings
You can access this from Settings in the bottom-left corner of the home screen. Inside, it’s divided into three main sections:
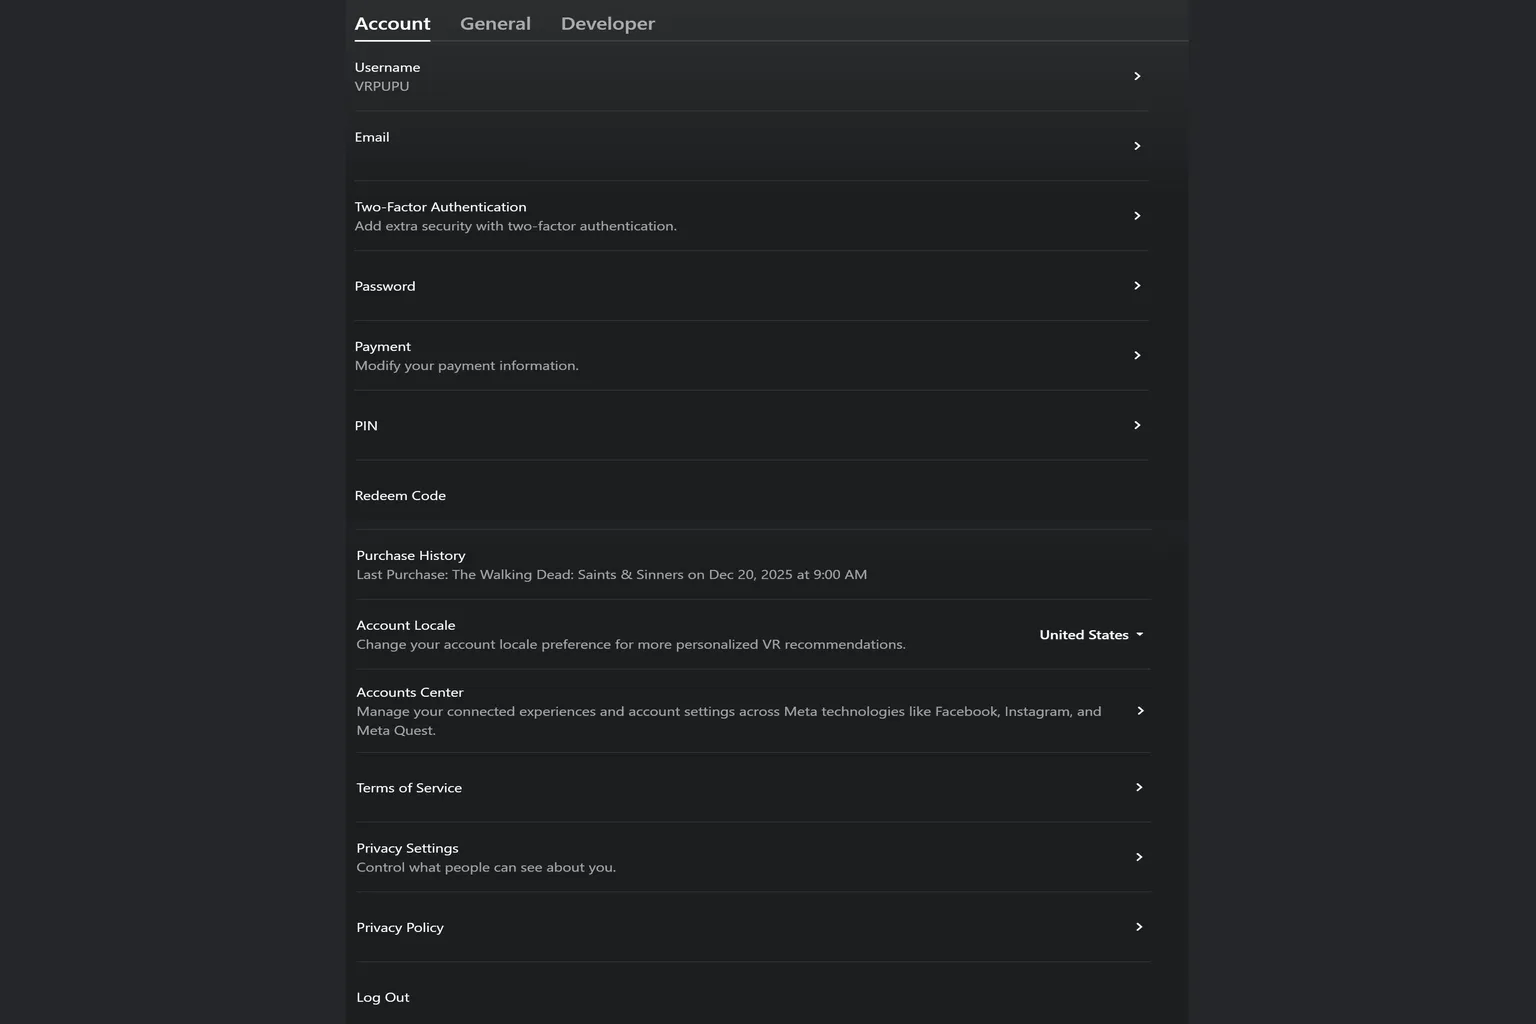
- Account: This is where you manage your Meta account. You can check and update your username, email address, two-factor authentication, payment methods, PIN, purchase history, and privacy settings. It’s basically where all your account info is handled in one place.
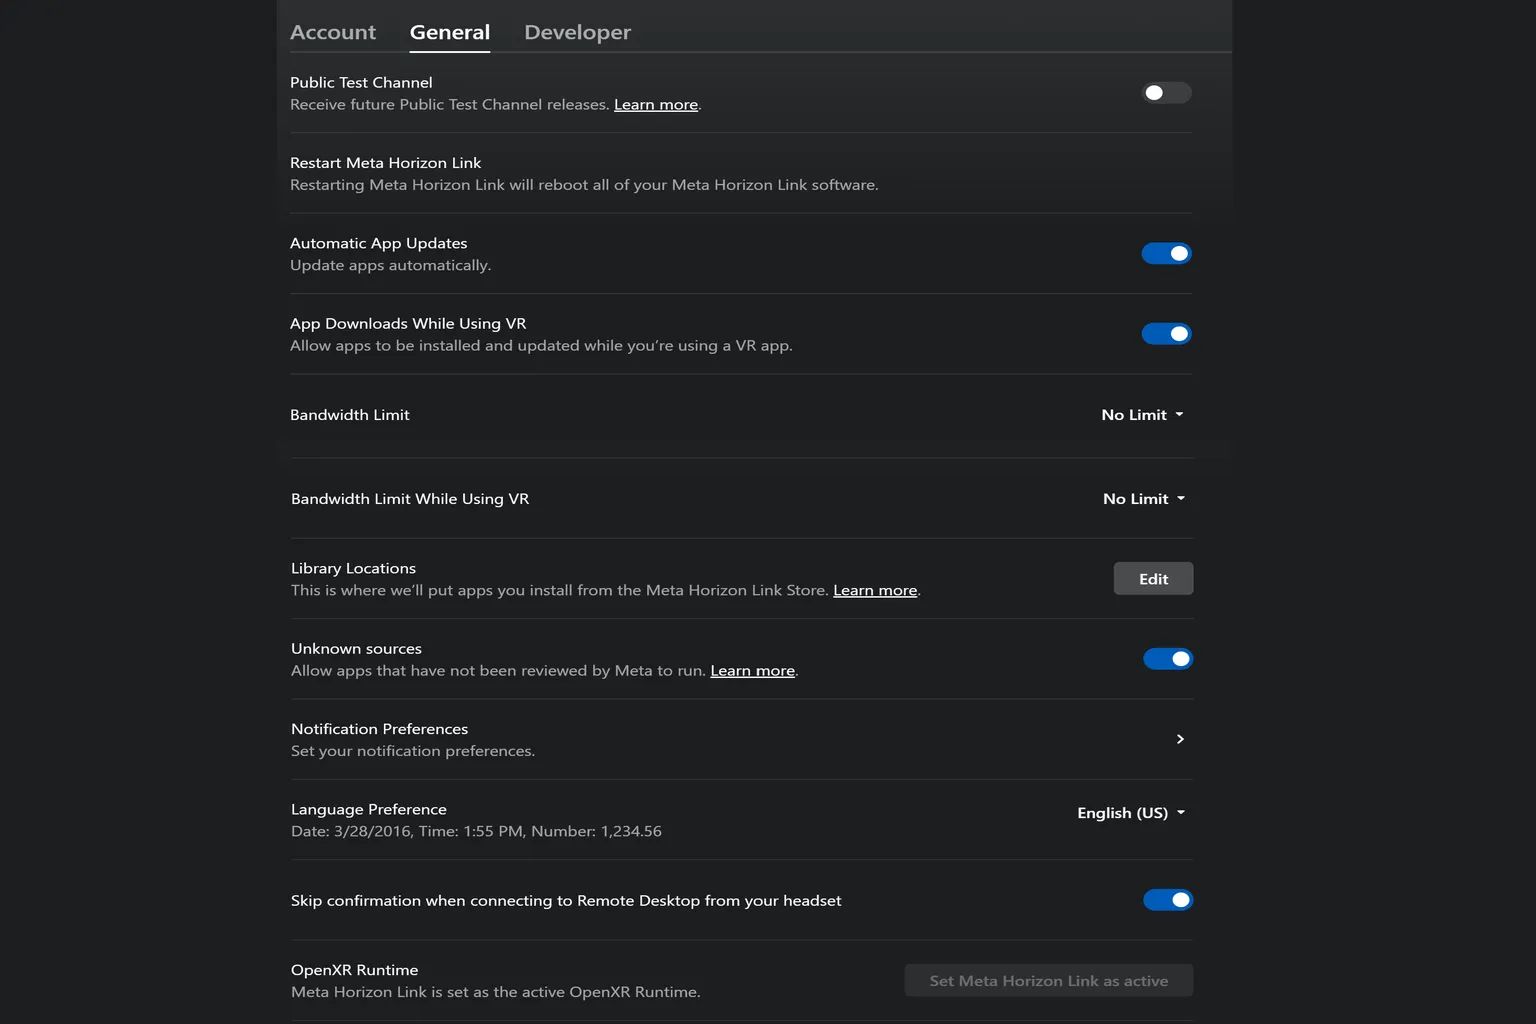
- General: These are the basic settings for Horizon Link. You’ll find things like automatic updates, bandwidth limits, unknown sources, language settings, and the OpenXR runtime. This is probably the page you’ll use the most.
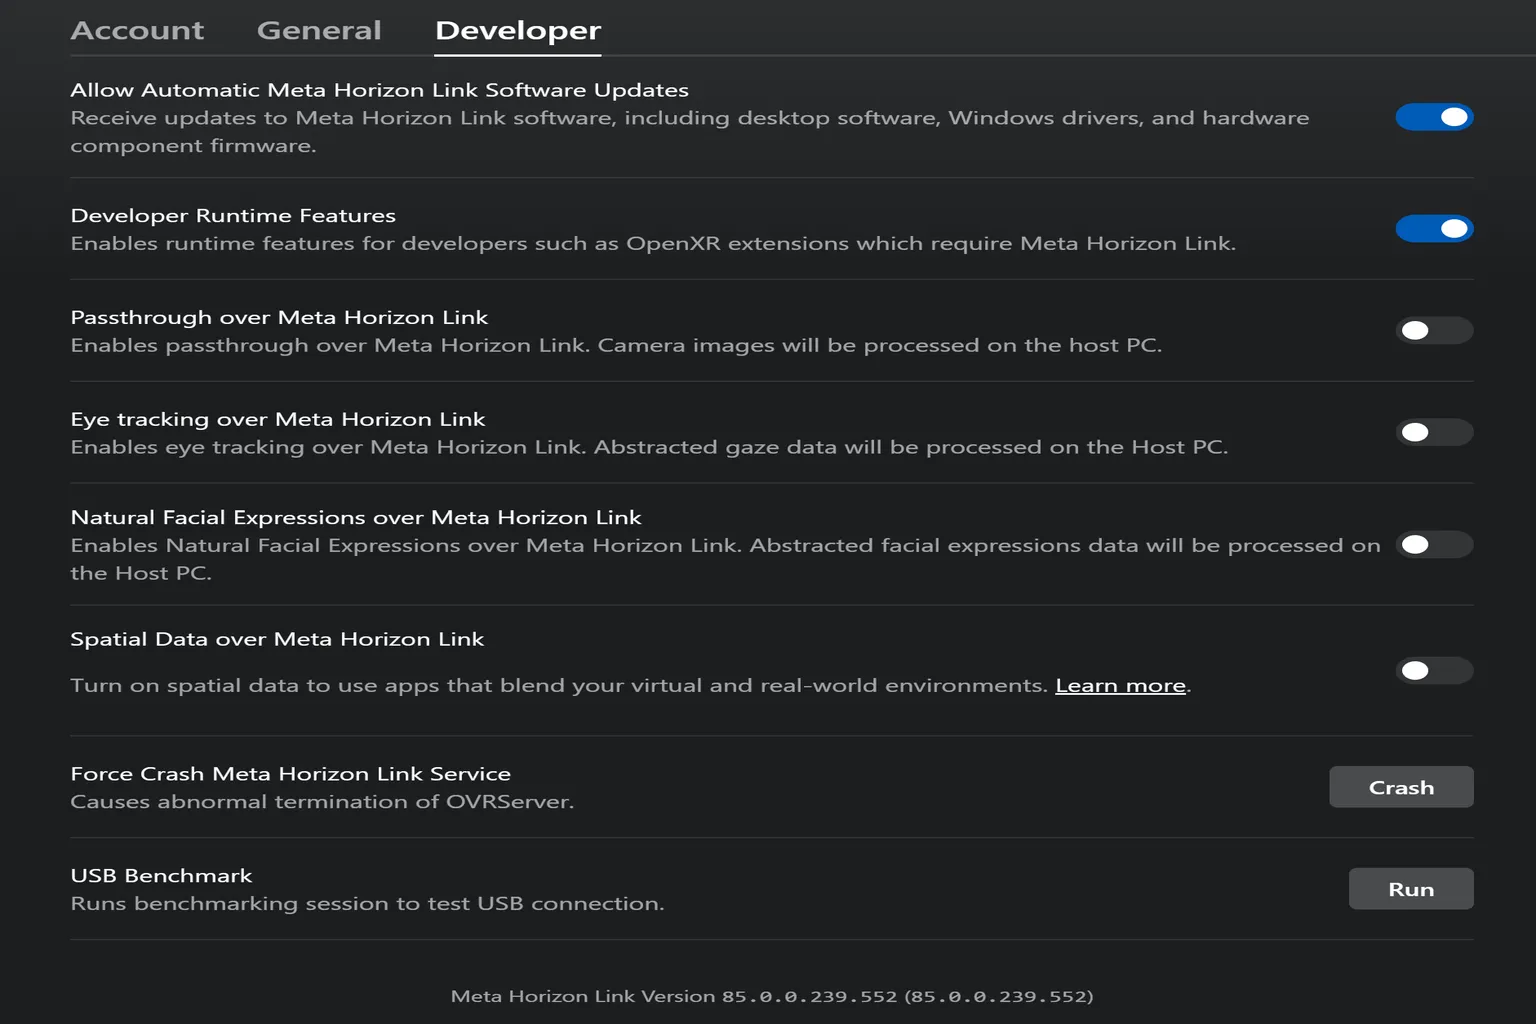
- Developer: These are more advanced settings. It includes options like automatic updates, OpenXR, passthrough, eye tracking, face tracking, and USB speed testing. You won’t use this much day to day, but it’s useful when you’re troubleshooting or using specific features.
Next, we’ll go through each of them in order.
Account
This section groups all account-related settings together. The main ones to pay attention to here are Account Language and Log Out.
- Username: Check or change your account name.
- Email: View the email linked to your account and update it if needed.
- Two-Factor Authentication: Add an extra layer of security with additional verification.
- Password: Change your Meta account password.
- Payment: Manage your payment methods, such as credit cards.
- PIN: Set the PIN used for purchases and certain actions.
- Redeem Code: Enter gift cards or codes here. (Only supports gift cards and distributed codes. If a friend sends you a game, you’ll need to claim it from that game’s page.)
- Purchase History: View the games and content you’ve purchased. You can also request refunds here. (Cross-Buy titles can be refunded here, but the list isn’t always accurate. It’s usually easier to do this from the Meta Horizon mobile app.)
- Account Language: Change your account language and region. (This affects the language used in account management and emails from Meta, but it doesn’t change the display language of Horizon Link.)
- Accounts Center: Opens Meta’s unified account management page, where you can manage settings across Facebook, Instagram, and Meta Quest.
- Terms of Service: View the terms of service.
- Privacy Settings: Adjust how your personal information is shared.
- Privacy Policy: View Meta’s privacy policy.
- Log Out: Sign out of this account from Horizon Link.
General
This is where the connection-related settings are grouped together. The most important one here is OpenXR Runtime.
- Public Test Channel: Lets you receive test-build updates. You get access to new features, but things can also be less stable. (For example, turning this on can upgrade you from 85.0.0.239.552 to the test build 201.0.0.73.547.)
- Restart Meta Horizon Link: Restarts the whole app. This is something you’ll use a lot when troubleshooting.
- Automatic App Updates: Automatically updates installed apps.
- App Downloads While Using VR: Lets apps download and update while you’re using the headset.
- Bandwidth Limit: Sets the network bandwidth limit Horizon Link can use. (The default setting is usually fine.)
- Bandwidth Limit While Using VR: Adds a separate bandwidth limit while you’re connected in VR to help avoid congestion. (The default setting is usually fine here too.)
- Library Locations: Choose where apps get installed.
- Unknown Sources: Lets you run unofficial apps that haven’t been reviewed by Meta.
- Notification Preferences: Adjusts how notifications are shown. (You can choose which apps send notifications, but it’s usually easier to manage this in the Meta Horizon mobile app.)
- Language Preference: Sets the display language and regional format. (Changes made here affect the display language used in Horizon Link.)
- Skip confirmation when connecting to Remote Desktop from your headset: Skips the confirmation prompt when connecting to Remote Desktop. (If this is off, you’ll get a confirmation every time.)
- OpenXR Runtime: Sets the OpenXR runtime environment used for PCVR.
This OpenXR setting is pretty important, because the connection method between your PC and headset depends on the manufacturer.
If this is set wrong, some games may not launch.
If you’re using Horizon Link, make sure to click Set Meta Horizon Link as active.
Developer
This section is mostly for developer-related settings. In general, regular users don’t need to touch anything here.
- Allow Automatic Meta Horizon Link Software Updates: Automatically downloads and installs updates for Horizon Link, including drivers and firmware.
- Developer Runtime Features: Enables developer features like OpenXR extensions.
- Passthrough over Meta Horizon Link: Enables MR passthrough and processes the camera feed on the PC.
- Eye Tracking over Meta Horizon Link: Sends eye-tracking data to the PC. (Quest 2 / 3S / 3 don’t support eye tracking, so this doesn’t do anything.)
- Natural Facial Expressions over Meta Horizon Link: Sends face-tracking data to the PC. (Quest 2 / 3S / 3 don’t support face tracking either, so this also doesn’t do anything.)
- Spatial Data over Meta Horizon Link: Provides spatial data for MR apps.
- Force Crash Meta Horizon Link Service: Forces the service to restart, mainly for troubleshooting.
- USB Benchmark: Runs a test for USB cable performance and connection speed.
Device Settings
This is where you adjust video and audio settings. From a player’s perspective, this is a pretty important section. Before changing graphics settings, it’s a good idea to keep your PC’s GPU performance in mind.
- Quest 3 Microphone: Adjusts the headset’s mic input volume.
- Quest 3 Headphones: Adjusts the output volume for speakers or headphones. (You can also control this with the buttons on the headset, so you don’t need to touch this much.)
- Hear VR Audio from Computer: Outputs VR audio to both your headset and your PC at the same time.
- Hear Computer Audio in VR: Plays your PC’s audio through the headset. (Audio will only come from the headset.)
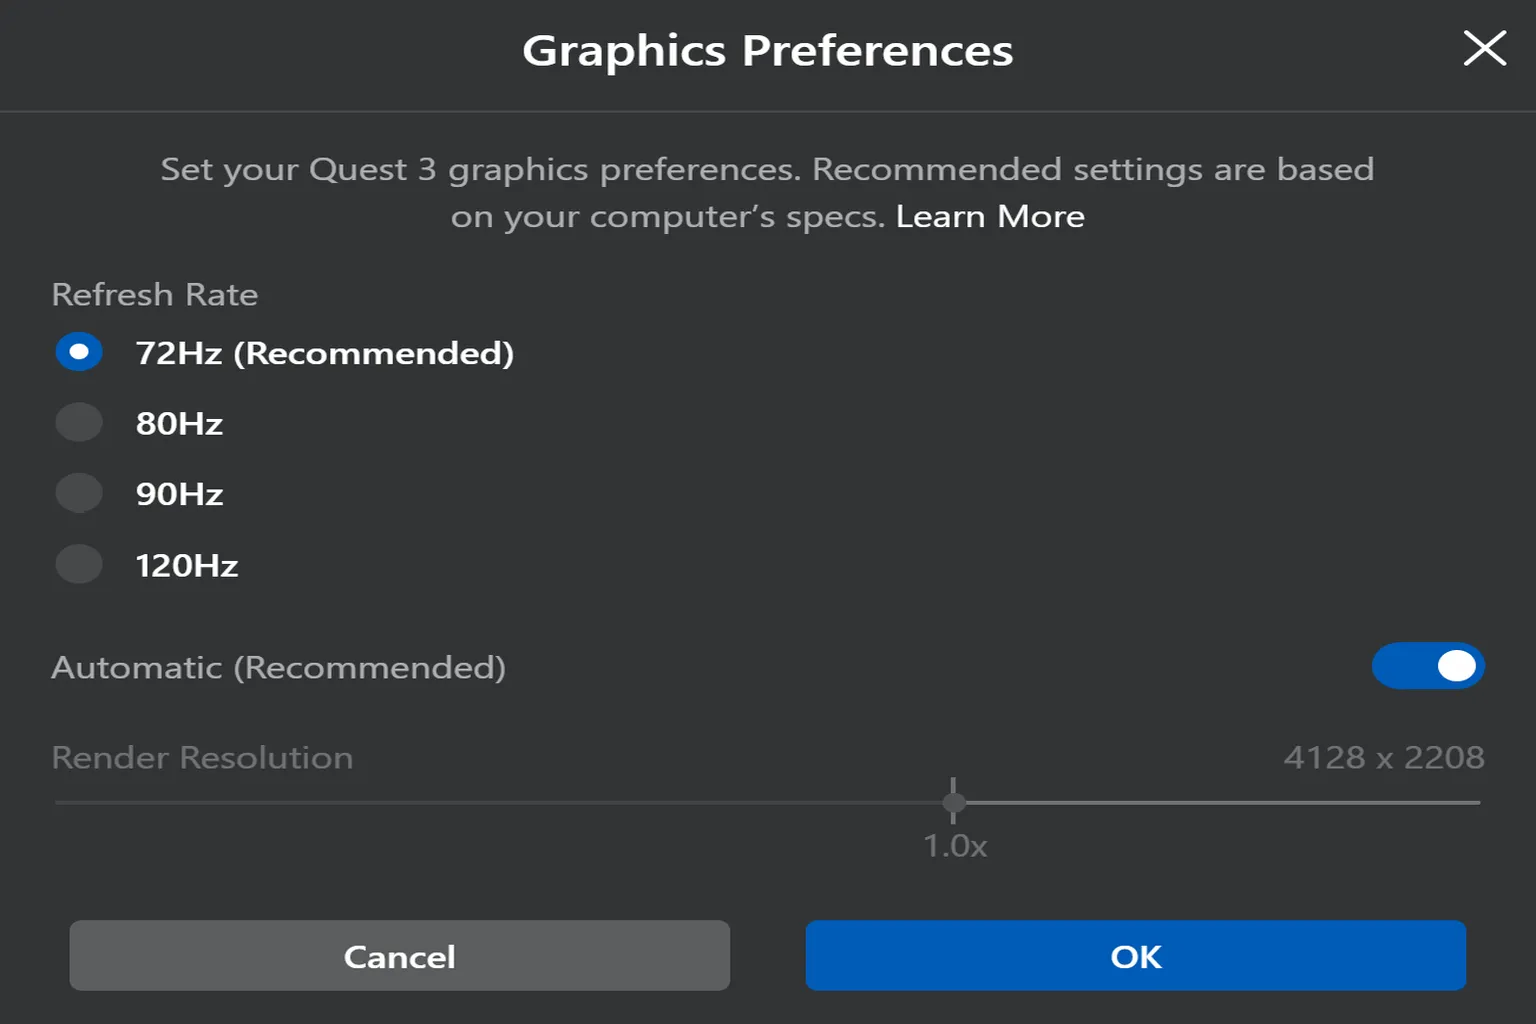
- Graphics Preferences: Adjusts refresh rate and resolution.
- Set Up Device: Opens connection settings, where you can reconnect the device.
- USB Test: Tests USB connection speed.
- Quest 3 Support: Lets you check supported features and related info.
Graphics Preferences
This is where you adjust the refresh rate and resolution for PCVR streaming. Both directly affect how smooth the motion feels and how sharp the image looks.
Refresh Rate (72 / 80 / 90 / 120Hz)
Higher values make motion smoother, but they also put more load on your PC.
72Hz is the most stable (default).
90Hz and 120Hz can start to drop frames or stutter if your GPU isn’t strong enough.
With most modern GPUs, PCVR requirements are usually not an issue. If you’re using something like an RTX 3070, RTX 4060, or RTX 5060 class or higher, running at 120Hz is generally fine.
Automatic (Recommended)
When enabled, the resolution adjusts automatically based on your PC’s performance.
Leaving this on is usually the most stable option.
Render Resolution
This controls the actual display resolution and affects how sharp the image looks.
Higher values improve clarity, but also increase GPU load.
If the image looks blurry → increase it
If you get stuttering → lower it
On Meta Quest 3, the range goes from 2432 × 1312 up to 5408 × 2912.
Once you’ve made it this far, the connection to your PC is complete. You can go ahead and start playing games or watching videos right away.
Now that you’re connected, it’s worth trying some higher-end VR titles to really see the difference in visuals and overall experience.
There are also a few tricks to using Air Link on the headset side. I’ve put those together in the next article, so check that out as well.
FAQ – Common Questions
Why do I get audio but no video after connecting to a PC?
This usually happens when Air Link and SteamVR conflict with each other. With that combination, issues like this come up pretty often.
If you want a more stable wireless setup, using Virtual Desktop is also an option.
What should I look out for when buying a cable?
For comfort, it’s better to go with at least a 3-meter cable.
You’ll also want speeds of at least 0.96 Gbps.
Before buying, make sure it’s actually a USB 3.0 high-speed cable. If you get this wrong, it might not work at all.
Can I still use it if my router is only Wi-Fi 5?
Wi-Fi 5 on the 5 GHz band is fast enough in terms of speed.
But for a better overall experience, Wi-Fi 6 or higher will feel smoother.
What if my PC doesn’t show up in Air Link?
First, check that your PC and Quest are connected to the same Wi-Fi network.
They need to be on the same router and the same band.
This mismatch is the most common cause.
If you have both an ISP modem (with built-in router functions) and a separate Wi-Fi router at home, make sure your PC and headset are connected to the same router.
If your PC is connected to the modem and your headset is on a different router, they won’t be able to connect.
Why is the latency so bad even when using Air Link or Virtual Desktop?
In most cases, it’s caused by network congestion.
Even with a Wi-Fi 6 router, if it’s not a high-end tri-band model, your PC and headset end up competing for bandwidth when they’re both on Wi-Fi, which creates a bottleneck.
A simple fix is to connect your PC to the router using an Ethernet cable.
Once you free up the Wi-Fi bandwidth for the headset, latency usually improves a lot.