
Moving photos and large VR videos off your Meta Quest should not be a frustrating process. Skip the slow official mobile app. This straightforward guide breaks down the four fastest ways to transfer files to your PC, including wireless options and lightning fast wired methods using SideQuest and the Quest Games Optimizer.
How to Get Files Off Your Meta Quest
The Meta Quest is a really capable VR headset. You can record videos, take screenshots, and play back media without any trouble. But once you try to move those files outside the headset, things get more annoying than you’d expect.
With the official setup, the only supported way to handle photos and videos is through the mobile Meta Horizon app. That means you first sync files from the headset to your phone, then transfer or back them up from your phone to your PC. It adds an extra step that feels unnecessary.
This roundabout flow is what makes it awkward to use in practice.
It gets even more frustrating when you want to do the opposite and put files into your Quest. It’s technically possible, but the limits are very strict.
You can only upload photos and videos that already exist in your phone’s photo library. For example, if you want to load a few movies onto the headset to watch while you’re out, or quickly show VR videos to a friend on the spot, the official features just don’t support that yet.
So in this article, I’m going to walk through how to deal with these limitations. I’ll cover both the official method Meta provides and the more convenient options that a lot of users actually rely on.
Here are the four methods covered in this guide:
Meta Horizon (Mobile App)
Price: Free
Connection: Wireless (speed is limited)
What it supports: Uploading and downloading photos and videos
SideQuest (PC Version)
Price: Free
Connection: Wired (very fast)
What it supports: Upload and download
Quest Games Optimizer (QGO)
Price: $9.99
Connection: Wired (very fast)
What it supports: Upload and download
Simple File Share
Price: $11.99
Connection: Wireless (a bit slow)
What it supports: Upload and download
Meta Horizon (Mobile App)
This is essentially the only official route Meta provides. When you take photos or record videos on the headset, they’re automatically uploaded to Meta’s cloud.
From there, you can open the Meta Horizon app on your phone and save those cloud files into your phone’s photo library. If you want them on your PC, you then transfer them from your phone, either wirelessly or by connecting a cable and copying the files.
The steps themselves aren’t complicated, but it definitely feels like taking a detour. From a usability standpoint, it’s not very efficient. On top of that, this method doesn’t support use cases like uploading movie files to the headset and playing them back directly.
How to use it:
Step 1: Turn on sync
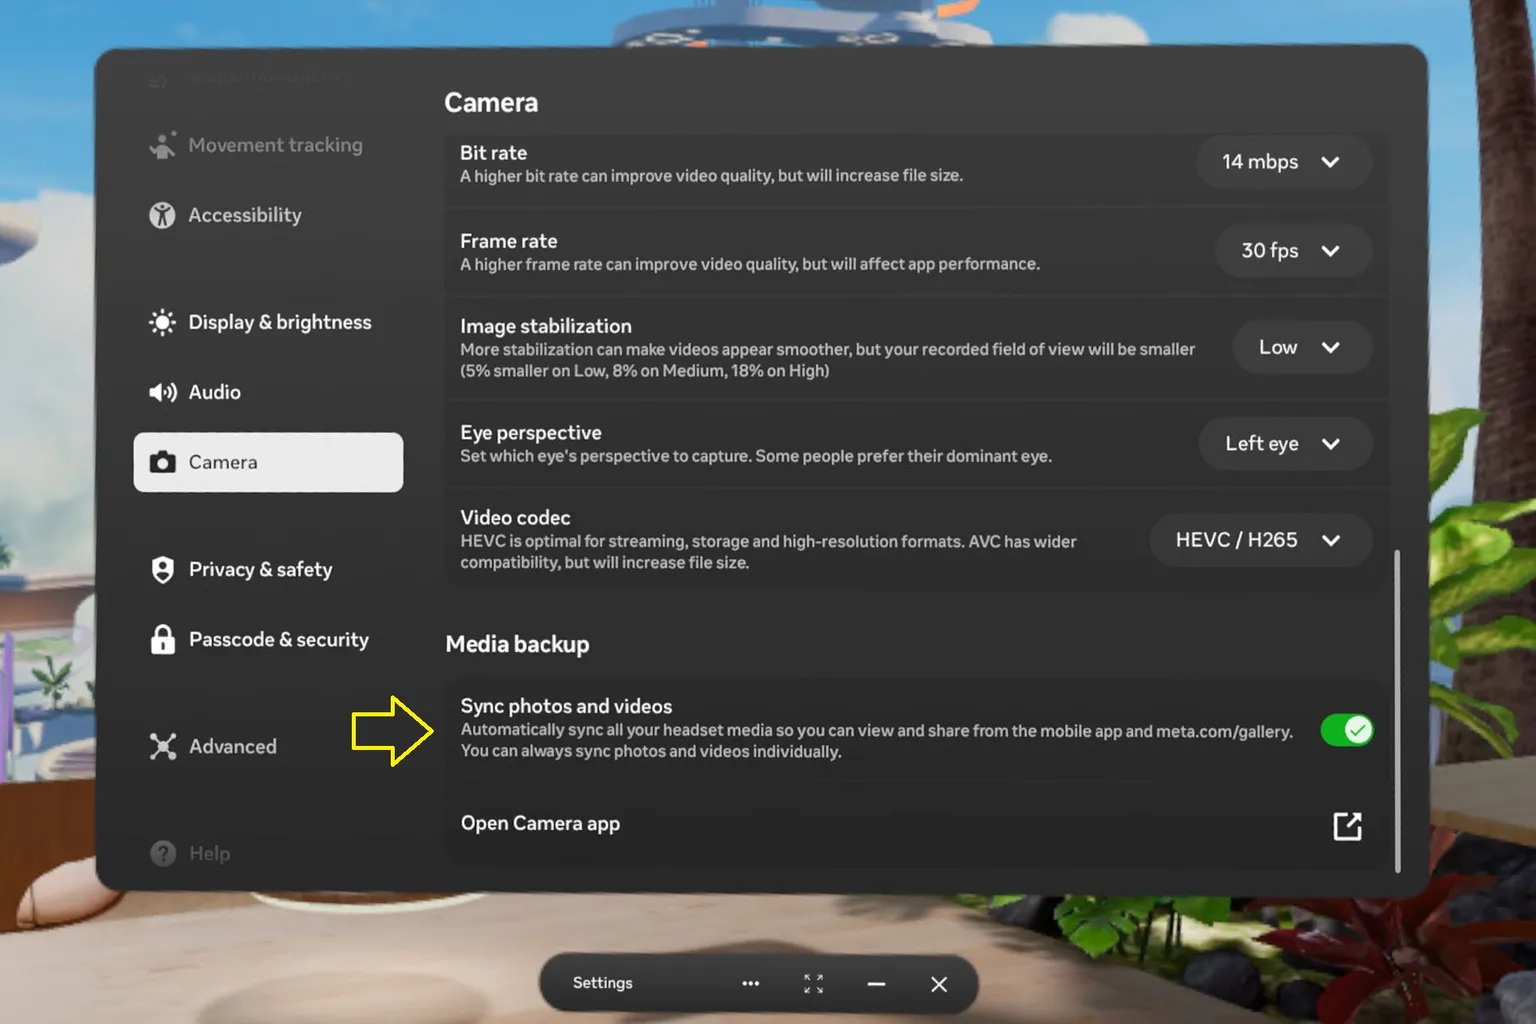
With the default settings, photos and videos you capture on the headset are automatically synced to the cloud. If sync is turned off, you can enable it from Settings on the headset.
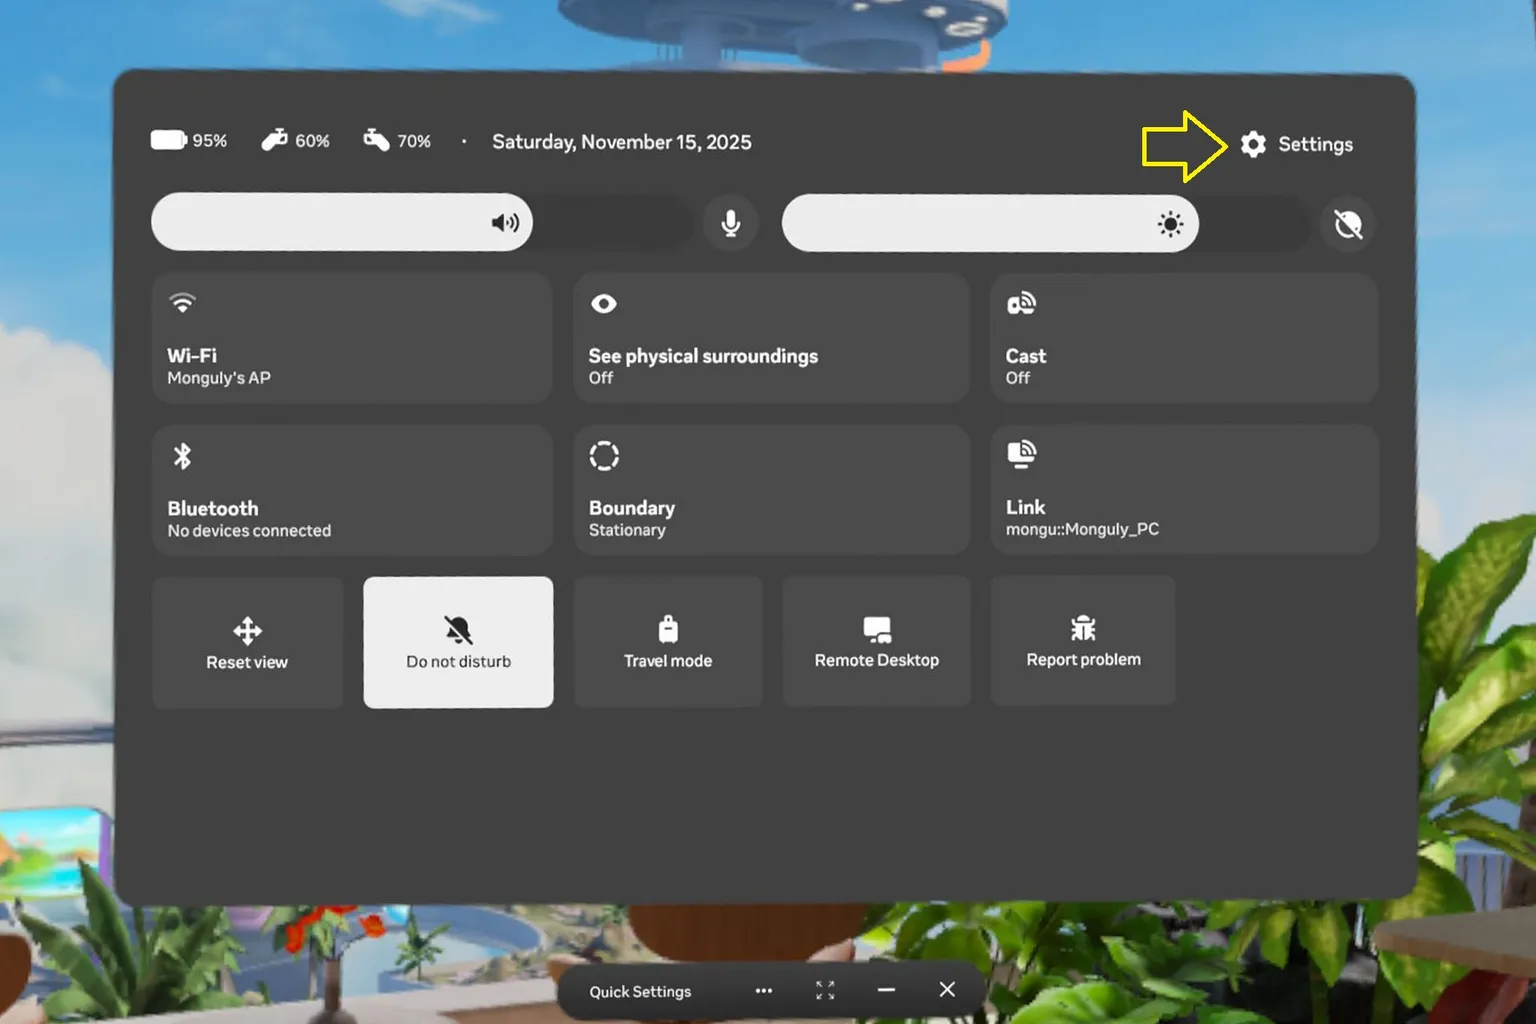
Next, open the Camera menu and make sure Sync Photos and Videos is turned on.
Step 2: Open the Meta Horizon album
In the app, tap the ☰ menu in the top-left corner and go to the settings area.

Then open Gallery, and you’ll see the photos and videos stored in the cloud.

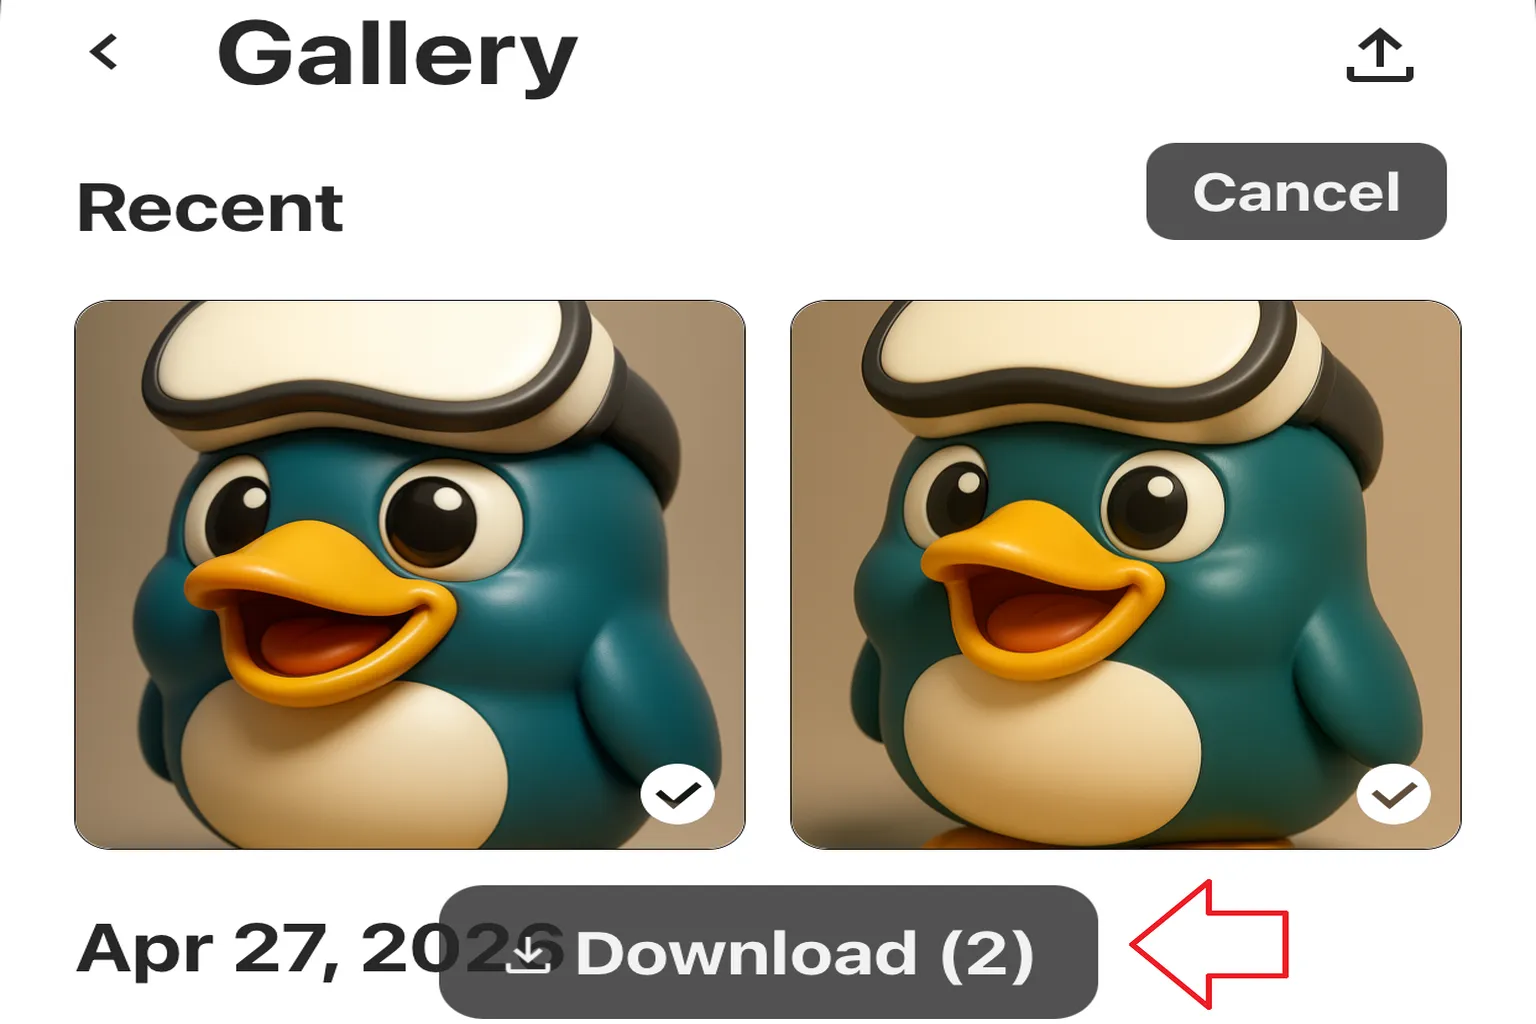
If you want to download something, just tap the item you need. You can also select multiple files and download them all at once.

However, in the Meta Horizon app after March 2026, a shortcut bar was added at the bottom of the screen.
This shortcut bar overlaps the Download button, which prevents you from downloading multiple files at once.

If you only need to download a few files, just open each image directly and save them to your mobile device one by one.

If you have a lot of files to download, use another method.
First, tap the VR headset icon in the shortcut bar, then select your own headset.

Under the Gallery section, tap See All.
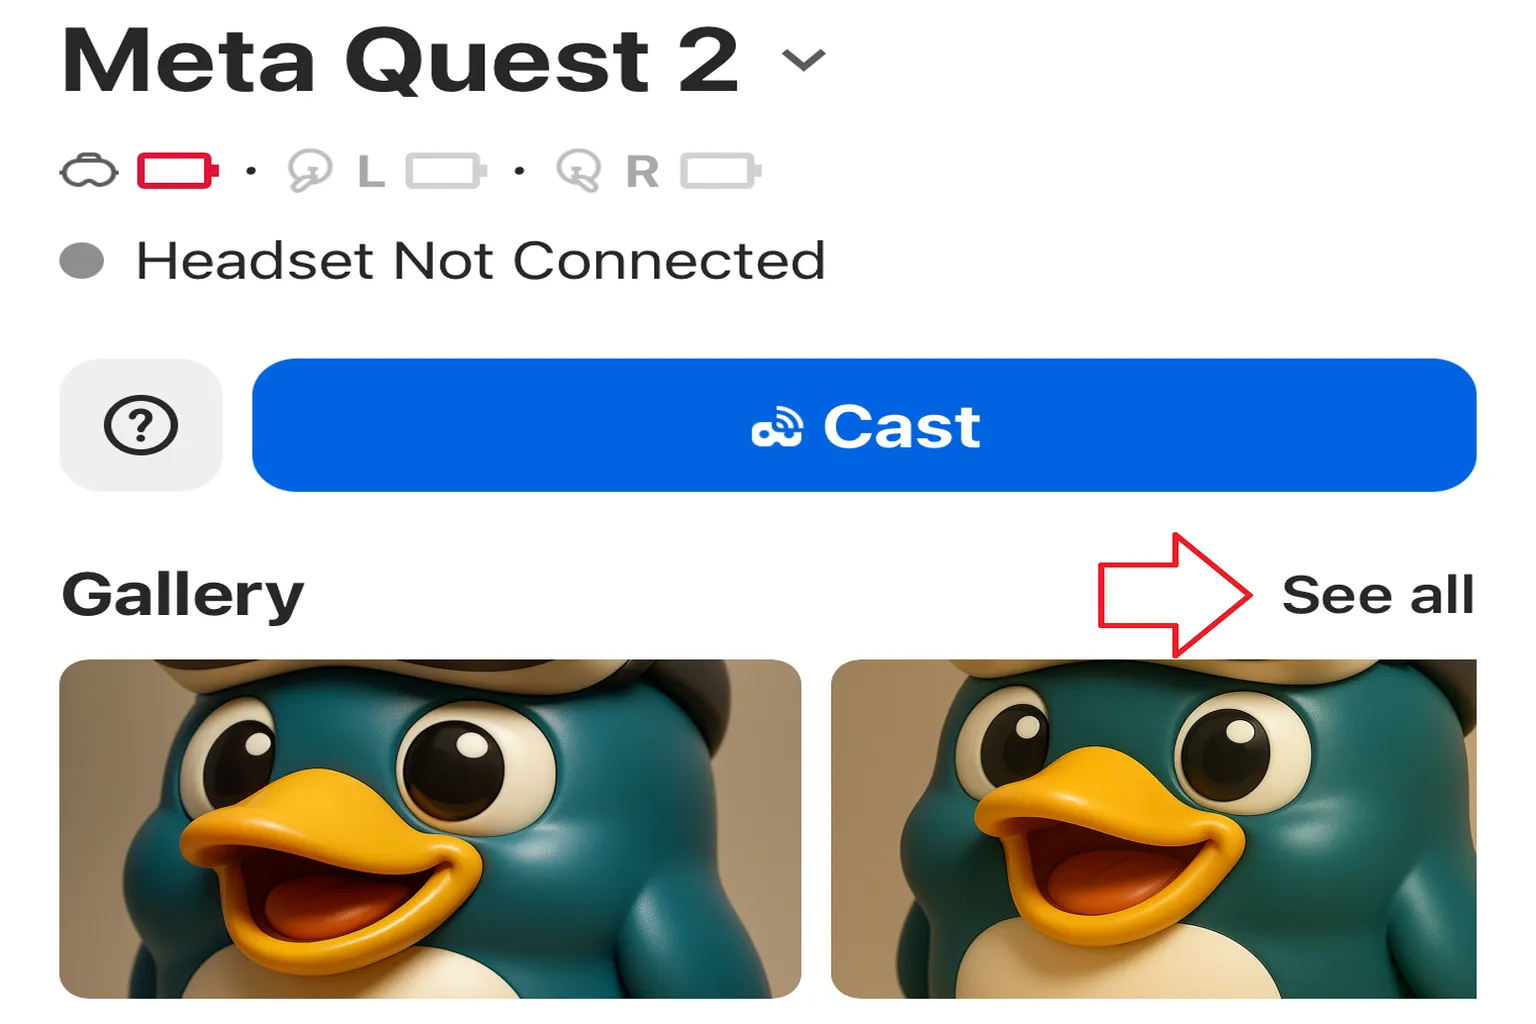
Here, the Download button won’t be hidden behind the shortcut bar, so you can download multiple files normally.
Step 3: Upload files
If you want to upload photos or videos from your phone’s photo library to the cloud, tap the Upload icon in the top-right corner.
Select the photos or videos you want to upload. They’ll automatically sync to the cloud and then show up on your headset as well.

How to Use SideQuest
Compared to the other options, this method is a bit more on the “engineer-friendly” side. You’ll need to enable Developer Mode first and install SideQuest on your PC.
Both of these setup steps are already covered in detail in a separate article, so make sure you’ve finished enabling Developer Mode and installing SideQuest before continuing here.

How to Enable Meta Quest Developer Mode
Fix Errors and Sideload Apps Fast

How to Install SideQuest on Meta Quest
Sideload Games & Custom Apps
Once installation and pairing are done, connect the headset to your PC with a USB-C cable and launch SideQuest.
From here, you have two ways to work with files: using the app interface, or opening the headset storage directly.
Method A: App-based control (stable, fast, best for one-off transfers)
This method uses SideQuest’s File Manager to move files directly. The connection is stable and transfer speeds are fast, which makes it reliable. The downside is that you usually work with one file or one folder at a time, so it can feel a bit tedious if you’re trying to download a large batch.
Step 1: Open File Manager
Click File Manager in the top-right corner of SideQuest.
You’ll see a list of folders inside the Quest, such as Android, Oculus, Download, and so on. From here, you can copy files, delete them, and manage the storage directly.

Step 2: Upload files to the headset
Click the + button in the bottom-right corner of the screen.
From there, you can create a new folder in the selected directory or upload files directly into it.
Step 3: Download files from the headset
Select the file you want to download from the list, then click the disk icon (Download) on the right side.
Note: You can only download one file at a time with this method. If you need to pull out a large number of files, the “storage access (disk connection)” method described later is much more efficient.

Method B: Storage access (use it like a USB drive)
This method mounts the Quest as a USB drive, so you can move files directly using Windows Explorer.
It’s the fastest option, and the workflow is very intuitive. The only thing to watch out for is that, in rare cases, the device may not be recognized by the system.
Step 1: Open the ADB command panel
In SideQuest, click the arrow icon in the top-right corner (Custom Command), then select ENABLE USB ADB to enter the ADB control screen.

On the ADB screen, you’ll see the following options:
- List Devices: Check connected devices and their serial numbers
- Enable USB ADB: Mount the headset as a USB drive
- Disconnect Everything: Disconnect all devices
- Reset ADB: Reset the ADB connection
- Reboot Headset: Reboot the headset
From this list, select Enable USB ADB, then click RUN COMMAND.

Step 2: Use Windows Explorer
Go back to This PC in Windows Explorer. You should see your device listed, such as Quest 3, Quest 3S, or Quest 2.
Open the device, and you’ll be able to see its internal folders. From here, the controls are almost the same as a normal drive. You can copy, move, or delete files using standard Explorer actions.

Troubleshooting (can’t connect / transfer freezes)
You may see the message “Adb Command Failed – No device connected.” If that happens, try the steps below in order:
- Unplug the USB cable, then reconnect it
- Run Enable USB ADB → RUN COMMAND again
- If that still doesn’t work, click Disconnect Everything on the ADB screen
- Restart both your PC and the headset
In most cases, this will restore the connection.

If none of the steps above work, it usually means the headset hasn’t approved the ADB connection yet.
Don’t unplug the USB cable.
Just put on the headset and tap the “USB Detected” notification to allow the connection.

Quest Games Optimizer connection method
To use this approach, you first need to enable Developer Mode and purchase and install Quest Games Optimizer (QGO).
Before continuing, make sure you’ve completed the initial setup by following the guide linked below.
How to Enable Meta Quest Developer Mode
Fix Errors and Sideload Apps Fast
How to Install SideQuest on Meta Quest
Sideload Games & Custom Apps

Quest Games Optimizer Introduction
How to Buy, Install & Boost Graphics
Quest Games Optimizer (QGO) file access feature
If you enable this feature in QGO, simply connecting the headset to your PC lets you open the internal folders right away. There’s almost no extra setup involved, and copying videos or moving files becomes much easier.
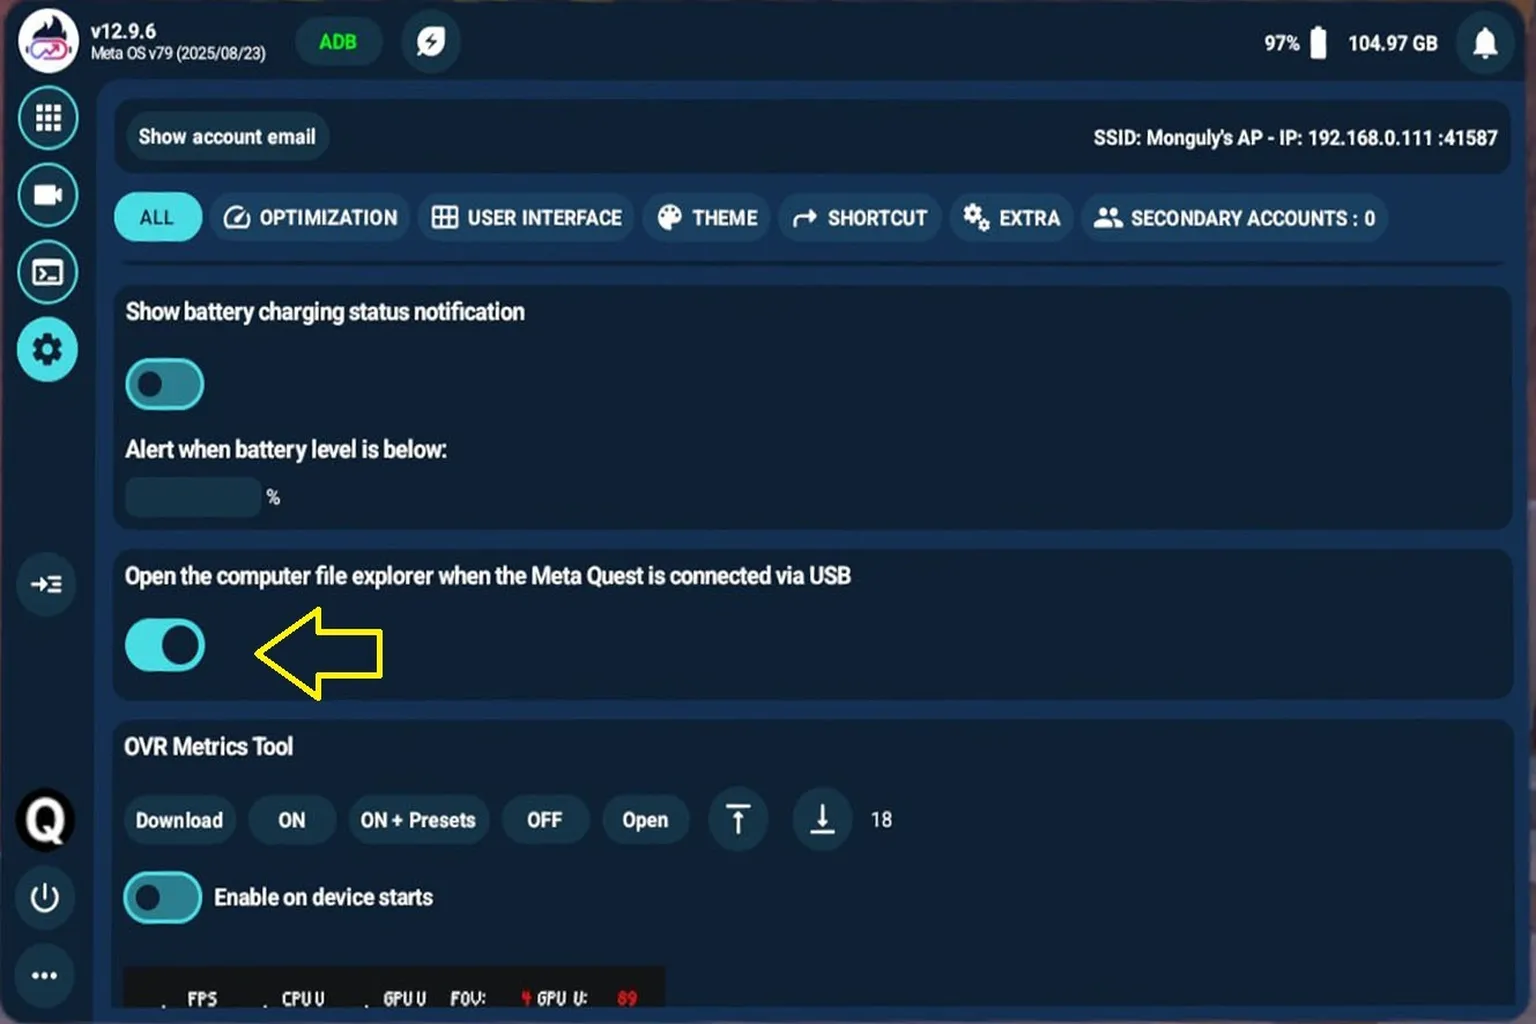
Step 1: Enable USB file access
Open the QGO settings page and look for the option labeled Open PC Explorer on USB connection.
Turn this switch on to enable the feature.
Step 2: Connect to your PC and open the folders
Connect the headset to your PC with a USB cable. After a few seconds, a new drive will automatically appear in Windows.
The device name is usually Quest 3, Quest 3S, or Quest 2.
Open it, and you’ll have direct access to the headset’s internal folders.

Inside the headset storage, the Oculus folder is where recorded videos and screenshots are saved. The Download folder is used for files downloaded through the headset’s built-in browser.
If you want to install an APK file, the process is the same. Just copy the APK directly into the Download folder. Then open the installer on the headset through QGO, and the installation will complete from there.

Transfer speeds with SideQuest and QGO are, honestly, very fast. Using a standard USB 3.0 cable, transferring a video around 10 GB usually takes about 20 to 30 seconds.
In real-world use, you’ll often see transfer speeds in the range of roughly 300 to 400 MB per second.
How to use Simple File Share
This is a pretty interesting app made specifically for Meta Quest. Once you launch it, the headset behaves like a network drive, letting you access its internal files directly from your PC.
It’s also basically the only way to upload files wirelessly without using Developer Mode.
There are two connection options available: FTP and WebDAV. Below, I’ll explain how to use each one.
Since this is a paid app, you’ll need to purchase “Simple File Share” from the Meta Horizon Store first, then download and install it on your headset.
The app shares files using a specific IP address, so both the headset and your PC must be on the same local network for this to work.
Before you start, check the following:
- Simple File Share is installed on your Meta Quest
- The headset is connected to a Wi-Fi router
- Your PC is connected to the same Wi-Fi network
How to connect via FTP
Compared to the other options, FTP takes a bit more setup. That said, once it’s configured, you can freely work with files inside the headset, and both uploading and downloading become pretty easy.
Here’s the full process.
Step 1: Grant data access permissions
After installing Simple File Share, the first time you launch it, you’ll see a prompt asking for storage access permissions.
Check Allow access, then tap Done.
This allows the app to access the headset’s internal storage.

Step 2: Check the account details
On the main screen, select FTP, then tap Start Server.
This starts the FTP server. You’ll see the username, password, and IP address needed to connect from your PC.

To connect, you’ll need to check this information first.
Tap the gear icon in the top-right corner to open the settings page. You’ll see the following details:
- Username: admin
- Password: password
Both are lowercase.
The app does let you change the username and password, but in practice, connections often fail after changing them. For stability, it’s better to leave the default credentials as they are.

Go back to the main screen and tap Start Server again. Once the server is running, the screen will show the following connection details:
- The IP address for the connection
- The port number
- The URL to access from your PC
You’ll use this information in the next step on your PC, so make sure to note it down.
Do not power off the headset, and do not close Simple File Share. Leave the headset on and set it aside. From the next step onward, you’ll continue the setup on your PC.

Step 3: Connect to the FTP drive
From here on, everything is done on your PC.
First, open Windows Explorer.
In the left sidebar, right-click This PC. A menu will appear.

From the menu, select Add a network location.

The “Add Network Location Wizard” will open. Click Next.

Choose Select a custom network location, then click Next again.

Enter the FTP address
In the field labeled “Specify the location of your website,” enter the FTP address that was shown on the headset earlier.
Example:
ftp://192.168.0.118:2121
This is just a sample. Make sure you replace it with the actual IP address displayed on your own headset.
Once you’ve entered the address, click Next.

Login settings
On the next screen, you’ll be asked whether to use anonymous logon. Do not check this option.
In the username field below, enter admin, then click Next.

Set the server name
Finally, give this connection a name so you can recognize it easily later. The name can be anything you like, as long as it’s clear to you.
Example: VRPUPU FTP
After entering the name, click Next to finish the setup.

That completes the setup for connecting to the FTP server.

Step 4: Connect and start using it
Go back to This PC in Windows Explorer. You’ll see the FTP connection you just created listed as a new item.
Click it, and you’ll be able to access the headset’s internal folders directly.

The first time you connect, you’ll be prompted to enter a password.
Enter password in lowercase.
If you check Save password, you won’t need to enter it again next time, which makes things more convenient.
Once you’re done, click Log On.

Once you’re logged in, you can copy, paste, delete, and move files just like you would with any normal folder on your PC.
One thing to note: in FTP mode, you can’t play videos directly. If you want to watch videos stored on the headset, copy them to your PC first and play them there.

As for speed, in a Wi-Fi 6E environment, transferring a 10 GB video took about 15 to 20 minutes in real-world testing. On average, that works out to roughly 10 MB/s.
It’s definitely not fast, but considering that you can upload and download files wirelessly without connecting a cable, it’s still a practical and convenient option.

The transfer speed itself isn’t exactly fast, but when you factor in that both uploads and downloads work without any cables, the real-world usability is actually quite good.
Occasionally, you might run into issues where the connection fails or stops responding. When that happens, restarting your PC usually fixes the problem.
WebDAV Connection
WebDAV is much easier to set up than FTP and still lets you upload and download files in a similar way. The limitation is that you can only download one file at a time. If you’re trying to pull out a large number of videos or photos at once, this can be a bit tedious.
Here’s the workflow.
Step 1: Grant data access permissions
After installing Simple File Share, the first time you launch it, a permission request will appear.
Check Allow access, then tap Done.
This allows the app to read and write files inside the headset’s file system. If you don’t grant permission here, you won’t be able to proceed with the connection steps that follow.
Step 2: Check the account details
On the main screen, select WebDAV, then tap Start Server.
This starts the WebDAV server.

Before connecting from your PC, you need to check the username and password used for access. Without these, you won’t be able to connect to the headset.
Tap the gear icon in the top-right corner to open the settings page. You’ll see the following information:
- Username: admin
- Password: password
Both are lowercase.
The app does allow you to change the username and password, but in real use, connections often fail after making changes. For the most stable experience, it’s best to leave the default settings as they are.

Step 3: Start the server and check the connection details
Go back to the main screen and tap Start Server again. Once the server starts, the following connection details will be shown:
- The IP address for the connection
- The port number
- The URL used to access it from your PC
You’ll need all of this information in the next steps, so make sure you write it down.
At this point, do not power off the headset, and don’t close Simple File Share. Leave the app running and keep the headset on while you move on to the PC-side setup.

Step 4: Connect from your PC
Open a web browser. Google Chrome, Microsoft Edge, Firefox, or Opera will all work.
In the address bar, enter the WebDAV URL that was shown on the headset earlier.
Example:
http://192.168.0.118:8080
This is just a sample. Be sure to replace it with the actual IP address displayed on your own headset.
Press Enter, and a login screen will appear. Enter the following details:
Username: admin
Password: password
After entering the information, click Sign In.

Step 5: Connect and start using it
Once you log in successfully, a list of the headset’s internal folders will appear in your browser.
From here, you can browse folder contents, download files, and upload new files directly.

For each file or folder, actions like Rename and Delete are available.
That said, changing system-related folders carelessly can cause the headset to malfunction or lead to file corruption. It’s strongly recommended that you avoid making unnecessary changes.

In the top-left corner of the page, there’s a + button. From here, you can create new folders or upload files.

When you click it, a menu appears where you can choose Create Folder or Upload File.

To create a new folder, select Create Folder and enter any name you want.

To upload files, drag the files from your PC into the upload area, then click Upload. The files will be transferred to the headset.

Summary and recommendations
So far, we’ve gone through the main ways to upload and download files on a Meta Quest. To wrap things up, here’s a quick breakdown of what works best depending on how you use it.
If you frequently move photos and videos
SideQuest or QGO is the best choice. Transfer speeds are fast, and overall workflow efficiency is much better.
If you only need to grab a few photos or videos once in a while
The Meta Horizon app is more than enough. There’s nothing to set up, and it’s easy to use.
If you occasionally want to put files onto the headset but don’t want to use Developer Mode
Simple File Share is the most convenient option. It lets you upload files wirelessly with minimal hassle.
| Software | Transfer Speed | Large Transfers | Price | Setup Difficulty | Notes |
| Meta Horizon | 30–50 MB/sec | Weak | Free | Low | Supports photo and video downloads only |
| SideQuest | 300-400 MB/sec | Excellent | Free | High | Requires Developer Mode and USB connection |
| QGO | 300–400 MB/sec | Excellent | $9.99 | High | Direct access to headset storage over USB |
| Simple File Share (FTP) | ~10 MB/sec | Decent | $12.99 | Medium | Supports both upload and download |
| Simple File Share (WebDAV) | ~10 MB/sec | Weak | $12.99 | Medium | Easiest to use, but limited to one file per transfer |
FAQ – Common Questions
I just want to pull out a few photos. What’s the easiest option?
The Meta Horizon app is enough.
It’s not fast, but it doesn’t require Developer Mode and takes very little setup.
I want to transfer a 5 GB or 10 GB video. What’s the fastest method?
SideQuest (storage access) or QGO.
Both feel about the same in real use, with speeds close to an external drive.
I don’t want to use Developer Mode. Are there any alternatives?
Simple File Share (FTP or WebDAV) is the only real option.
It works wirelessly, but large files will be slow no matter what.
SideQuest doesn’t recognize my headset.
Try these in order:
Reconnect the USB cable → run Reset ADB → Reboot Headset
This fixes the issue most of the time.
Can I play videos directly over FTP or WebDAV?
No.
You need to download the file to your PC first, then play it there.