
Virt-A-Mate (VAM) offers one of the most advanced interactive VR experiences out there, but getting it to work with a synced device like The Handy can be a real headache. If you’ve spent hours dealing with plugin network errors, Bluetooth pairing issues, or missing JSON files, you’re definitely not the only one.
This guide breaks the whole setup process down step by step. It walks you through installing ToySerialController, setting up VaMSync in legacy Bluetooth mode, and loading the config files you need.
Instead of getting stuck in menus and settings, you can focus on getting VAM and The Handy connected properly and running with real-time sync.
This is about syncing Virt-A-Mate with The Handy.
When it comes to adult VR apps, the experience usually falls into two categories: watching videos or playing interactive content.
A lot of people start with VR video services like SexLikeReal (SLR), and after that, it’s pretty common to want something more immersive and pick up a synced device like The Handy. With script-based sync, the motion lines up with what’s happening in VR, so the experience feels much more real.
That said, if you think The Handy is only for videos, that’s a bit of a waste.
Devices like this also work with 3D games, and they really shine in something like Virt-A-Mate (VAM), where you have a lot more freedom.
VAM stands out because of its character quality, how much detail you can tweak, and how flexible everything is. You can create interactions that feel much closer to real behavior.
Once you add device sync on top of that, it’s no longer just watching something in VR—you’re actually feeling it in sync with the movement.
It takes the whole experience up a level.
The characters you can create in VAM are definitely very detailed, but that also means the controls and setup come with a pretty high learning curve.
Even if you know The Handy can sync with it, once you actually start setting things up, it’s easy to get stuck on the UI, plugins, or connection steps. You can end up spending a lot of time on it and still not get it working, then just give up.
If you’re just getting started with VAM, or you haven’t even installed it on your PC yet, it’s better to pause here for now.
Go through a basic guide on installing Virt-A-Mate and getting familiar with the fundamentals first—things like setup, launching the app, and preparing your headset (like Meta Quest).
Then come back to this kind of advanced setup later. It’ll be a lot easier to follow and get working.

This page goes into a more advanced way to use VAM with device sync.
Once you’re used to putting on a headset and looking at characters you’ve made in VR, this is where you take it one step further.
It’s not just visuals and audio anymore—you start adding touch into it.
What people usually get stuck on isn’t the device, it’s the setup. The steps are messy, and it’s easy to get stuck halfway and just give up.
So this time, everything is broken down step by step. Just follow along in order.
If you go through it as-is, you should be able to get everything working.
It takes what you see on screen and turns it into synced movement in your hand. The experience shifts from just watching to actually being in it.
If you don’t have The Handy yet, check this page first:
The Ultimate Guide to The Handy: Handy 1 vs. Handy 2 vs. Pro & Discount Codes
How to set it up
To sync VAM with The Handy, you’ll need to have the following ready first:
- A PC with VAM installed
- A PC with Bluetooth support
- The Handy or The Handy 2 device
- A Meta Quest headset (recommended)
A paid subscription account if you want to use high-quality scenes that support sync
From here, you’ll move into the actual connection setup.
Step 1: Install the ToySerialController plugin
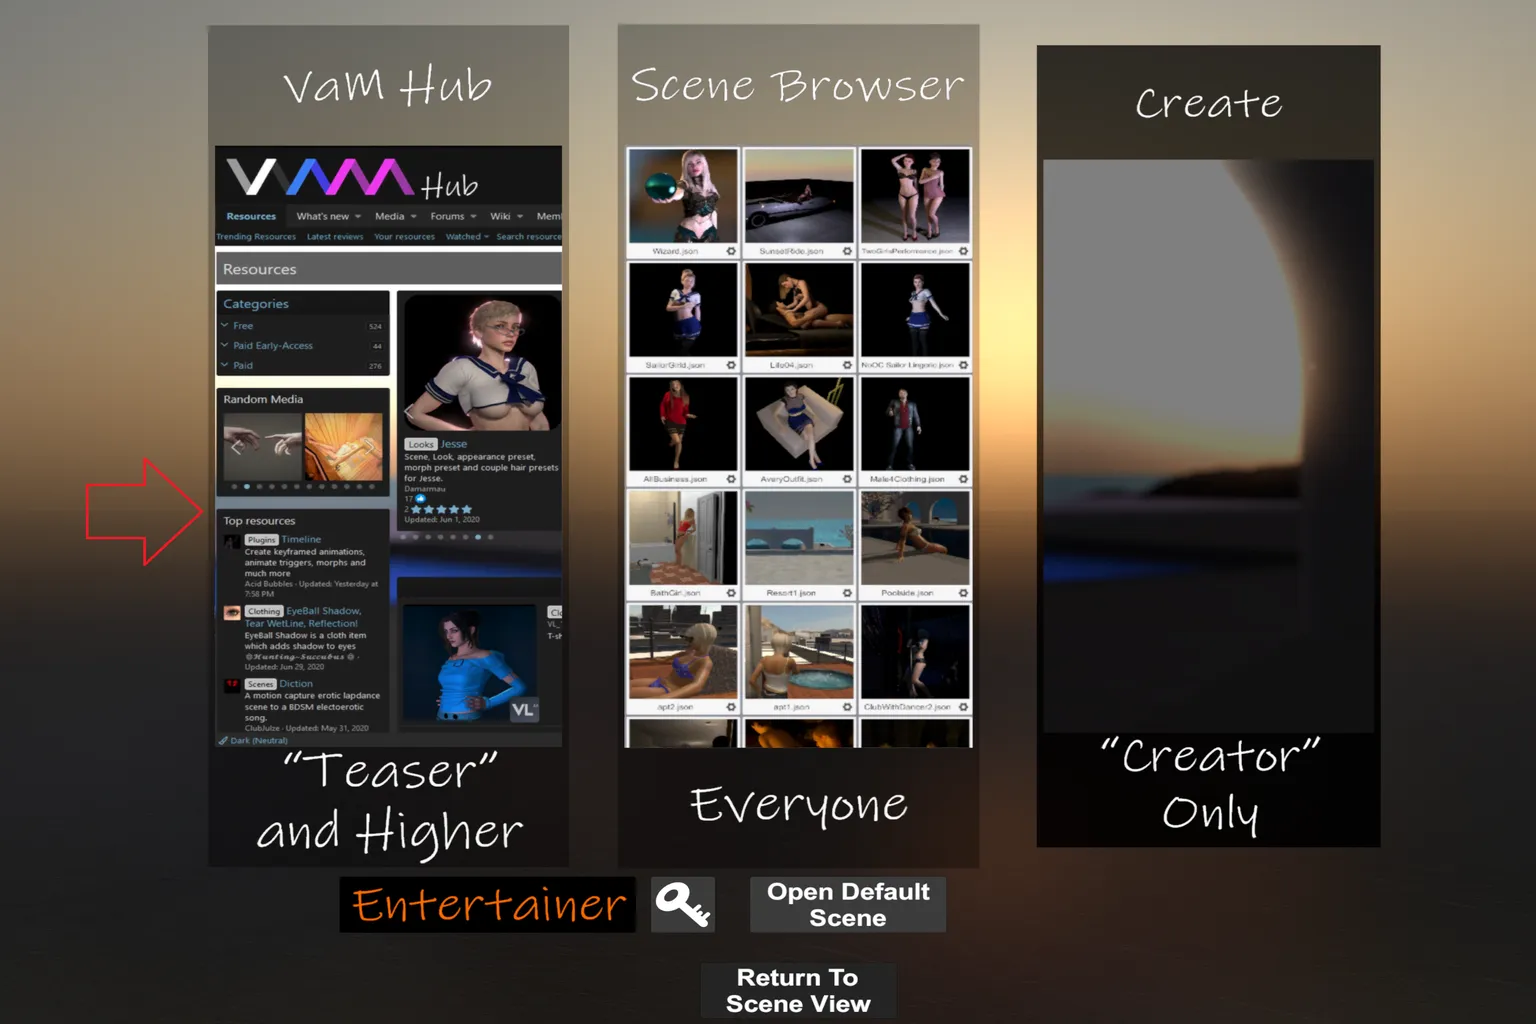
Launch VAM, then open VAM Hub on the left side of the screen and go into the plugin list.
In the search box around the middle on the left side, type “blazedust.” That’s the name of the ToySerialController developer.
Once you search, related plugins will show up on the right. Select “ToySerialController + VAMLaunch.”
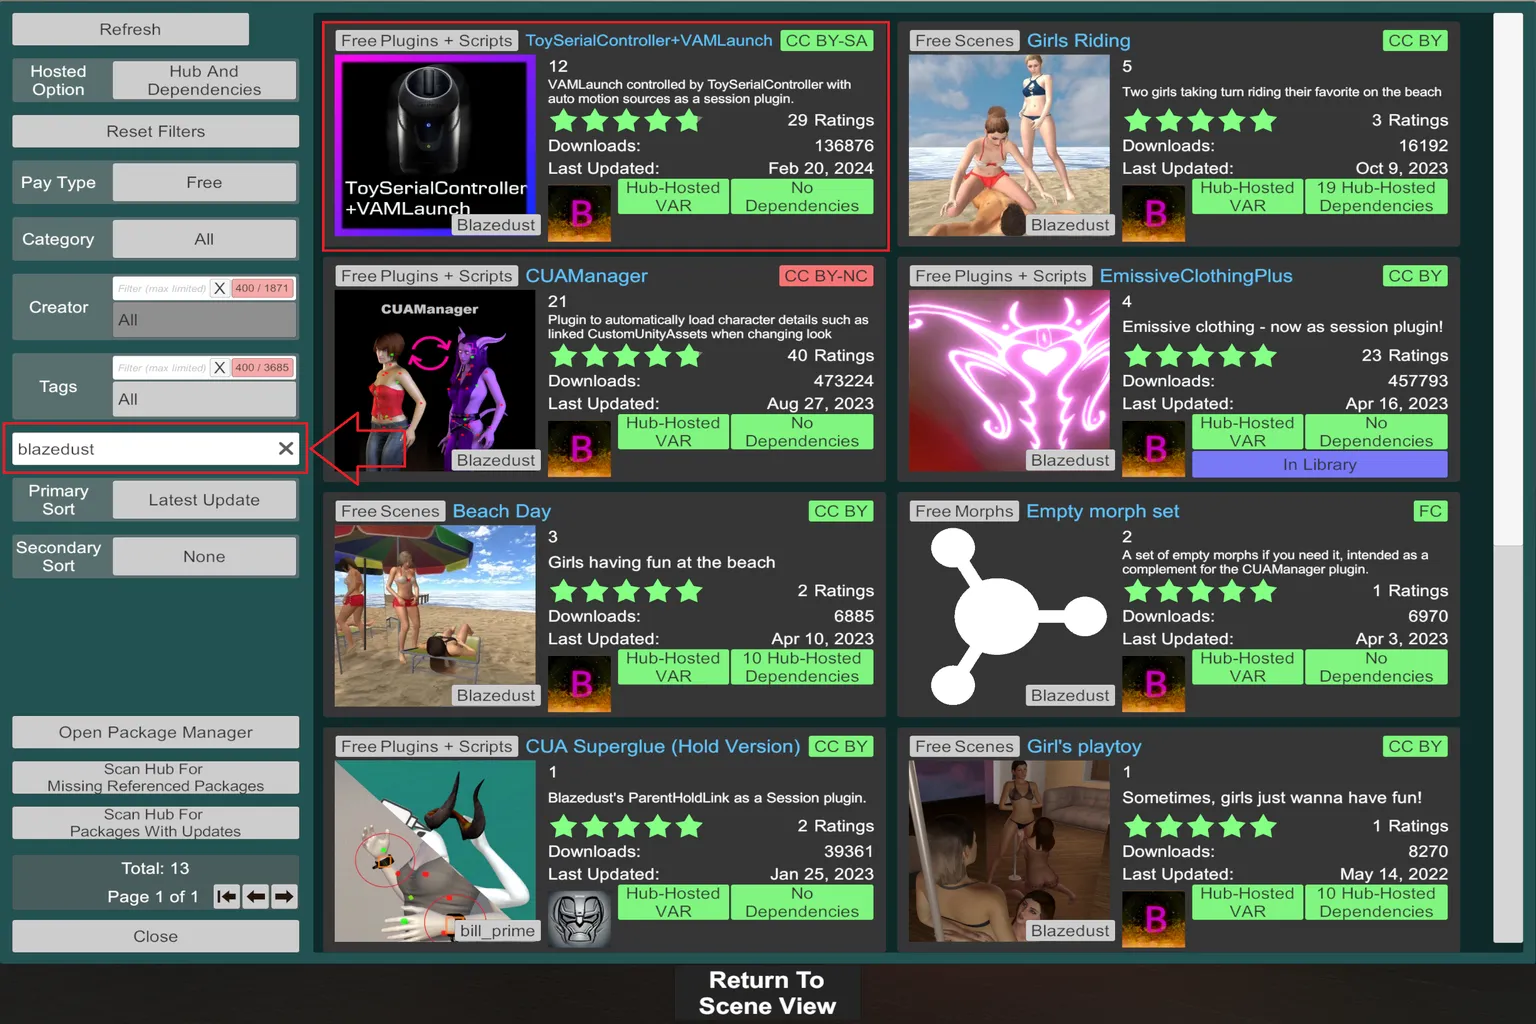
The plugin details and information will show up on the right side.
Then click Download All in the middle-left area to download it.
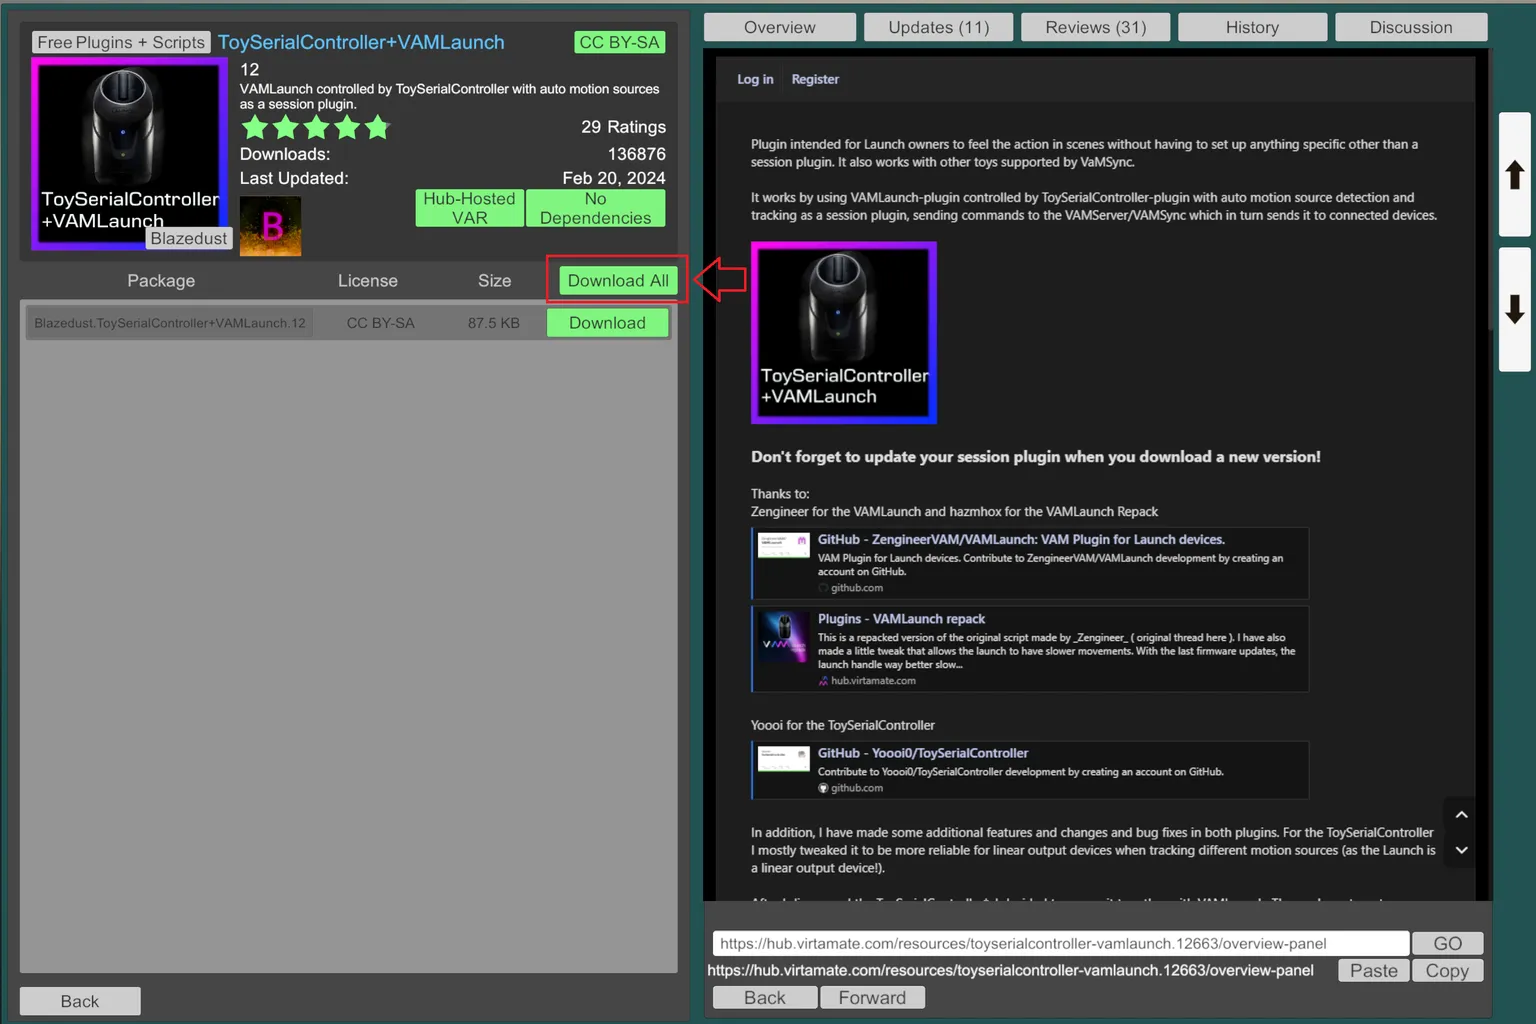
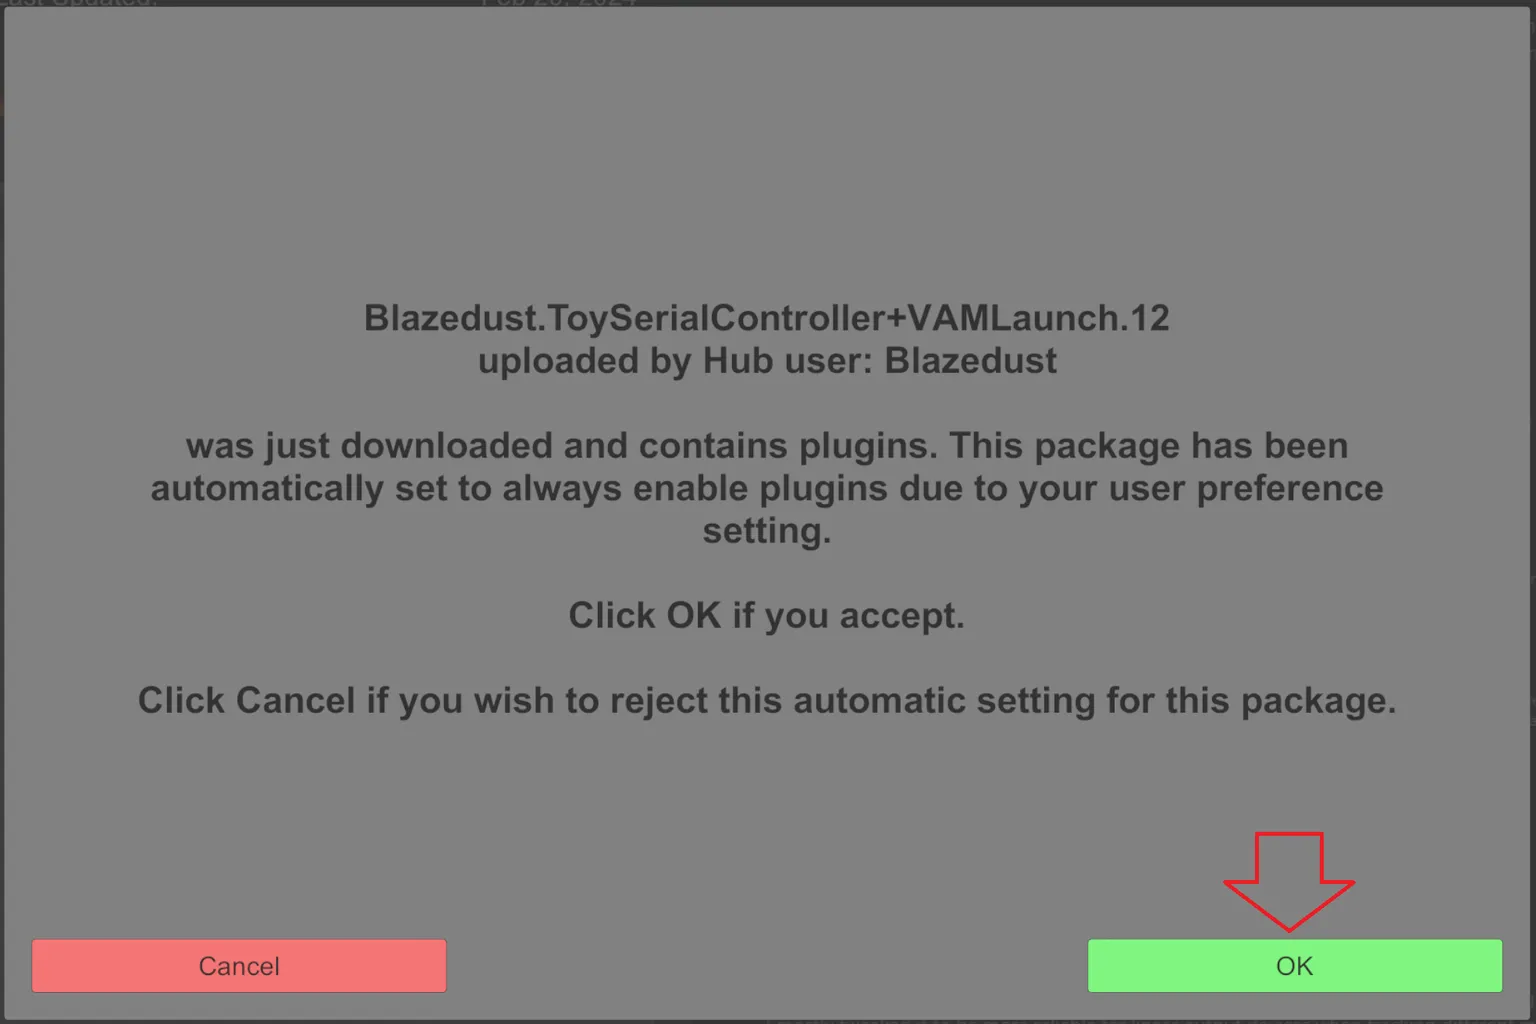
Once the download finishes, an installation window will pop up.
Just click OK, and the plugin will be installed on your PC.
Step 2: Enable network access for the plugin
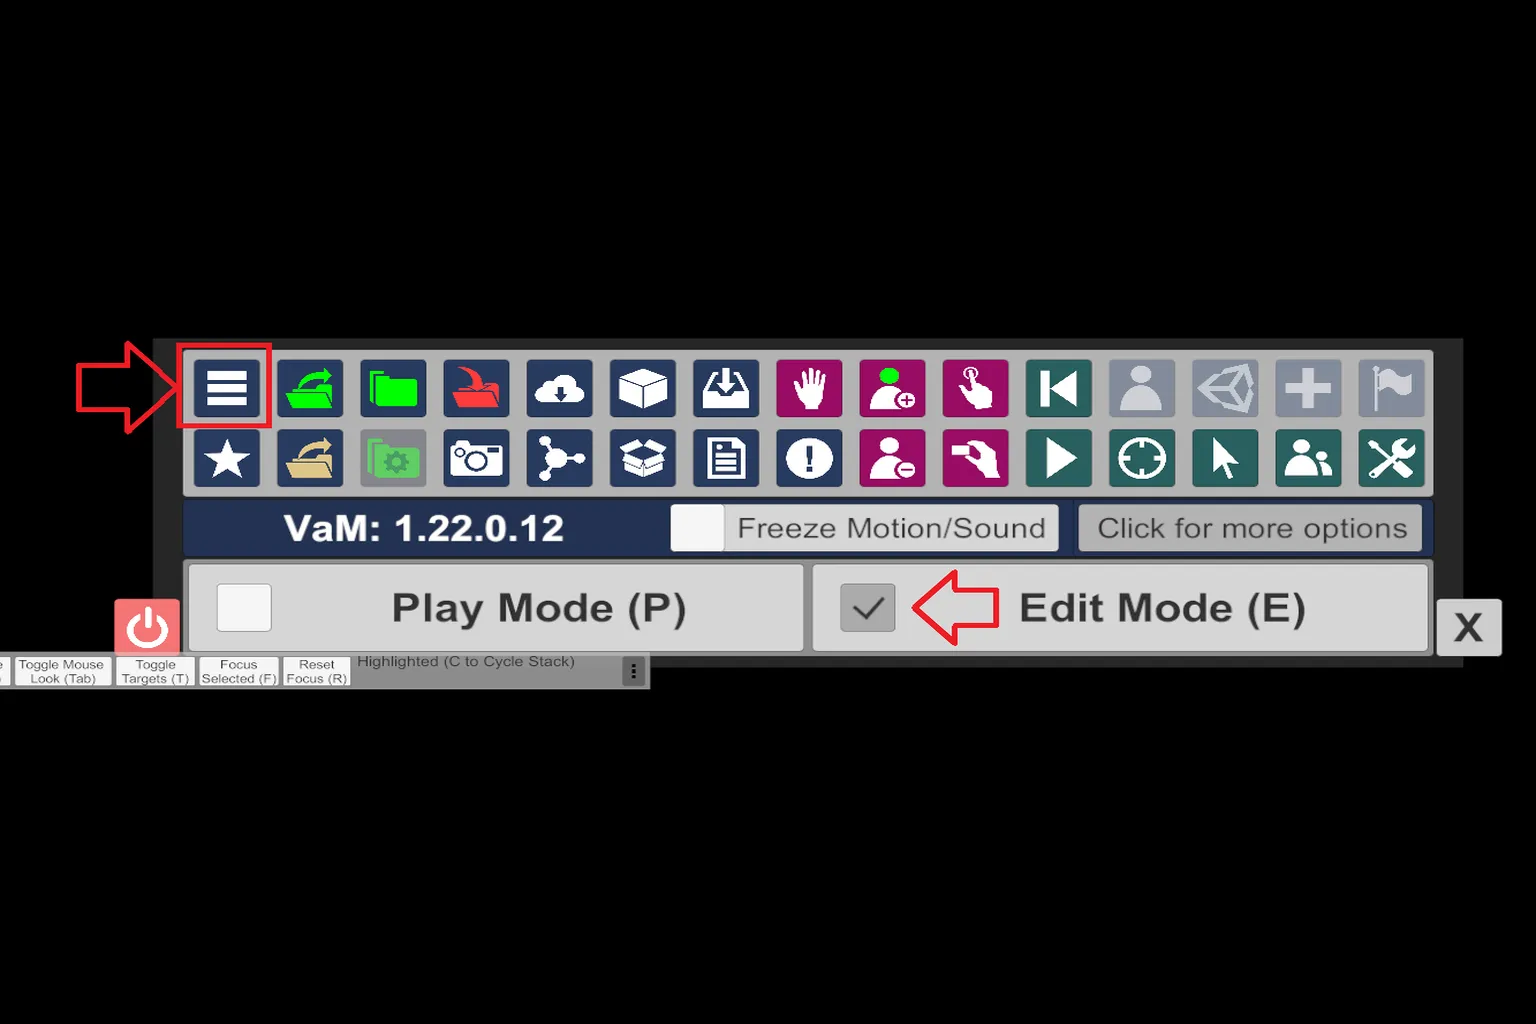
Press “U” on your keyboard to return to the main menu, then click the “☰” on the left and open Open Main UI.
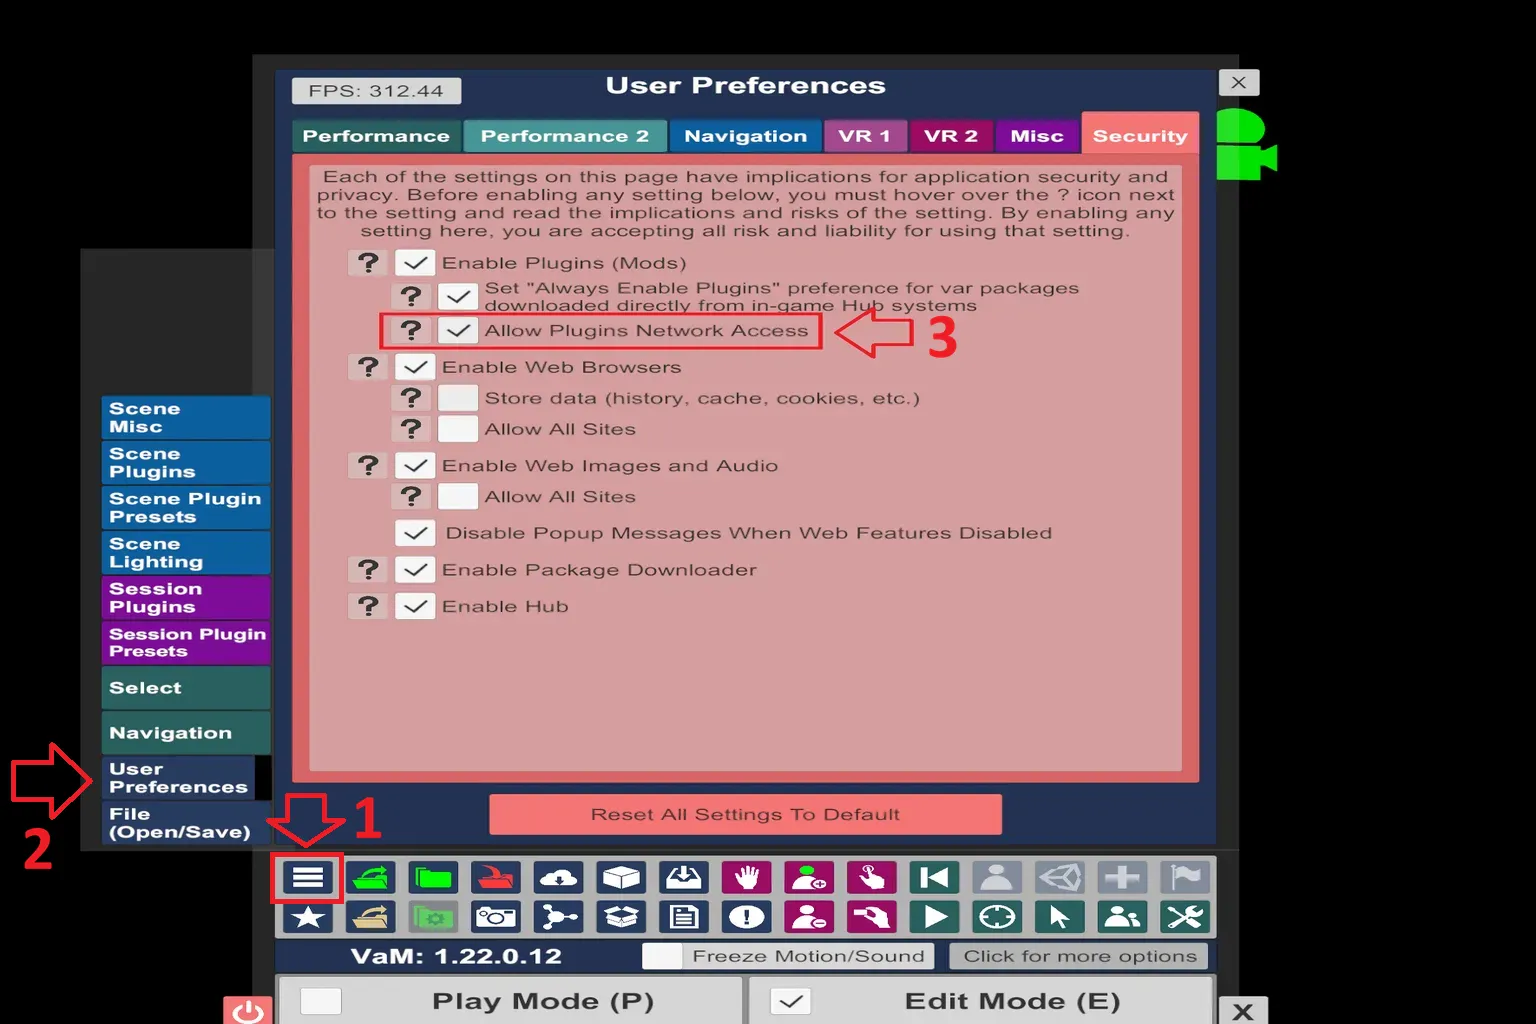
From the left menu, select User Preferences, then switch to the Security tab at the top.
Check Allow Plugins Network Access.
This allows the plugin to connect to external devices.
Step 3: Set up the ToySerialController plugin
Press “U” on your keyboard to return to the main menu, then click the “☰” on the left and open Open Main UI.
In the Open Main UI menu, select Session Plugins on the far left to open the plugin settings screen.
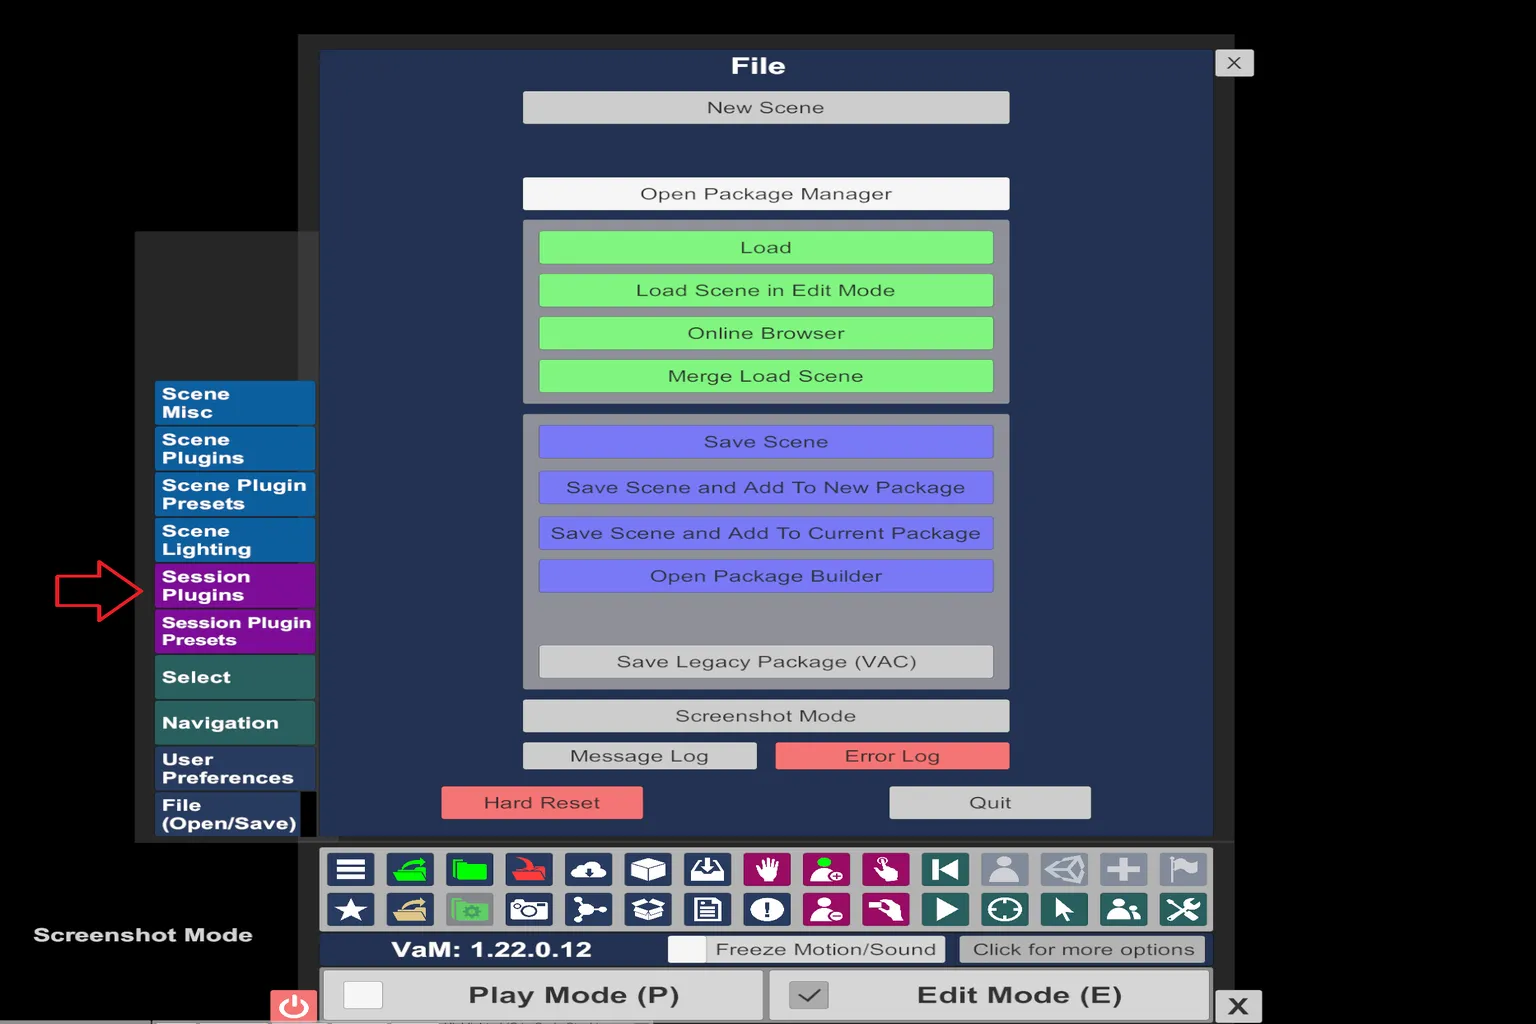
On the Session Plugins screen, click Select File… to start selecting and configuring the plugin.
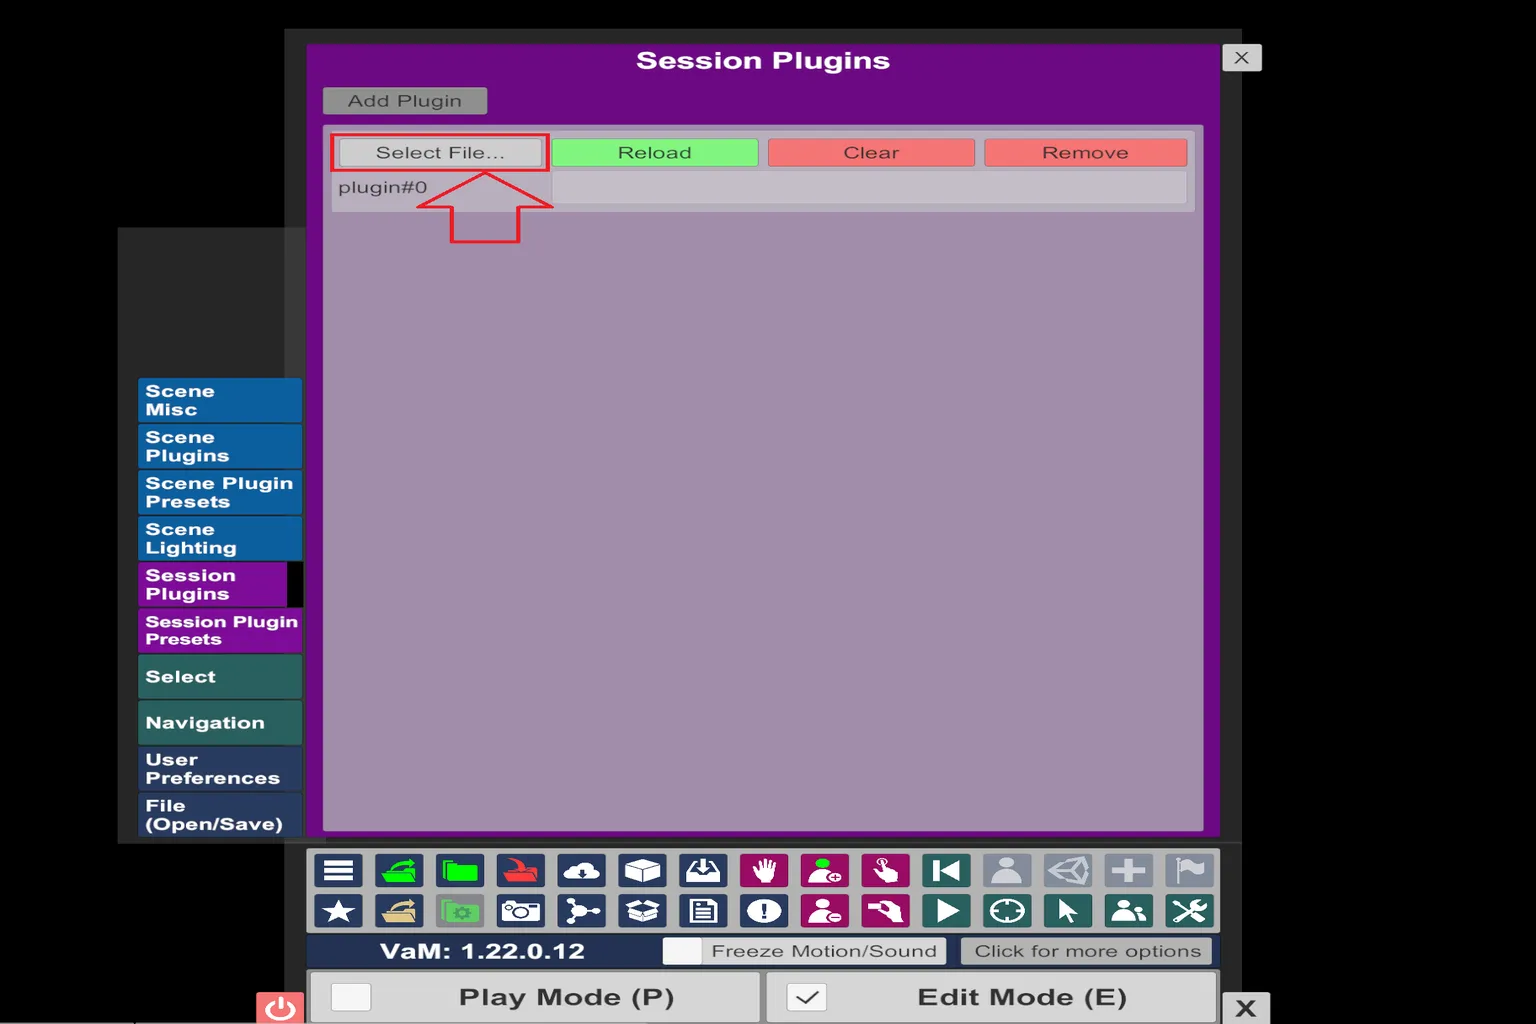
This is where you configure the plugin you just installed.
In the search box on the left, type “blazedust,” and a list of related plugins will show up.
From that list, select “Blazedust.ToySerialController + VAMLaunch.12” at the bottom.
Once you’re inside the folder, select “ADD_ME.cslist,” and the installation is complete.

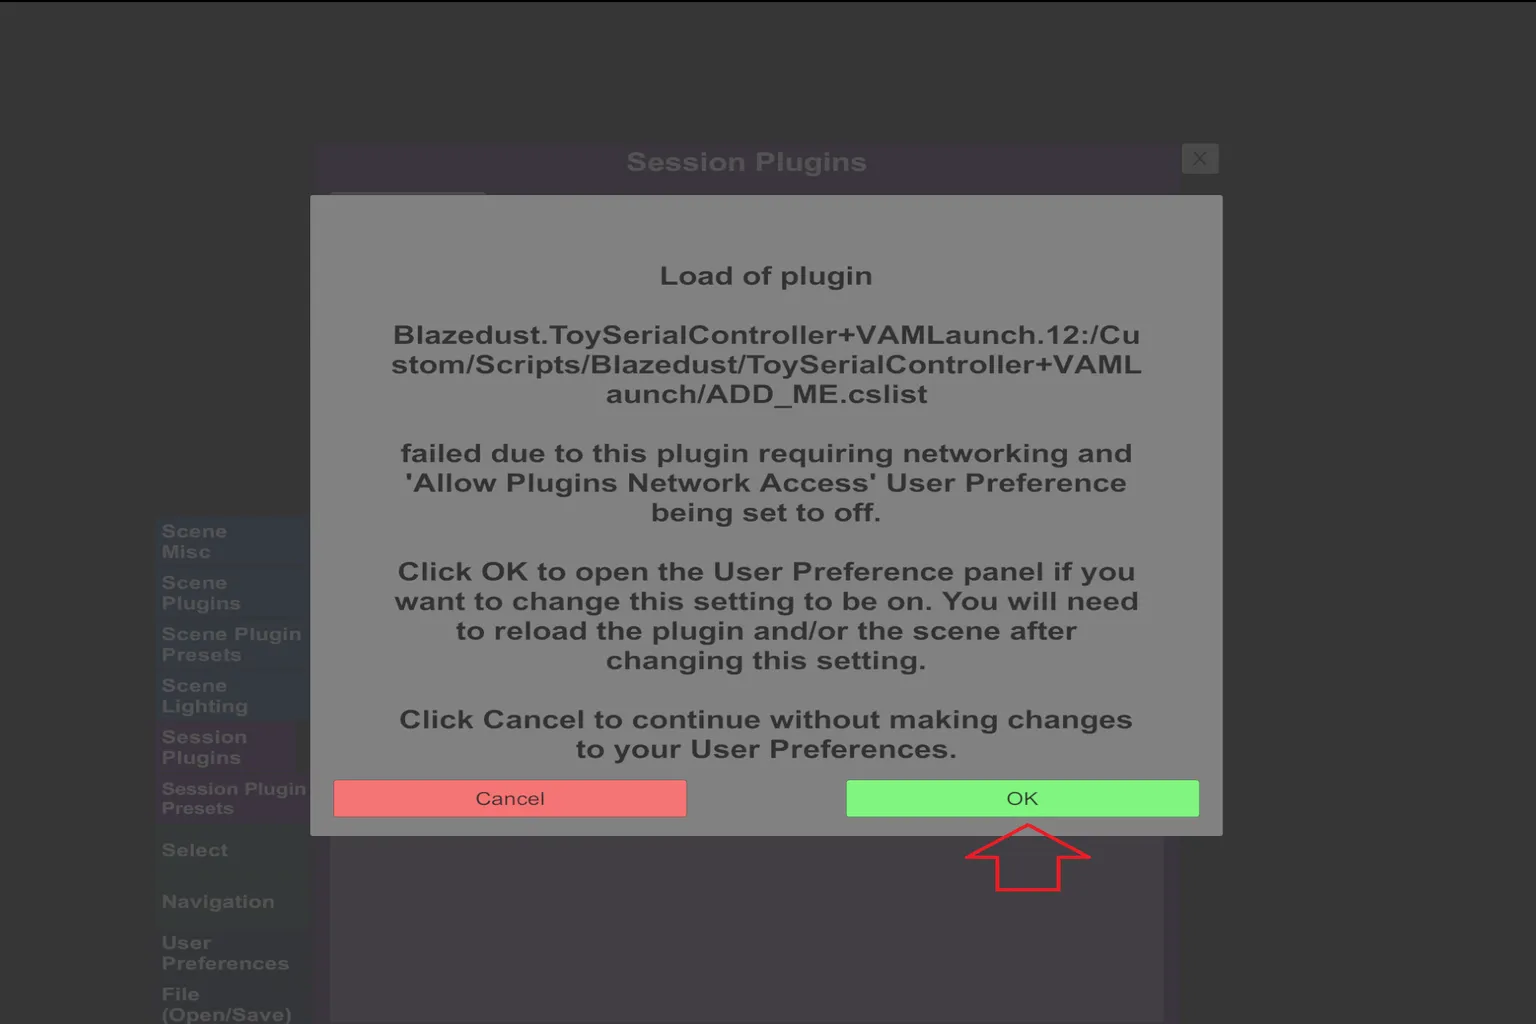
What it looks like when activation fails
If you didn’t turn on Allow Plugins Network Access in Step 2, you’ll get a warning here.
It means the plugin needs network access, but it’s still disabled.
Click OK, and it will take you to the User Preferences settings screen.
After you finish the setting, go back and redo Step 3.
Otherwise, the plugin won’t activate properly.
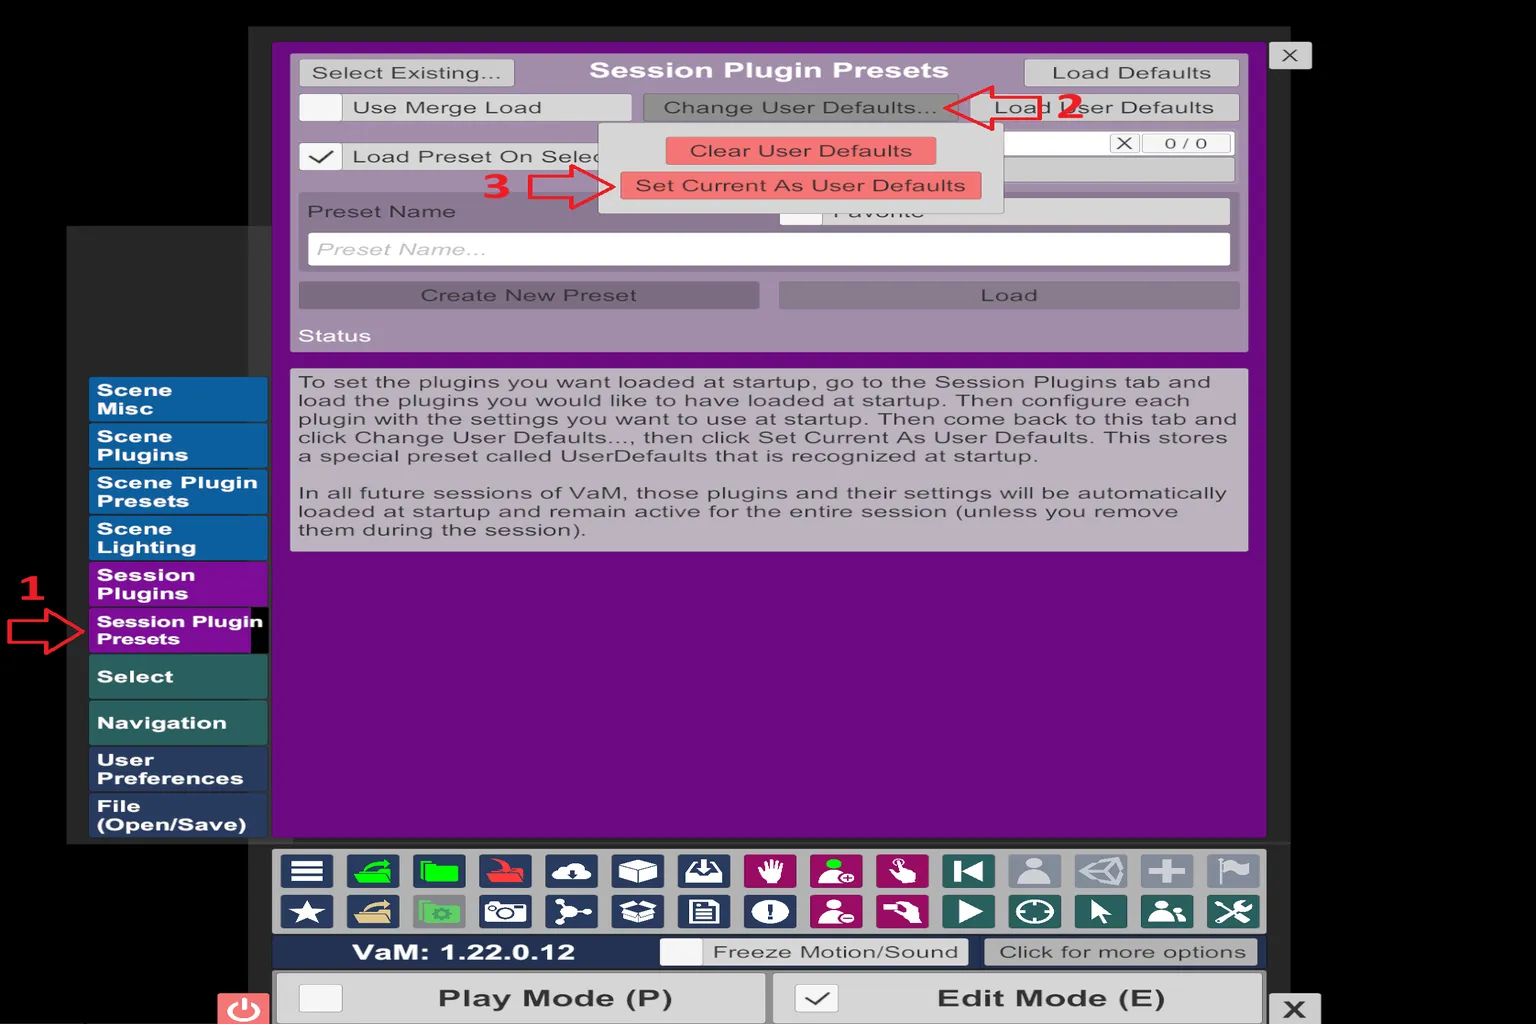
Step 4: Keep the plugin loaded automatically
At this point, the plugin itself is enabled, but if you leave it like this, you’ll have to turn it on manually every time you launch VAM. Honestly, that gets annoying pretty fast.
If you set this up here, VAM will load the plugin automatically the next time you start it.
In the Open Main UI menu, open Session Plugin Presets, then select Change User Defaults… at the top.
After that, change the setting to Set Current As User Defaults.
This saves the plugin setup you did in Step 3, so it will be applied automatically from now on.
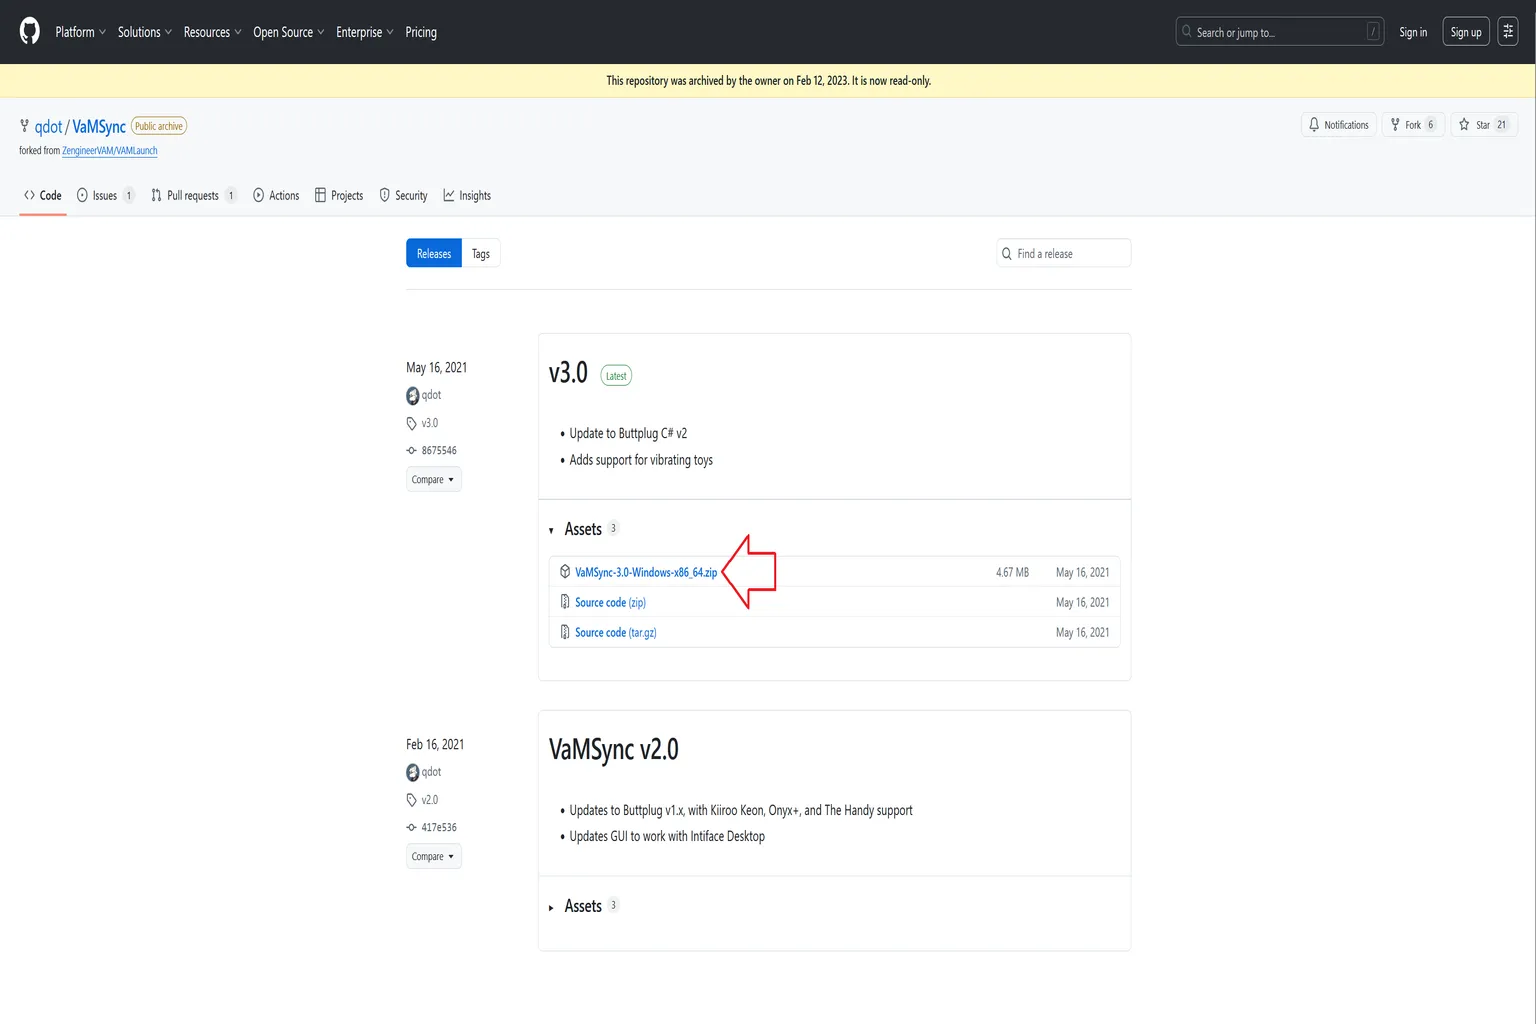
Step 5: Install the connection software
If you just use your PC’s Bluetooth on its own, The Handy won’t be detected. You’ll need a separate connection tool to handle the pairing.
There are two commonly used options to connect VAM with The Handy: VaMSync and VAM Launch.
From testing, VAM Launch didn’t connect reliably with the original Handy, so this guide uses VaMSync.
Go to the VaMSync developer’s site and download the latest version: “VamSync-3.0-Windows-x86_64.zip.”
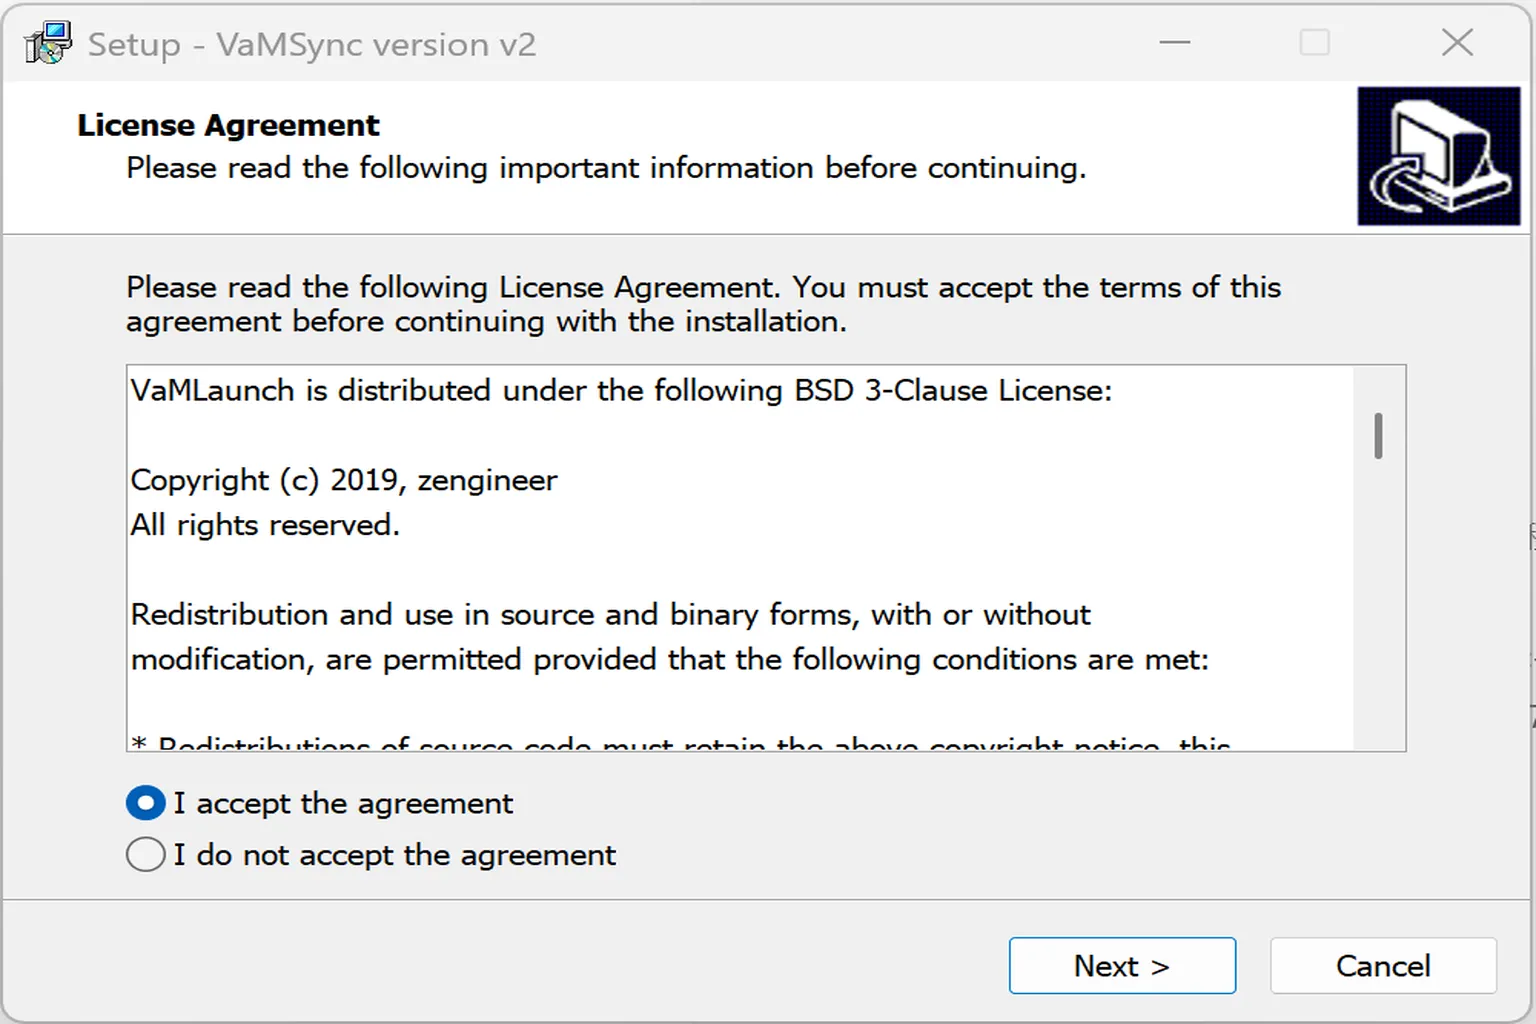
After extracting the file, find “vamsync-installer” inside the folder and run it.
Just follow the prompts and install it on your PC.
Step 6: Enable Bluetooth on The Handy
Normally, The Handy is used with a smartphone, so when you turn it on, a pink light shows up.
That means it’s in online mode.

Press and hold the “function button” for about 5 to 10 seconds until the light turns blue.
That switches it into Bluetooth mode.
But even in this state, it still won’t connect to your PC yet.
You need to switch it to the legacy Bluetooth mode.
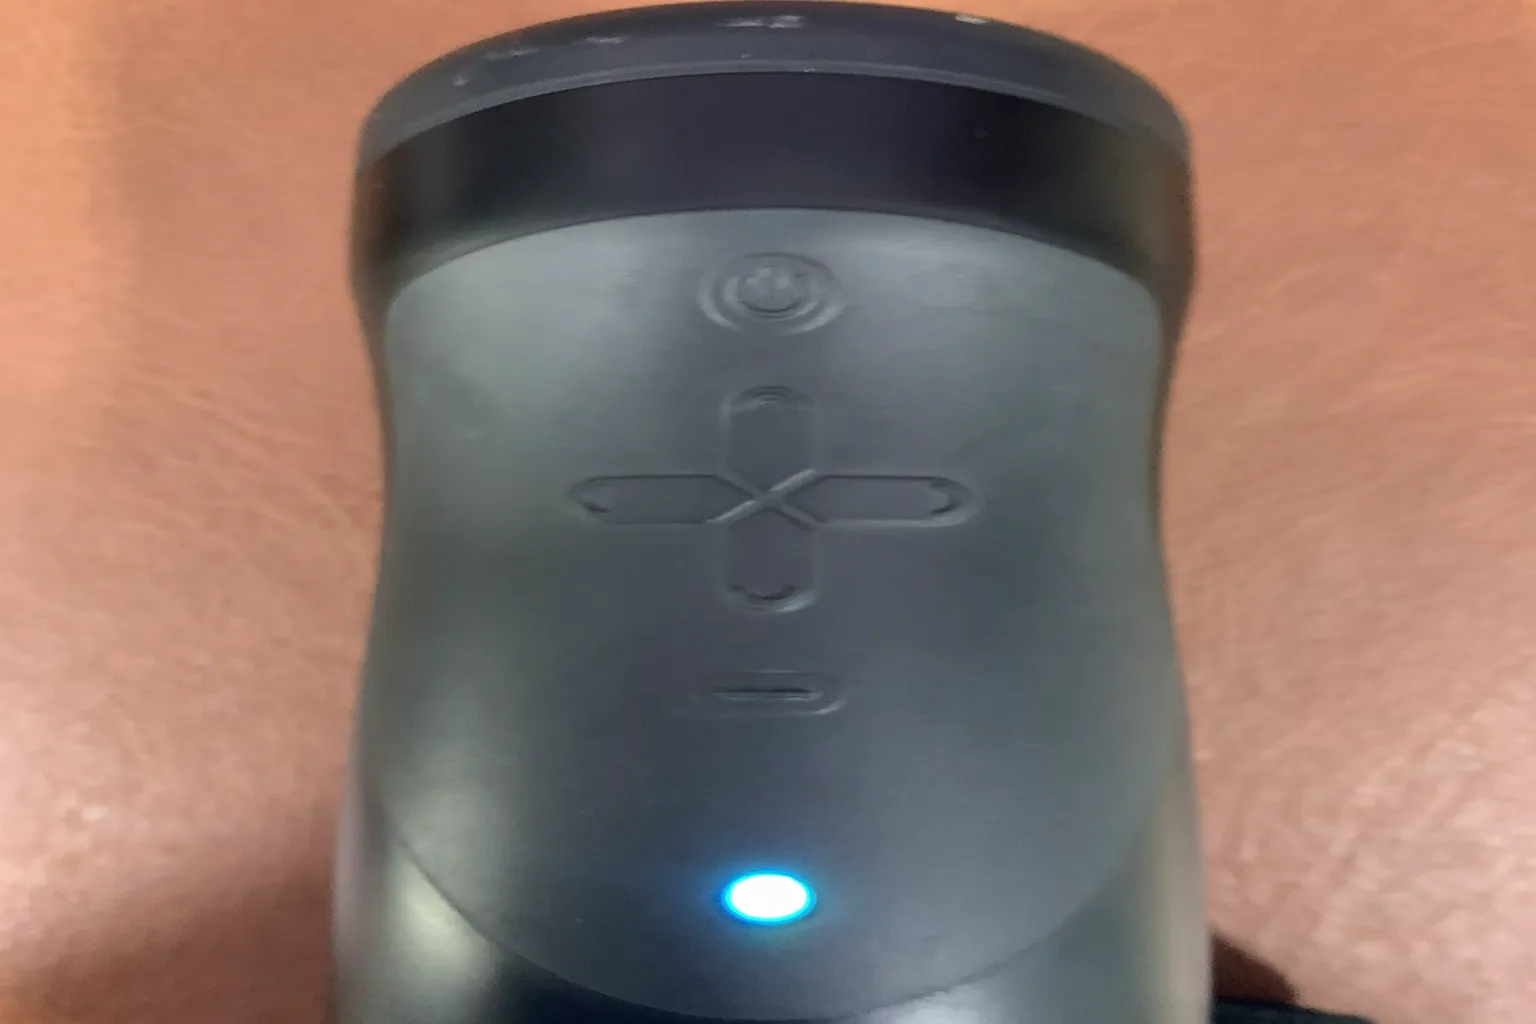
After that, press the “function button” and the “up button” at the same time for about 1 to 2 seconds.
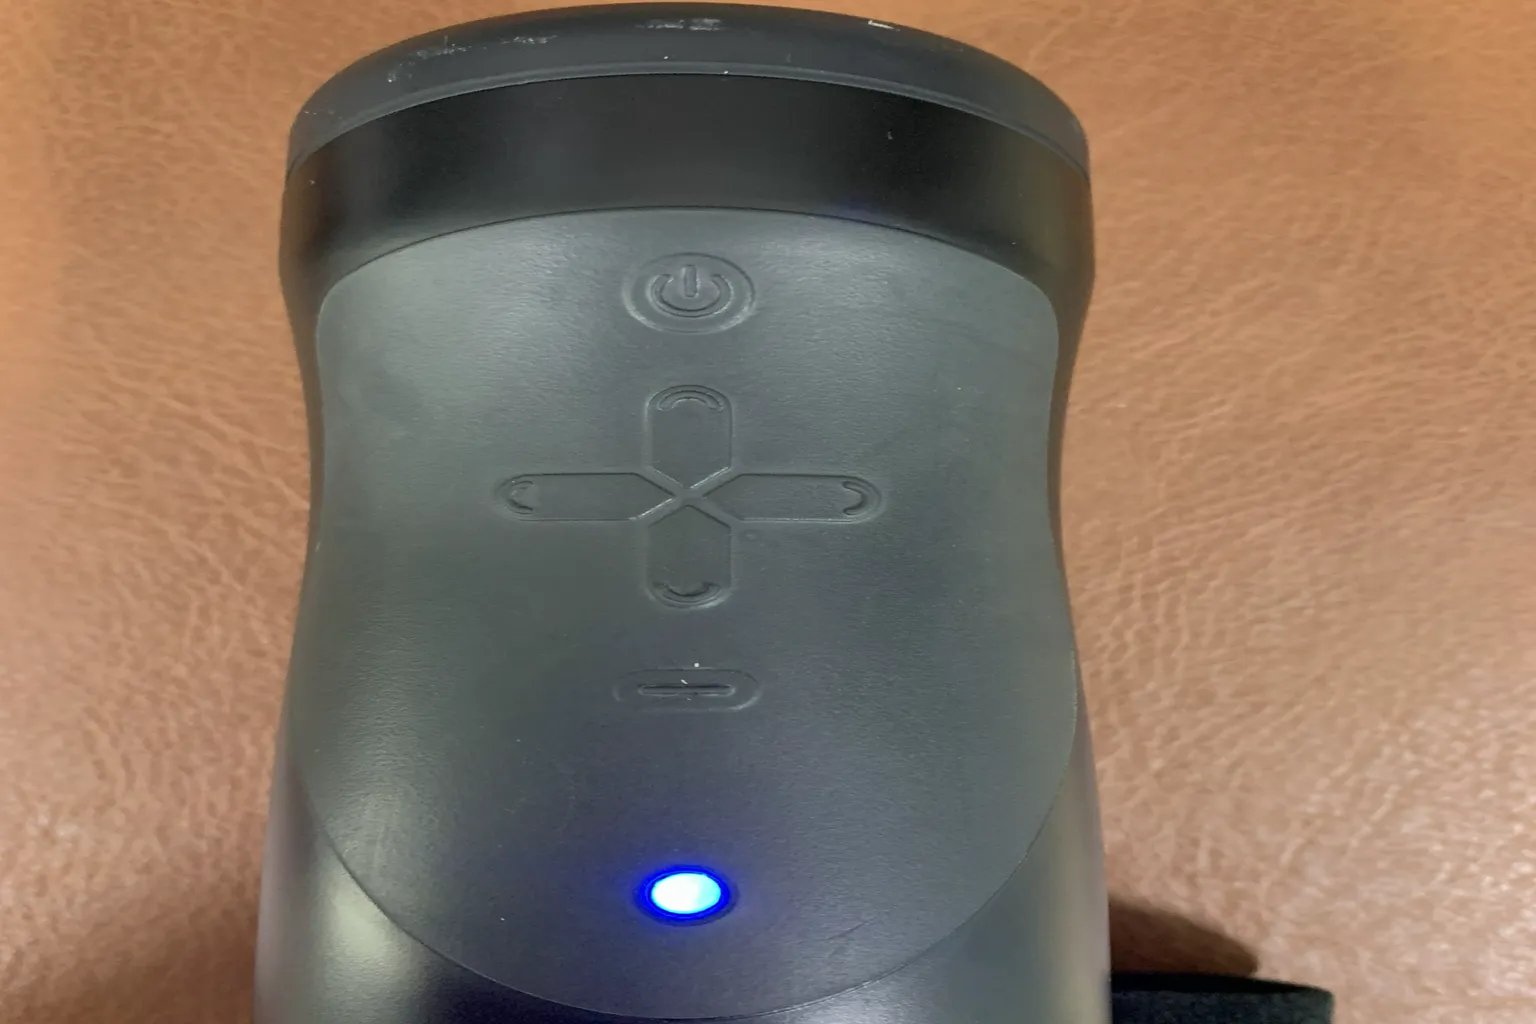
At this point, the light changes from blue to a more cyan-like color.
That means it has switched into legacy Bluetooth mode.
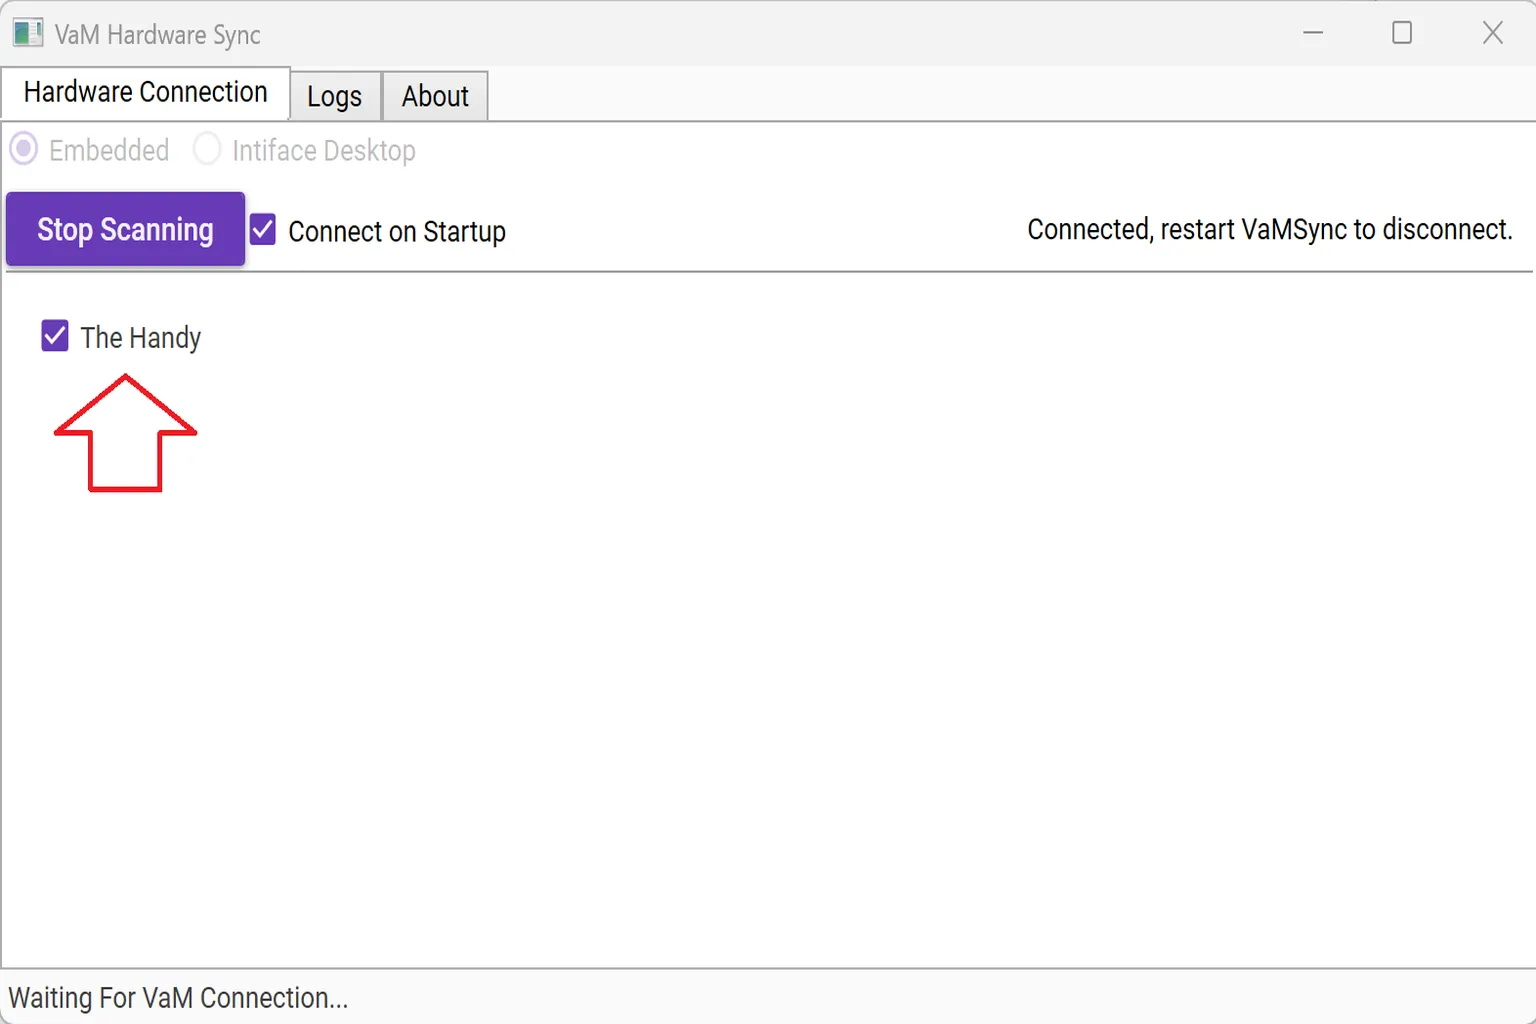
Step 7: Connect The Handy to your PC
First, launch VAM on your PC, then start VaMSync.
At this point, The Handy should show up. Just check it, and it will connect automatically.
If it doesn’t appear, try restarting VaMSync.
After a couple of tries, it usually gets picked up.
Step 8: Download the control config file
Here, you’ll set up a config file that converts movement data. It takes the character’s motion in VAM and turns it into control data that The Handy can read.
This config file is created by Misiv on Eroscripts.
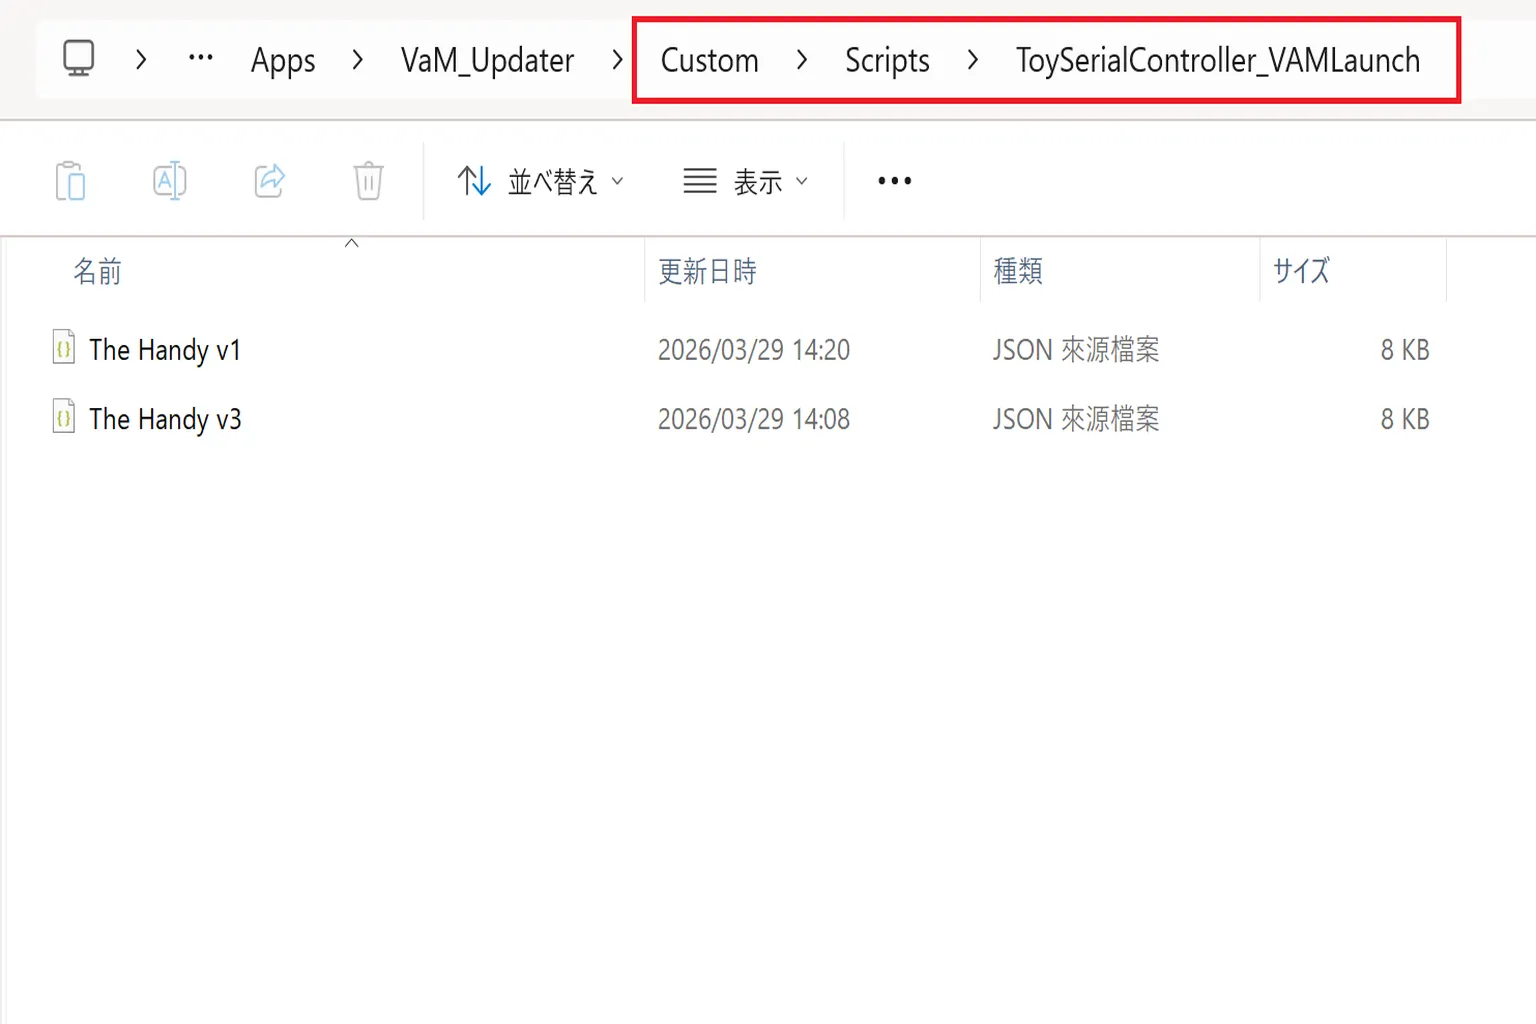
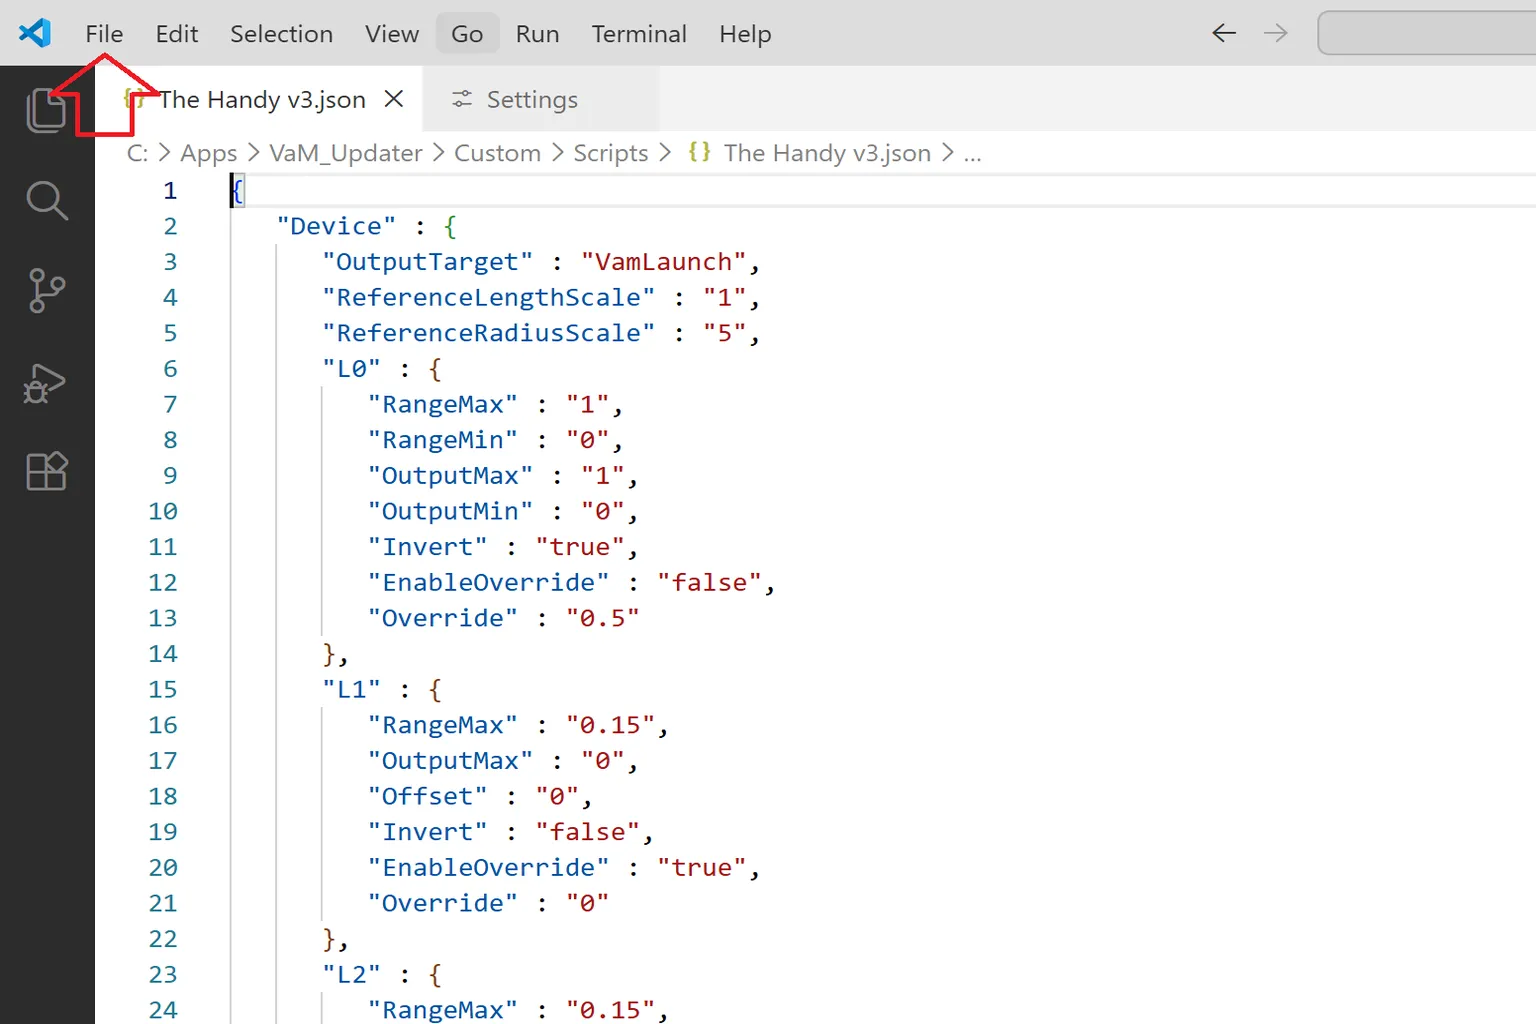
Download “The Handy v3.zip” from the link.
Then open your VAM folder, go to Custom → Scripts, and create a new folder called “ToySerialController_VAMLaunch.”
Place the extracted “The Handy v3.json” file inside that folder.
You can also download it directly from Misiv’s post page (you’ll need an Eroscripts account).
The file will be shown as code, so just save it as-is and use it as a JSON file.
Step 9: Enable the config file
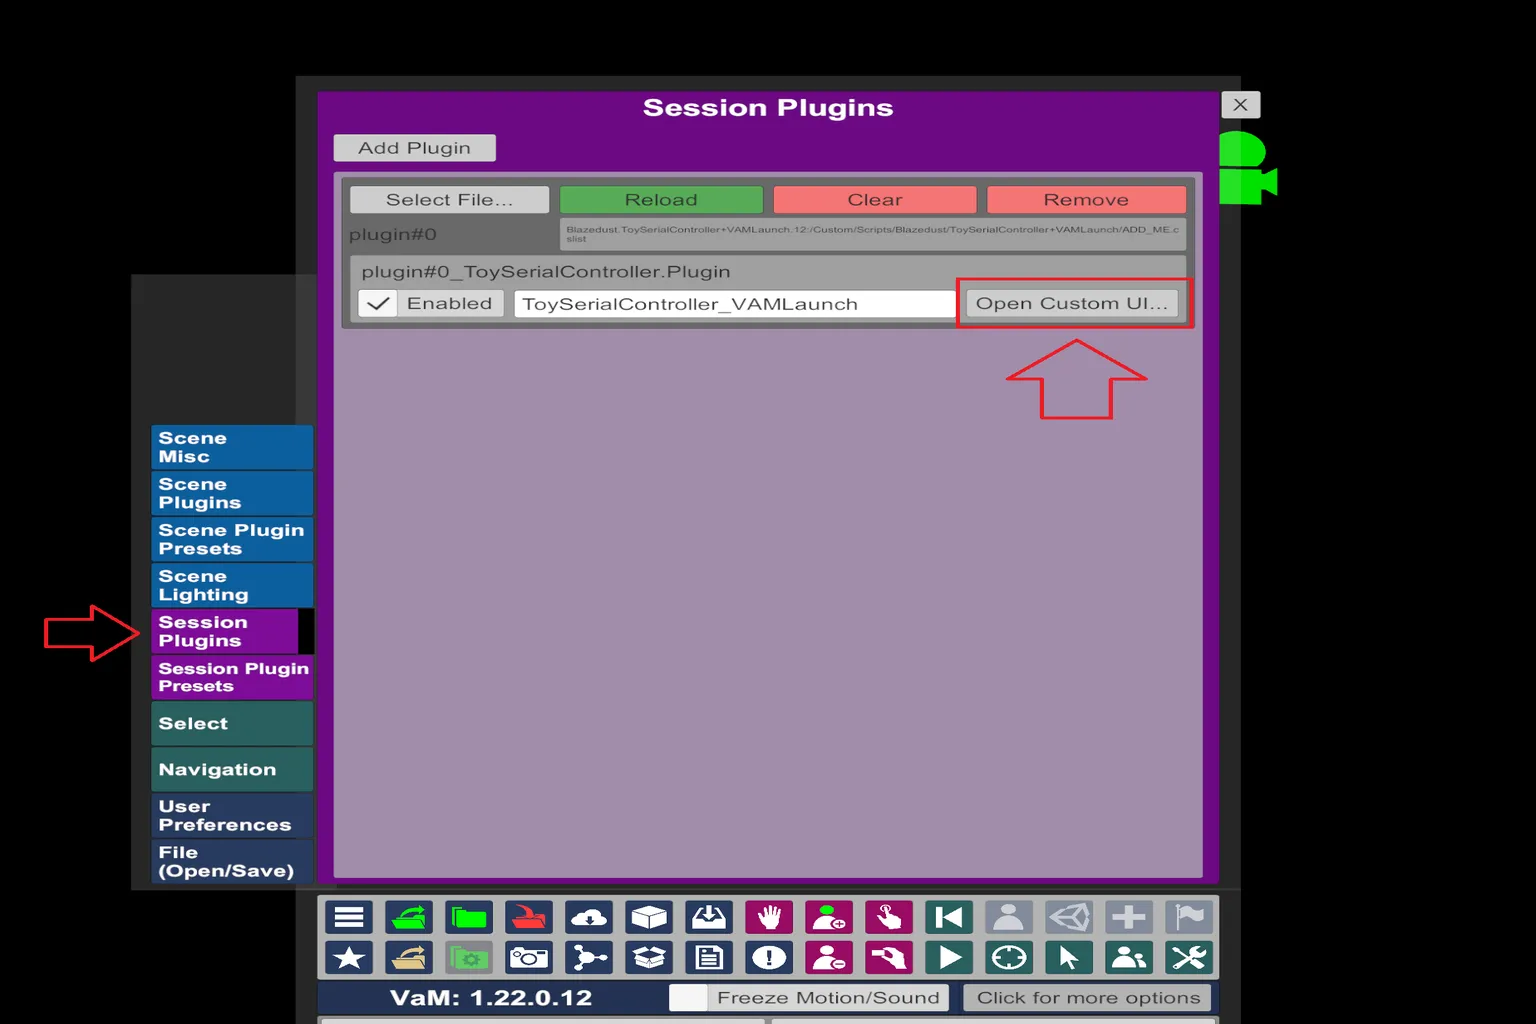
Open Session Plugins from the Open Main UI menu, and you’ll see the ToySerialController plugin you set up earlier.
From there, click Open Custom UI… to enter the plugin settings screen.
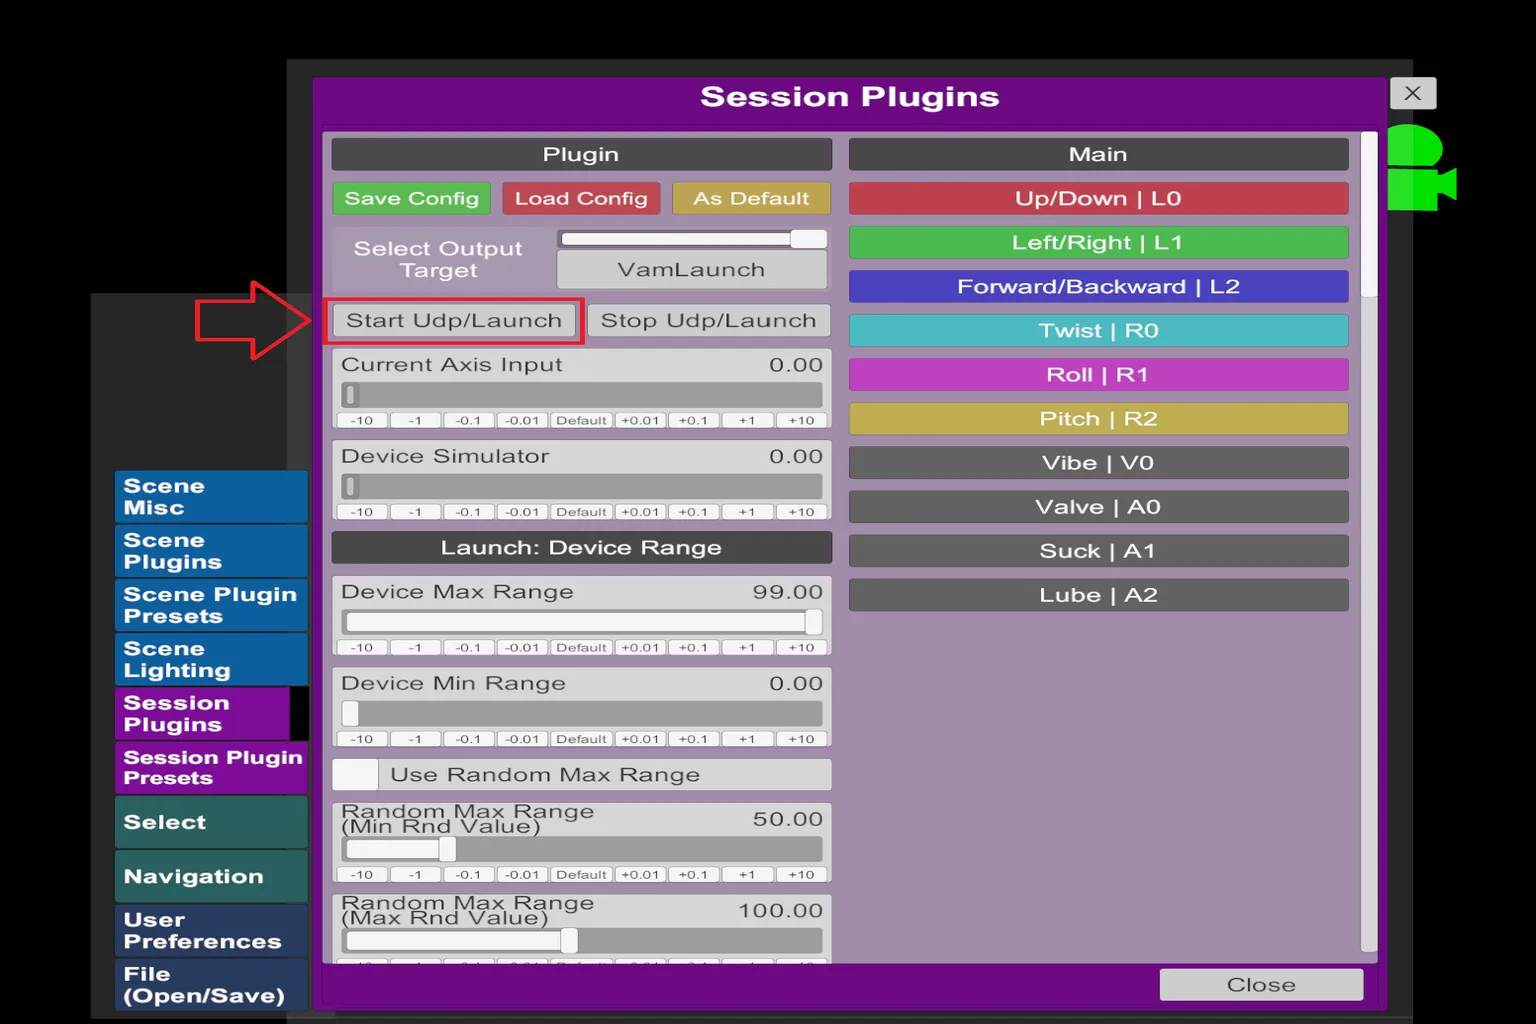
On the Session Plugins screen, click Load Configs, then select the config file you prepared earlier.
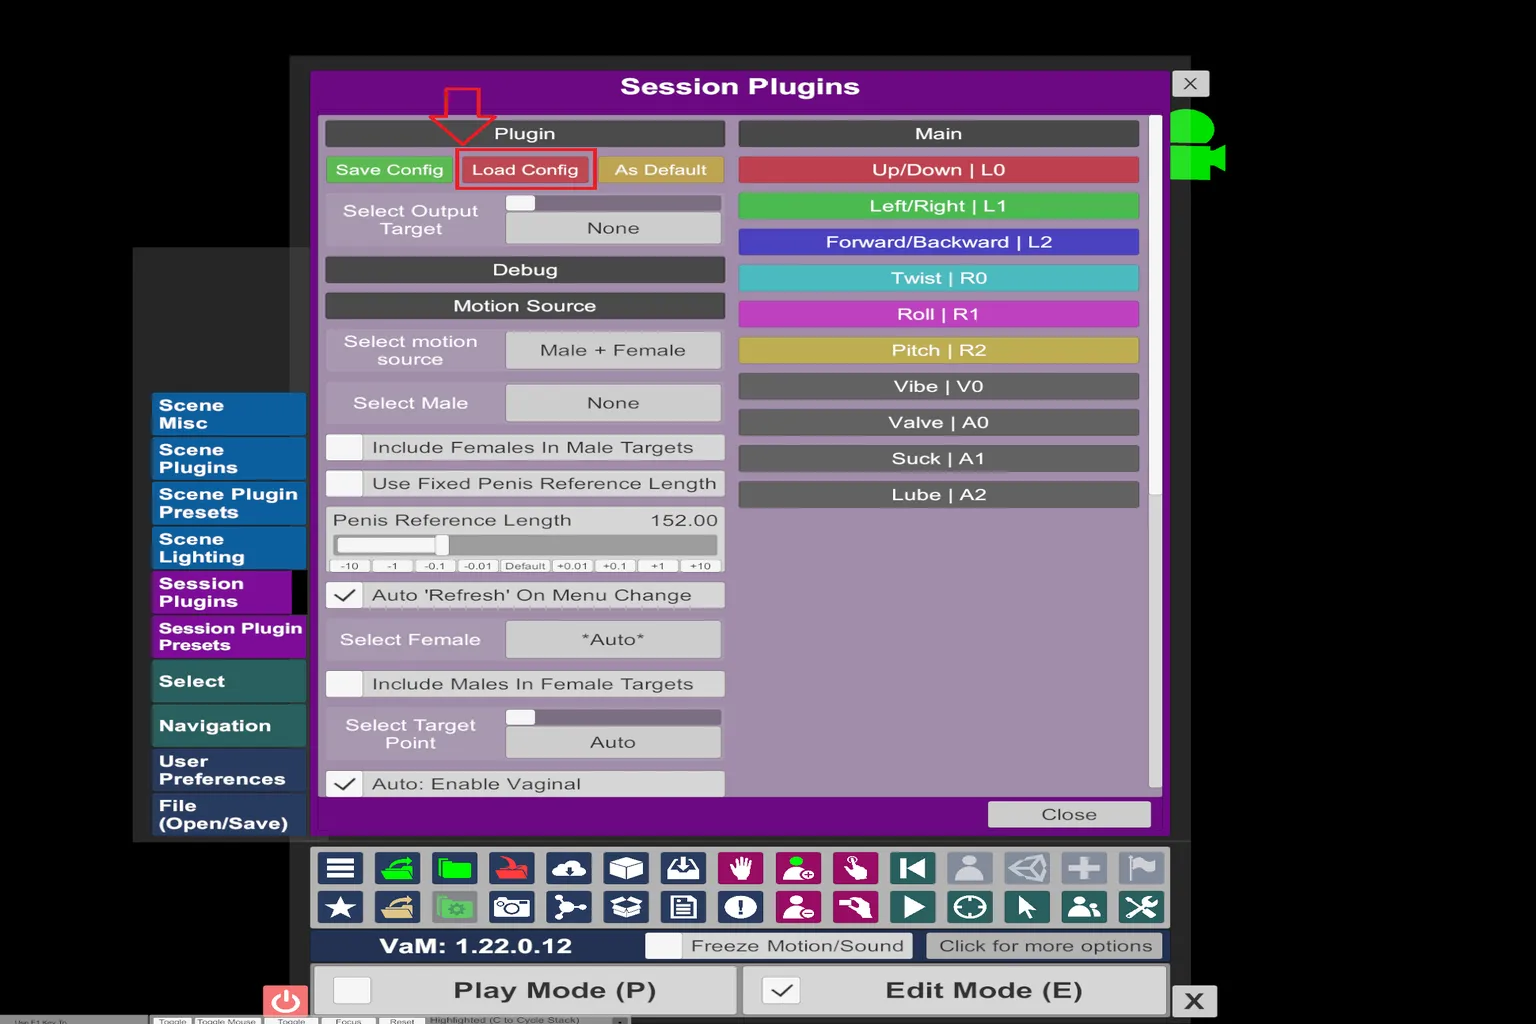
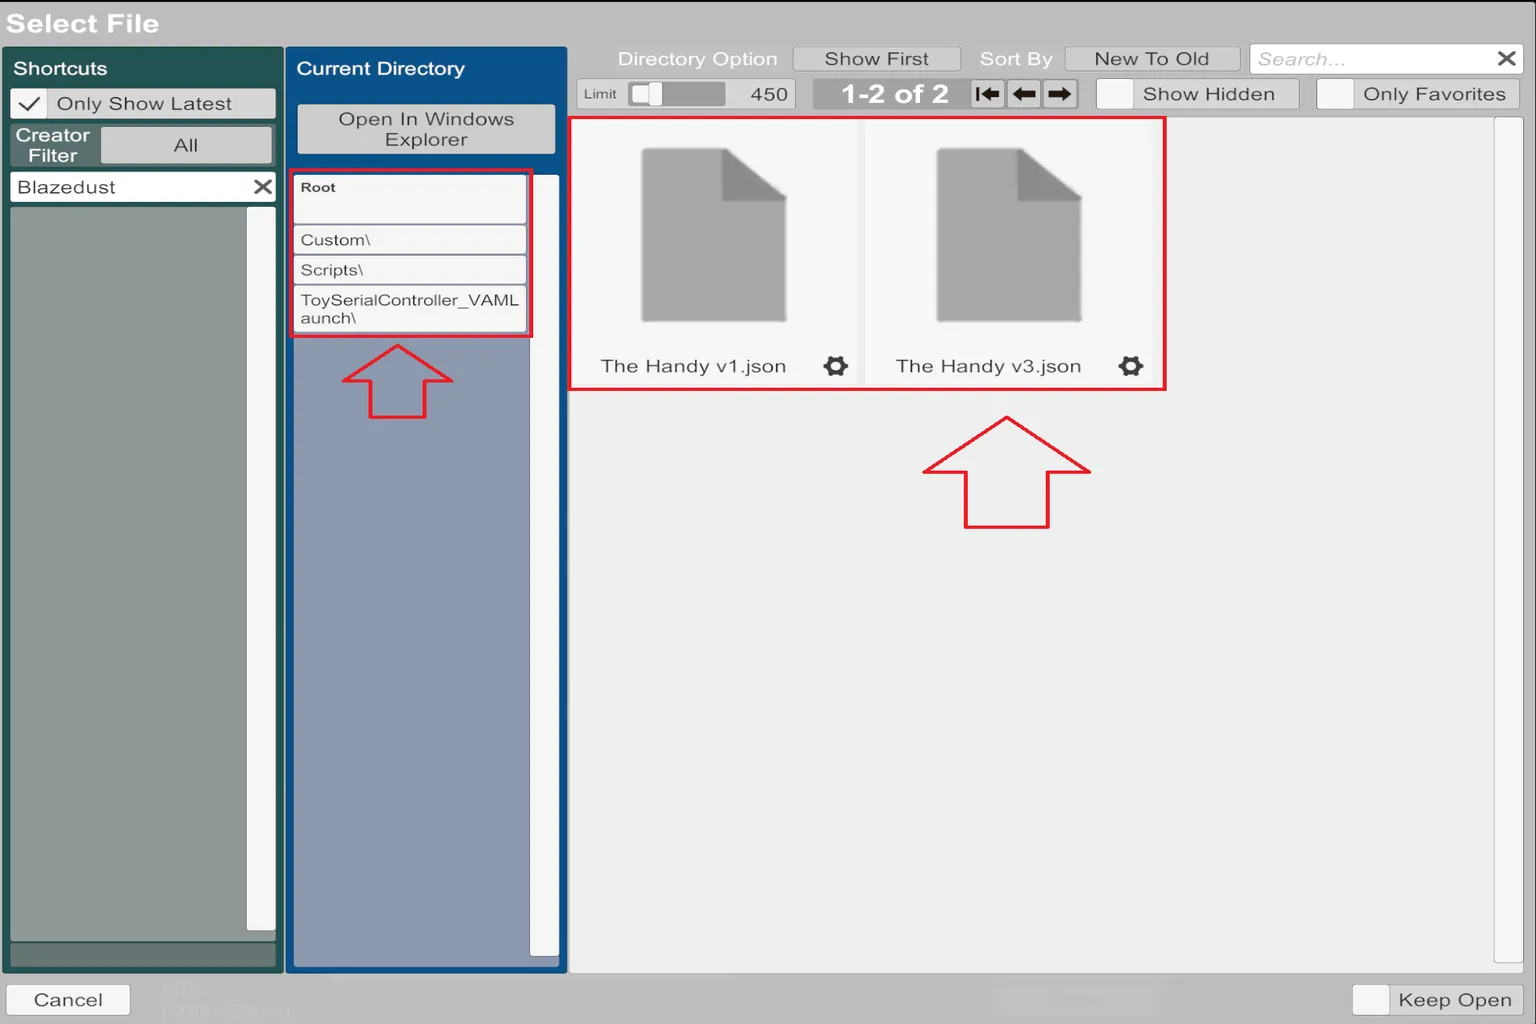
You should see “The Handy v3.json” listed here—just select it to enable it.
If it doesn’t show up, it’s likely not in the correct folder.
In that case, click Open In Windows Explorer and check the file location manually.
Once the config finishes loading, you should see “Select Output Target” set to VaMLaunch.
That means the config is linked correctly.
From there, just click Start Udp / Launch, and the connection between VAM and The Handy is complete.
Now when you play a scene, the device will move up and down in sync with the character’s motion.
Scenes that support sync
Once you’ve finished the setup, you can start loading scenes and playing.
Just keep in mind—if the scene itself doesn’t support interactive devices, The Handy won’t move.
From testing different scenes, the pattern is pretty consistent:
Scenes that don’t work:
Most solo scenes don’t support sync.
Things like dancing, model showcases, or a character just moving on their own generally won’t trigger any movement.
Scenes that do work:
Scenes with two or more characters, where there’s clear interaction and movement between them, usually sync properly.
When you load a scene, if The Handy moves once and then returns to its original position, that’s usually a sign the scene supports sync.
Here are a few examples that worked:
- Pink Poison: Faster pacing, more intense movement overall. The device response feels very direct.
- Julie Cowgirl Riding by xxxa: A more cute-style character, focused on riding-type motion.
- Heavy Petting: Set in something like the back seat of a bus, starting from kissing and gradually progressing.
VAM has a huge number of scenes, with all kinds of characters—movie-style, anime-style, and more.
But because of that, scenes can take a while to load, and the controls can feel a bit complicated.
If you want something quicker and easier to jump into, content from SexLikeReal is also an option.
It loads fast, the controls are simple, and both the actresses and characters look really good, so it’s worth checking out what’s introduced next.

SexLikeReal Ultimate Guide
Hidden Discounts, Japanese VR & Passthrough Review

SLR Virtual Character Guide
VAM vs Honey Select vs Koikatsu Reviewed
FAQ – Common Questions
Why doesn’t The Handy respond even after pressing Start Udp / Launch?
In most cases, the device isn’t properly connected. Check the following:
- Is the device light set to cyan (legacy Bluetooth mode)?
- Is the device checked/selected?
- Is The Handy detected in VaMSync?
Can’t find “The Handy v3.json” in Load Configs?
It’s likely in the wrong location.
After extracting, make sure it’s placed here:
Custom → Scripts → ToySerialController_VAMLaunch
The plugin won’t activate and shows a network permission error?
You need to enable it here:
User Preferences → Security
Turn on Allow Plugins Network Access, then redo the plugin setup.
Do you have to reconfigure the plugin every time you launch VAM?
Save it here to fix that:
Session Plugin Presets → Change User Defaults → Set Current As User Defaults
Why don’t some scenes work?
Most solo scenes don’t support sync.
In general, only scenes with two characters and clear interaction will work properly.